1. Einleitung
Thank you for choosing the Karaca BakeXL Bread Maker. This versatile appliance is designed to simplify your baking experience, allowing you to prepare fresh bread, knead dough, make jam, and even yogurt with ease. Your bread maker also comes with a booklet containing 45 different recipes to get you started. Please read this manual thoroughly before first use to ensure safe operation and optimal performance. Keep this manual for future reference.
2. Wichtige Sicherheitshinweise
- Vor der Reinigung oder wenn das Gerät nicht benutzt wird, sollte es immer vom Stromnetz getrennt sein.
- Tauchen Sie das Gerät, das Kabel oder den Stecker nicht in Wasser oder andere Flüssigkeiten.
- Um Verletzungen zu vermeiden, halten Sie Hände und Utensilien während des Betriebs von beweglichen Teilen fern.
- Do not touch hot surfaces. Use oven mitts when removing the bread pan or handling hot bread.
- Dieses Gerät ist nur für den Hausgebrauch bestimmt. Nicht im Freien verwenden.
- Stellen Sie sicher, dass das Gerät auf einer stabilen, hitzebeständigen Oberfläche und fern von brennbaren Materialien aufgestellt wird.
- Bei der Benutzung von Geräten durch oder in der Nähe von Kindern ist eine genaue Aufsicht erforderlich.
- Betreiben Sie kein Gerät, dessen Kabel oder Stecker beschädigt ist, oder wenn das Gerät eine Fehlfunktion aufweist oder auf sonstige Weise beschädigt wurde.
- Verwenden Sie kein Zubehör, das nicht vom Hersteller empfohlen wird, da dies zu Verletzungen führen kann.
3. Produktüberschreitungview
Familiarize yourself with the components of your Karaca BakeXL Bread Maker:

Abbildung 3.1: Exterieur view of the Karaca BakeXL Bread Maker. This image shows the sleek black and silver design of the appliance from an angled perspective, highlighting its compact form.

Abbildung 3.2: Bread Maker with lid open. This view reveals the interior cavity where the bread pan is placed, along with the heating element and the mechanism for the kneading paddles.

Abbildung 3.3: Bread Maker with the bread pan removed. This image displays the main unit alongside the removable bread pan, illustrating how it detaches for easy cleaning and ingredient loading.
Funktionen des Bedienfelds:

Abbildung 3.4: Nahaufnahme des Bedienfelds. Dieses Bild vermittelt einen klaren Eindruck. view of the digital display and various buttons for program selection, loaf size, crust color, and start/stop functions.
- SPEISEKARTE: Selects the desired program (e.g., Basic Bread, Whole Wheat, Jam, Yogurt).
- BROTGRÖSSE: Adjusts the loaf weight (e.g., 1000g, 1250g, 1500g).
- FARBE: Sets the crust darkness (Light, Medium, Dark).
- DELAY TIMER (+/-): Sets a delayed start time for baking.
- START STOP: Initiates or cancels the selected program.
4. Einrichtung und erste Verwendung
- Unpack the bread maker and all accessories. Remove any packaging materials.
- Wischen Sie die Außenseite des Geräts mitamp Tuch.
- Waschen Sie die Backform und die Knethaken mit warmem Seifenwasser. Gründlich abspülen und vollständig abtrocknen.
- Insert the kneading paddles onto the shafts at the bottom of the bread pan.
- Place the bread pan into the baking chamber, ensuring it clicks securely into place.
- Position the bread maker on a stable, flat, and heat-resistant surface, ensuring adequate ventilation around the unit.
- For the first use, it is recommended to run the "Bake" program (usually program 12 or similar) for 10 minutes without ingredients to burn off any manufacturing residues. Allow the unit to cool completely afterward.
5. Bedienungsanleitung
General Baking Steps:
- Ensure the kneading paddles are correctly installed in the bread pan.
- Add liquid ingredients first, followed by dry ingredients. Make sure yeast is added last and does not come into direct contact with liquid or salt. Refer to your recipe booklet for precise ingredient order.
- Place the bread pan into the bread maker and close the lid.
- Plug in the appliance. The default program will display.
- Drücken Sie die SPEISEKARTE button to select your desired program.
- Drücken Sie die LOAFGRÖSSE button to select the desired loaf weight (e.g., 1000g, 1250g, 1500g).
- Drücken Sie die FARBE button to select your preferred crust darkness (Light, Medium, Dark).
- If desired, use the Verzögerungstimer buttons to set a delayed start.
- Drücken Sie die START/STOP button to begin the program. The machine will beep, and the timer will start counting down.
- Once the program is complete, the machine will beep multiple times. Unplug the appliance.
- Using oven mitts, carefully remove the bread pan by twisting and lifting it out.
- Invert the pan onto a wire rack to release the bread. If the kneading paddles remain in the bread, remove them carefully with a non-metallic utensil.
- Lassen Sie das Brot vor dem Anschneiden mindestens 20-30 Minuten auf einem Drahtgitter abkühlen.

Abbildung 5.1: A user selecting settings on the control panel. This image shows a hand pressing one of the control buttons, demonstrating the interactive nature of the bread maker's interface.
Spezielle Programmhinweise:
- Bread Programs (Basic, French, Whole Wheat, Sweet, Rapid): These programs handle the entire process from kneading to baking. Follow the recipe booklet for specific ingredient ratios.
- Dough Program: This program kneads and allows the dough to rise, but does not bake it. Ideal for pizza dough, rolls, or pastries that will be baked in a conventional oven.
- Jam Program: Use this program for making homemade jams. Ensure fruits are chopped and sugar is added according to a suitable recipe.
- Yogurt Program: This program maintains a consistent temperature for fermenting yogurt. Follow specific yogurt recipes for best results.
6. Wartung und Reinigung
Regular cleaning ensures the longevity and hygiene of your bread maker.
- Trennen Sie das Gerät immer vom Stromnetz und lassen Sie es vollständig abkühlen, bevor Sie es reinigen.
- Brotbackform und Knethaken: Remove the bread pan and paddles. Wash them with warm, soapy water using a soft sponge. Do not use abrasive cleaners or metal scouring pads, as this can damage the non-stick coating. Rinse and dry thoroughly.
- Exterieur: Wischen Sie die Außenseite des Brotbackautomaten mit einem weichen, fusselfreien Tuch ab.amp Tuch. Verwenden Sie keine scharfen Chemikalien oder Scheuermittel.
- Deckel: Der Deckel kann mit einem Tuch abgewischt werden.amp cloth. Ensure no water enters the ventilation slots.
- Backraum: Verwenden Sie ein weiches,amp cloth to wipe the inside of the baking chamber. Remove any crumbs or residue.
- Tauchen Sie das Hauptgerät niemals in Wasser oder andere Flüssigkeiten.
7. Fehlerbehebung
| Problem | Mögliche Ursache | Lösung |
|---|---|---|
| Der Brotteig geht nicht auf. | Expired yeast, incorrect water temperature, too much salt/sugar, yeast in direct contact with liquid/salt. | Check yeast expiry. Use lukewarm water (38-43°C). Ensure ingredients are added in the correct order as per recipe. |
| Das Brot ist zu fest. | Too much flour, too little liquid, insufficient kneading. | Measure ingredients precisely. Ensure correct program is selected. |
| Das Brot fällt in der Mitte zusammen. | Zu viel Flüssigkeit, zu viel Hefe, hohe Luftfeuchtigkeit. | Reduce liquid slightly. Ensure correct yeast amount. |
| Kneading paddles stuck in bread. | Häufiges Vorkommen. | Remove carefully with a non-metallic utensil after bread has cooled. |
| Maschine startet nicht. | Nicht angeschlossen, Deckel nicht richtig geschlossen, Programm nicht ausgewählt. | Überprüfen Sie die Stromverbindung. Stellen Sie sicher, dass der Deckel vollständig geschlossen ist. Wählen Sie ein Programm und drücken Sie START/STOP. |
8. Spezifikationen
- Marke: ROGEN
- Modellnummer: 000001000018219001
- Farbe: Schwarz
- Produktabmessungen: 30 cm (Tiefe) x 36 cm (Breite) x 46 cm (Höhe)
- Gewicht: 7.22 Kilogramm
- Kapazität: 1500 Gramm
- Leistung/Watttage: 850 Watt
- Material: Plastik
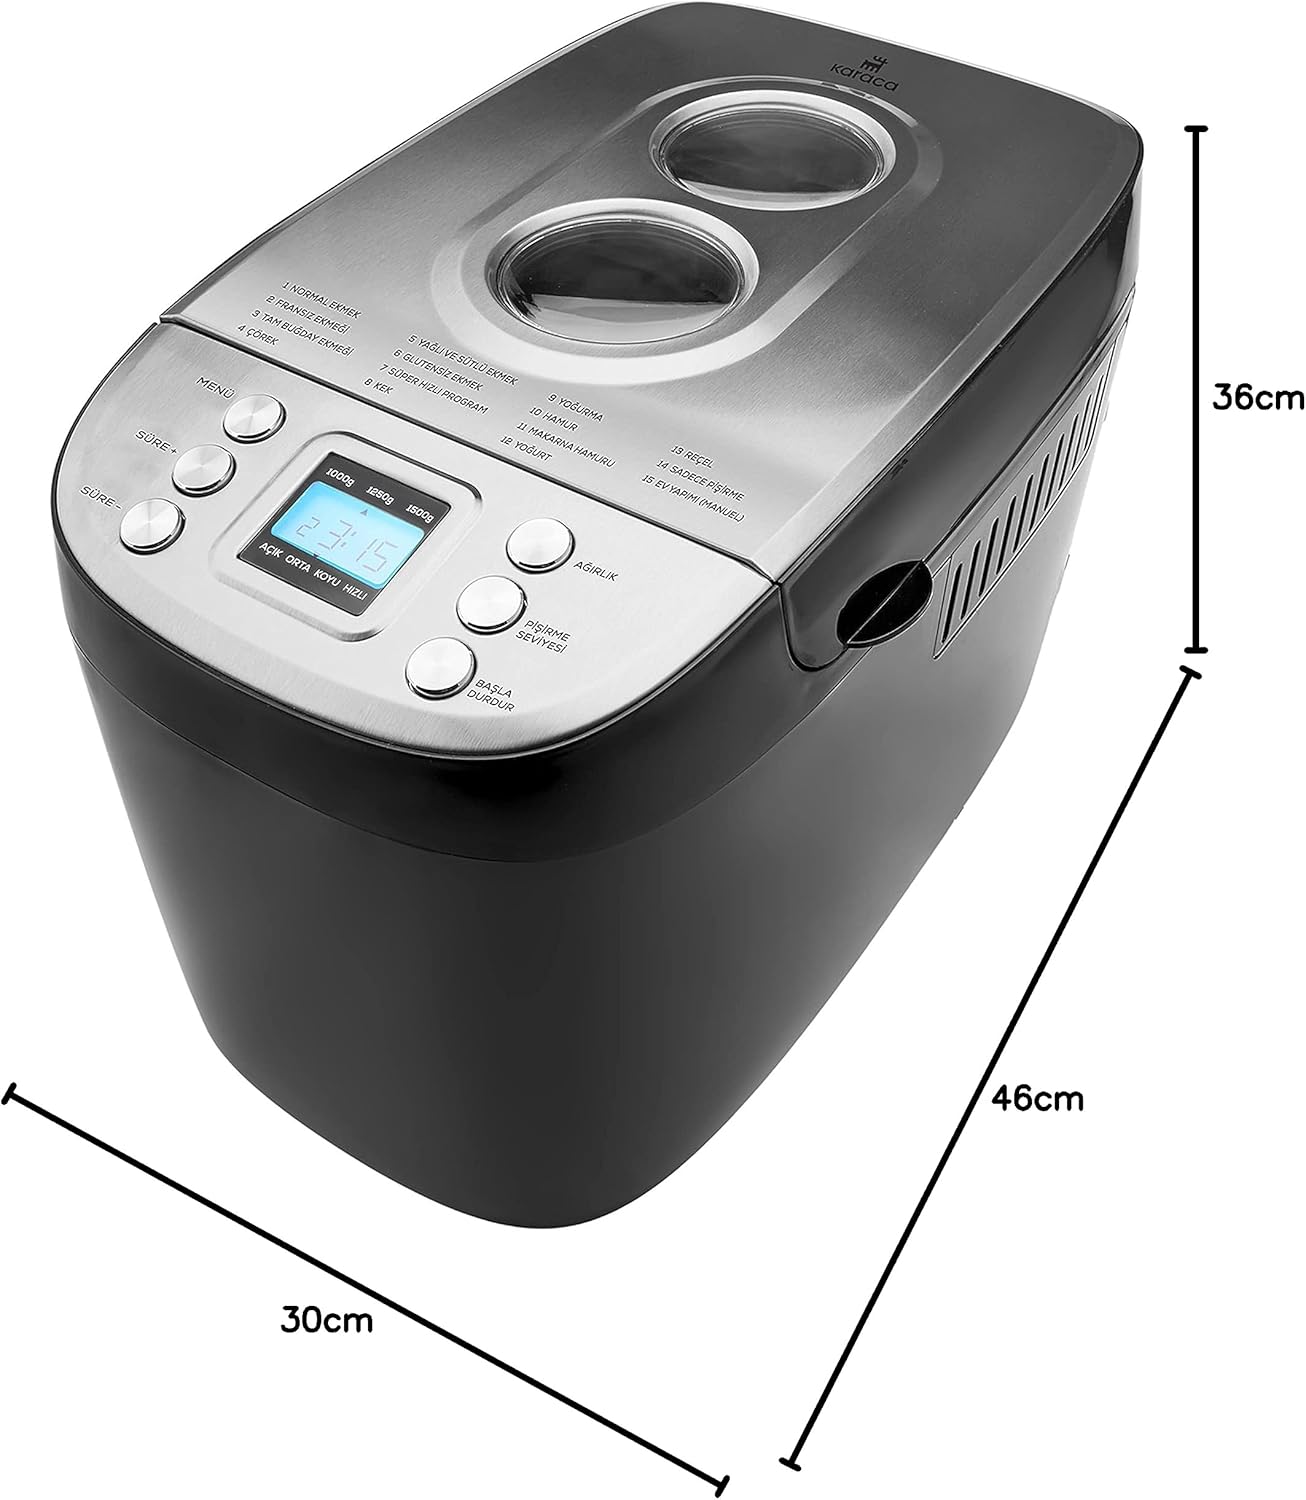
Abbildung 8.1: Dimensions of the Karaca BakeXL Bread Maker. This image visually represents the depth (30cm), width (36cm), and height (46cm) of the appliance.
9. Garantie und Support
For warranty information, technical support, or service inquiries, please refer to the warranty card included with your product or visit the official KARACA website. Do not attempt to repair the appliance yourself, as this will void the warranty and may pose safety risks.
Weitere Informationen und Kontaktdaten finden Sie auf der Website KARACA Store on Amazon.


