Einführung
The OLIGHT Warrior Mini2 is a high-performance rechargeable tactical flashlight designed for everyday carry (EDC), outdoor activities, camping, and emergency situations. It features a maximum output of 1,750 lumens, a 220-meter beam distance, and incorporates a smart proximity sensor for enhanced safety. This manual provides comprehensive instructions for the proper setup, operation, and maintenance of your Warrior Mini2 flashlight.

Image: The OLIGHT Warrior Mini2 flashlight, showcasing its compact design and key specifications including 1750 lumens max output, 45 days max runtime, 220 meters max throw, 1.5 meters drop test rating, and IPX8 waterproof rating.
Lieferumfang
- Warrior Mini2 x 1
- MCC3 Magnetisches USB-Ladekabel x 1
- Two-Way Pocket Clip x 1
- Schlüsselband x 1
- Lanyard Clip x 1
Aufstellen
Einlegen der Batterie
Before first use, unscrew the body of the flashlight and remove the insulating film from the battery. Ensure the positive end of the battery faces the flashlight head when reinserting or replacing the battery.

Image: A visual guide demonstrating the battery installation process, specifically highlighting the removal of the insulating film from the battery before initial use.
Laden
The Warrior Mini2 utilizes a convenient magnetic charging system. Attach the MCC3 magnetic charging cable to the tail cap of the flashlight. The indicator on the charger will show red during charging and turn green when fully charged.

Image: The OLIGHT Warrior Mini2 flashlight connected to its magnetic USB charging cable, illustrating the ease of charging by simply snapping the cable onto the tail cap.
Bedienungsanleitung
General Operation (Side Switch)
The side switch allows access to six different lighting modes for daily use. Press the side switch to turn the flashlight on or off. Hold the side switch to cycle through brightness levels (Moonlight, Low, Medium, High). Double-click for Turbo mode, and triple-click for Strobe mode.

Bild: Eine Nahaufnahme view of the OLIGHT Warrior Mini2, highlighting the side switch and its accessibility for selecting preferred output settings.
Taktischer Heckschalter
Die Dual-stage tactical tail switch provides quick access to Turbo or Strobe modes. A light press activates momentary low light, while a firm press activates momentary high light. For constant on, press and hold until it clicks. This switch is ideal for tactical operations.

Image: A hand holding the OLIGHT Warrior Mini2, illustrating the use of the tactical tail switch to quickly activate Strobe or Turbo modes.
Näherungssensor
The Warrior Mini2 is equipped with a smart proximity sensor. This sensor automatically dims the LED and turns it completely off after 1 minute if the lens is obstructed, preventing overheating and potential damage to nearby objects. This feature activates in higher output modes.

Image: The OLIGHT Warrior Mini2 flashlight demonstrating its safe proximity protection feature, where the light dims automatically when the lens is obstructed.
Lockout/Unlock Feature
To prevent accidental activation, the flashlight features a lockout mode. When the flashlight is off, press and hold the side switch for approximately 2 seconds to access the button lockout mode. To unlock, for the first time using or under lockout mode, keep holding the side switch for over one second until the moonlight mode is on again.
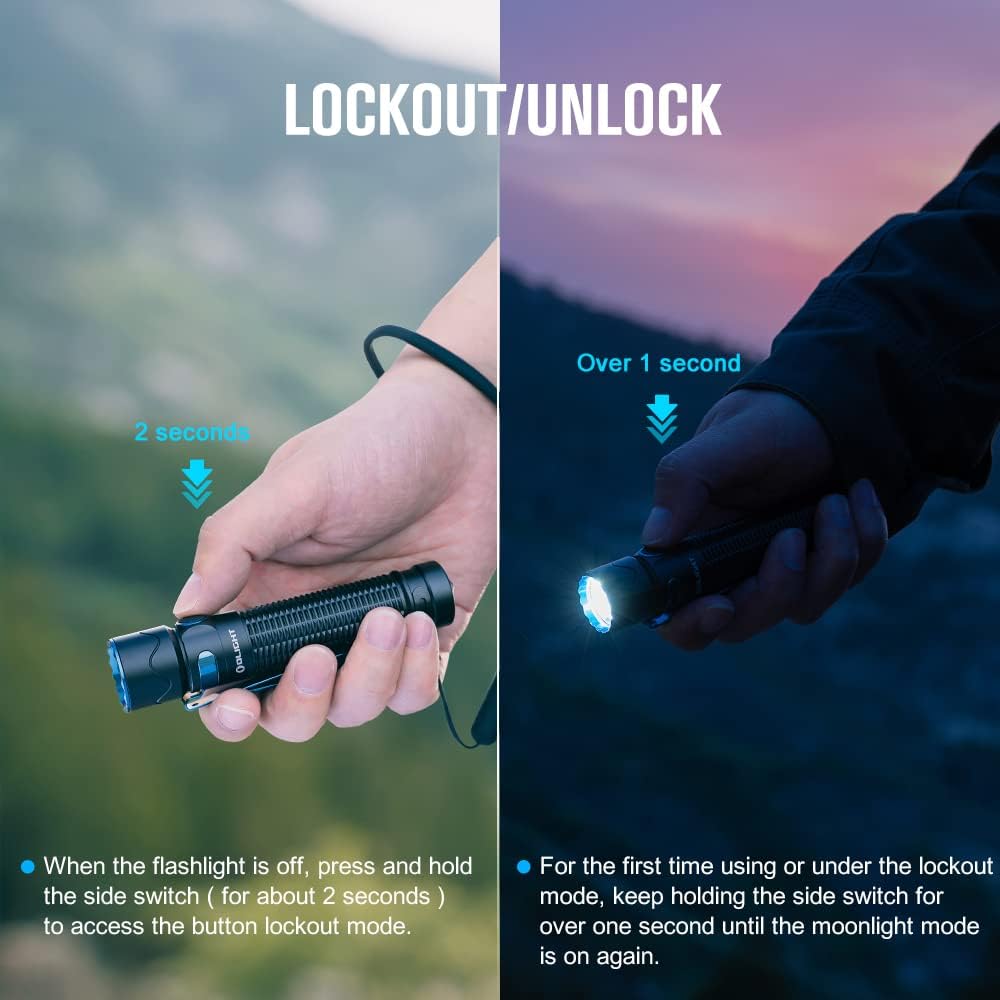
Image: A visual guide illustrating the lockout and unlock procedures for the OLIGHT Warrior Mini2, showing the duration for holding the side switch for each action.
Wartung
To ensure optimal performance and longevity of your OLIGHT Warrior Mini2, follow these maintenance guidelines:
- Reinigung: Reinigen Sie die Gewinde und O-Ringe regelmäßig mit einem sauberen Tuch. Tragen Sie regelmäßig eine dünne Schicht Silikonfett auf die O-Ringe auf, um die Wasserdichtigkeit zu erhalten.
- Batteriepflege: Bewahren Sie die Taschenlampe mit einem teilweise geladenen Akku auf, wenn Sie sie längere Zeit nicht benutzen. Vermeiden Sie eine vollständige Entladung des Akkus, um seine Lebensdauer zu verlängern.
- Linsenreinigung: Use a soft, clean cloth to wipe the lens. Avoid abrasive materials that could scratch the surface.
- Demontage vermeiden: Versuchen Sie nicht, den Lampenkopf oder andere versiegelte Bauteile zu zerlegen, da dies zum Verlust der Garantie und zu Schäden führen kann.
Fehlerbehebung
If you encounter issues with your Warrior Mini2, please refer to the following common troubleshooting steps:
- Taschenlampe schaltet sich nicht ein: Ensure the battery is correctly installed with the positive end facing the head. Check if the insulating film has been removed. Verify the battery is charged.
- Gedimmte Lichtleistung: The battery may be low; recharge the flashlight. The proximity sensor might be activated due to an obstruction; clear the lens area.
- Ladeprobleme: Ensure the magnetic charging cable is securely attached and the USB power source is functional. Check for debris on the magnetic contact points.
- Versehentliche Aktivierung: Ensure the lockout mode is engaged when carrying the flashlight to prevent unintended power-on.
If problems persist after attempting these steps, please contact OLIGHT customer support.
Technische Daten
| Besonderheit | Detail |
|---|---|
| Maximale Leistung | 1750 Lumen |
| Maximaler Wurf | 220 Meter |
| Max Laufzeit | 45 Tage (Mondlichtmodus) |
| Stromquelle | Wiederaufladbarer Lithium-Ionen-Akku (im Lieferumfang enthalten) |
| Lichtquellentyp | LED |
| Material | Aluminiumlegierung |
| Wasserbeständigkeit | IPX8 (wasserdicht) |
| Abmessungen (L x T) | 4.65" x 0.98" (118 mm x 25 mm) |
| Gewicht | 6.7 Unzen (190 g) |
| Besondere Merkmale | Proximity Sensor, Dual Switch, Magnetic Charging |

Image: A graphic detailing the various output modes of the OLIGHT Warrior Mini2, including Turbo (1750 Lumens), High, Med, Low, Moon, and Strobe, along with their respective runtimes.
Garantie und Support
OLIGHT bietet ein Lebenslange Garantie on the Warrior Mini2 flashlight, reflecting their commitment to quality and durability. For detailed warranty terms and conditions, please refer to the official OLIGHT weboder der beiliegenden Garantiekarte.
If you have any questions about your OLIGHT Warrior Mini2 or require technical assistance, please do not hesitate to contact OLIGHT customer support. You can find contact information on the official OLIGHT webWebsite oder über Ihren Händler.
Eine herunterladbare PDF-Version des Benutzerhandbuchs finden Sie hier: OLIGHT Warrior Mini2 User Manual (PDF)


