1. Einleitung
This manual provides detailed instructions for the installation, operation, and maintenance of the ZKTeco IN01-A/3G Fingerprint Time Attendance and Access Control Terminal. Please read this manual thoroughly before using the device to ensure proper functionality and to prevent damage.
2. Produktüberschreitungview
The ZKTeco IN01-A/3G is a sophisticated 3-inch TFT screen terminal designed for both time attendance and access control applications. It integrates advanced fingerprint recognition technology to provide secure and efficient user identification.
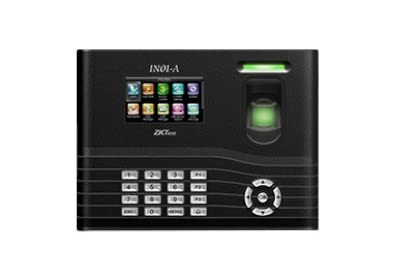
Abbildung 1: Front view of the ZKTeco IN01-A/3G terminal, showing the 3-inch TFT screen, numeric keypad, navigation buttons, and the fingerprint sensor with an illuminated ring.
Key components include a high-resolution TFT display for user interaction, a numeric keypad for data entry, navigation buttons for menu control, and a robust fingerprint sensor for biometric authentication.
3. Funktionen
- Fingerabdruckkapazität: Supports storage for up to 3000 fingerprints.
- Anzeige: Equipped with an LCD (3-inch TFT screen) for clear visual feedback.
- Identification Method: Primarily uses fingerprint recognition for user authentication.
- Haltbarkeit: Features a scratch-proof design for enhanced longevity.
- Funktionalität: Combines time attendance tracking with access control capabilities.
4. Einrichtung
4.1 Auspacken und Prüfen
Carefully unpack the device and verify that all components are present and undamaged. Report any discrepancies to your supplier immediately.
4.2 Gerät montieren
- Choose a suitable location for installation, ensuring it is protected from direct sunlight, extreme temperatures, and moisture.
- Use the provided mounting template to mark drilling positions on the wall.
- Löcher bohren und Dübel einsetzen.
- Befestigen Sie die Montageplatte mit Schrauben an der Wand.
- Attach the IN01-A/3G terminal to the mounting plate.
4.3 Stromanschluss
Connect the provided power adapter to the device's power input port and then plug it into a standard electrical outlet. Ensure the power supply matches the device's requirements.
4.4 Netzwerkverbindung (optional)
If network connectivity is required for data transfer or remote management, connect an Ethernet cable to the device's LAN port and to your network router/switch.
4.5 Erstkonfiguration
Upon first power-up, the device may prompt for initial setup, including date, time, and administrator registration. Follow the on-screen instructions to complete these steps.
5. Bedienungsanleitung
5.1 Administrator Registration
The first step is to register an administrator fingerprint. This user will have access to all device settings and user management functions.
- Drücken Sie die SPEISEKARTE Taste.
- Navigieren Sie zu Benutzerverwaltung und wählen Sie Neuer Benutzer.
- Enter a User ID and then select Fingerabdruck registrieren.
- Place your finger on the sensor three times as prompted, ensuring full contact each time.
- Set the user's privilege level to Administrator.
- Speichern Sie die Einstellungen.
5.2 User Fingerprint Enrollment
To allow other users to record attendance or gain access, their fingerprints must be enrolled.
- Access the menu as an administrator.
- Navigieren Sie zu Benutzerverwaltung und wählen Sie Neuer Benutzer or select an existing user to add a fingerprint.
- Enter or confirm the User ID.
- Wählen Fingerabdruck registrieren and follow the on-screen prompts to scan the user's finger three times.
- Speichern Sie die Benutzerinformationen.
5.3 Recording Attendance
Users can record their attendance by simply placing their enrolled finger on the fingerprint sensor. The device will provide visual and audible confirmation of a successful scan.
5.4 Access Control Functionality
For access control, the device will verify the enrolled fingerprint against its database. Upon successful verification, it will trigger the connected access mechanism (e.g., door lock) according to the configured access rules.
6. Wartung
6.1 Gerät reinigen
Regularly clean the fingerprint sensor and screen with a soft, dry, lint-free cloth. Do not use abrasive cleaners or solvents, as these can damage the surface.
6.2 Datensicherung
It is recommended to regularly back up attendance records and user data to an external storage device (e.g., USB drive) or a connected server to prevent data loss.
6.3 Firmware-Updates
Überprüfen Sie regelmäßig die offizielle ZKTeco-Website. website for firmware updates. Keeping the device's firmware up-to-date ensures optimal performance and access to new features.
7. Fehlerbehebung
- Das Gerät lässt sich nicht einschalten:
- Stellen Sie sicher, dass das Netzteil sowohl mit dem Gerät als auch mit einer funktionierenden Steckdose fest verbunden ist.
- Überprüfen Sie, ob die Steckdose funktioniert.
- Fingerabdruck nicht erkannt:
- Stellen Sie sicher, dass Ihr Finger sauber und trocken ist.
- Place your finger flat and centered on the sensor.
- Try enrolling the fingerprint again if the issue persists.
- Clean the fingerprint sensor surface.
- Cannot access menu:
- Ensure you are using an enrolled administrator fingerprint or password.
- Probleme bei der Datenübertragung:
- Überprüfen Sie die Netzwerkkabelverbindungen.
- Verify network settings on the device and server.
8. Spezifikationen
| Besonderheit | Detail |
|---|---|
| Marke | ZKTeco |
| Modell | IN01-A/3G |
| Fingerabdruckkapazität | 3000 |
| Anzeige | 3-Zoll-TFT-LCD |
| Identifikationsmethode | Fingerabdruck |
| Produktabmessungen (L x B x H) | 21.2 x 158.9 x 4.8 Zentimeter |
| Artikel Teilenummer | 8765 |
| Ursprungsland | Indien |
| Erstes verfügbares Datum | 22. Juni 2022 |
9. Garantie und Support
For warranty information and technical support, please refer to the documentation provided with your purchase or visit the official ZKTeco webBewahren Sie Ihren Kaufbeleg als Kaufnachweis für Garantieansprüche auf.
For further assistance, you may contact ZKTeco customer service or your local distributor.


