Einführung
This manual provides detailed instructions for the proper use and maintenance of your CAMMHD H4-32G Body Camera. Please read this manual thoroughly before operating the device to ensure optimal performance and longevity.
Lieferumfang
- 1*H4-32G Body Camera
- 1*Charger and 1*Mini USB cable
- 1* Long Clip and 1* Short Clip

Image: Contents of the CAMMHD H4-32G Body Camera package. Includes the camera, charger, USB cable, long clip, and short clip.
Produkt überview
The CAMMHD H4-32G is a compact and versatile body camera designed for various recording needs. It features high-definition video and photo capabilities, night vision, and a long-lasting battery.
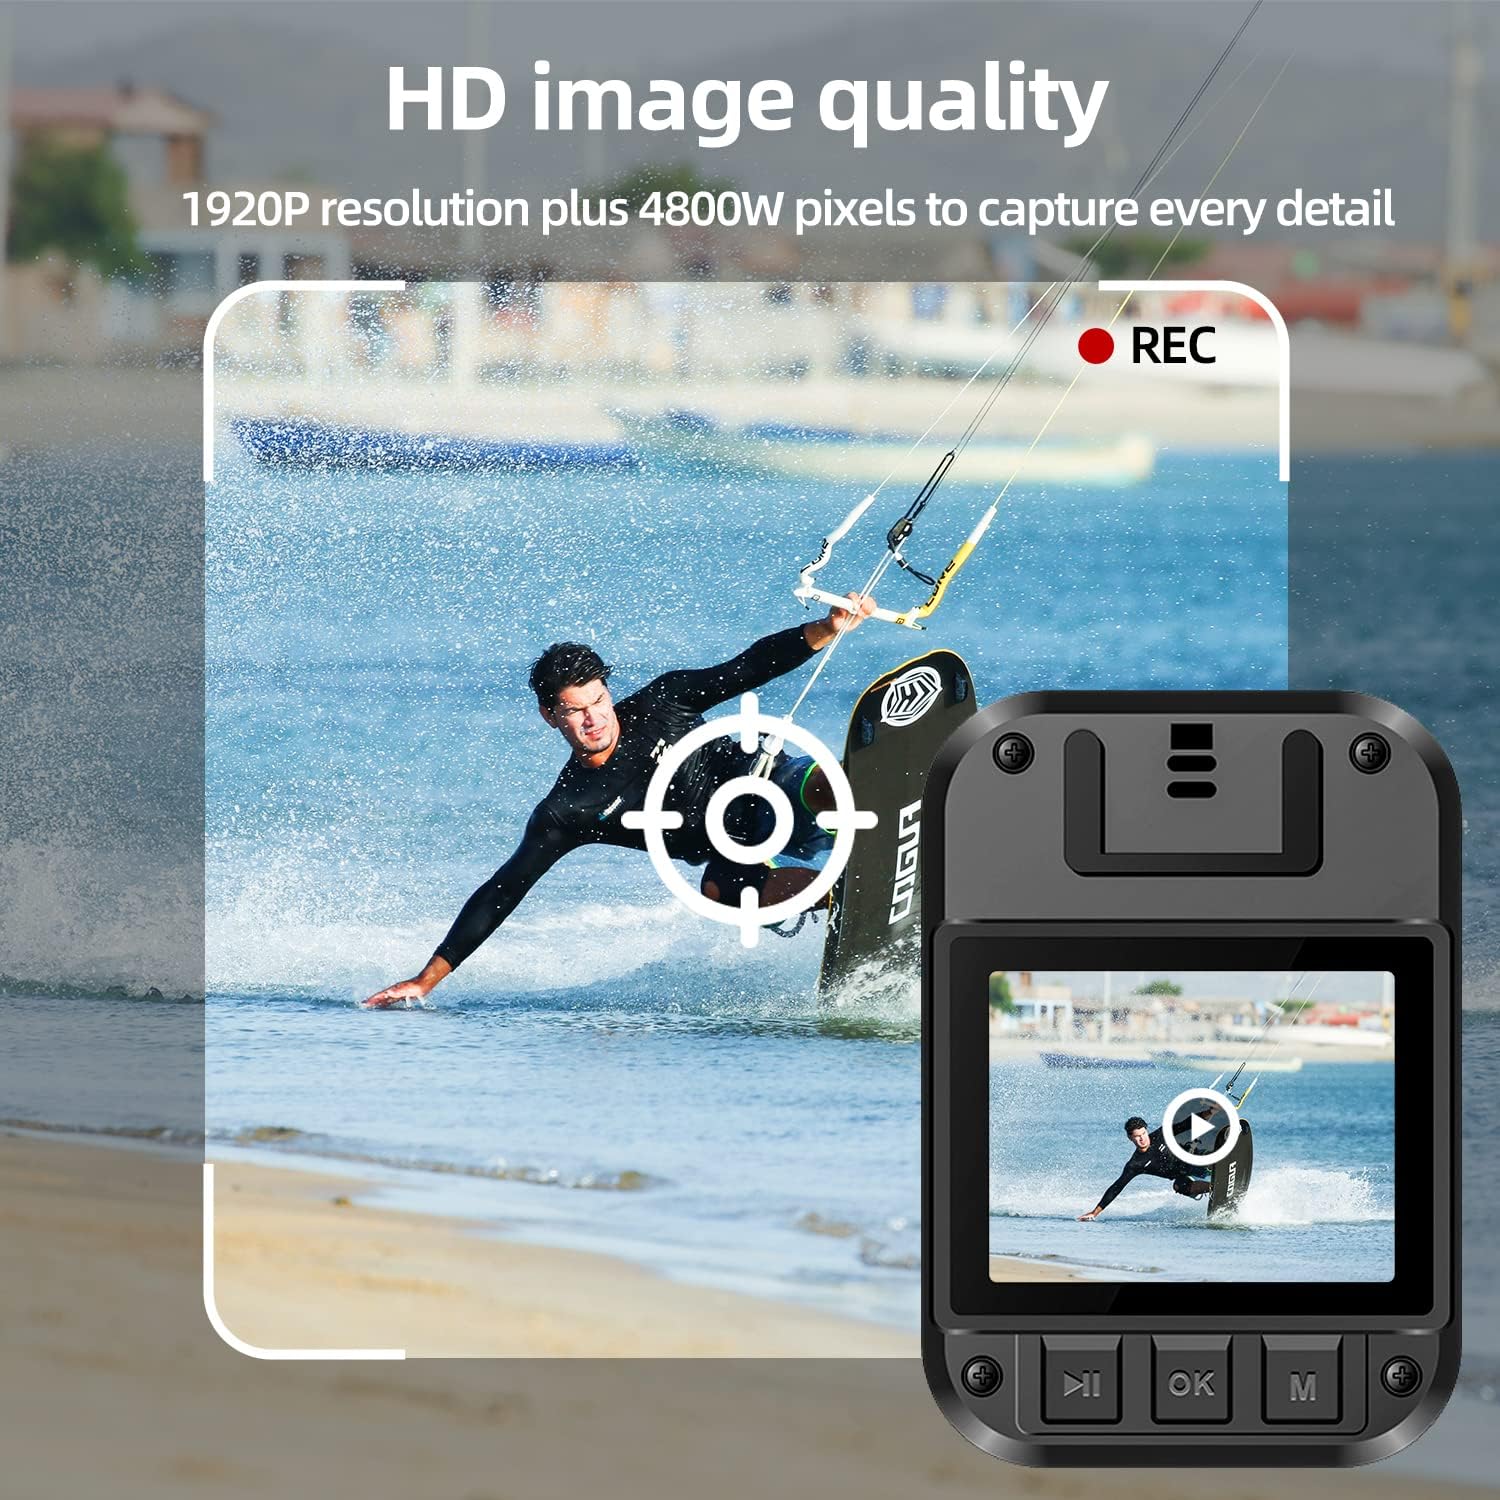
Bild: Vorderseite view of the CAMMHD H4-32G Body Camera, highlighting the lens, infrared lights, and control buttons.
Hauptmerkmale
- Hochauflösende Aufnahme: Captures video at up to 1920P and photos at 48M pixels with a 160-degree wide-angle lens.
- Verlängerte Akkulaufzeit: Equipped with a 3000mAh battery, providing up to 9 hours of continuous video recording.
- Integrierter Speicher: Includes 32GB of internal memory for storing recorded footage.
- Nachtsicht: Features 8 high-power infrared lights for clear recording up to 50 feet in low-light conditions.
- Bewegungserkennung: Die Aufnahme startet automatisch, sobald eine Bewegung erkannt wird.
- Loop-Aufnahme: Überschreibt das älteste Lebensmitteltage, wenn der Speicher voll ist, um eine kontinuierliche Aufzeichnung zu gewährleisten.
- Sicherheitsfunktionen: Supports password protection to prevent unauthorized access to recorded data.
- Ein-Tasten-Bedienung: Allows for quick activation of video recording in emergency situations.
- Alarmfunktion: Includes red and blue light alarm capabilities.
- OTG-Funktionalität: Supports On-The-Go (OTG) for direct connection to compatible devices.
Video: Ein überview of the CAMMHD H4 body camera, demonstrating its features and design.
Aufstellen
1. Laden des Akkus
Before first use, fully charge the body camera. Connect the Mini USB cable to the camera and the charger, then plug the charger into a power outlet. The charging indicator light will show the charging status.
2. Anbringen des Clips
Select either the long or short clip based on your preference. Align the clip with the slot on the back of the camera and slide it in until it clicks securely into place. Ensure the clip is firmly attached before use.

Image: Demonstrates the process of attaching the clip to the body camera for secure wearing.
3. Ein-/Ausschalten
- So schalten Sie das Gerät ein: Press and hold the power button until the screen illuminates and the device starts.
- So schalten Sie das Gerät aus: Halten Sie die Einschalttaste gedrückt, bis das Gerät herunterfährt.
4. Grundeinstellungen
Upon first power-on or after a reset, you may need to set the date, time, and preferred recording resolution. Navigate through the menu using the control buttons below the screen. Refer to the "Operating" section for detailed menu navigation.
Betrieb
1. Videoaufnahme
- Aufnahme starten: From standby mode, press the dedicated video recording button once to start recording. A red indicator light or on-screen icon will confirm recording is active.
- Aufnahme beenden: Drücken Sie die Videoaufnahmetaste erneut, um die Aufnahme zu beenden.
- Loop-Aufnahme: The camera supports loop recording. When the memory is full, the oldest files will be automatically overwritten by new recordings. This feature can usually be toggled in the settings menu.

Image: Demonstrates the HD image quality of the camera, capturing details in a dynamic scene.
2. Fotoaufnahme
From standby mode, press the dedicated photo button to take a still image. The screen may briefly flash or an icon will indicate a photo has been taken.
3. Nachtsicht
The camera's infrared night vision can be activated manually or set to automatic mode via the settings. In automatic mode, the camera will switch to night vision when ambient light is low. The 8 infrared lights provide visibility up to 50 feet.

Image: Illustrates the camera's infrared night vision, showing a clear view in einer dunklen Umgebung.
4. Bewegungserkennung
Enable motion detection in the camera's settings menu. When active, the camera will automatically begin recording when movement is detected within its field of view.
5. Passwortschutz
To protect your recorded data from unauthorized access or deletion, set a password through the camera's menu. This adds an extra layer of security to your footage.
6. OTG-Funktion
The H4 body camera supports OTG (On-The-Go) functionality, allowing you to connect it directly to compatible devices (e.g., smartphones, tablets) to view oder übertragen files ohne einen Computer zu benötigen.
7. Red and Blue Light Alarm
Activate the red and blue light alarm function as needed. This feature can be used for signaling or to deter unwanted attention.
8. Wiedergabe
Um zu review recorded videos and photos, navigate to the playback menu on the camera. Use the control buttons to select and play files. Videos, audio, and photos are watermarked with time to help restore the real scene.

Image: The camera's screen displaying a recorded video, demonstrating the playback function.
Wartung
Reinigung
Use a soft, dry cloth to clean the camera body and lens. Avoid using harsh chemicals or abrasive materials, as these can damage the device. Ensure the camera is powered off before cleaning.
Lagerung
Bewahren Sie die Kamera an einem kühlen, trockenen Ort ohne direkte Sonneneinstrahlung und extreme Temperaturen auf. Achten Sie bei längerer Lagerung darauf, dass der Akku teilweise geladen ist (etwa 50 %), um seine Lebensdauer zu verlängern.
Fehlerbehebung
- Die Kamera lässt sich nicht einschalten:
- Ensure the battery is charged. Connect the camera to the charger and check if the charging indicator lights up.
- If the camera still does not power on after charging, contact customer support.
- Die Videoqualität ist schlecht:
- Check the lens for smudges or dirt and clean it gently with a soft cloth.
- Ensure you are recording in the desired resolution setting (e.g., 1920P).
- Übertragung nicht möglich files zum Computer:
- Stellen Sie sicher, dass das USB-Kabel sowohl mit der Kamera als auch mit dem Computer fest verbunden ist.
- Prüfen Sie gegebenenfalls, ob sich die Kamera im richtigen USB-Modus befindet (z. B. Massenspeicher).
- Versuchen Sie es mit einem anderen USB-Anschluss oder Kabel.
- Die Akkulaufzeit ist kürzer als erwartet:
- Continuous use of features like night vision or high-resolution recording can consume more power.
- Stellen Sie sicher, dass die Kamera vor der Verwendung vollständig aufgeladen ist.
- Die Leistungsfähigkeit des Akkus kann sich mit der Zeit durch wiederholte Ladezyklen verschlechtern.
Technische Daten
| Besonderheit | Spezifikation |
|---|---|
| Modellname | H4 |
| Auflösung der Videoaufnahme | Up to 1920P (Default 1080P) |
| Fotoauflösung | 48M Pixel |
| Weitwinkel | 160 Grad |
| Batteriekapazität | 3000mAh Lithium-Ionen |
| Kontinuierliche Aufnahmezeit | Bis zu 9 Stunden |
| Interner Speicher | 32 GB |
| Nachtsichtbereich | Up to 50 feet (with 8 infrared lights) |
| Konnektivität | USB (supports OTG) |
| Artikelgewicht | 3.88 Unzen |
| Verpackungsabmessungen | 10.16 x 5.35 x 2.17 Zoll |

Image: Visual representation of the camera's dimensions and key specifications.
Garantie und Support
For warranty information or technical support, please refer to the documentation included with your purchase or visit the official CAMMHD website. If you encounter any issues not covered in this manual, please contact CAMMHD customer service for assistance.
Besuchen Sie die CAMMHD Store für weitere Informationen und Supportressourcen.


