Einführung
This manual provides detailed instructions for the setup, operation, maintenance, and troubleshooting of your NiPoGi AK1 PRO Mini PC. The AK1 PRO is a compact desktop computer powered by an 11th Generation Intel Celeron N5105 processor, designed for efficient daily tasks, multimedia playback, and business applications. It features 12GB DDR4 RAM, a 256GB M.2 SSD, 4K UHD video output, dual display support, Dual Band WiFi, and Bluetooth 4.2.
Lieferumfang
Bitte überprüfen Sie den Inhalt Ihres Pakets nach Erhalt. Das Standardpaket beinhaltet:
- 1 x NiPoGi AK1 PRO Mini PC (12GB RAM, 256GB ROM)
- 1 x EU-Netzadapter
- 1 x HDMI-Kabel
- 1 x VESA Bracket with Screws
- 1 x Benutzerhandbuch
Produkt überview
The NiPoGi AK1 PRO Mini PC is designed with various ports for connectivity and expansion. Familiarize yourself with the layout below.
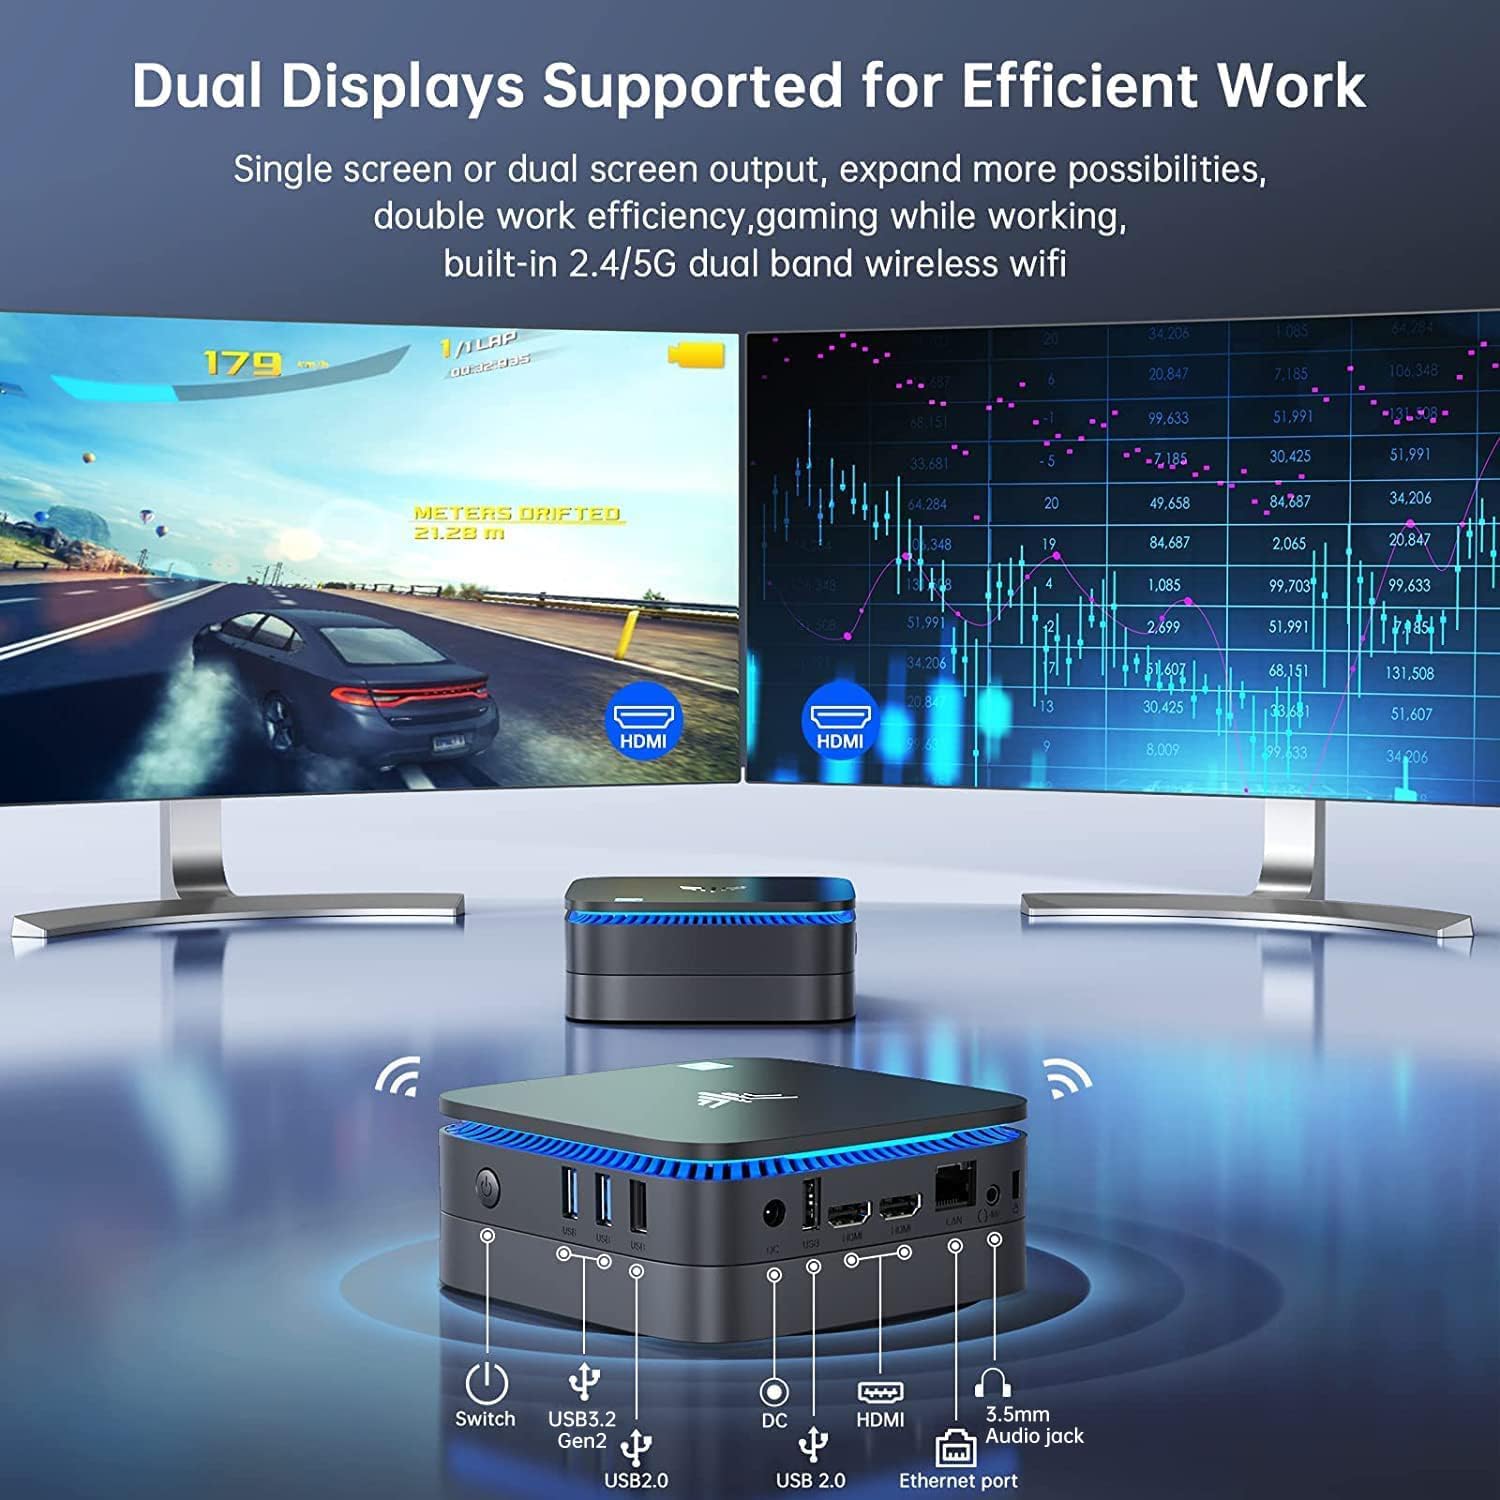
Bild: Vorne und hinten view of the NiPoGi AK1 PRO Mini PC, highlighting its various ports and compact design. The front features the power button and USB ports, while the rear includes HDMI, Ethernet, and additional USB ports.
Anschlusslayout:
- Front: Power Button, 2 x USB 3.0 ports, 2 x USB 2.0 ports
- Hinteren: DC Power Input, 2 x HDMI ports, 1 x RJ45 Gigabit Ethernet port, 1 x 3.5mm Audio Jack
Hauptmerkmale:
- Prozessor: 11th Gen Intel Celeron N5105 Quad-Core (up to 2.9 GHz)
- Grafik: Intel UHD Graphics, supporting 4K UHD (4096x2160@60Hz)
- Erinnerung: 12 GB DDR4 RAM
- Lagerung: 256GB M.2 SSD (expandable with 2.5-inch SSD/HDD up to 2TB)
- Konnektivität: Dual Band 2.4GHz+5GHz WiFi, Gigabit Ethernet, Bluetooth 4.2
- Ausgabe anzeigen: Dual HDMI for dual screen setup
- Betriebssystem: Vorinstalliertes Betriebssystem
Installationshandbuch
Follow these steps to set up your NiPoGi AK1 PRO Mini PC for the first time.
- Anschluss an ein Display: Use the provided HDMI cable to connect the Mini PC to your monitor or TV. The AK1 PRO supports dual displays, so you can connect two monitors via the two HDMI ports.
- Peripheriegeräte anschließen: Schließen Sie Ihre USB-Tastatur und -Maus an die verfügbaren USB-Anschlüsse an.
- An die Stromversorgung anschließen: Connect the EU power adapter to the DC input port on the Mini PC, then plug the adapter into a power outlet.
- Einschalten: Press the power button located on the front of the Mini PC. The device will boot up, and the blue light will illuminate.
- Erste Betriebssystemeinrichtung: Folgen Sie den Anweisungen auf dem Bildschirm, um die Einrichtung des Betriebssystems abzuschließen, einschließlich der Konfiguration von Sprache, Region und Netzwerk.
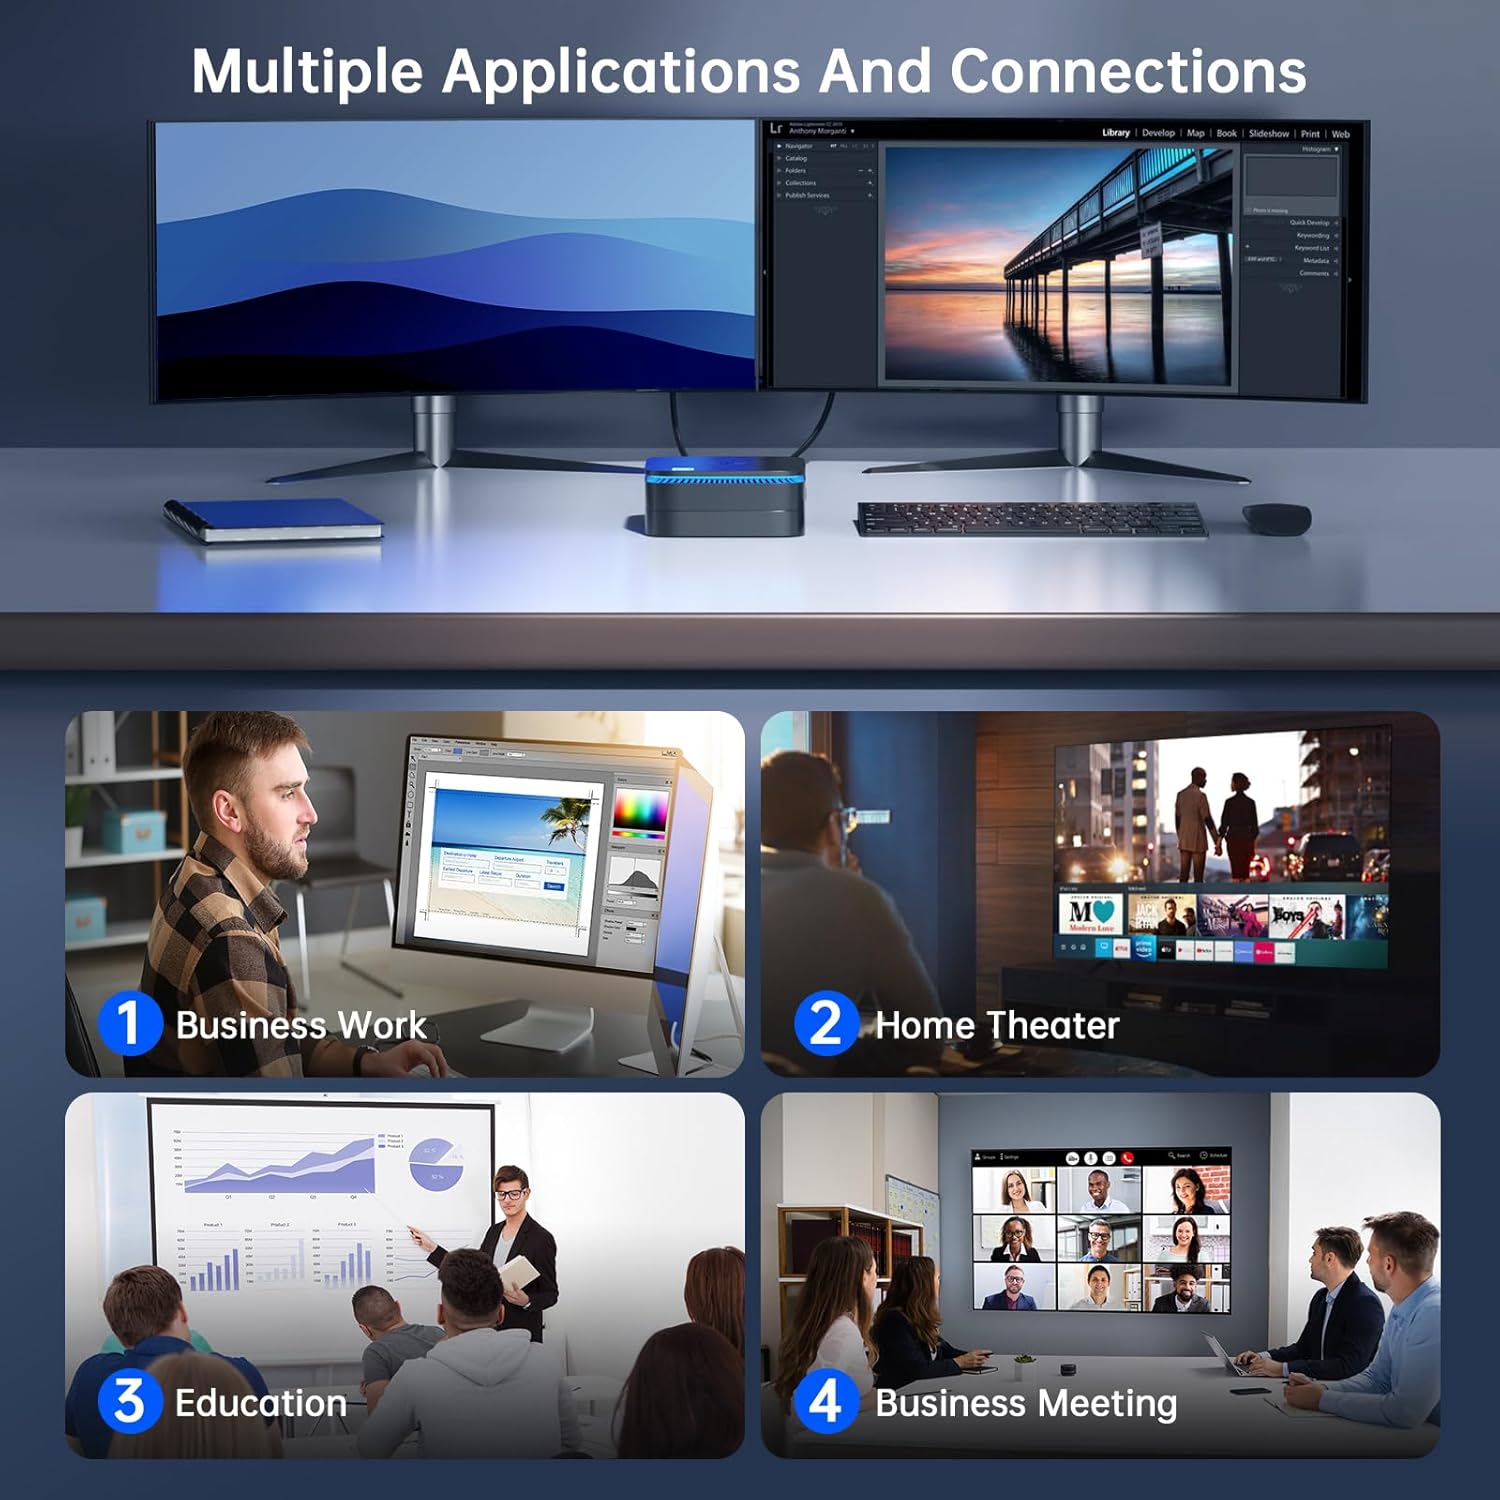
Bild: The NiPoGi AK1 PRO Mini PC demonstrating multiple applications and connections, including business work, home theater, education, and business meetings, showcasing seine Vielseitigkeit.
Bedienungsanleitung
Grundlegende Bedienung:
- Ein-/Ausschalten: Press the front power button to turn the PC on. To turn off, use the operating system's shutdown function or press and hold the power button for a few seconds for a forced shutdown (not recommended for regular use).
- Neustart: Nutzen Sie die Neustartfunktion des Betriebssystems.
- Schlafmodus: The PC can enter sleep mode to save power. Wake it up by moving the mouse or pressing a key on the keyboard.
4K UHD-Videowiedergabe:
The integrated Intel UHD Graphics supports 4K UHD resolution (4096x2160@60Hz), providing a clear visual experience for movies, streaming, and presentations.

Bild: A person enjoying 4K HD video playback on a large display, powered by the NiPoGi AK1 PRO Mini PC, highlighting its multimedia capabilities and wireless Bluetooth support.
Konfiguration mit zwei Displays:
Connect two monitors to the two HDMI ports for an extended desktop experience. This can enhance productivity for work or provide a more immersive entertainment setup. Configure display settings within your operating system.
Speichererweiterung
The NiPoGi AK1 PRO Mini PC comes with a 256GB M.2 SSD. For additional storage, you can install a 2.5-inch SSD or HDD (not included) in the removable base, supporting up to 2TB.
Installationsschritte:
- Stellen Sie sicher, dass der Mini-PC ausgeschaltet und vom Netzteil getrennt ist.
- Öffnen Sie vorsichtig die untere Abdeckung des Mini-PCs.
- Insert your 2.5-inch SSD/HDD into the designated slot in the removable base.
- Secure the drive with screws if necessary (check the base for mounting points).
- Bringen Sie die untere Abdeckung wieder an.
- After powering on, you may need to initialize and format the new drive through your operating system's disk management tools.

Bild: A visual tutorial demonstrating how to install a 2.5-inch SSD or HDD into the NiPoGi AK1 PRO Mini PC by opening the bottom cover and inserting the drive into the expansion bay.
Installation der VESA-Halterung
The included VESA bracket allows you to mount the Mini PC to the back of a compatible monitor or TV, saving desk space and creating an all-in-one computing solution.
Installationsschritte:
- Attach the VESA bracket to the back of your monitor using the provided screws. Ensure your monitor has standard VESA mounting holes.
- Slide the NiPoGi AK1 PRO Mini PC onto the VESA bracket until it clicks securely into place.
- Connect all necessary cables (power, HDMI, peripherals) to the Mini PC.

Bild: The NiPoGi AK1 PRO Mini PC shown mounted on the rear of a computer monitor using a VESA bracket, illustrating how it can transform into an all-in-one computer and save desk space.
Wartung
Durch sachgemäße Wartung wird die Langlebigkeit und optimale Leistung Ihres Mini-PCs sichergestellt.
- Reinigung: Regularly clean the exterior of the Mini PC with a soft, dry cloth. Use compressed air to clear dust from ventilation openings to prevent overheating.
- Software-Updates: Halten Sie Ihr Betriebssystem und Ihre Treiber auf dem neuesten Stand, um Sicherheit und Leistung zu gewährleisten.
- Umgebungsbedingungen: Betreiben Sie den Mini-PC in einem gut belüfteten Bereich, fern von direkter Sonneneinstrahlung, übermäßiger Hitze und Feuchtigkeit.
- Energieverwaltung: Verwenden Sie das mitgelieferte Netzteil. Vermeiden Sie häufige, plötzliche Stromausfälle.
Fehlerbehebung
If you encounter issues with your Mini PC, refer to the following common troubleshooting steps.
- Kein Strom:
- Stellen Sie sicher, dass das Netzteil sowohl mit dem Mini-PC als auch mit einer funktionierenden Steckdose fest verbunden ist.
- Überprüfen Sie die Funktionsfähigkeit der Steckdose, indem Sie ein anderes Gerät anschließen.
- Kein Bildschirm:
- Prüfen Sie, ob das HDMI-Kabel sowohl mit dem Mini-PC als auch mit dem Monitor fest verbunden ist.
- Stellen Sie sicher, dass der Monitor eingeschaltet und auf die richtige Eingangsquelle (HDMI 1, HDMI 2 usw.) eingestellt ist.
- Versuchen Sie es gegebenenfalls mit einem anderen HDMI-Kabel oder Monitor.
- Keine Internetverbindung (WLAN/Ethernet):
- Stellen Sie bei WLAN-Verbindungen sicher, dass der WLAN-Adapter im Betriebssystem aktiviert ist und Sie mit dem richtigen Netzwerk und dem richtigen Passwort verbunden sind.
- For Ethernet, ensure the Ethernet cable is securely connected to both the Mini PC and your router/modem. Check router status.
- Starten Sie Ihren Router/Ihr Modem und den Mini-PC neu.
- Langsame Leistung:
- Schließen Sie unnötige Anwendungen, die im Hintergrund laufen.
- Stellen Sie sicher, dass auf Ihrem primären Laufwerk ausreichend freier Speicherplatz vorhanden ist.
- Prüfen Sie, ob ausstehende Betriebssystemaktualisierungen verfügbar sind, und installieren Sie diese.
- Überwachen Sie die CPU- und RAM-Auslastung mithilfe des Task-Managers (Windows), um ressourcenintensive Prozesse zu identifizieren.
Technische Daten
Detailed technical specifications for the NiPoGi AK1 PRO Mini PC.
| Besonderheit | Detail |
|---|---|
| Marke | NiPoGi |
| Modellreihen | AK1PRO N5105/12GB RAM+256GB ROM |
| Prozessor | Intel Celeron N5105 (11th Gen, Quad-Core, up to 2.9 GHz) |
| Grafik-Coprozessor | Intel UHD-Grafik |
| RAM | 12 GB DDR4 |
| Lagerung | 256GB M.2 SSD (Expandable with 2.5" SSD/HDD up to 2TB) |
| Betriebssystem | OS |
| Konnektivität | Dual Band Wi-Fi (802.11a/b/g/n/ac), Bluetooth 4.2, Gigabit Ethernet |
| USB-Anschlüsse | 2 x USB 3.0, 2 x USB 2.0 |
| HDMI-Anschlüsse | 2 (supports dual display, 4K UHD resolution) |
| Audio | 1 x 3.5 mm Audiobuchse |
| Maße | 12.8 x 12.8 x 5.15 cm (ca. 5.04 x 5.04 x 2.05 Zoll) |
| Gewicht | 274 Gramm |
| Farbe | Schwarz |
Garantie und Support
NiPoGi provides comprehensive support and warranty services for your Mini PC.
Kontaktieren Sie den Support:
- Amazon Orders: Log in to Amazon, go to "Your Account", then "Your Orders", and select "Ask Product Question" for assistance.
- E-Mail-Support: support@inipogi.com
- Telefonischer Support: +44 808 175 2348 (Montag–Freitag, 9–5 Uhr EST)
NiPoGi offers maintenance points for exchange or repair of your mini PC during the warranty period. Please retain your proof of purchase for warranty claims.

Bild: Information regarding NiPoGi's "All-Around Protection" plan, including contact methods for support via Amazon, email, and phone, and details about maintenance services.