1. Einleitung
The AeroCool Blade is an ATX semi-tower PC case designed for optimal airflow and aesthetic appeal. It features an RGB front panel with preset lighting modes, a full tempered glass side window, and ample space for component installation. This manual provides essential information for the proper setup, operation, and maintenance of your PC case.
Sicherheitshinweise: Always disconnect power from your system before performing any installation or maintenance. Handle components with care to avoid damage. Refer to individual component manuals for specific installation instructions.
2. Packungsinhalt
- AeroCool Blade ATX Semi-Tower PC Case
- 1 x 120mm RGB Rear Fan (pre-installed)
- 3 x 120mm Front Fans (pre-installed)
- Zubehörset (Schrauben, Abstandshalter, Kabelbinder)
3. Einrichtung und Installation
3.1 Vorbereitung des Falls
Carefully remove the case from its packaging. Place it on a stable, flat surface. Remove the tempered glass side panel by unscrewing the thumb screws at the rear of the case and gently pulling the panel away.

Abbildung 3.1: Intern view of the AeroCool Blade PC case, illustrating the layout for component installation.
3.2 Motherboard-Installation
- Install the necessary motherboard standoffs into the motherboard tray according to your motherboard's form factor (ATX, Micro-ATX, Mini-ITX).
- Montieren Sie die I/O-Blende in die hintere Öffnung des Gehäuses.
- Setzen Sie das Motherboard vorsichtig auf die Abstandshalter und achten Sie dabei auf die Ausrichtung der Schraubenlöcher.
- Befestigen Sie das Motherboard mit den mitgelieferten Schrauben.
3.3 Installation des Netzteils (PSU)
The AeroCool Blade supports bottom-mounted PSUs. Slide your PSU into the dedicated compartment at the bottom rear of the case. Secure it with screws from the rear of the case.
3.4 Installation des Speicherlaufwerks
- 3.5"-Festplatten: Install 3.5" hard drives into the drive cage located beneath the PSU shroud.
- 2.5"-SSDs/HDDs: Install 2.5" drives onto the dedicated mounting points on the motherboard tray or behind it.

Abbildung 3.2: Hintere Innenseite view, highlighting cable management routes and 2.5-inch drive mounting locations.
3.5 Installation der Erweiterungskarte (GPU)
Remove the necessary expansion slot covers from the rear of the case. Insert your graphics card or other expansion cards into the PCIe slots on your motherboard and secure them with screws.
3.6 Lüfter- und Kühlungsinstallation
The case comes with one 120mm RGB fan pre-installed at the rear and three 120mm fans pre-installed at the front. Ensure all fan cables are connected to appropriate headers on your motherboard or fan controller.

Figure 3.3: A 120mm RGB fan, similar to those pre-installed in the AeroCool Blade case.
3.7 Frontplatten-E/A-Anschlüsse
Connect the front panel cables (USB 3.0, USB 2.0, HD Audio, Power Switch, Reset Switch, LED Switch, Power LED, HDD LED) to the corresponding headers on your motherboard. Refer to your motherboard manual for exact pin configurations.
4. Bedienungsanleitung
4.1 Einschalten
Once all components are installed and connected, replace the side panel. Connect your monitor, keyboard, mouse, and power cable to the PSU. Press the Power button located on the top panel of the case to turn on your system.

Abbildung 4.1: Draufsicht view of the case, indicating the location of the power button and front I/O ports.
4.2 RGB-Beleuchtungssteuerung
The AeroCool Blade features an RGB front panel. Use the dedicated LED button on the top panel to cycle through various preset lighting modes and effects. Pressing the button will change the lighting pattern or color.

Abbildung 4.2: Vorderseite view of the AeroCool Blade case with its distinctive RGB lighting.
4.3 Anschlüsse an der Vorderseite
Die obere Abdeckung ermöglicht einen bequemen Zugriff auf:
- 1 x USB 3.0-Anschluss
- 2 x USB 2.0-Anschlüsse
- HD Audio output
- Mikrofoneingang
Connect your USB devices, headphones, and microphone to these ports as needed.
5. Wartung
5.1 Reinigung des Staubfilters
Regularly check and clean the dust filters to maintain optimal airflow and prevent dust buildup inside the case. Dust filters are typically located at the top, front, and bottom (under the PSU). Gently remove them and clean with compressed air or rinse with water (ensure they are completely dry before re-installation).
5.2 Außenreinigung
Wischen Sie die Außenflächen des Gehäuses mit einem weichen, fusselfreien Tuch ab.amp Verwenden Sie kein Tuch. Vermeiden Sie die Verwendung von scharfen Chemikalien oder Scheuermitteln, die die Oberfläche oder das gehärtete Glas beschädigen könnten.
6. Fehlerbehebung
- System lässt sich nicht einschalten:
Ensure the PSU is switched on and properly connected to the wall outlet. Verify all power cables from the PSU are correctly connected to the motherboard and components. Check the front panel power switch connection to the motherboard. - RGB-Beleuchtung funktioniert nicht:
Ensure the RGB controller (if applicable) and fan RGB cables are securely connected. Press the LED button on the top panel to cycle through modes. If connected to a motherboard header, check motherboard software settings. - Lüfter drehen sich nicht:
Verify that all fan power cables are securely connected to the motherboard fan headers or a fan controller. Check BIOS/UEFI settings for fan speed control. - USB-/Audioanschluss an der Vorderseite funktioniert nicht:
Ensure the USB and HD Audio cables from the front panel are correctly connected to the corresponding headers on your motherboard.
7. Spezifikationen
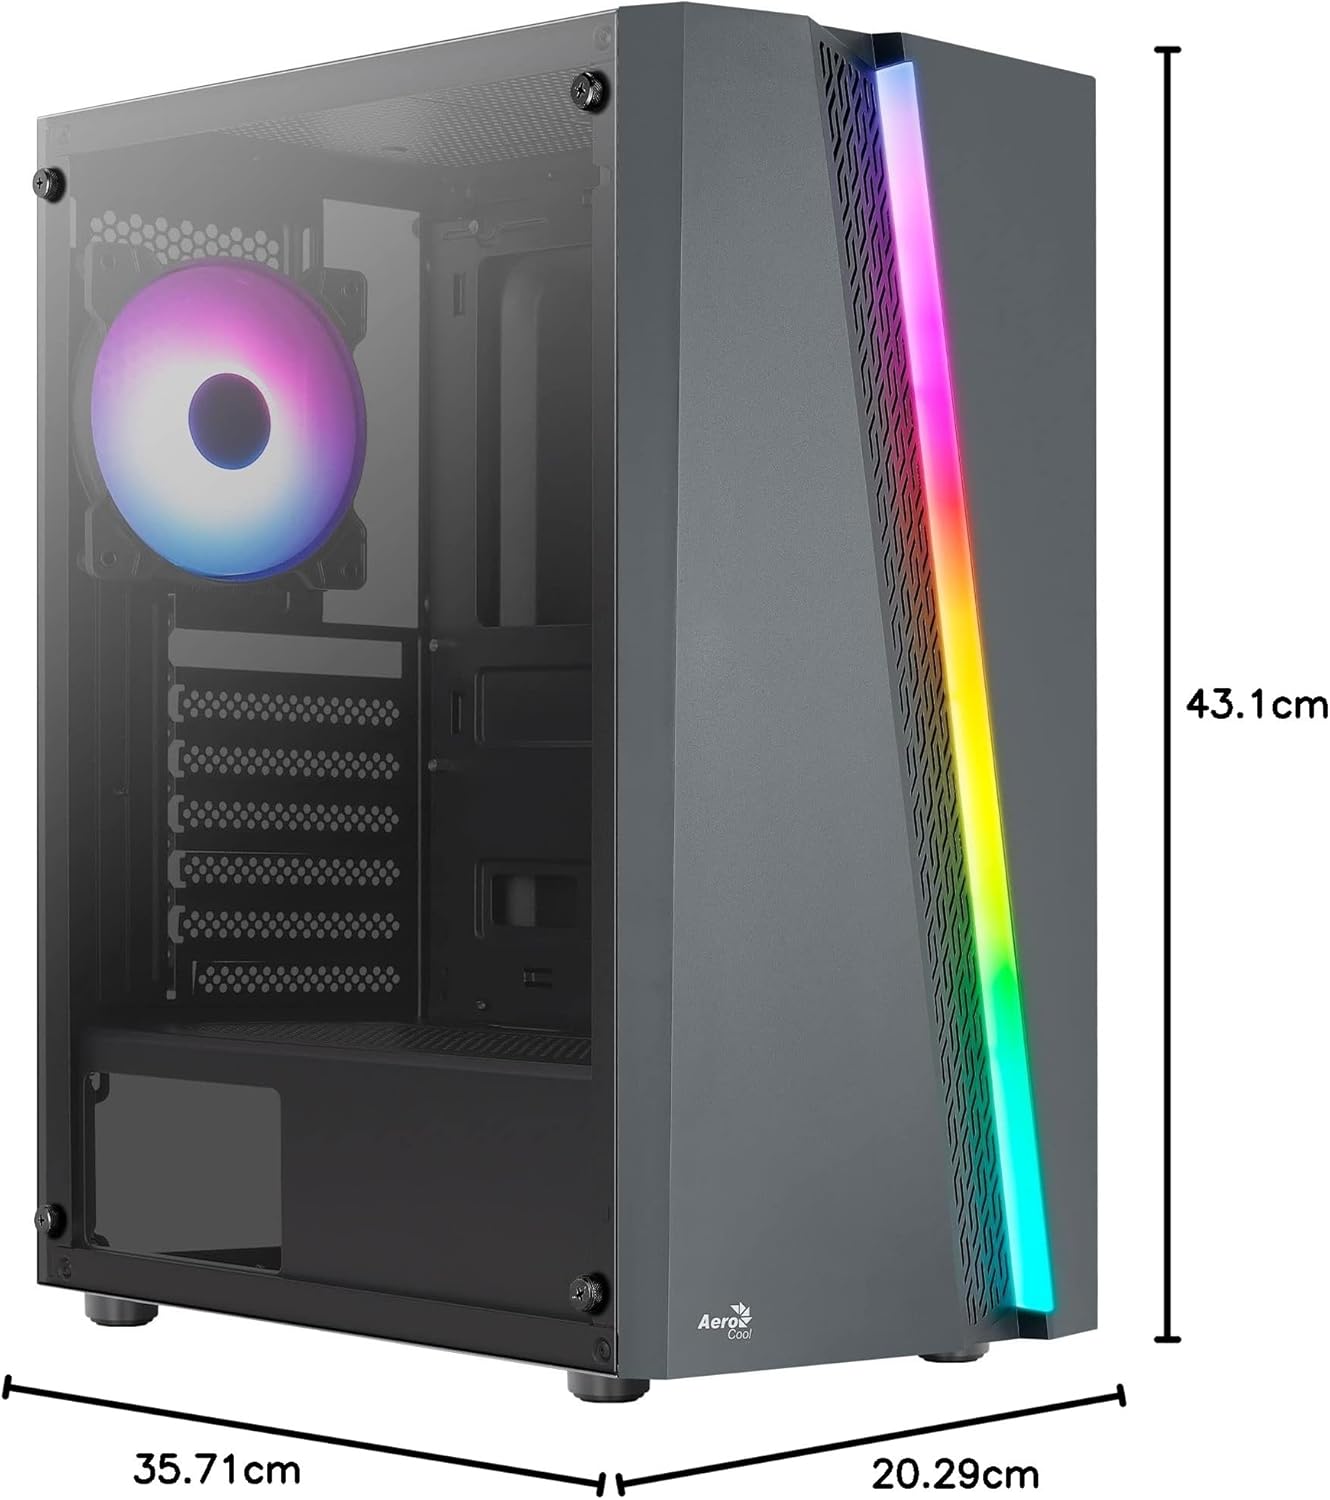
Figure 7.1: Dimensions of the AeroCool Blade PC Case.
| Besonderheit | Spezifikation |
|---|---|
| Marke | AeroCool |
| Modellname | BLADEBK |
| Gehäusetyp | Semi-Tower |
| Motherboard-Kompatibilität | ATX, Mikro-ATX, Mini-ITX |
| Material | Gehärtetes Glas (Seitenwand) |
| Produktabmessungen (L x B x H) | 43.1 x 20.3 x 35.7 cm |
| Artikelgewicht | 4 kg |
| Laufwerksschächte | 2 x 3.5", 2 x 2.5" |
| GPU-Freigabe | Bis zu 307 mm |
| Höhe des CPU-Kühlers | Bis zu 155 mm |
| Front I / O Ports | 1 x USB 3.0, 2 x USB 2.0, HD Audio, Mic, LED Control, Power |
| Vorinstallierte Lüfter | 1 x 120mm RGB Rear, 3 x 120mm Front |
| Kühlmethode | Luft |
8. Garantie und Support
Informationen zur Garantie und zum technischen Support finden Sie auf der offiziellen AeroCool-Website. webBesuchen Sie unsere Website oder wenden Sie sich an Ihren Händler vor Ort. Bewahren Sie Ihren Kaufbeleg für Garantieansprüche auf.
Kontaktinformationen: Für weitere Unterstützung besuchen Sie bitte www.aerocool.io.


