Einführung
The LFF Weather Station is a versatile device designed to provide accurate indoor and outdoor environmental data, timekeeping, and weather forecasting. Equipped with multiple wireless sensors, it allows you to monitor temperature and humidity in various locations simultaneously. This manual provides detailed instructions for setup, operation, maintenance, and troubleshooting to ensure optimal performance of your weather station.
Lieferumfang
- LFF Weather Station Main Display Unit
- 3 x drahtlose Außensensoren
- AC-AC Power Adapter
- Benutzerhandbuch (PDF online verfügbar)
Produkt überview
Hauptanzeigeeinheit
The main unit features a large 7.5-inch full-color touch screen that displays all relevant information clearly. It includes sections for time, date, weather forecast, barometric pressure trend, and temperature/humidity readings from the indoor sensor and up to three outdoor sensors. Seven touch buttons on the front panel allow for easy operation and settings adjustments.

Figure 1: Main Display Unit highlighting its 7.5-inch color screen and various display sections.
Drahtlose Sensoren
The weather station comes with three wireless remote sensors designed for real-time monitoring of temperature and humidity in different outdoor or indoor locations. Each sensor has its own small display and transmits data wirelessly to the main unit up to a range of 330 feet (100 meters) in open areas. Ensure each sensor is set to a unique channel (1, 2, or 3) for proper communication.

Figure 2: Wireless sensors demonstrating their 330ft/100m transmission range for multi-location monitoring.
Aufstellen
Powering the Main Unit
- Connect the included AC-AC power adapter to the main unit and plug it into a standard wall outlet. The screen will remain on when using the adapter.
- (Optional) For battery backup, insert 2 x AAA batteries (not included) into the battery compartment. When operating on battery power only, the screen will automatically turn off after approximately 10 seconds to conserve energy.

Figure 3: Power supply options for the main weather station unit.
Installing Batteries in Wireless Sensors
- Öffnen Sie das Batteriefach auf der Rückseite jedes drahtlosen Sensors.
- Insert 2 x AAA batteries (not included) into each sensor, observing the correct polarity (+/-).
- Set the channel switch inside each sensor's battery compartment to a unique channel (Channel 1, Channel 2, Channel 3). This is crucial for the main unit to distinguish between sensors.
- Verschließen Sie die Batteriefächer sicher.
Pairing Sensors with Main Unit
The main unit will automatically search for and connect to the wireless sensors once they are powered on and within range. Ensure the sensors are placed within 330 feet (100 meters) of the main unit, avoiding large metal objects or thick walls that may interfere with the signal. For best results, place the main unit and sensors close to each other during initial pairing, then move sensors to desired locations.
Initial Setup and Atomic Clock Synchronization
Upon first power-up or after a reset, the weather station will attempt to synchronize with the WWVB atomic clock signal. Select the correct time zone (AST, EST, CST, MST, PST, AKT, HST) according to your location. The atomic clock function ensures accurate timekeeping without manual adjustments.
Video: Official LFF weather station overview, demonstrating features like atomic clock synchronization and multi-sensor display.
Bedienungsanleitung
Anpassen der Anzeigehelligkeit
The main unit's display features 3 levels of adjustable brightness. Press the 'Light/Snooze' touch button on the front panel to cycle through bright, dim, and off settings. This allows you to customize the display's visibility based on ambient light conditions or personal preference.
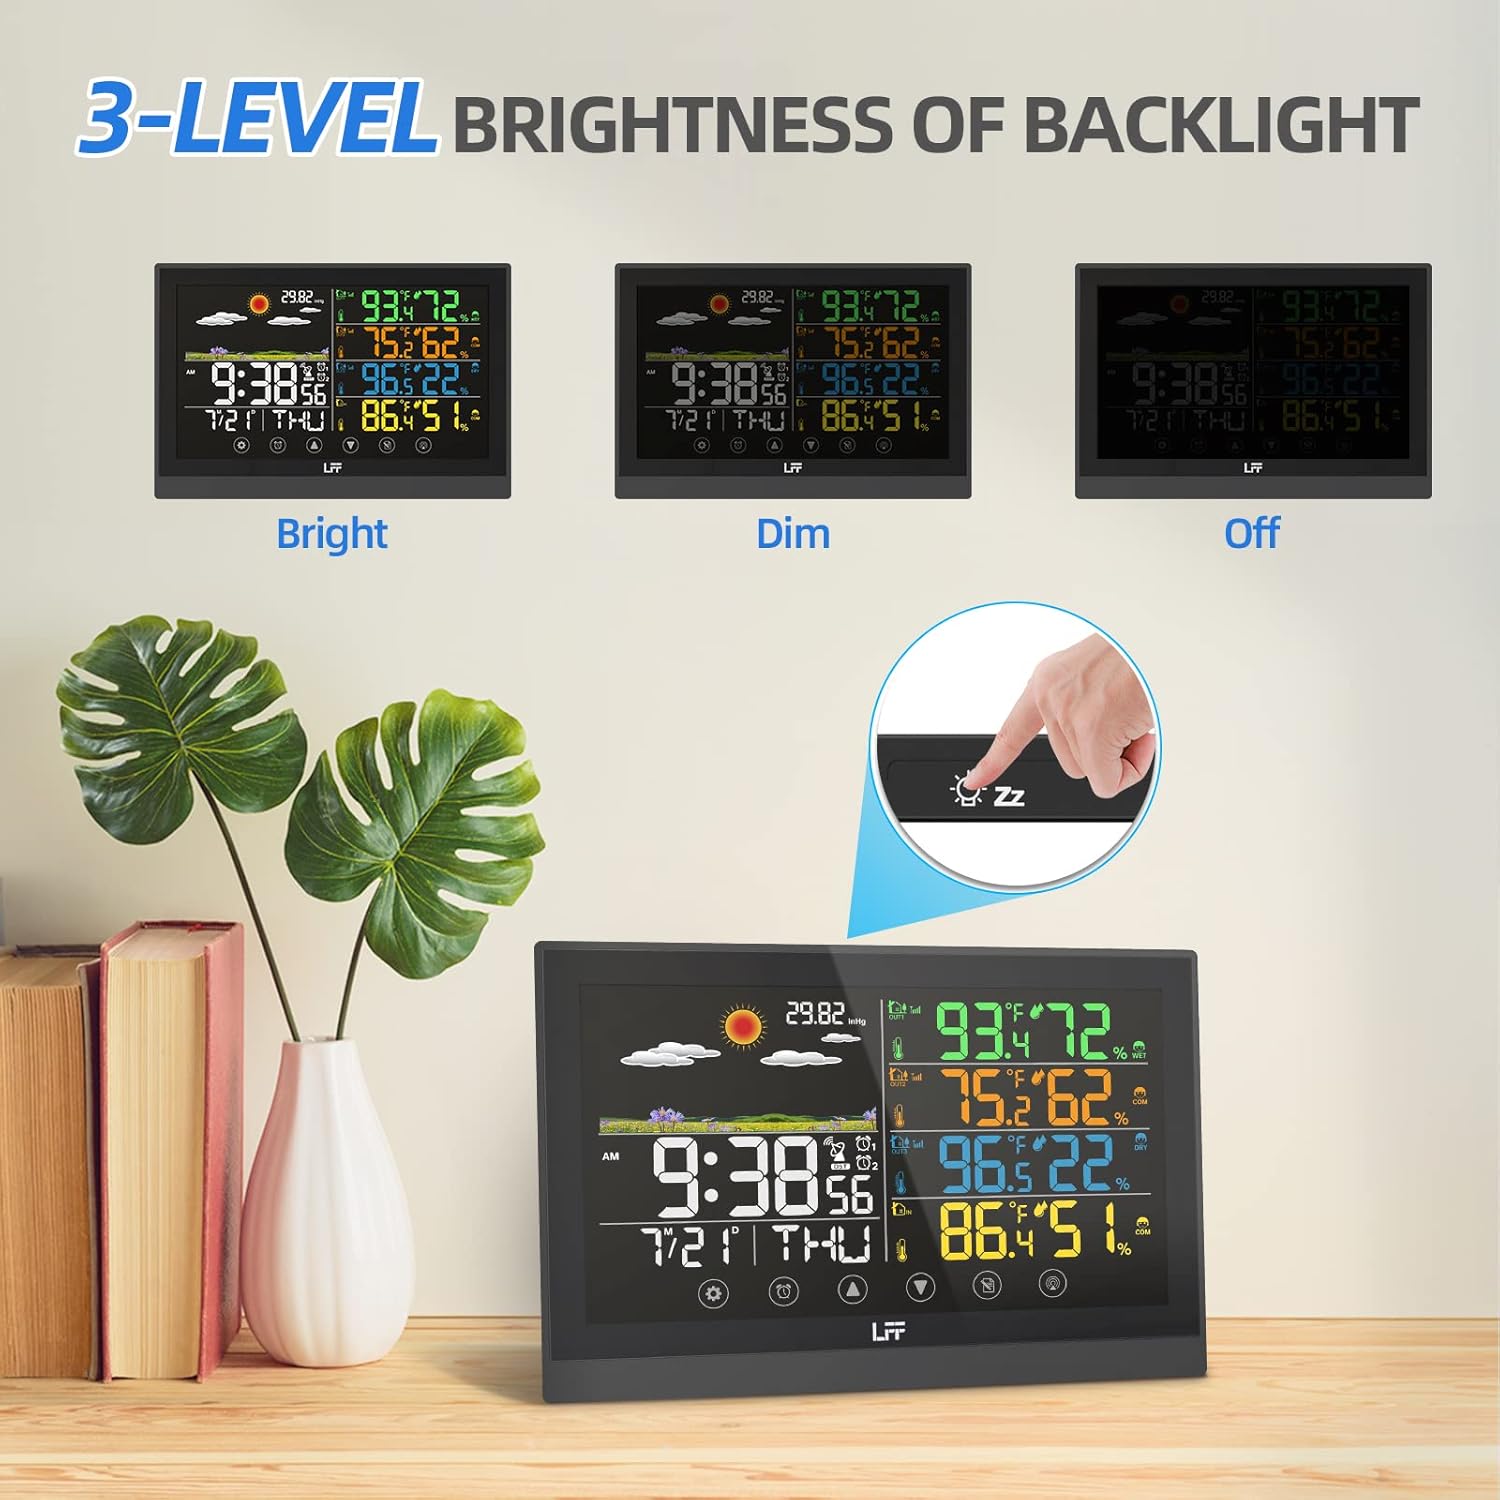
Figure 4: Demonstrates the three adjustable brightness levels of the weather station display.
Einstellen von Alarmen
The weather station supports two independent alarms with a snooze function. Use the 'Alarm' touch button to access and set alarm times. The snooze function provides a brief delay before the alarm sounds again, offering convenience for waking up.
Understanding Weather Forecast
The weather station predicts the weather for the next 6-12 hours based on barometric pressure fluctuations, not current weather conditions. The forecast is displayed using 6 intuitive weather icons: sunny, slightly cloudy, cloudy, rainy, heavy rainy, and snowy. This feature helps you prepare for upcoming weather changes.

Figure 5: Visual representation of the six weather forecast types.
ViewTemperatur und Luftfeuchtigkeit
The main display shows real-time temperature and humidity for the indoor environment and each connected outdoor sensor. The comfort level icon indicates whether the indoor environment is too dry, comfortable, or too wet, helping you maintain optimal living conditions.
Wartung
Batteriewechsel
When the low battery indicator appears on the display for either the main unit or a specific sensor, it's time to replace the batteries. For the main unit, replace 2 x AAA batteries. For each wireless sensor, replace 2 x AAA batteries. Always use fresh batteries and dispose of old ones responsibly.
Reinigung
To clean the weather station, use a soft, damp cloth. Avoid abrasive cleaners or solvents that may damage the display or casing. Ensure the unit is powered off before cleaning.
Fehlerbehebung
| Ausgabe | Mögliche Ursache | Lösung |
|---|---|---|
| Kein Display/Gerät lässt sich nicht einschalten | Netzteil nicht angeschlossen oder defekt; Batterien leer oder falsch eingelegt. | Check power adapter connection; replace batteries, ensuring correct polarity. |
| Außensensor verbindet sich nicht/zeigt keine Daten an | Sensor out of range; incorrect channel setting; sensor batteries drained. | Move sensor closer to main unit; ensure sensor channel matches main unit's setting; replace sensor batteries. |
| Falsche Uhrzeit angezeigt | Atomic clock signal weak or not synchronized; incorrect time zone. | Ensure unit is in an open area for better signal reception; manually set time zone; allow time for automatic synchronization. |
| Ungenaue Temperatur-/Feuchtigkeitsmesswerte | Sensor exposed to direct sunlight or heat sources; sensor placed in an area with poor air circulation. | Relocate sensor to a shaded area away from direct heat/cold sources; ensure proper air circulation around the sensor. |
Technische Daten
| Besonderheit | Detail |
|---|---|
| Technische Daten | 7.48 x 0.59 x 5.12 Zoll; 1.41 Pfund |
| Artikelmodellnummer | LWS125-EU |
| Batteries (Main Unit) | 2 AAA-Batterien erforderlich (nicht im Lieferumfang enthalten) |
| Batteries (Wireless Sensor) | 2 AAA batteries required per sensor (not included) |
| Stromquelle | Corded Electric (5.0V AC, 0.15A AC-AC adaptor) |
| Anzeigetyp | 7.5" Full-Color Touch Screen |
| Drahtlose Übertragungsreichweite | Bis zu 100 m (Freifläche) |
| Besondere Merkmale | Weather forecast, Dual alarm, Atomic clock, Adjustable backlight |
| Material | Plastik |
| Farbe | Schwarz |
Garantie und Support
For detailed warranty information and further support, please refer to the official user manual provided with your product. A digital version of the user manual is also available online for your convenience.


