1. Einleitung
This manual provides essential information for the safe and efficient use of your AOC U34V5C/BK 34-inch WQHD LED Monitor. Please read this manual thoroughly before operating the device and retain it for future reference. The AOC U34V5C/BK is designed to deliver a high-quality visual experience with its 3440 x 1440 WQHD resolution and 21:9 aspect ratio, suitable for various applications from professional work to entertainment.
2. Sicherheitshinweise
Beachten Sie die folgenden Sicherheitsvorkehrungen, um Schäden am Monitor zu vermeiden und Ihre persönliche Sicherheit zu gewährleisten:
- Um Brand- oder Stromschlaggefahren zu vermeiden, setzen Sie den Monitor weder Regen noch Feuchtigkeit aus.
- Öffnen Sie den Monitor nicht.asing. Im Inneren befinden sich keine vom Benutzer wartbaren Teile. Alle Wartungsarbeiten dürfen nur von qualifiziertem Servicepersonal durchgeführt werden.
- Stellen Sie den Monitor auf eine stabile, ebene Fläche, um zu verhindern, dass er herunterfällt.
- Sorgen Sie für ausreichende Belüftung um den Monitor herum. Blockieren Sie keine Lüftungsöffnungen.
- Verwenden Sie ausschließlich das mit dem Monitor gelieferte Netzkabel und Netzteil.
- Trennen Sie den Monitor bei Gewittern oder wenn er längere Zeit nicht benutzt wird vom Stromnetz.
3. Packungsinhalt
Überprüfen Sie, ob alle Artikel im Paket vorhanden sind:
- AOC U34V5C/BK Monitor
- Monitorständer (Fuß und Hals)
- Stromkabel
- HDMI-Kabel
- DisplayPort-Kabel
- USB-C-Kabel
- Benutzerhandbuch (dieses Dokument)
4. Produktüberschreitungview
The AOC U34V5C/BK monitor features a 34-inch VA panel with WQHD resolution, USB-C connectivity with 65W Power Delivery, and a 100Hz refresh rate with AMD FreeSync support.
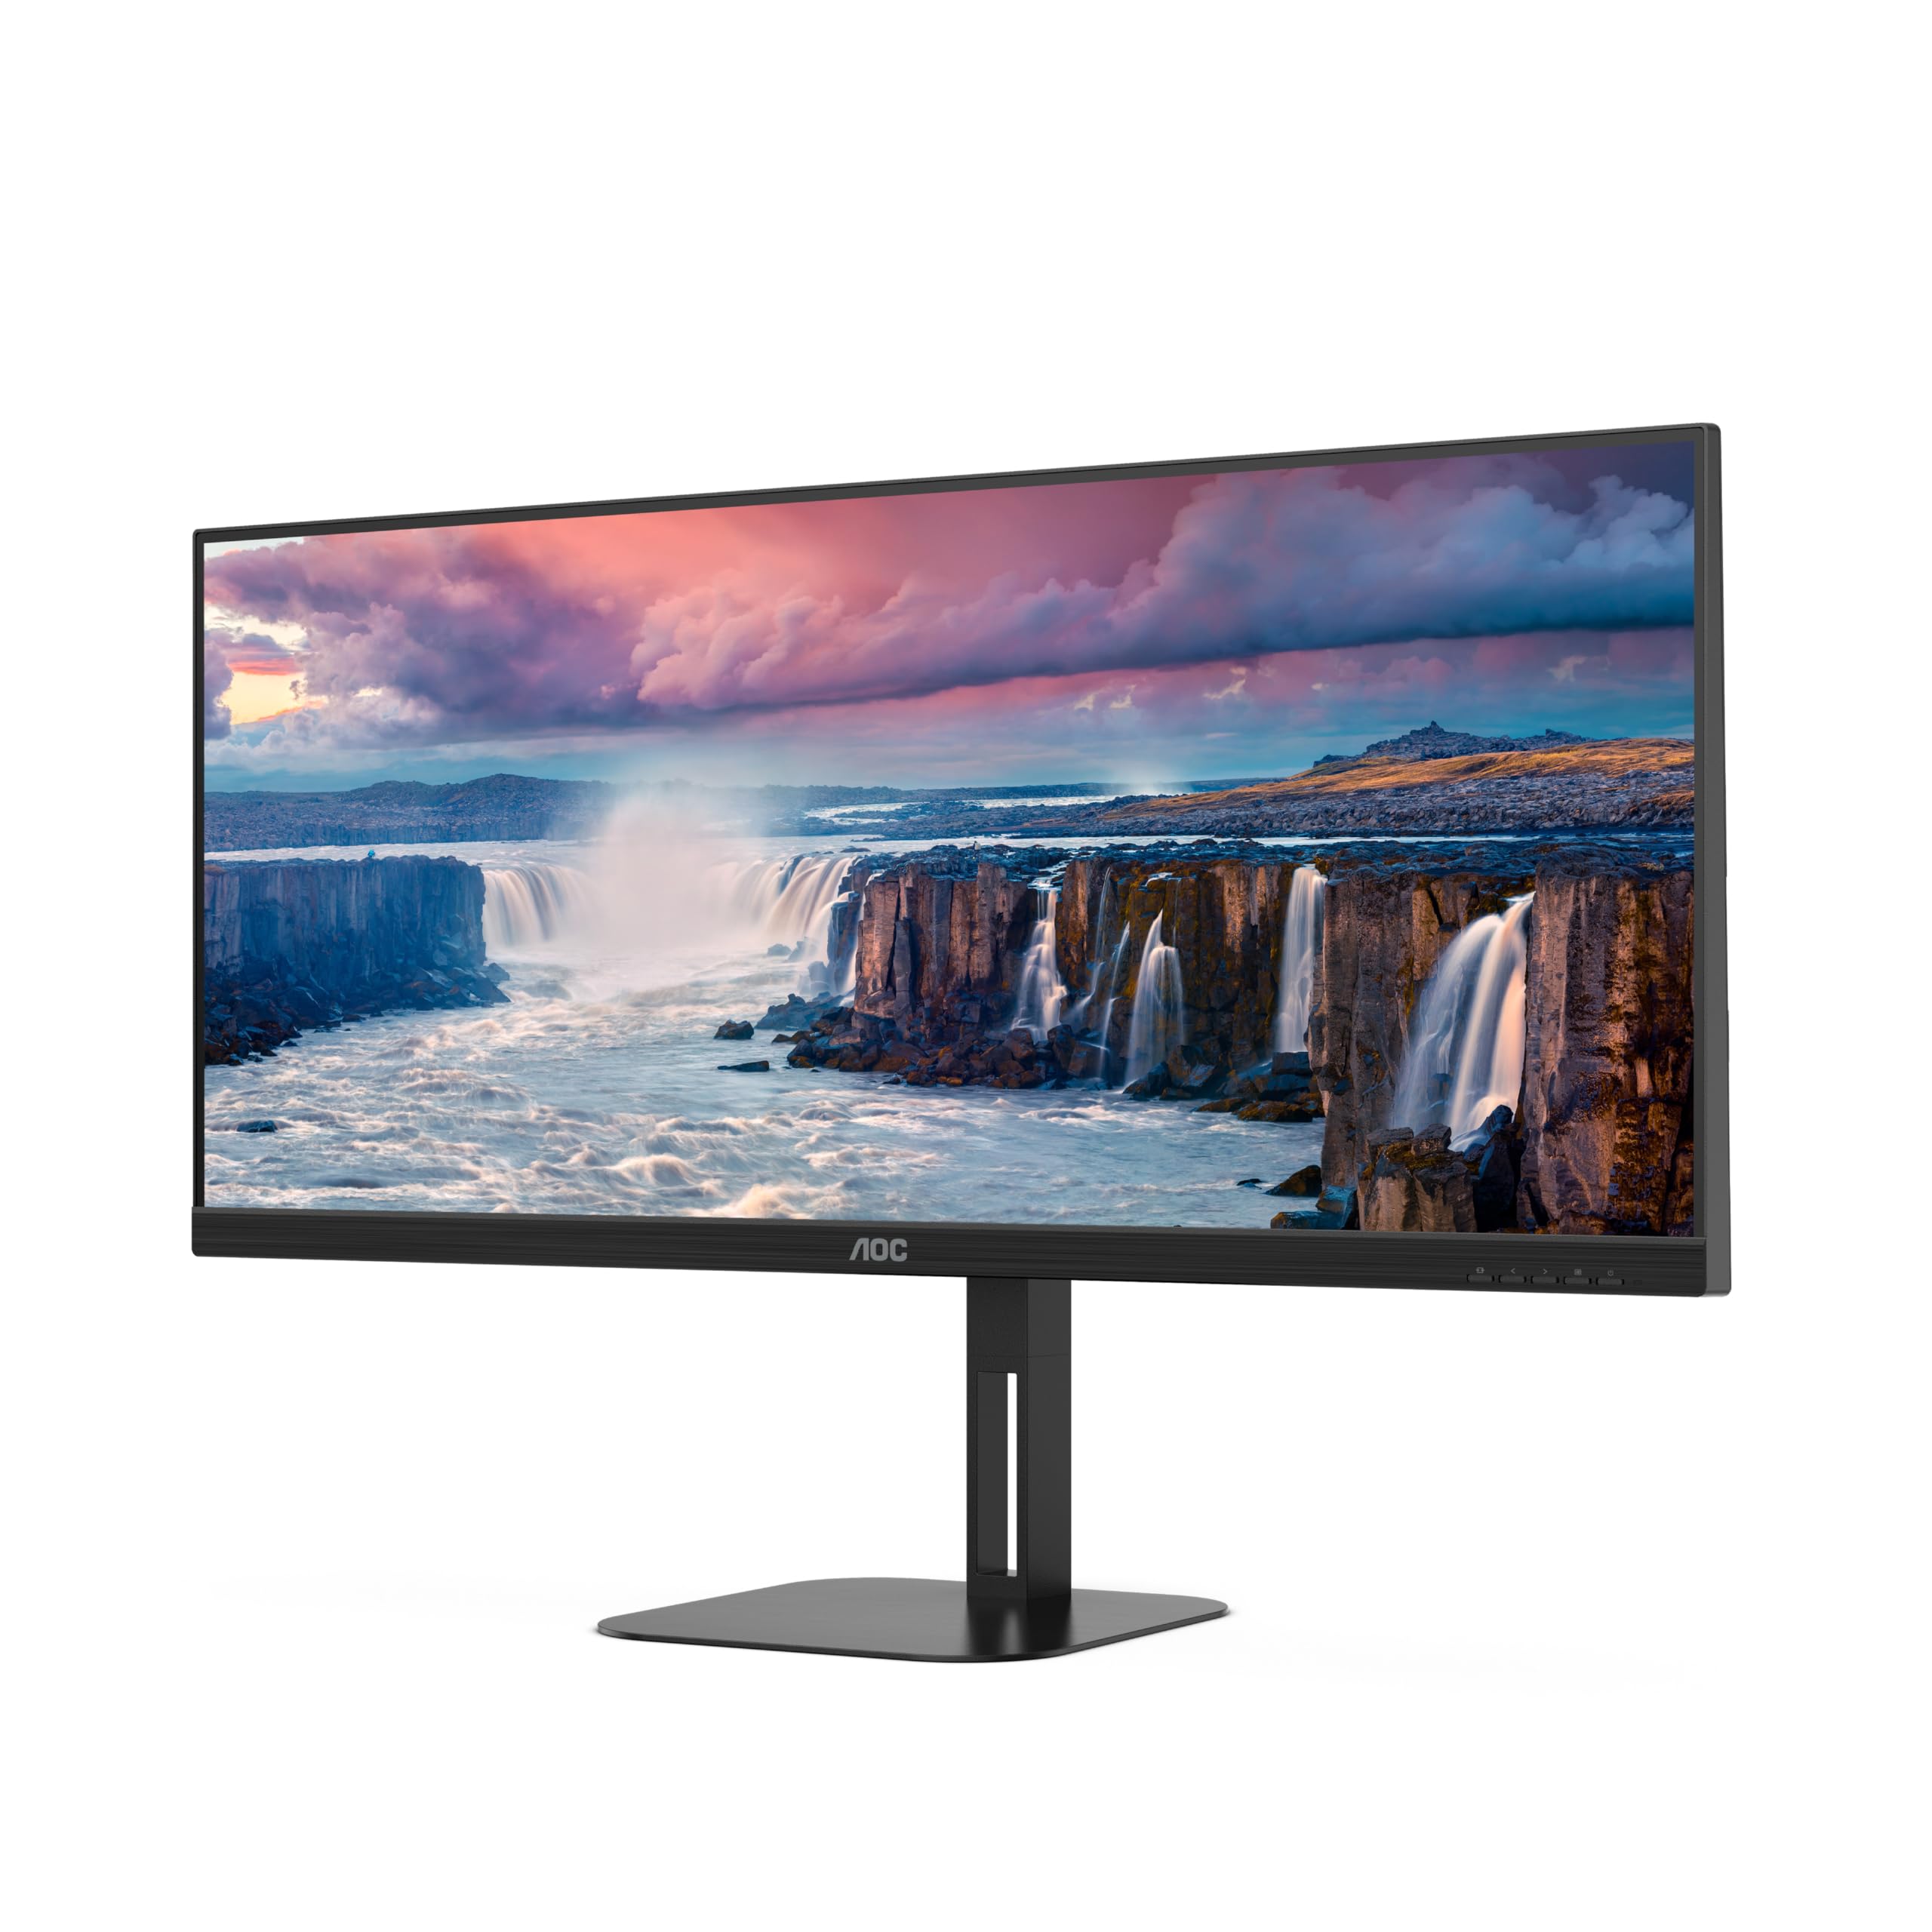
Abbildung 4.1: Vorderseite view of the AOC U34V5C/BK monitor highlighting its 34-inch VA panel, USB-C port with 65W Power Delivery, 100Hz refresh rate, and AMD FreeSync technology.
4.1 Monitorkomponenten
Familiarize yourself with the various parts of your monitor:
- Vorderseite: Display screen, OSD control buttons (usually located on the bottom right bezel).
- Rückwand: Power input, video input ports (HDMI, DisplayPort, USB-C), USB hub ports, security lock slot.
- Stand: Provides stable support and allows for height, tilt, and swivel adjustments.

Abbildung 4.2: Rückseite view of the AOC U34V5C/BK monitor, showing the VESA mount compatibility and the stand attachment point.

Abbildung 4.3: Unten view of the AOC U34V5C/BK monitor, detailing the power input, DisplayPort, HDMI, USB-C, and USB-A hub ports.
5. Einrichtung
5.1 Montage des Ständers
- Legen Sie den Monitor vorsichtig mit der Vorderseite nach unten auf ein weiches, sauberes Tuch, um Kratzer zu vermeiden.
- Befestigen Sie den Standfußhals an der Rückseite des Monitors, bis er einrastet oder (falls zutreffend) mit Schrauben gesichert ist.
- Befestigen Sie den Stativfuß am Stativhals und ziehen Sie die unverlierbare Schraube an der Unterseite des Fußes fest.
- Heben Sie den Monitor vorsichtig an und stellen Sie ihn auf einen stabilen Schreibtisch.
5.2 Anschließen des Monitors
Stellen Sie sicher, dass Computer und Monitor ausgeschaltet sind, bevor Sie irgendwelche Verbindungen herstellen.
- Stromanschluss: Schließen Sie das Netzkabel an den Stromeingang des Monitors und anschließend an eine geerdete Steckdose an.
- Videoverbindung: Wählen Sie eine der folgenden Optionen:
- HDMI: Connect one end of the HDMI cable to your computer's HDMI output and the other end to an HDMI input on the monitor.
- DisplayPort: Connect one end of the DisplayPort cable to your computer's DisplayPort output and the other end to the DisplayPort input on the monitor.
- USB-C: Connect one end of the USB-C cable to your computer's USB-C port (which supports video output) and the other end to the USB-C input on the monitor. This connection can also provide power delivery and USB data transfer.
- USB-Hub-Anschluss (optional): If using the monitor's USB hub, connect a USB upstream cable (USB-C to USB-A or USB-C to USB-C, depending on your computer) from your computer to the monitor's USB upstream port. This enables the monitor's USB-A ports for peripherals.
6. Bedienung des Monitors
6.1 Ein-/Ausschalten
Press the power button, usually located on the bottom right bezel, to turn the monitor on or off. The power indicator light will illuminate when the monitor is on.
6.2 Bildschirmmenü (OSD)
The OSD menu allows you to adjust various monitor settings. Use the control buttons (joystick or individual buttons) on the monitor's bezel to navigate the menu.
- Press the Menu button (or push the joystick) to open the OSD menu.
- Use the navigation buttons (or joystick) to move through the menu options.
- Press the Select button (or push the joystick) to enter a sub-menu or confirm a selection.
- Use the Exit button (or move the joystick left) to go back to the previous menu or exit the OSD.
6.3 Häufige OSD-Einstellungen
- Leuchtdichte: Adjust brightness, contrast, and gamma.
- Bildeinrichtung: Fine-tune image quality, sharpness, and pixel clock.
- Farbeinstellungen: Wählen Sie zwischen Farbtemperatur, sRGB-Modus oder benutzerdefinierten Farbeinstellungen.
- Picture Boost: Enhance specific areas of the screen.
- OSD-Setup: Adjust OSD language, position, and transparency.
- Spieleinstellung: Enable/disable FreeSync, adjust overdrive, and game modes.
- Extra: Select input source, reset settings, view Information.
7. Wartung
7.1 Reinigung des Monitors
- Ziehen Sie vor der Reinigung immer den Stecker aus der Steckdose.
- Benutzen Sie ein weiches, fusselfreies Tuch, dampMit Wasser oder einem milden, nicht scheuernden Bildschirmreiniger abspülen.
- Verwenden Sie keinen Alkohol, Ammoniak oder Scheuermittel, da diese den Bildschirm oder die Elektronik beschädigen können.asing.
- Wipe the screen gently. Do not apply excessive pressure.
7.2 Allgemeine Pflege
- Vermeiden Sie es, schwere Gegenstände auf den Monitor oder dessen Kabel zu stellen.
- Setzen Sie den Monitor keiner direkten Sonneneinstrahlung, Wärmequellen und extremen Temperaturen aus.
- Do not expose the monitor to strong vibrations or impacts.
8. Fehlerbehebung
Sollten Sie Probleme mit Ihrem Monitor haben, beachten Sie bitte die folgenden häufig auftretenden Probleme und Lösungen:
| Problem | Mögliche Ursache | Lösung |
|---|---|---|
| Kein Bild auf dem Bildschirm | Monitor not powered on; Incorrect input source; Loose video cable | Press power button; Select correct input via OSD; Reconnect video cable securely |
| Bild zu dunkel/hell | Helligkeits-/Kontrasteinstellungen falsch | Adjust Brightness and Contrast in OSD menu |
| Flackerndes Bild | Incorrect refresh rate; Faulty cable | Set refresh rate to 100Hz in display settings; Try a different video cable |
| USB-Anschlüsse funktionieren nicht | USB-Upstream-Kabel nicht angeschlossen | Connect the USB-C upstream cable from the monitor to your computer |
If the problem persists after trying these solutions, contact AOC customer support.
9. Spezifikationen
Below are the technical specifications for the AOC U34V5C/BK monitor:

Figure 9.1: Product Information Sheet for AOC U34V5C/BK, detailing energy efficiency and technical parameters.
| Parameter | Wert |
|---|---|
| Marke | AOC |
| Modell | U34V5C/BK |
| Bildschirmgröße | 34 Zoll (86.4 cm) |
| Auflösung | 3440 x 1440 WQHD |
| Seitenverhältnis | 21:9 |
| Ansprechzeit | 4 Millisekunden |
| Bildwiederholrate | 100 Hz (default 60 Hz) |
| Panel-Technologie | VA Panel, LED LCD |
| Viewing-Winkel | 178 Degrees (Horizontal/Vertical) |
| Hardware-Schnittstelle | DisplayPort, HDMI, USB-C |
| Anzahl USB-Anschlüsse | 4 (USB-Hub) |
| Stromversorgung (USB-C) | 65 W |
| Bandtage | 5 Volts (Internal Power Supply) |
| Technische Daten | 50 x 25 x 40 cm; 7 kg |
| Energieeffizienzklasse (SDR) | G |
| Stromverbrauch (SDR) | 34.0 Watt |
| Energieeffizienzklasse (HDR) | G |
| Stromverbrauch (HDR) | 35.0 Watt |
| Standby-Stromversorgung | 0.5 Watt |
| Minimum guaranteed software/firmware updates | 8 Jahre |
| Minimum guaranteed spare parts availability | 7 Jahre |
| Minimaler garantierter Produktsupport | 8 Jahre |
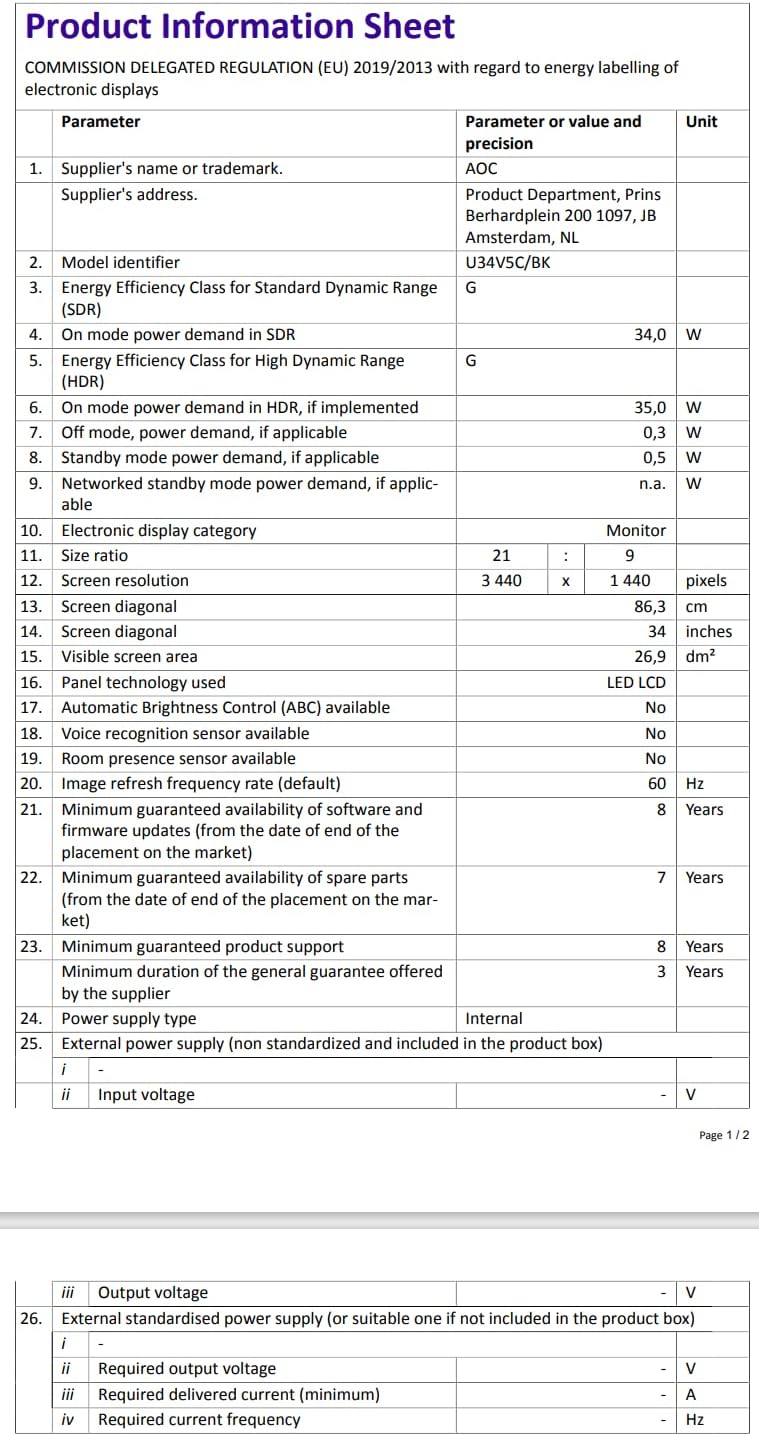
Figure 9.2: Energy Label for AOC U34V5C/BK. For more details, visit the EPREL-Datenbank.
10. Garantie und Support
The AOC U34V5C/BK monitor comes with a minimum guaranteed general warranty of 3 Jahre vom Lieferanten bereitgestellt.
For technical support, warranty claims, or service inquiries, please visit the official AOC website or contact your local AOC customer service center. Ensure you have your monitor's model number (U34V5C/BK) and serial number ready when contacting support.


