Einführung
This manual provides instructions for the RETROFLAG Handheld Controller, a one-piece joypad designed for use with Nintendo Switch LCD and Switch OLED models. This controller enhances your portable gaming experience with integrated controls, motion sensing, and vibration feedback.
Hauptmerkmale
- One-piece handheld joypad design, compatible with Nintendo Switch OLED and LCD models.
- PD Fast Charge capability for efficient power delivery.
- Advanced playing options with an added Turbo Button and Hotkey.
- Simple plug-and-play assembly, no screwdrivers required.
- Integrated 6-Axis Motion Control for precise movements.
- Functional Dual Motor Vibration for immersive gameplay.
- Hall sensor Joysticks designed for anti-drifting performance.

Image: The RETROFLAG Handheld Controller securely attached to a Nintendo Switch console, ready for gameplay.
Aufstellen
1. Attaching the Controller
- Ensure your Nintendo Switch console (LCD or OLED model) is powered off or in sleep mode.
- Align the console with the central slot of the RETROFLAG Handheld Controller.
- Gently slide the console into the controller until it is securely seated and the USB-C connector is fully engaged. The controller is designed for plug-and-play functionality.
2. Erstes Einschalten
Once the Switch console is securely attached, power on your Nintendo Switch. The controller should be automatically recognized and ready for use. No additional pairing steps are typically required.
3. Aufladen
The controller supports PD Fast Charge. To charge your Switch console while it is attached to the RETROFLAG controller, connect a USB-C PD compatible charger to the USB-C port located at the bottom of the controller.
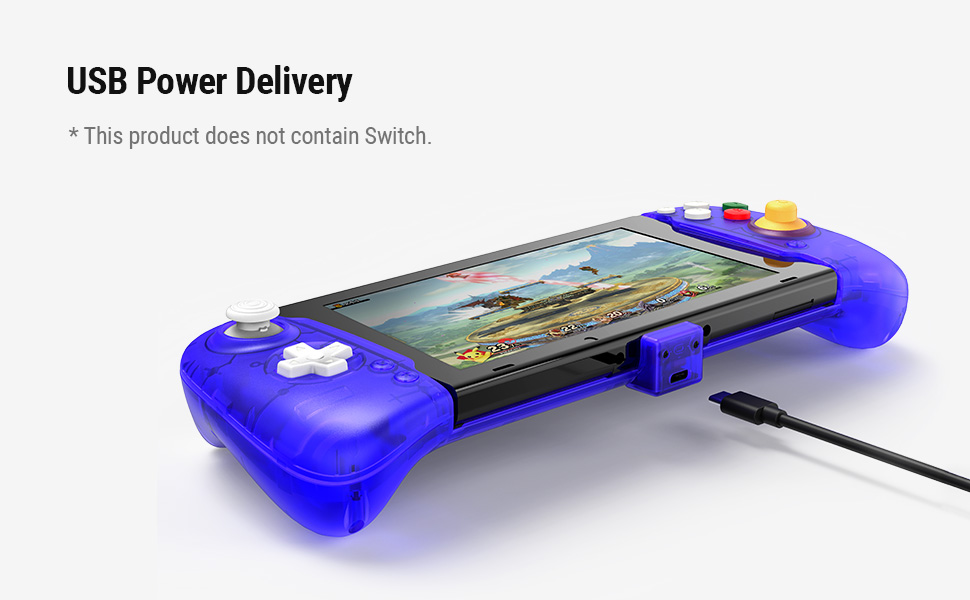
Image: The RETROFLAG controller with a Nintendo Switch console connected to a USB-C cable for PD fast charging.
Bedienungsanleitung
1. Grundlegende Steuerelemente
Familiarize yourself with the button layout:

Image: Detailed diagram illustrating the location and labels of all buttons and sticks on the RETROFLAG controller.
- Left Stick (L3) / D-pad: For movement and menu navigation.
- Right Stick (R3) / ABXY Buttons: For camera control, actions, and menu selections.
- L/R-, ZL/ZR-Tasten: Schulter- und Triggerknöpfe für verschiedene Aktionen im Spiel.
- Screenshot-Schaltfläche: Erstellt Screenshots im Spiel.
- Home "Button: Kehrt zum HOME-Menü der Nintendo Switch zurück.
2. Bewegungssteuerung
The controller features 6-axis motion control, allowing for precise in-game movements and aiming by tilting and rotating the controller. This functionality is automatically enabled for compatible games.
3. Vibrationsfunktion
Dual motor vibration provides tactile feedback during gameplay, enhancing immersion. This feature is automatically active in games that support vibration.

Image: Visual representation of the motion control and vibration features supported by the controller.
4. Turbo Button and Hotkey
The controller includes a dedicated Turbo button and Hotkey for advanced playing options. Refer to specific game instructions or controller settings within the Switch system for customization and usage of these features.
5. Hall-Effekt-Joysticks
The joysticks utilize Hall Effect sensing technology. This design means the components do not physically touch, which helps prevent joystick drift over time, ensuring long-term accuracy and responsiveness.

Image: An illustration of the internal components of a Hall Effect Sensing Joystick, highlighting its non-contact design.
Wartung
Reinigung
- Verwenden Sie ein weiches, trockenes Tuch, um die Oberfläche des Controllers zu reinigen.
- Bei hartnäckigen Verschmutzungen leicht dampBefeuchten Sie das Tuch mit Wasser. Vermeiden Sie die Verwendung von scharfen Chemikalien oder scheuernden Materialien.
- Stellen Sie sicher, dass keine Flüssigkeit in die Öffnungen des Controllers eindringt.
Lagerung
- Bewahren Sie den Controller an einem kühlen, trockenen Ort fern von direkter Sonneneinstrahlung und extremen Temperaturen auf.
- When not in use for extended periods, detach the Nintendo Switch console from the controller.
Fehlerbehebung
Controller reagiert nicht
- Ensure the Nintendo Switch console is fully and correctly inserted into the controller's USB-C port.
- Starten Sie Ihre Nintendo Switch-Konsole neu.
- Check for any system updates on your Nintendo Switch.
Probleme beim Aufladen
- Verify that the USB-C charging cable and power adapter are functioning correctly and are PD compatible.
- Stellen Sie sicher, dass das Ladekabel sowohl mit dem Controller als auch mit der Stromquelle fest verbunden ist.
Joystick-Drift
The controller features Hall Effect joysticks designed to minimize drift. If you experience any unusual joystick behavior, try the following:
- Calibrate the joysticks through the Nintendo Switch system settings (System Settings > Controllers and Sensors > Calibrate Control Sticks).
- Ensure the controller is clean and free of debris around the joysticks.
Technische Daten

Image: Diagram outlining the dimensions and key features of the RETROFLAG Handheld Controller.
| Kategorie | Detail |
|---|---|
| Modell | B0BKG8BLDS |
| Kompatibilität | Nintendo Switch, Nintendo Switch OLED model |
| Dimensions (Controller only) | 273 x 110 x 54 mm (ungefähr 10.75 x 4.33 x 2.13 Zoll) |
| Weight (Controller only) | 270 g (approximately 9.52 ounces) |
| Konnektivität | Direct USB-C connection to console |
| Laden | USB Power Delivery (PD) Fast Charge Compatible |
| Besondere Merkmale | Hall Sensor Joysticks, 6-Axis Motion Control, Dual Motor Vibration, Turbo Button, Hotkey |
Garantie und Support
For warranty information and technical support, please refer to the official RETROFLAG webBesuchen Sie die Website oder kontaktieren Sie den Verkäufer direkt. Bewahren Sie Ihren Kaufbeleg für eventuelle Garantieansprüche auf.


