1. Einleitung
Thank you for choosing the Gembird USB-C Gigabit Network Adapter with 3-Port USB 3.1 Hub. This device is designed to expand the connectivity of your USB-C enabled laptop, tablet, or computer, providing both high-speed Gigabit Ethernet and additional USB 3.1 ports. This manual provides essential information for setting up, operating, and maintaining your device.
2. Produktmerkmale
- USB-C-Konnektivität: Connects to your host device via a reversible USB-C port.
- Gigabit-Ethernet-Port: Provides a stable and fast wired network connection up to 1000 Mbps.
- 3-Port USB 3.1 Hub: Adds three USB 3.1 ports for connecting peripherals such as external hard drives, flash drives, keyboards, and mice.
- Hochgeschwindigkeitsdatenübertragung: USB 3.1 ports support data transfer rates up to 5 Gbps.
- Plug-and-Play: No driver installation required for most modern operating systems.
3. Packungsinhalt
Please ensure the following items are included in your package:
- Gembird USB-C Gigabit Network Adapter with 3-Port USB 3.1 Hub (Model A-CMU3-LAN-01)
4. Produktüberschreitungview
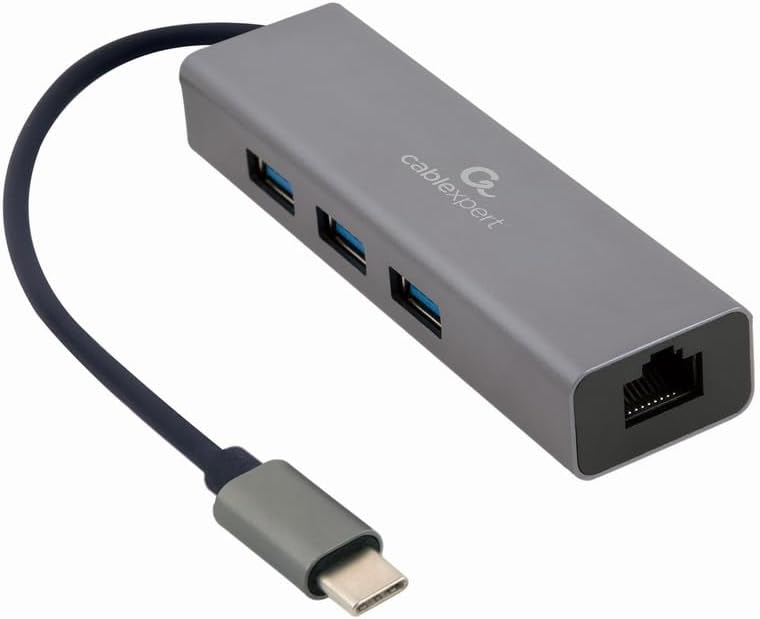
Abbildung 1: Front view of the Gembird USB-C Gigabit Network Adapter, showing the USB-C cable, three USB 3.1 ports, and the RJ45 Gigabit Ethernet port.

Abbildung 2: Retail packaging for the Gembird USB-C Gigabit Network Adapter, highlighting key features like USB Type-C, USB 3.1 x 3, RJ45, Gigabit, 1000 Mbps, and Plug & Play.
5. Einrichtung
Follow these steps to set up your Gembird USB-C Gigabit Network Adapter:
- Verbindung zum Hostgerät herstellen: Plug the USB-C connector of the adapter into an available USB-C port on your laptop, tablet, or computer.
- Mit Netzwerk verbinden: Insert an Ethernet cable (RJ45) from your router or modem into the Gigabit Ethernet port on the adapter.
- USB-Peripheriegeräte anschließen: Plug your USB devices (e.g., flash drives, external hard drives, mouse, keyboard) into the three available USB 3.1 ports on the adapter.
- Treiberinstallation: The adapter is typically plug-and-play. Your operating system (Windows, macOS, Linux, Chrome OS) should automatically detect and install the necessary drivers. If prompted, allow the system to install drivers.
6. Bedienungsanleitung
Nach dem Anschluss funktioniert der Adapter automatisch:
- Netzwerkzugriff: Your host device should now have a wired network connection. You can verify this in your operating system's network settings.
- USB Device Access: Connected USB peripherals will be recognized by your host device and function as if directly connected.
7. Fehlerbehebung
Sollten Sie auf Probleme stoßen, konsultieren Sie bitte die folgenden häufigen Probleme und Lösungen:
- Keine Netzwerkverbindung:
- Stellen Sie sicher, dass das Ethernet-Kabel sowohl mit dem Adapter als auch mit Ihrem Router/Modem fest verbunden ist.
- Check your router/modem for proper operation.
- Überprüfen Sie die Netzwerkeinstellungen auf Ihrem Hostgerät.
- Versuchen Sie, den Adapter an einen anderen USB-C-Anschluss Ihres Host-Geräts anzuschließen.
- USB-Geräte werden nicht erkannt:
- Ensure USB devices are properly plugged into the adapter's USB 3.1 ports.
- Try connecting the USB device directly to your host computer to confirm it is functional.
- Some high-power USB devices may require an external power source if your host device's USB-C port does not provide sufficient power (this adapter does not have a dedicated power input).
- Langsame Netzwerkgeschwindigkeit:
- Ensure your Ethernet cable is rated for Gigabit speeds (Cat5e or higher).
- Verify your internet service provider's speed and your router's capabilities.
- Ensure your host device's USB-C port supports USB 3.0/3.1 speeds.
8. Spezifikationen
| Modellnummer | A-CMU3-LAN-01 |
| Hardware-Schnittstelle | USB-C (Host), USB 3.1 (Hub), RJ45 (Ethernet) |
| Anzahl USB-Anschlüsse | 3 (USB-3.1) |
| Ethernet-Anschlüsse | 1 (Gigabit RJ45) |
| Data Transfer Rate (USB) | Bis zu 5 Gbit/s (USB 3.1) |
| Data Transfer Rate (Ethernet) | 10/100/1000 Mbit/s |
| Technische Daten | 10 x 2 x 2.7 Zoll |
| Artikelgewicht | 2.46 Unzen |
9. Wartung
Um die Langlebigkeit und optimale Leistung Ihres Adapters zu gewährleisten:
- Reinigung: Reinigen Sie die Außenseite des Geräts mit einem weichen, trockenen Tuch. Vermeiden Sie flüssige Reiniger oder Lösungsmittel.
- Lagerung: Bewahren Sie den Adapter bei Nichtgebrauch an einem kühlen, trockenen Ort fern von direkter Sonneneinstrahlung und extremen Temperaturen auf.
- Handhabung: Avoid dropping or subjecting the device to strong impacts. Do not attempt to disassemble the adapter.
10. Garantie und Support
This Gembird product comes with a Zwei Jahre Garantie gegen HerstellungsfehlerBitte bewahren Sie Ihren Kaufbeleg für Garantieansprüche auf.
For technical support or warranty inquiries, please contact your retailer or visit the official Gembird webWebsite für Kontaktinformationen.


