Einführung
Vielen Dank für Ihren Einkauf.asing the Nedis Alarm Clock with Wireless Charger. This device combines a digital alarm clock with a Qi-certified wireless charging pad, a USB-A charging port, a dimmable display, dual alarm settings, and a color-changing night light. This manual provides essential information for safe and efficient use of your new device.
Sicherheitshinweise
- Lesen Sie vor der Verwendung alle Anweisungen sorgfältig durch.
- Halten Sie das Gerät von Wasser, Feuchtigkeit und extremen Temperaturen fern.
- Versuchen Sie nicht, das Gerät selbst zu zerlegen oder zu reparieren. Überlassen Sie alle Wartungsarbeiten qualifiziertem Fachpersonal.
- Ensure the power adapter used is compatible with the device's power requirements. For fast charging, a QC3.0 power adapter (not included) is recommended.
- Avoid placing metal objects on the wireless charging pad, as this may interfere with charging or cause overheating.
Packungsinhalt
- Nedis Alarm Clock with Wireless Charger (Model WCACQ30WT)
- Power Adapter (if included, otherwise sold separately)
- Bedienungsanleitung
Produkt überview
Machen Sie sich mit den verschiedenen Komponenten Ihres Weckers vertraut:

Bild 1: Vorderseite View. This image displays the front of the alarm clock, featuring the large digital time display and the touch-sensitive control buttons located above it. The buttons include controls for display brightness, time setting, and alarm adjustments.
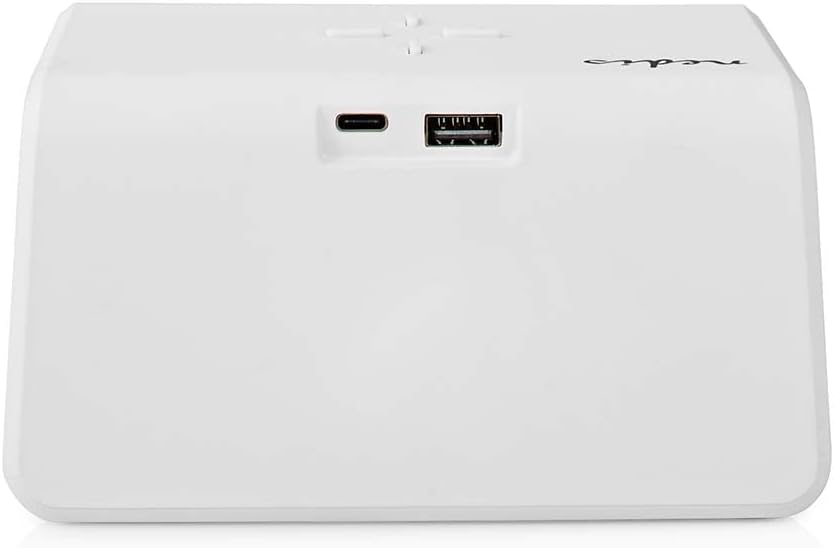
Bild 2: Hinten View. The back of the alarm clock is shown, highlighting the USB-C port for power input and a standard USB-A port for charging external devices.
- Digitaler Bildschirm: Shows time, alarm status, and other indicators.
- Bedientasten: (Located on top)
- Light Button: Controls night light.
- Time/Alarm Set Button: For setting time and alarms.
- +/- Buttons: Adjust values.
- Kabelloses Ladepad: (Top surface) For Qi-compatible devices.
- USB-C-Eingang: (Rear) For connecting the power adapter.
- USB-A Ausgang: (Rear) For charging other devices via cable.
- Night Light Panel: (Side/Rear) Emits ambient light.
Aufstellen
- Strom anschließen: Plug the provided power adapter into the USB-C input port on the back of the alarm clock. Connect the other end to a wall outlet. The display will light up.
- Erste Zeiteinstellung: The clock may display a default time. Proceed to the 'Operating Instructions' section to set the correct time.
Bedienungsanleitung
1. Uhrzeit einstellen
- Halten Sie die Time/Alarm Set button (usually marked with a clock icon) until the hour digits start flashing.
- Verwenden Sie die + or - Tasten zum Einstellen der Stunde.
- Drücken Sie die Time/Alarm Set button again to switch to minute adjustment. The minute digits will flash.
- Verwenden Sie die + or - Tasten zum Einstellen der Minuten.
- Drücken Sie die Time/Alarm Set Drücken Sie erneut die Taste, um die Zeiteinstellung zu bestätigen und den Modus zu verlassen.
2. Alarme einstellen (Alarm 1 und Alarm 2)
This device supports two independent alarm times.
- Drücken Sie die Time/Alarm Set button once to enter Alarm 1 setting mode. The alarm icon and hour digits for Alarm 1 will flash.
- Verwenden Sie die + or - buttons to adjust the hour for Alarm 1.
- Drücken Sie die Time/Alarm Set button again to switch to minute adjustment for Alarm 1.
- Verwenden Sie die + or - buttons to adjust the minutes for Alarm 1.
- Drücken Sie die Time/Alarm Set button again to confirm Alarm 1 and move to Alarm 2 setting mode (if applicable). Repeat steps 2-4 for Alarm 2.
- After setting Alarm 2, press the Time/Alarm Set Taste zum Bestätigen und Verlassen des Alarmeinstellungsmodus.
- Zum Aktivieren/Deaktivieren eines Alarms kurz die Taste drücken Time/Alarm Set button until the desired alarm icon (e.g., 'AL1' or 'AL2') appears or disappears on the display.
3. Schlummerfunktion
When an alarm sounds, press any button (except the alarm off button, if present) to activate the snooze function. The alarm will temporarily stop and sound again after a few minutes (typically 5-10 minutes, refer to specific model details if available). To turn off the alarm completely, press the designated alarm off button or follow the instructions for deactivating the alarm.
4. Kabelloses Laden (Qi)
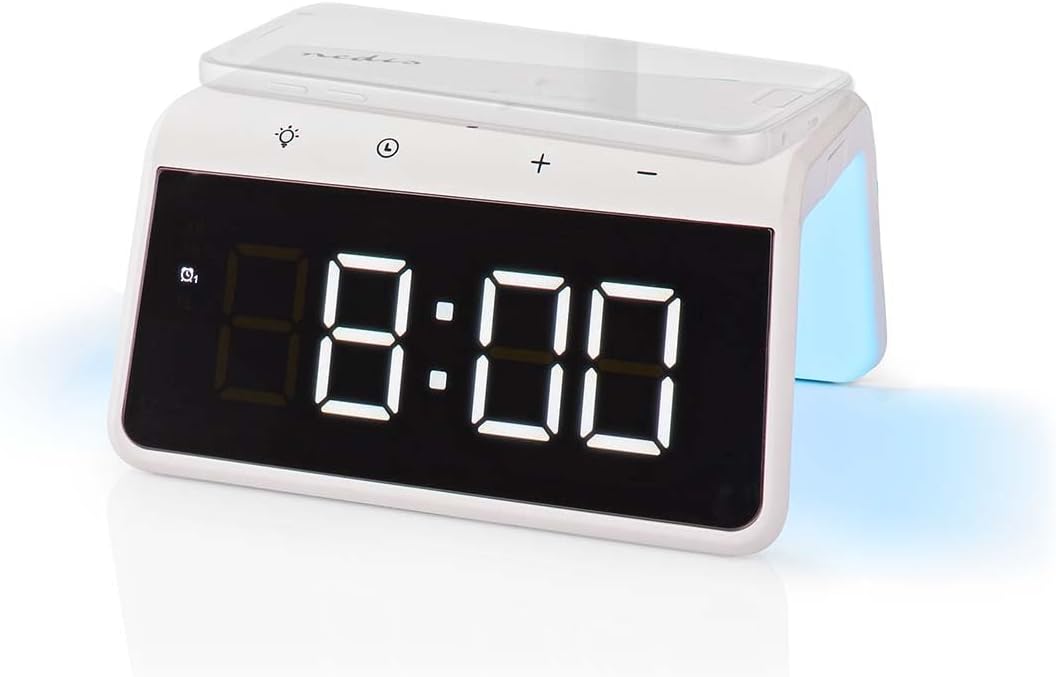
Image 3: Wireless Charging. A smartphone is shown resting on the top surface of the alarm clock, which functions as a Qi wireless charging pad.
- Place your Qi-compatible smartphone or device directly onto the wireless charging pad located on the top surface of the alarm clock.
- Für eine optimale Leistung muss das Gerät mittig auf dem Ladepad platziert werden.
- A charging indicator (e.g., an icon on the display or an LED light) will typically illuminate to confirm that charging has begun.
- The charger supports 5W, 7.5W, 10W, and 15W output, automatically adjusting to your device's requirements. For 15W fast charging, a QC3.0 power adapter (not included) is required.
5. USB-A Charging Output
The alarm clock features an additional USB-A port for charging devices that are not Qi-compatible or for simultaneous charging.
- Connect your device's USB charging cable to the USB-A output port on the back of the alarm clock.
- Verbinden Sie das andere Ende des Kabels mit Ihrem Gerät.
- Der Ladevorgang beginnt automatisch.
6. Nachtlichtfunktion

Image 4: Night Light. This image shows the side of the alarm clock with its integrated night light emitting a soft glow.
- Drücken Sie die Licht button (usually marked with a light bulb icon) to turn the night light on or off.
- Drücken Sie wiederholt die Licht button to cycle through different color modes or to set a specific color. The night light can display a diverse changing color palette.
- The night light can be set to remain on or to be manually activated as needed.
7. Anpassung der Anzeigehelligkeit
The digital display features dimmable backlighting for comfortable viewbei unterschiedlichen Lichtverhältnissen.
- Look for a dedicated brightness button or a combination of buttons (e.g., a short press of the Light button or +/- buttons when not in setting mode) to adjust the display brightness.
- Cycle through available brightness levels (e.g., high, medium, low, off).
Wartung
- Reinigung: Wischen Sie das Gerät mit einem weichen, trockenen oder leichtamp Tuch. Keine Scheuer- oder Lösungsmittel verwenden.
- Lagerung: Wenn Sie das Gerät längere Zeit nicht verwenden, ziehen Sie den Stecker und bewahren Sie es an einem kühlen, trockenen Ort auf.
Fehlerbehebung
- Gerät lässt sich nicht einschalten: Ensure the power adapter is securely connected to both the alarm clock and a working power outlet.
- Kabelloses Laden funktioniert nicht:
- Verify your device is Qi-compatible.
- Stellen Sie sicher, dass Ihr Gerät mittig auf dem Ladepad platziert ist.
- Remove any thick phone cases or metal objects between the phone and the charging pad.
- USB-A charging not working: Check the USB cable for damage and ensure it is properly connected to both the alarm clock and your device.
- Kein Alarm: Ensure the alarm is activated (check for the alarm icon on the display) and the volume is not set to zero (if adjustable).
- Bildschirm zu dunkel/hell: Adjust the display brightness using the dedicated controls.
Technische Daten
| Besonderheit | Spezifikation |
|---|---|
| Modellnummer | WCACQ30WT |
| Marke | NEDIS |
| Technische Daten | 14 x 3.81 x 7 cm |
| Artikelgewicht | 242 Gramm |
| Drahtloser Ladeausgang | 5W / 7.5W / 10W / 15W (Qi Certified) |
| USB-A-Ausgang | Ja |
| Anzeigetyp | Digitales |
| Besondere Merkmale | Alarm, Charging Port, Dimmable Display, Night Light (Color Changing) |
| Stromquelle | Kabelgebundene Elektrik |
| Farbe | Weiß |
Garantie und Support
Nedis products are manufactured to high quality standards. In the unlikely event of a defect during the warranty period, please contact your retailer for support. The warranty period is subject to the terms and conditions of the retailer and local consumer laws.
For further assistance or technical support, please refer to the official Nedis webBesuchen Sie die Website oder kontaktieren Sie direkt den Kundenservice. Bewahren Sie Ihren Kaufbeleg als Kaufnachweis auf.


