1. Einleitung
Thank you for choosing the Dimplex 36 Inch Slim Built-in Linear Electric Fireplace Heater. This manual provides essential information for the safe installation, operation, and maintenance of your new electric fireplace. Please read all instructions carefully before installation and use, and retain this manual for future reference.
This electric fireplace is designed to provide supplemental heat and aesthetic flame effects for indoor residential use. Its slim design allows for versatile installation options, including built-in or wall-mounted configurations.
2. Wichtige Sicherheitshinweise
WARNUNG: Um das Risiko von Bränden, Stromschlägen oder Verletzungen zu verringern, beachten Sie bitte Folgendes:
- Lesen Sie alle Anweisungen, bevor Sie diese Heizung verwenden.
- Dieses Heizgerät wird im Betrieb heiß. Um Verbrennungen zu vermeiden, berühren Sie keine heißen Oberflächen mit bloßer Haut. Halten Sie brennbare Materialien wie Möbel, Kissen, Bettwäsche, Papier, Kleidung und Vorhänge mindestens 0.9 m von der Vorderseite des Heizgeräts entfernt und achten Sie darauf, dass diese nicht zu den Seiten oder nach hinten gelangen.
- Bei der Verwendung eines Heizgeräts durch oder in der Nähe von Kindern oder behinderten Personen sowie immer dann, wenn das Heizgerät in Betrieb und unbeaufsichtigt bleibt, ist äußerste Vorsicht geboten.
- Do not operate any heater with a damaged cord or plug or after the heater malfunctions, has been dropped, or damaged in any manner. Discard heater or return to authorized service facility for examination and/or repair.
- Nicht im Freien verwenden.
- Stellen Sie das Heizgerät niemals an einer Stelle auf, an der es in eine Badewanne oder einen anderen Wasserbehälter fallen könnte.
- Verlegen Sie das Kabel nicht unter Teppichen. Decken Sie das Kabel nicht mit Läufern oder ähnlichen Materialien ab. Verlegen Sie das Kabel nicht in Bereichen, in denen viel los ist und wo niemand darüber stolpern kann.
- Um die Heizung abzuschalten, schalten Sie die Steuerung aus und ziehen Sie dann den Stecker aus der Steckdose.
- Führen Sie keine Fremdkörper in die Belüftungs- oder Abluftöffnungen ein und lassen Sie nicht zu, dass diese in diese eindringen. Dies kann zu einem Stromschlag oder Brand führen oder das Heizgerät beschädigen.
- Um einen möglichen Brand zu verhindern, blockieren Sie Lufteinlässe oder -auslässe in keiner Weise. Verwenden Sie das Gerät nicht auf weichen Oberflächen wie einem Bett, wo Öffnungen blockiert werden könnten.
- Ein Heizgerät hat heiße Teile, die Lichtbögen oder Funken bilden. Verwenden Sie es nicht in Bereichen, in denen Benzin, Farbe oder entzündliche Dämpfe oder Flüssigkeiten verwendet oder gelagert werden.
- Verwenden Sie das Heizgerät ausschließlich wie in dieser Anleitung beschrieben. Jede andere, vom Hersteller nicht empfohlene Verwendung kann zu Feuer, Stromschlag oder Verletzungen führen.
- Schließen Sie Heizgeräte immer direkt an eine Wandsteckdose an. Verwenden Sie sie niemals mit einem Verlängerungskabel oder einem verschiebbaren Stromanschluss (Steckdose/Steckerleiste).
3. Packungsinhalt
Vergewissern Sie sich vor Beginn der Installation, dass alle Komponenten vorhanden sind:
- Dimplex 36 Inch Slim Electric Fireplace Unit
- Fernbedienung
- Acrylic Crystals (Ember Bed Media)
- Mounting Bracket (for wall-mount installation)
- Benutzerhandbuch (dieses Dokument)
4. Installation
The Dimplex Slim Electric Fireplace offers flexible installation options: built-in (recessed) or wall-mounted. Its shallow 4-inch depth allows for flush installation into standard 2x4 framing.
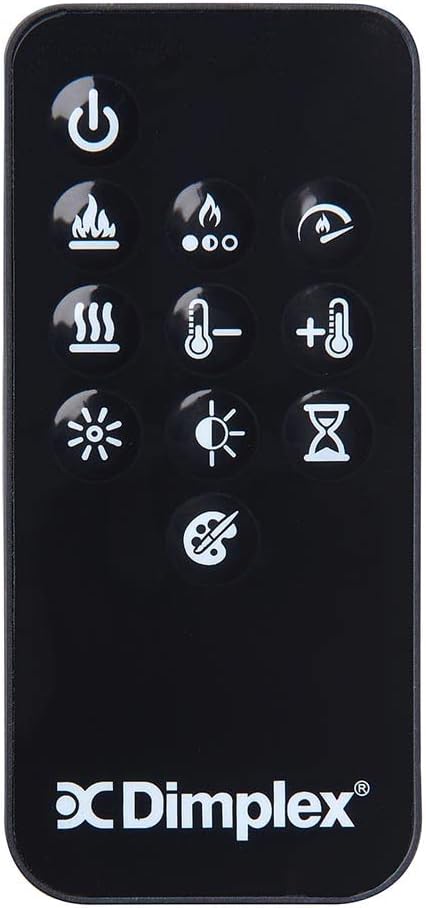
Bild: An infographic demonstrating the versatility of the fireplace's installation, showing how it can be fully recessed into a wall, partially recessed, or surface wall-mounted.
4.1 Standortwahl
- Ensure the chosen location is away from water sources and direct sunlight.
- Maintain proper clearances from combustible materials as specified in the safety information.
- Ensure a grounded 120V AC, 15 Amp dedicated circuit is available.
4.2 Built-in (Recessed) Installation
This fireplace is designed to fit flush into new or existing 2x4 framing.
- Construct a framed opening in the wall according to the product dimensions (refer to Section 7. Specifications and the dimensional diagram).
- Ensure the opening provides adequate support for the fireplace unit.
- Carefully slide the fireplace unit into the framed opening.
- Secure the unit to the framing using appropriate screws through the designated mounting holes.
- Schließen Sie das Netzkabel an eine geerdete Steckdose an.

Bild: A technical diagram illustrating the precise dimensions of the Dimplex 36-inch electric fireplace, including its shallow depth of 3.75 inches (9.8 cm), width of 37.25 inches (94.6 cm), and height of 19.625 inches (49.8 cm).

Bild: Eine Seite view of the fireplace unit, emphasizing its shallow design which allows for flush installation into standard 2x4 framing.
4.3 Wandmontage
For surface wall-mounting, use the included mounting bracket.
- Suchen Sie die Wandpfosten für eine sichere Montage.
- Attach the mounting bracket to the wall using appropriate hardware, ensuring it is level and securely fastened to at least two studs.
- Carefully lift the fireplace unit and hang it onto the mounting bracket.
- Ensure the unit is securely seated on the bracket.
- Schließen Sie das Netzkabel an eine geerdete Steckdose an.

Bild: The electric fireplace is shown integrated seamlessly into a wall, demonstrating its flush-mount installation in a contemporary room setting.
5. Bedienung
Your Dimplex electric fireplace can be operated using the integrated control panel on the unit or the included remote control.

Bild: This image shows the Dimplex 36-inch electric fireplace in operation, featuring its dynamic multi-color flame effects and the illuminated acrylic crystal ember bed.
5.1 Systemsteuerung
The control panel is located on the top right of the fireplace unit. It features a digital display and touch-sensitive buttons for various functions.

Bild: Eine detaillierte view of the fireplace's on-unit control panel, showing the digital temperature display and touch-sensitive buttons for manual operation.
5.2-Fernbedienung
The included remote control provides convenient access to all fireplace functions from a distance.

Bild: The included remote control unit, featuring clearly labeled buttons for adjusting power, flame color and speed, heater settings, and the built-in timer.
5.3 Grundfunktionen
- Ein-/Ausschalten: Drücken Sie die Ein/Aus-Taste, um das Gerät ein- oder auszuschalten.
- Flammeneffekte: Use the flame button to cycle through various flame colors (Yellow, Orange, Blue, Mixed) and adjust flame speed. The Multi-Fire SL Technology creates a multi-layered flame appearance.
- Glutbett: Adjust the color of the acrylic crystal ember bed to complement the flame effects.
- Heizfunktion: Activate the supplemental heater. Use the temperature up/down buttons to set your desired room temperature. The heater provides warmth for up to 400 sq ft.
- Lüftergeschwindigkeit: Adjust the fan speed for the heater.
- Timer: Set the built-in timer for automatic shut-off, up to 8 hours.
6. Wartung
Regelmäßige Wartung gewährleistet optimale Leistung und Langlebigkeit Ihres Elektrokamins.
- Reinigung: Vor der Reinigung die Stromzufuhr unterbrechen. Verwenden Sie ein weiches, fusselfreies Tuch.amp Reinigen Sie die Außenflächen mit einem Tuch. Verwenden Sie keine Scheuermittel oder Sprays.
- Glasscheibe: Reinigen Sie die Glasscheibe mit einem weichen Tuch und einem nicht scheuernden Glasreiniger.
- Belüftungsöffnungen: Überprüfen und reinigen Sie regelmäßig die Lufteinlass- und -auslassöffnungen, um sicherzustellen, dass sie frei von Staub und Schmutz sind. Verwenden Sie dazu einen Staubsauger mit Bürstenaufsatz.
- Lagerung: If storing the fireplace for an extended period, ensure it is clean, dry, and stored in a safe, dry location.
7. Fehlerbehebung
If you experience issues with your fireplace, refer to the following common problems and solutions:
| Problem | Mögliche Ursache | Lösung |
|---|---|---|
| Der Kamin lässt sich nicht einschalten. | Kein Strom, Sicherungsautomat ausgelöst, lose Verbindung. | Überprüfen Sie den Anschluss des Netzkabels, stellen Sie sicher, dass die Steckdose funktionsfähig ist, und setzen Sie den Sicherungsautomaten zurück. |
| Kein Flammeneffekt. | Flame function is off, LED issue. | Ensure flame function is activated via control panel or remote. If problem persists, contact customer support. |
| Heizung erzeugt keine Wärme. | Heater function off, thermostat setting too low, air vents blocked. | Activate heater, increase thermostat setting, ensure air vents are clear. |
| Fernbedienung funktioniert nicht. | Leere Batterien, Hindernis, Fernbedienung außer Reichweite. | Replace batteries, remove obstructions, operate remote within range. |
| Ungewöhnliche Geräusche während des Betriebs. | Lüfterverstopfung, lose Bauteile. | Turn off and unplug the unit. Check for any obstructions in the fan area. If noise persists, contact customer support. |
8. Spezifikationen
| Besonderheit | Detail |
|---|---|
| Marke | DIMPLEX |
| Modellname | PLF3614-XS |
| Stromquelle | Elektrisch |
| Produktabmessungen (T x B x H) | 3.75"T x 36"B x 19.5"H (9.5 cm T x 91.4 cm B x 49.5 cm H) |
| Material | Metall |
| Ausführung | Schwarz |
| Installationstyp | Built-in, Wall Mount |
| Wärmeabgabe | 40000 British Thermal Units (BTU) |
| Heizungsabdeckung | Bis zu 400 m² |
| Besondere Merkmale | LED Multi-Color Flames, Slim Thin Design, Built-in Timer, Corded |
| Im Lieferumfang enthaltene Komponenten | Acrylic Crystals, Mounting Bracket, Remote Control |
| Artikelgewicht | 57.7 Pfund (26.17 kg) |
| UPC | 781052137318 |
9. Garantieinformationen
This Dimplex electric fireplace comes with a Eingeschränkte Garantie. Please refer to the warranty card included with your product for specific terms, conditions, and duration of coverage. The warranty typically covers manufacturing defects and material flaws under normal use and service.
Bewahren Sie Ihren Kaufbeleg (Quittung) für Garantieansprüche auf.
10. Kundendienst
For technical assistance, warranty claims, or to order replacement parts, please contact Dimplex Customer Support. Refer to the contact information provided on the product packaging or the official Dimplex webWebsite.
When contacting support, please have your model number (PLF3614-XS) and serial number (if applicable) ready.


