1. Wichtige Sicherheitshinweise
Beim Gebrauch von Elektrogeräten sollten zur Verringerung der Gefahr von Bränden, Stromschlägen und Verletzungen immer grundlegende Sicherheitsvorkehrungen getroffen werden. Dazu gehören die folgenden:
- Lesen Sie alle Anweisungen, bevor Sie das Gerät in Betrieb nehmen.
- Berühren Sie keine heißen Oberflächen. Benutzen Sie Griffe oder Knöpfe.
- Um einen Stromschlag zu vermeiden, tauchen Sie das Kabel, den Stecker oder das Gerät nicht in Wasser oder andere Flüssigkeiten.
- Bei der Benutzung von Geräten durch oder in der Nähe von Kindern ist eine genaue Aufsicht erforderlich.
- Bei Nichtgebrauch und vor der Reinigung den Stecker aus der Steckdose ziehen. Vor dem Anbringen oder Abnehmen von Teilen abkühlen lassen.
- Betreiben Sie kein Gerät mit beschädigtem Kabel oder Stecker oder nachdem das Gerät eine Fehlfunktion aufweist oder auf sonstige Weise beschädigt wurde. Wenden Sie sich zur Überprüfung, Reparatur oder Justierung an den Kundendienst.
- Die Verwendung von Zubehör, das vom Gerätehersteller nicht empfohlen wird, kann zu Verletzungen führen.
- Nicht im Freien verwenden.
- Lassen Sie das Kabel nicht über die Tisch- oder Thekenkante hängen oder heiße Oberflächen berühren.
- Nicht auf oder in die Nähe eines heißen Gas- oder Elektrobrenners oder in einen beheizten Ofen stellen.
- Beim Bewegen eines Geräts, das heißes Öl oder andere heiße Flüssigkeiten enthält, ist äußerste Vorsicht geboten.
- Stecken Sie den Stecker immer zuerst in das Gerät und dann das Netzkabel in die Steckdose. Zum Trennen vom Stromnetz schalten Sie alle Bedienelemente auf „Aus“ und ziehen Sie dann den Stecker aus der Steckdose.
- Das Gerät darf nur für den vorgesehenen Zweck verwendet werden.
- Sorgen Sie während des Betriebs für ausreichende Belüftung rund um das Gerät.
2. Produktüberschreitungview
The STARLYF Air Oven is a versatile kitchen appliance designed for oil-free frying, roasting, and baking. It utilizes advanced Air Cycling Technology to circulate hot air rapidly, ensuring even cooking and crispy results with significantly less oil.
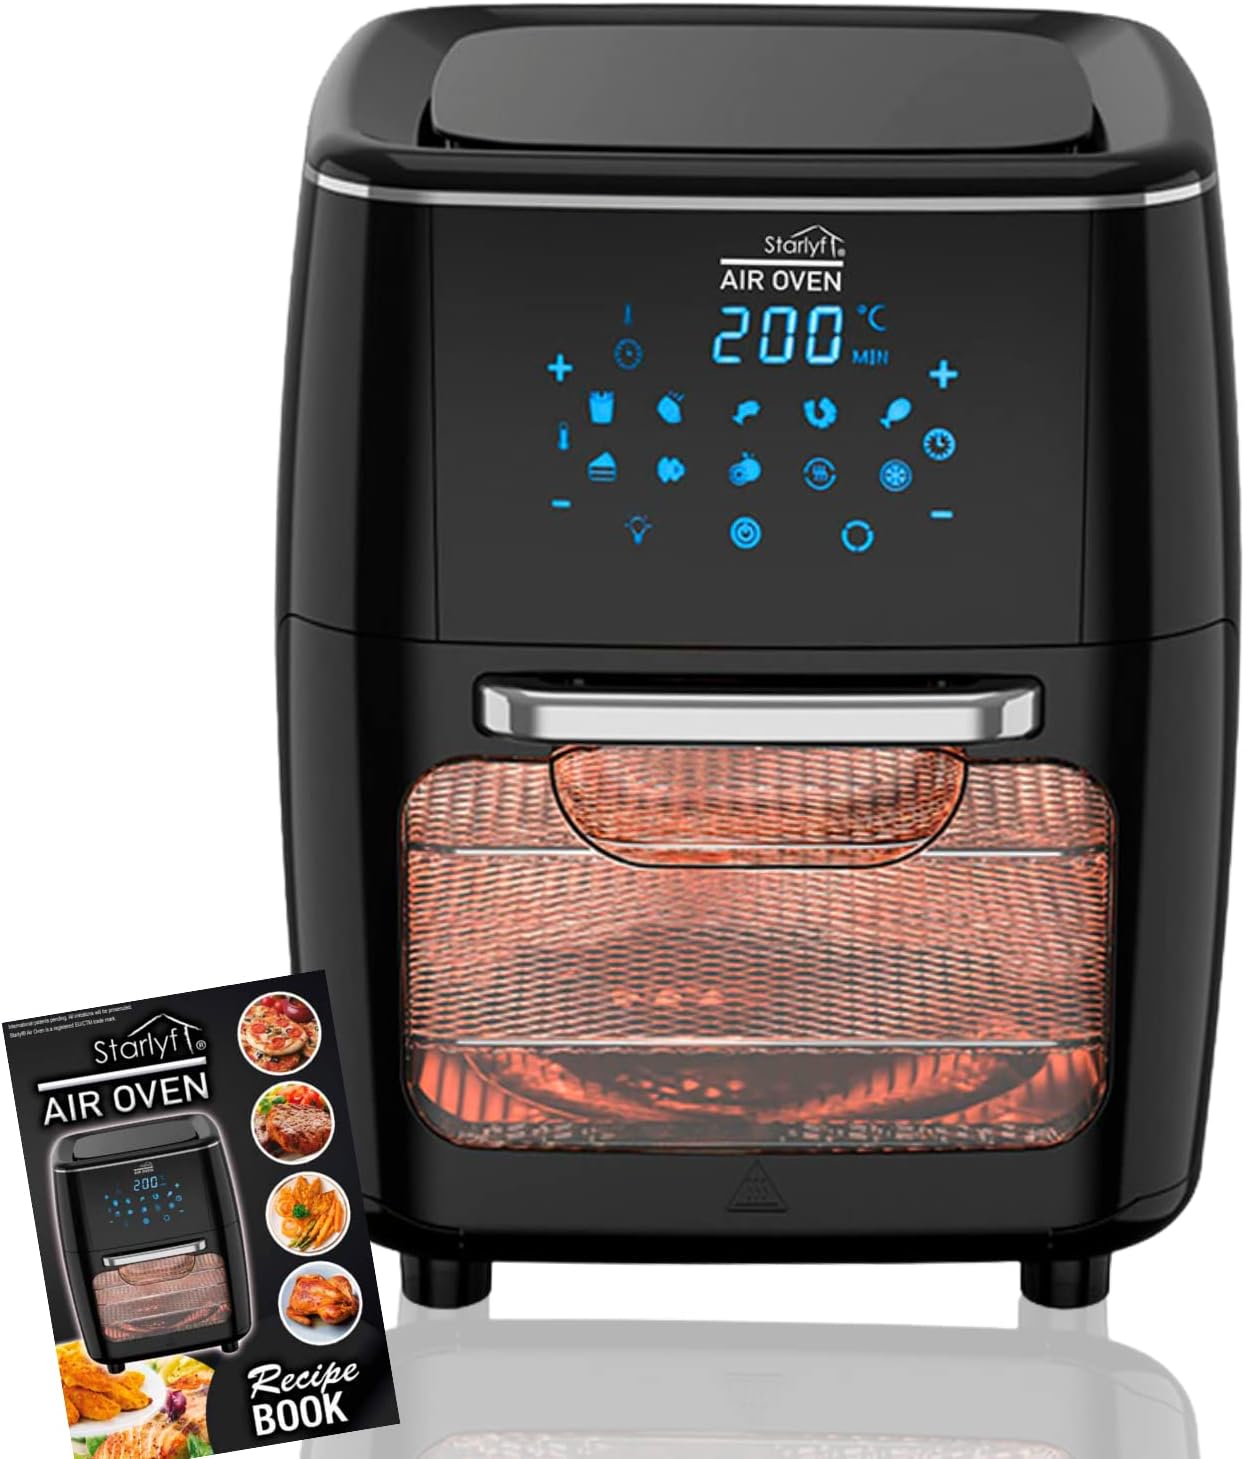
Abbildung 2.1: Front view of the STARLYF Air Oven, showcasing its sleek black design, digital LED touch panel, and transparent cooking window. A recipe book is also visible, indicating included accessories.
Hauptmerkmale:
- Starke Leistung: 1700W heating element for rapid heating and efficient cooking.
- Air Cycling Technology: Sorgt für eine gleichmäßige Wärmeverteilung und gleichbleibende Ergebnisse.
- 10 voreingestellte Programme: Convenient one-touch cooking for various dishes.
- LED-Touchpanel: Intuitive digital display for easy control of temperature and time.
- Ölfreies Frittieren: Achieves crispy textures with up to 85% less oil compared to traditional deep frying.
- Innenbeleuchtung: Ermöglicht die Überwachung des Garvorgangs, ohne die Tür öffnen zu müssen.
- Automatische Abschaltung: Enhances safety by automatically turning off the appliance after cooking is complete or if the door is opened.

Abbildung 2.2: Diagram illustrating key features of the STARLYF Air Oven, including LED touch screen, auto shut-off, 85% less oil cooking, adjustable time/temperature, 1700W power, interior light, and preset cooking programs.

Abbildung 2.3: Illustration showing the STARLYF Air Oven's versatility, capable of performing functions typically requiring multiple appliances such as a frying pan, baking oven, electric grill, rotisserie, dehydrator, microwave oven, and toaster oven.
Komponenten:
- Main Unit with LED Touch Panel
- Transparent ViewFenster
- Türgriff
- Removable Cooking Racks/Trays (specific accessories may vary)
- Tropfschale
- Netzkabel
3. Einrichtung und erste Verwendung
3.1 Auspacken
- Entfernen Sie sorgfältig sämtliches Verpackungsmaterial vom Gerät und dessen Zubehör.
- Prüfen Sie das Produkt auf Transportschäden. Beschädigte Produkte dürfen nicht verwendet werden.
- Die Verpackung sollte für eine spätere Lagerung oder einen Transport aufbewahrt werden.
3.2 Platzierung
- Place the Air Oven on a stable, flat, heat-resistant surface.
- Ensure there is at least 15 cm (6 inches) of clear space on all sides and above the appliance for proper air circulation.
- Stellen Sie das Gerät nicht in die Nähe von brennbaren Materialien oder Wärmequellen.
- Achten Sie darauf, dass das Netzkabel nicht eingeklemmt wird oder heiße Oberflächen berührt.
3.3 Erstreinigung
- Wischen Sie die Außenseite des Geräts mitamp Tuch.
- Wash all removable accessories (racks, drip tray) with warm soapy water. Rinse thoroughly and dry completely.
- Insert the drip tray at the bottom of the oven and slide in the cooking racks as desired.
3.4 Erste Verwendung (Einbrennen)
- Schließen Sie das Gerät an eine geerdete Steckdose an.
- Run the Air Oven empty for approximately 10-15 minutes at 200°C (390°F) to burn off any manufacturing residues. A slight odor or smoke may be present; this is normal.
- Sorgen Sie während dieses Vorgangs für ausreichende Belüftung des Bereichs.
- Allow the appliance to cool completely before proceeding with cooking.
4. Bedienungsanleitung
4.1 Ein-/Ausschalten
- Stecken Sie das Netzkabel in eine geeignete Steckdose. Das LED-Display leuchtet auf.
- Drücke den Power Knopf (⏻) on the touch panel to turn the appliance on.
- To turn off, press and hold the Power button until the display turns off, or simply unplug the unit.
4.2 Using the LED Touch Panel
The touch panel allows you to control all functions of the Air Oven. It features dedicated buttons for temperature, time, pre-set programs, and an interior light.
- Temperaturkontrolle: Verwenden Sie die + Und - buttons to adjust the cooking temperature (range: 65°C - 200°C).
- Zeitkontrolle: Verwenden Sie die + Und - Tasten zum Einstellen der Garzeit.
- Voreingestellte Programme: Select from 10 pre-programmed settings for common dishes. Each icon represents a specific food type (e.g., fries, chicken, fish). Press the desired icon to activate the program.
- Innenbeleuchtung: Press the light bulb icon to turn the interior light on or off, allowing you to monitor food without opening the door.
4.3 Kochvorgang
- Prepare your food and place it on the cooking racks or in suitable oven-safe accessories. Do not overload the racks.
- Slide the racks into the Air Oven. Ensure the drip tray is in place at the bottom.
- Schließen Sie die Backofentür fest.
- Schalten Sie das Gerät mit dem Netzschalter ein.
- Manueller Modus: Set your desired temperature and time using the respective + Und - buttons. The oven will start preheating.
- Pre-set Program Mode: Select one of the 10 pre-set programs. The oven will automatically set the optimal temperature and time for that program.
- The cooking process will begin. You can use the interior light to check on your food.
- Some recipes may require shaking or flipping food halfway through cooking. Carefully open the door, remove the rack, shake/flip, and reinsert. The oven will pause when the door is open and resume when closed.
- Once the cooking time is complete, the oven will beep and automatically shut off.
- Carefully remove the cooked food using oven mitts. Be aware of hot steam.

Abbildung 4.1: Images demonstrating the use of the STARLYF Air Oven, including loading food and interacting with the touch panel. The accompanying recipe book is also shown, providing cooking ideas.
4.4 Kochtipps
- For best results, preheat the Air Oven for 3-5 minutes before adding food.
- Do not overcrowd the cooking racks. Cook in batches if necessary to ensure even cooking.
- Lightly spray or toss food with a small amount of oil for extra crispiness, especially for fresh vegetables or homemade fries.
- Adjust cooking times and temperatures based on food quantity, thickness, and desired crispiness.
5. Wartung und Reinigung
Regular cleaning will extend the life of your STARLYF Air Oven and ensure optimal performance.
5.1 Vor der Reinigung
- Ziehen Sie immer den Netzstecker des Geräts.
- Allow the Air Oven to cool down completely before cleaning any parts.
5.2 Reinigung des Hauptgeräts
- Wischen Sie die Außenseite mit adamp Tuch und mildem Reinigungsmittel. Verwenden Sie keine Scheuermittel oder Topfreiniger.
- Reinigen Sie den Innenraum mit einem weichen,amp cloth. For stubborn food residue, use a non-abrasive sponge with warm soapy water.
- Tauchen Sie das Hauptgerät niemals in Wasser oder andere Flüssigkeiten.
- Ensure the interior is completely dry before plugging in or storing.
5.3 Reinigungszubehör
- Remove all cooking racks and the drip tray.
- Wash them in warm soapy water using a non-abrasive sponge. For baked-on food, soak them in warm water for a few minutes before cleaning.
- Rinse thoroughly and dry completely before reinserting into the oven or storing.
- Some accessories may be dishwasher safe; refer to specific accessory instructions if available.
5.4 Speicherung
- Stellen Sie sicher, dass das Gerät sauber und trocken ist, bevor Sie es lagern.
- Store the Air Oven in a cool, dry place.
- Do not place heavy objects on top of the appliance during storage.
6. Fehlerbehebung
If you encounter issues with your STARLYF Air Oven, please consult the following table before contacting customer service.
| Problem | Mögliche Ursache | Lösung |
|---|---|---|
| Gerät lässt sich nicht einschalten. | Nicht eingesteckt. Fehlfunktion der Steckdose. Appliance damaged. | Stellen Sie sicher, dass das Netzkabel fest an eine funktionierende Steckdose angeschlossen ist. Testen Sie die Steckdose mit einem anderen Gerät. If damaged, do not use; contact customer service. |
| Das Essen wird nicht gleichmäßig gegart. | Overcrowding of racks. Falsche Temperatur/Zeit. Das Essen wurde nicht geschüttelt/gewendet. | Reduce food quantity; cook in smaller batches. Temperatur und Garzeit je nach Rezept oder Lebensmittelart anpassen. Das Gargut nach der Hälfte der Garzeit schütteln oder wenden. |
| Aus dem Gerät kommt weißer Rauch. | Grease/oil residue on heating element. Fettiges Essen wird zubereitet. | Unplug and allow to cool. Clean the interior and heating element. This is normal for very fatty foods; ensure drip tray is clean. |
| Gerät bleibt während des Betriebs plötzlich stehen. | Überhitzungsschutz aktiviert. Tür geöffnet. | Unplug and allow to cool for 30 minutes before restarting. Close the door securely; the appliance will resume operation. |
| Das Essen ist nicht knusprig. | Zu viel Feuchtigkeit im Essen. Zu wenig Öl (für bestimmte Lebensmittel). Überfüllung. | Lebensmittel vor dem Kochen trocken tupfen. Lightly toss with a small amount of oil. In kleineren Portionen kochen. |
7. Technische Daten
| Besonderheit | Detail |
|---|---|
| Modellname | STARLYF Air Oven |
| ASIN | B0BRLB3G3N |
| Stromversorgung | 2.3E+2 Volt (Wechselstrom) |
| Nennleistung | 1700 Watts (also listed as 1500 Watts in some specifications) |
| Kapazität | 10 Liter |
| Temperaturbereich | 65 °C - 200 °C |
| Abmessungen (L x B x H) | 30 x 31 x 40 cm |
| Gewicht | 7.22 Kilogramm |
| Farbe | Schwarz |
| Besondere Merkmale | Temperature Control, LED Touch Panel, Air Cycling Technology, 10 Programs |
8. Garantie und Kundendienst
8.1 Garantieinformationen
The STARLYF Air Oven is manufactured with high-quality materials and undergoes strict quality control. While specific warranty terms may vary by region and retailer, generally, the product is covered against manufacturing defects for a limited period from the date of purchase.
Please retain your proof of purchase (receipt or invoice) as it will be required for any warranty claims. The warranty typically does not cover damage resulting from misuse, neglect, unauthorized repairs, or normal wear and tear.
8.2 Kundendienst
For any questions, technical assistance, or warranty inquiries, please contact the retailer where you purchased the product or the STARLYF customer service department. Contact details can usually be found on the product packaging or the brand's official webWebsite.
When contacting support, please be prepared to provide the product model (STARLYF Air Oven 10L) and ASIN (B0BRLB3G3N) for faster assistance.


