1. Einleitung
This manual provides essential information for the safe and effective use of your HMF Small Furniture Safe. Please read these instructions carefully before setup and operation to ensure proper functionality and security.

Figure 1: HMF Small Furniture Safe (Model 49216-02) with the door open and key inserted.
2. Sicherheitshinweise
Halten Sie sich stets an die folgenden Sicherheitsrichtlinien:
- Keep keys in a secure location away from the safe. Do not store keys inside the safe.
- Stellen Sie sicher, dass der Tresor sicher an einer Wand oder am Boden befestigt ist, um eine unbefugte Entnahme zu verhindern.
- Do not attempt to force the lock or door.
- Keep the safe away from extreme temperatures and moisture.
- This safe is designed for storing valuables and documents; it is not fireproof or waterproof unless explicitly stated.
3. Packungsinhalt
Überprüfen Sie, ob alle Komponenten im Paket vorhanden sind:
- 1 x HMF Small Furniture Safe
- 2 x Double Point Keys
- 2 x Metal Dowels
- 2 x Befestigungsschrauben
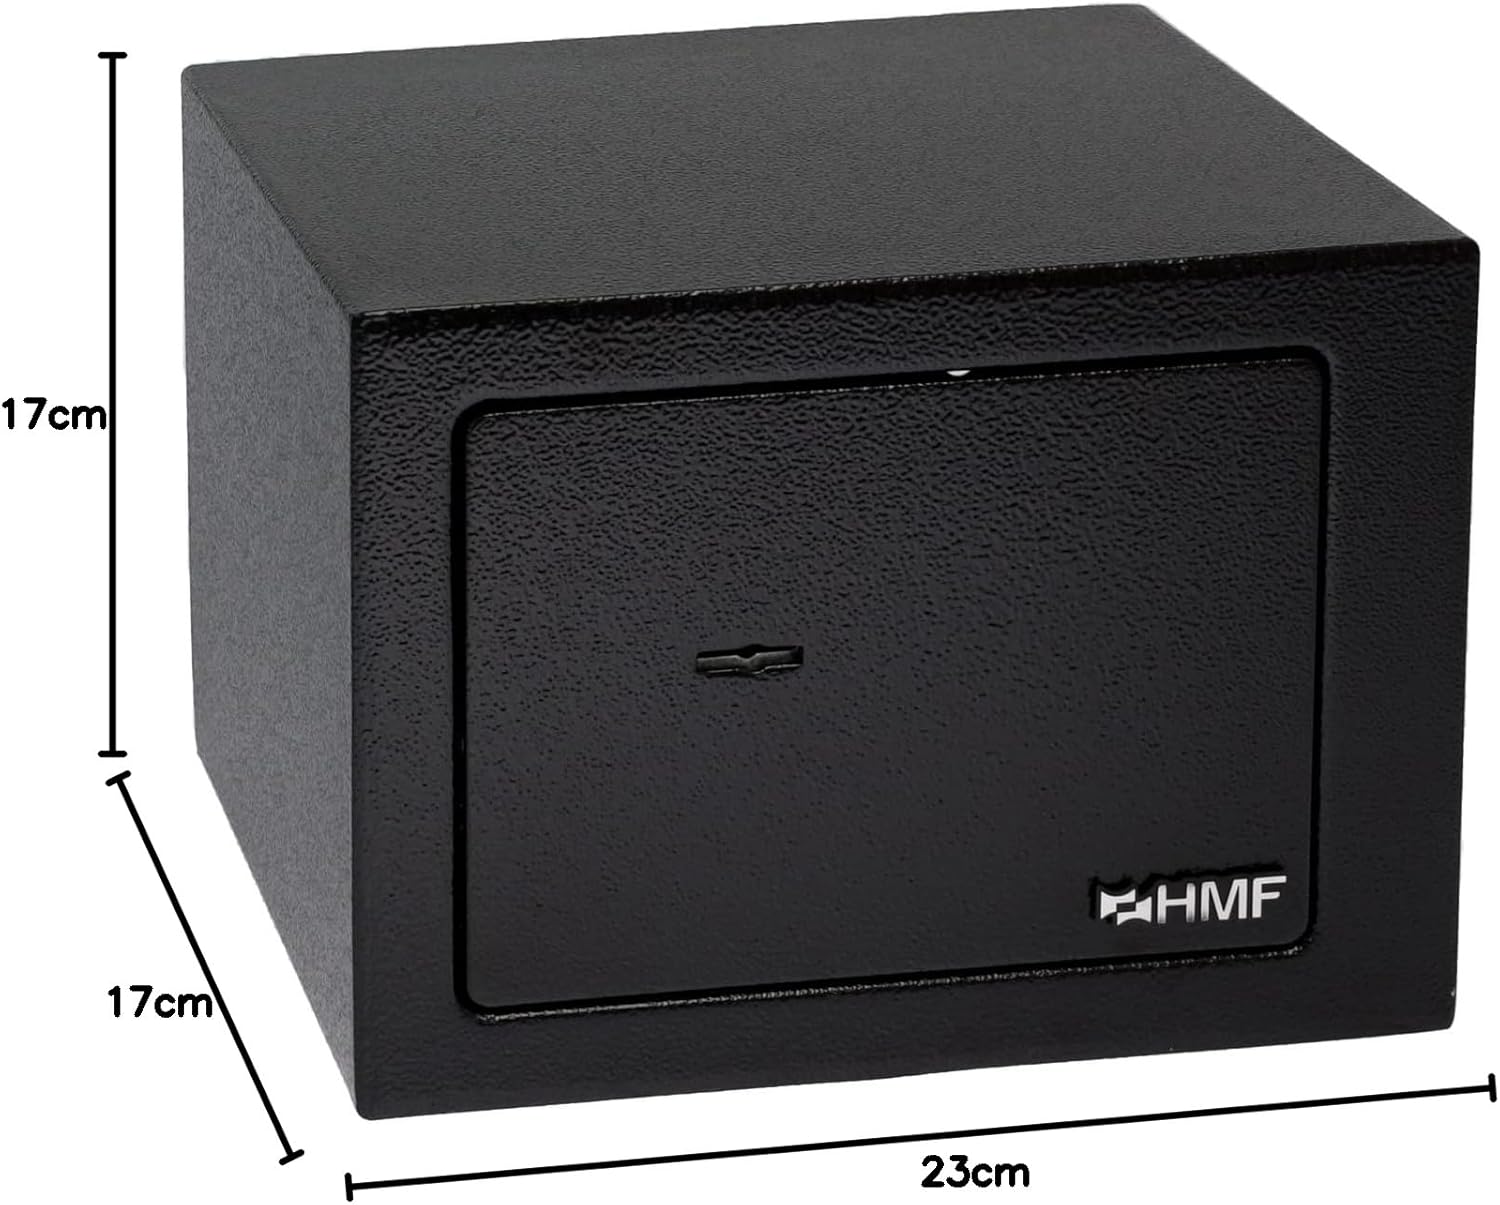
Figure 2: Included accessories: two double point keys and two metal dowels for secure mounting.
4. Spezifikationen
| Besonderheit | Detail |
|---|---|
| Modellnummer | 49216-02 |
| Marke | HMF |
| Außenmaße (B x H x T) | 23 x 17 x 17 cm |
| Innenabmessungen (B x H x T) | 22.5 x 16.5 x 16.5 cm (suitable for DIN A5 documents) |
| Gewicht | 2.35 kg |
| Material | Legierter Stahl |
| Wandstärke | 1 mm (body), 3 mm (door) |
| Sperrtyp | Mechanical double-bit lock with three-bolt lock |
| Montage | Prepared holes for wall or floor mounting |
Figure 3: External dimensions of the HMF safe.
5. Einrichtung und Installation
5.1 Auspacken
Carefully remove the safe and all accessories from the packaging. Inspect for any damage. Retain packaging for future transport or storage if needed.
5.2 Den Tresor zum ersten Mal öffnen
- Locate one of the two double-bit keys provided.
- Stecken Sie den Schlüssel in das Schlüsselloch an der Tresortür.
- Drehen Sie den Schlüssel im Uhrzeigersinn, um den Safe zu öffnen.
- Ziehen Sie die Tür auf.

Figure 4: Safe door open, revealing the three-bolt locking mechanism.
5.3 Montage des Tresors
The safe is equipped with pre-drilled holes for secure mounting to a wall or floor. This significantly enhances security.
- Choose a suitable location for the safe, considering both accessibility and concealment.
- Mark the drilling points on the wall or floor using the safe's pre-drilled holes as a template. The safe has two holes on the back and two on the bottom.
- Bohren Sie an den markierten Stellen Löcher mit einem für Ihr Wand-/Bodenmaterial geeigneten Bohrer.
- Insert the provided metal dowels into the drilled holes.
- Align the safe with the dowels and secure it using the provided fixing screws. Ensure the safe is firmly attached and does not wobble.

Abbildung 5: Rückseite view of the safe, highlighting the pre-drilled mounting holes.
6. Bedienung des Safes
6.1 Den Tresor abschließen
- Ensure the safe door is fully closed.
- Insert the double-bit key into the keyhole.
- Turn the key counter-clockwise until it stops. The three bolts will extend, securing the door.
- Remove the key and store it in a secure, separate location.

Figure 6: The safe in a closed and locked position.
6.2 Öffnen des Safes
- Insert the double-bit key into the keyhole.
- Turn the key clockwise until it stops. The three bolts will retract.
- Ziehen Sie die Tür auf.
- You can now access the contents of your safe.

Abbildung 7: Innenraum view of the safe, suitable for storing various small valuables.
7. Wartung
- Reinigung: Wischen Sie die Außenseite des Tresors mit einem weichen, fusselfreien Tuch ab.amp Mit einem Tuch abwischen. Vermeiden Sie scheuernde Reiniger oder Lösungsmittel, die die Oberfläche beschädigen könnten.
- Verriegelungsmechanismus: The mechanical lock requires minimal maintenance. If the key turns stiffly, a small amount of graphite lubricant (not oil) can be applied to the key and inserted into the lock.
- Inspektion: Überprüfen Sie regelmäßig die Befestigungsschrauben, um sicherzustellen, dass sie fest angezogen sind.
8. Fehlerbehebung
| Problem | Mögliche Ursache | Lösung |
|---|---|---|
| Key does not turn or turns stiffly. | Obstruction in keyhole, worn key, or dry lock mechanism. | Ensure no debris is in the keyhole. Try the second key. Apply a small amount of graphite lubricant to the key and insert into the lock. |
| Safe door does not open after unlocking. | Bolts not fully retracted, door stuck. | Ensure the key is turned fully clockwise. Gently pull the door. Do not force. |
| Safe feels loose after mounting. | Mounting screws are loose or not properly installed. | Tighten all mounting screws. If necessary, re-install the safe ensuring proper dowel and screw placement. |
9. Garantieinformationen
HMF products are manufactured to high-quality standards. For specific warranty terms and conditions, please refer to the documentation provided at the time of purchase or visit the official HMF webBewahren Sie Ihren Kaufbeleg für Garantieansprüche auf.
10. Kundendienst
If you encounter any issues not covered in this manual or require further assistance, please contact HMF customer support:
- WebWebsite: www.hmf.de (Please note: This is a general placeholder. Refer to your product packaging or purchase details for specific regional support contacts.)
- E-Mail: support@hmf.de


