1. Einleitung
Welcome to the instruction manual for your Zenwire USB-C Hub Adapter EB7. This guide provides essential information for setting up, operating, and maintaining your device to ensure optimal performance.
The Zenwire EB7 is a versatile 8-in-1 USB-C hub designed to expand the connectivity of your USB-C enabled devices. It offers a comprehensive range of ports for display output, high-speed data transfer, stable wired networking, and efficient power delivery.

Abbildung 1: The Zenwire USB-C Hub Adapter EB7, shown alongside its packaging, highlighting its compact design and multiple connectivity options.
2. Produktmerkmale
The Zenwire EB7 USB-C Hub Adapter offers a robust set of features to enhance your device's connectivity:
- Advanced Display Output: Supports Display Port resolutions up to 8K at 60Hz, 4K at 144Hz, 2K WQHD at 144Hz, and Full HD at 240Hz.
- Schnelles Ethernet: Bietet eine stabile kabelgebundene Netzwerkverbindung.
- Stromversorgung 3.0: Supports up to 100W for efficient charging of your host device.
- Mehrere USB-Anschlüsse: Includes 2x USB 3.0 and 1x USB 2.0 ports for various peripherals.
- Integrierter Kartenleser: Features dedicated slots for SD and Micro SD memory cards.
- Kompakt und tragbar: Lightweight design (approximately 61 grams) for easy transport.
- Langlebige Konstruktion: Untergebracht in einem robusten Aluminiumgehäuseasing.
- Breite Kompatibilität: Works with Windows, macOS (including Macbook M1/M2), Linux, iOS, and Android devices.

Abbildung 2: Eine Nahaufnahme view of the Zenwire USB-C Hub Adapter EB7, demonstrating its various ports in use with connected USB drives and an HDMI adapter, along with SD and Micro SD cards.
3. Packungsinhalt
Bitte vergewissern Sie sich, dass alle Artikel in Ihrem Paket vorhanden sind:
- Zenwire USB-C Hub Adapter EB7
- Bedienungsanleitung (dieses Dokument)
4. Gerät überview und Häfen
The Zenwire EB7 hub integrates the following ports:
- 1x Display Port: Supports high-resolution video output up to 8K@60Hz, 5K@120Hz, 4K@144Hz, 2K WQHD@144Hz, and Full HD@240Hz.
- 2x USB 3.0-Anschlüsse: For connecting high-speed USB peripherals and data transfer.
- 1x USB 2.0-Anschluss: Ideal for connecting standard USB devices such as keyboards, mice, or webNocken.
- 1x USB-C Power Delivery (PD)-Anschluss: Allows charging of your host device with up to 100W power input.
- 1x SD-Kartensteckplatz: For standard Secure Digital memory cards.
- 1x Micro-SD-Kartensteckplatz: For smaller Micro Secure Digital memory cards.
- 1x Fast Ethernet (RJ45) Port: Provides a stable wired network connection at speeds up to 100 Mbps.

Abbildung 3: Zenwire USB-C Hub Adapter EB7 with all its ports clearly labeled for identification.
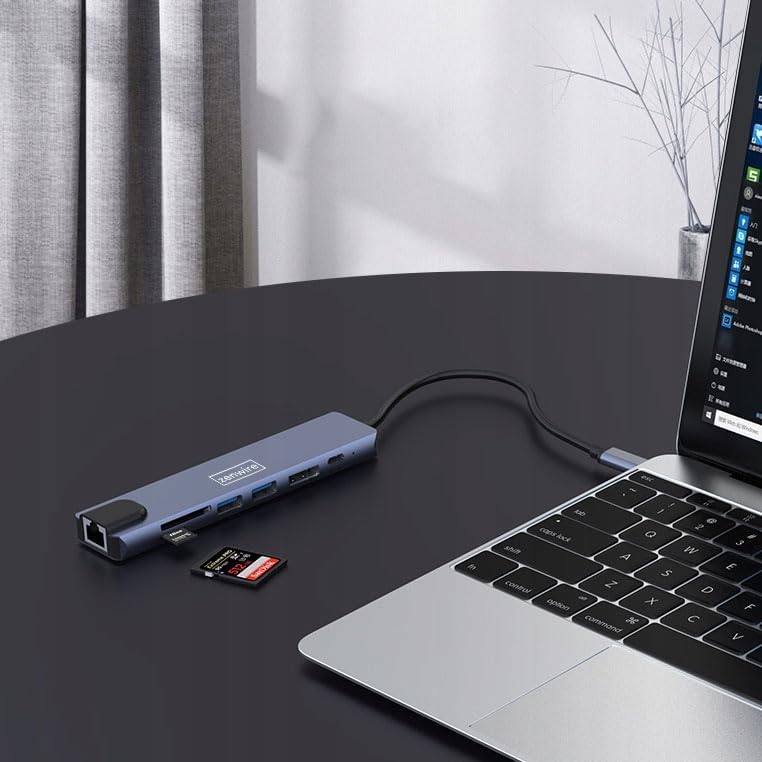
Abbildung 4: The Zenwire USB-C Hub Adapter EB7 connected to a laptop, with an SD card clearly inserted into its slot, demonstrating the card reader function.
5. Installationsanleitung
Follow these steps to set up your Zenwire EB7 hub:
- Verbinden Sie den Hub: Plug the USB-C connector of the Zenwire EB7 hub firmly into an available USB-C port on your laptop, tablet, or smartphone. Ensure the USB-C port on your host device supports DisplayPort Alternate Mode for video output.
- Peripheriegeräte anschließen:
- Anzeige: Connect a Display Port cable from the hub's Display Port to your external monitor or TV.
- USB-Geräte: Schließen Sie Ihre USB-Geräte (z. B. Maus, Tastatur, USB-Laufwerk) an die USB 3.0- oder USB 2.0-Anschlüsse an.
- Speicherkarten: Insert your SD or Micro SD card into the corresponding slot.
- Netzwerk: Schließen Sie ein Ethernet-Kabel an den RJ45-Anschluss an, um eine stabile kabelgebundene Internetverbindung herzustellen.
- Stromversorgung: If your host device requires charging, connect your USB-C power adapter to the hub's USB-C PD port. This allows your device to charge while using the hub.
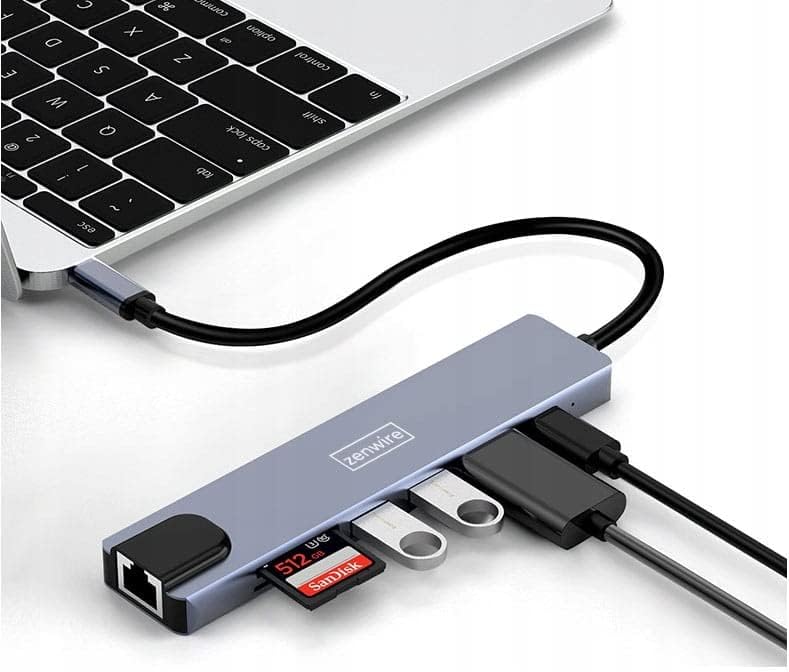
Abbildung 5: The Zenwire USB-C Hub Adapter EB7 connected to a laptop, showcasing its functionality with multiple USB flash drives and an SD card inserted into its respective slots.

Abbildung 6: The Zenwire USB-C Hub Adapter EB7 connected to a laptop, with a power adapter plugged into the hub's Power Delivery port and a power strip, illustrating its charging capability.
6. Bedienungsanleitung
6.1 Ausgabe anzeigen
The Display Port allows you to connect an external monitor or projector. The hub supports various resolutions and refresh rates. Ensure your display and Display Port cable support the desired resolution and refresh rate for optimal performance.
- Spiegelmodus: Spiegeln Sie den Bildschirm Ihres Host-Geräts auf dem externen Display.
- Erweiterter Modus: Erweitern Sie Ihren Desktop auf mehrere Bildschirme und schaffen Sie so mehr Arbeitsfläche.
To configure display settings (e.g., resolution, refresh rate, mirror/extend), refer to your operating system's display preferences (e.g., Windows Display Settings, macOS System Preferences).

Abbildung 7: A laptop connected to a large external monitor via the Zenwire USB-C Hub Adapter EB7, illustrating its display output capability for an extended or mirrored desktop.
6.2 Datenübertragung
Utilize the USB 3.0 ports for high-speed data transfer with compatible devices such as external hard drives or high-speed flash drives. The USB 2.0 port is suitable for standard peripherals that do not require high bandwidth.
6.3 Kartenleserfunktionalität
Insert your SD or Micro SD cards into their respective slots. The cards will appear as removable drives on your host device, allowing you to access, transfer, and manage files.
6.4 Netzwerkverbindung
The Fast Ethernet port provides a stable wired network connection. Once an Ethernet cable is connected, your host device should automatically detect the network and establish an internet connection.
6.5 Stromversorgung
The USB-C PD port allows you to charge your host device while simultaneously using the hub's other functions. Connect your original USB-C power adapter to this port. The hub supports up to 100W power delivery, ensuring efficient charging for most compatible devices.
7. Kompatibilität
The Zenwire EB7 USB-C Hub Adapter is designed for broad compatibility with various devices and operating systems:
- Betriebssysteme: Windows, macOS (including Macbook M1/M2), Linux, iOS (for compatible iPad models), Android (for compatible smartphones and tablets, including Samsung DEX).
- Geräte: Laptops, tablets, and smartphones equipped with a full-featured USB-C port that supports DisplayPort Alternate Mode and Power Delivery.

Abbildung 8: The Zenwire USB-C Hub Adapter EB7 connected to both a smartphone and a tablet, highlighting its compatibility with mobile devices for expanded connectivity.
8. Spezifikationen
| Besonderheit | Detail |
|---|---|
| Display Port Resolution | 8K@60Hz, 5K@120Hz, 4K@144Hz, 2K WQHD@144Hz, Full HD@240Hz |
| USB-Anschlüsse | 2x USB 3.0, 1x USB 2.0 |
| Kartenleser | SD Card Slot, Micro SD Card Slot |
| Ethernet | Fast Ethernet (100 Mbps) |
| Stromversorgung | USB-C PD 3.0, up to 100W |
| Abmessungen (L x B x H) | Ca.. 142mm x 32.4mm x 11mm |
| Kabellänge | Ca. 150 mm |
| Gewicht | Ca. 61 Gramm |
| Material | Aluminium |
| Farbe | Space Grau |
| Unterstützte Betriebssysteme | Windows, macOS, Linux, iOS, Android |

Abbildung 9: A technical diagram illustrating the precise dimensions of the Zenwire USB-C Hub Adapter EB7, including its length, width, height, and cable length.
9. Wartung
To ensure the longevity and optimal performance of your Zenwire EB7 hub, please follow these maintenance guidelines:
- Reinigung: Keep the hub clean and free from dust. Use a soft, dry, lint-free cloth for cleaning. Avoid using liquid cleaners or abrasive materials.
- Umgebungsbedingungen: Setzen Sie das Gerät keinen extremen Temperaturen, hoher Luftfeuchtigkeit oder direkter Sonneneinstrahlung aus.
- Handhabung: Handle the hub with care. Do not drop it or subject it to strong impacts.
- Demontage: Do not attempt to disassemble or repair the hub yourself. This may void your warranty and could cause damage.
- Lagerung: Disconnect the hub from your devices and store it in a cool, dry place when not in use for extended periods.
10. Fehlerbehebung
If you encounter issues with your Zenwire EB7 hub, please refer to the following troubleshooting tips:
10.1 Keine Displayausgabe
- Verbindungsprüfung: Ensure the USB-C connection to your host device is secure and fully inserted.
- Kabelüberprüfung: Verify that the Display Port cable is correctly connected to both the hub and the external monitor. Try a different cable if available.
- Unterstützung für Hostgeräte: Confirm that your host device's USB-C port supports video output (DisplayPort Alternate Mode). Not all USB-C ports have this capability.
- Monitoreingang: Ensure your monitor is set to the correct input source (e.g., Display Port).
- Treiber-Update: Update your graphics drivers on your host device to the latest version.
10.2 USB-Geräte werden nicht erkannt
- Richtiges Einfügen: Stellen Sie sicher, dass die USB-Geräte ordnungsgemäß in die Anschlüsse des Hubs eingesteckt sind.
- Direct Connection Test: Try connecting the USB device directly to your host device to confirm its functionality.
- Strombedarf: Some high-power USB devices may require external power. Ensure the hub's Power Delivery port is connected to a power source if needed.
10.3 Langsame Netzwerkgeschwindigkeit
- Geschwindigkeitsbegrenzung: The Fast Ethernet port supports speeds up to 100 Mbps. If you require Gigabit Ethernet speeds, this hub may not meet that requirement.
- Kabel und Anschluss: Check your Ethernet cable for damage and ensure a secure connection to both the hub and your router/modem.
- Treiber-Update: Ensure network drivers are up to date on your host device.
10.4 Host Device Not Charging
- Netzteilanschluss: Ensure your USB-C power adapter is connected to the hub's USB-C PD port.
- Power Adapter Functionality: Verify that your power adapter is functional and provides sufficient wattage (bis zu 100 W werden vom Hub unterstützt).
- Unterstützung für Hostgeräte: Check if your host device supports charging via its USB-C port.
11. Garantie und Support
For detailed warranty information and technical support, please refer to the official Zenwire website or contact your retailer. It is recommended to retain your proof of purchase for any warranty claims.


