1. Einführung und Endeview
The Calix GigaCenter 844E-1 is a high-performance wireless router and modem designed to provide robust and reliable internet connectivity for home and small office environments. It supports dual-band Wi-Fi (2.4GHz and 5GHz) for optimal wireless performance and includes multiple Ethernet ports for wired connections. This manual provides detailed instructions for setting up, operating, maintaining, and troubleshooting your GigaCenter 844E-1 device.
2. Produktmerkmale
- Dualband-WLAN: Supports 2.4GHz and 5GHz frequencies for flexible and high-speed wireless connections (802.11ac, 802.11n, 802.11a/g/b compatible).
- High LAN Data Rate: Capable of up to 1000 Mbps for fast wired connections.
- Mehrere Ports: Includes Ethernet (RJ-45) ports (4 LAN ports), USB 2.0, and RJ-11 ports for versatile connectivity.
- Integrated Modem: Functions as both a router and a modem, simplifying network setup.
- Kompaktes Design: Designed for efficient space utilization.
3. Packungsinhalt
Bitte überprüfen Sie, ob alle Artikel in Ihrem Paket vorhanden sind:
- Calix GigaCenter 844E-1 Wireless Router Modem
- Netzteil Netzteil
- (Optional: Ethernet Cable, Phone Cable - may vary by package)
4. Installationsanleitung
Follow these steps to set up your Calix GigaCenter 844E-1:
- Positionierung des Geräts: Place the GigaCenter 844E-1 in a central location in your home, away from obstructions and sources of interference (e.g., microwaves, cordless phones). Ensure adequate ventilation.
- Strom anschließen: Connect the provided AC Adapter Power Supply to the "POWER" port on the back of the GigaCenter 844E-1 and then plug the adapter into a standard electrical outlet. The Power indicator light on the front panel should illuminate.

Abbildung 4.1: Vorderseite view of the Calix GigaCenter 844E-1 showing indicator lights and the included power adapter.
- Verbindung zur Internetquelle herstellen: Connect your internet service provider's (ISP) cable or fiber optic line to the appropriate WAN/Broadband port on the GigaCenter 844E-1. This port is typically labeled "ETH-WAN" or "Broadband". The Broadband indicator light should turn solid green once a connection is established.

Abbildung 4.2: Seite view of the GigaCenter 844E-1 highlighting the ETH-WAN, Power, and Phone ports.
- Anschluss kabelgebundener Geräte (optional): Use standard Ethernet cables to connect computers, gaming consoles, or other network devices to the "ETHERNET 1-4" ports on the back of the GigaCenter 844E-1. The corresponding Ethernet indicator light will illuminate when a device is connected and active.

Figure 4.3: Top/back view of the GigaCenter 844E-1 displaying the USB, Reset, Ethernet (LAN), and Phone ports.
- Connect Phone Devices (Optional): If your service includes voice, connect analog phones to the "PHONE 1" or "PHONE 2" ports using RJ-11 cables.
- Erste WLAN-Verbindung:
- Locate the Wi-Fi Network Name (SSID) and Password (WPA Key) on the label usually found on the bottom or back of your GigaCenter 844E-1.
- Suchen Sie auf Ihrem drahtlosen Endgerät (Laptop, Smartphone, Tablet) nach verfügbaren WLAN-Netzwerken.
- Select your GigaCenter's SSID and enter the WPA Key when prompted.
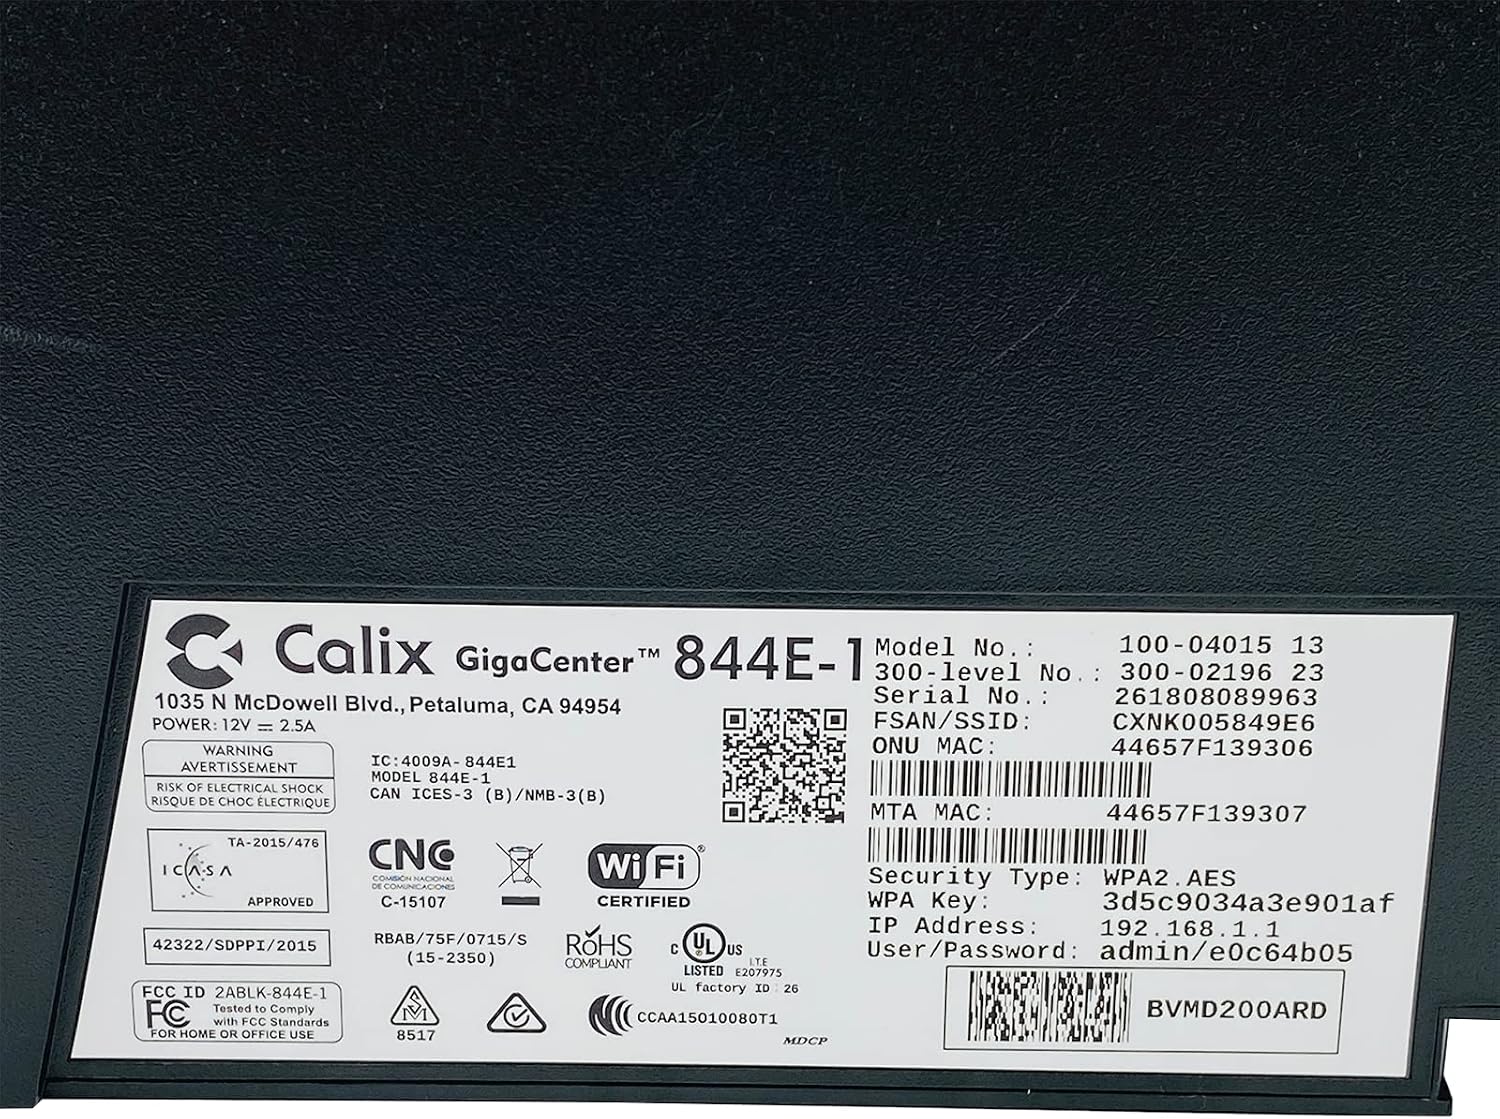
Abbildung 4.4: Ausführlich view of the bottom label, providing essential information such as model number, serial number, Wi-Fi SSID, and WPA Key for network access.
- Verbindung überprüfen: Sobald die Verbindung hergestellt ist, öffnen Sie a web browser and try to access a webWebsite (zB www.google.com). If successful, your GigaCenter 844E-1 is set up and ready for use.
5. Bedienungsanleitung
5.1 Kontrollleuchten
The front panel of the GigaCenter 844E-1 features several indicator lights that provide status information:
| Licht | Status | Beschreibung |
|---|---|---|
| LEISTUNG | Durchgehend grün | Gerät ist eingeschaltet. |
| BREITBAND | Durchgehend grün | Die Internetverbindung ist aktiv. |
| SERVICE | Durchgehend grün | Service is active and provisioned. |
| WIFI 2.4 GHz | Dauerhaft grün/Blinkend | 2.4 GHz Wi-Fi is active/data transfer. |
| WIFI 5 GHz | Dauerhaft grün/Blinkend | 5 GHz Wi-Fi is active/data transfer. |
| ETHERNET 1-4 | Dauerhaft grün/Blinkend | Wired connection active/data transfer. |
| PHONE 1-2 | Dauerhaft grün/Blinkend | Phone service active/in use. |
| USB | Dauerhaft grün/Blinkend | USB device connected/data transfer. |
| WPS | Blinkt | WPS-Kopplung läuft. |
5.2 Zugriff auf die Web Schnittstelle
To configure advanced settings, you can access the GigaCenter's web Schnittstelle:
- Ensure your device is connected to the GigaCenter via Wi-Fi or Ethernet.
- Öffnen Sie ein web browser and enter the IP Address (e.g., 192.168.1.1) found on the product label into the address bar.
- Enter the User/Password (e.g., admin/e0c64b05) from the product label when prompted.
- You can now configure settings such as Wi-Fi name, password, port forwarding, and parental controls.
6. Wartung
- Reinigung: Reinigen Sie die Außenseite des Geräts mit einem weichen, trockenen Tuch. Verwenden Sie keine flüssigen Reiniger oder Sprays.
- Belüftung: Um eine Überhitzung zu vermeiden, stellen Sie sicher, dass die Lüftungsschlitze des Geräts nicht blockiert sind.
- Firmware-Updates: Periodically check with your Internet Service Provider (ISP) for available firmware updates to ensure optimal performance and security.
- Neustart: Sollten Verbindungsprobleme auftreten, versuchen Sie, das Gerät neu zu starten, indem Sie das Netzteil für 10 Sekunden abziehen und es dann wieder anschließen.
7. Fehlerbehebung
Dieser Abschnitt behandelt häufig auftretende Probleme:
7.1 Keine Internetverbindung
- Kabel prüfen: Ensure all cables (power, internet source, Ethernet) are securely connected.
- Kontrollleuchten: Verify that the POWER, BROADBAND, and SERVICE lights are solid green. If not, refer to Section 5.1 or contact your ISP.
- Gerät neu starten: Power cycle the GigaCenter 844E-1 by unplugging it for 10 seconds and plugging it back in.
- ISP Outage: Erkundigen Sie sich bei Ihrem Internetanbieter nach eventuellen Serviceausfällen.tages in Ihrer Nähe.
7.2 WLAN funktioniert nicht oder ist langsam
- Wi-Fi Lights: Ensure the WIFI 2.4 GHz and/or WIFI 5 GHz lights are solid green.
- Passwort: Double-check that you are entering the correct Wi-Fi password (WPA Key).
- Signalstärke: Move closer to the GigaCenter 844E-1 to improve signal strength.
- Interferenz: Störungen durch andere elektronische Geräte reduzieren.
- Kanaloptimierung: Zugriff auf die web interface to change Wi-Fi channels if experiencing congestion.
7.3 Kein Zugriff möglich Web Schnittstelle
- IP-Adresse: Confirm you are using the correct IP Address (e.g., 192.168.1.1).
- Verbindung: Ensure your device is connected to the GigaCenter's network.
- Referenzen: Verify the User/Password from the product label.
- Firewall/Antivirus: Deaktivieren Sie vorübergehend jegliche Firewall- oder Antivirensoftware auf Ihrem Computer, die möglicherweise den Zugriff blockiert.
7.4 WPS-Funktionalität
The WPS (Wi-Fi Protected Setup) button allows for easy connection of WPS-compatible devices without manually entering the password. Press the WPS button on the GigaCenter 844E-1 and then activate WPS on your client device within two minutes. The WPS light will flash during the pairing process.
8. Spezifikationen
| Besonderheit | Detail |
|---|---|
| Modell | GigaCenter 844E-1 (100-04015 13) |
| Marke | Calix |
| Konnektivitätstechnologie | Wireless-Wi-Fi 802.11ac, Ethernet (RJ-45) Hub/Switch, 5G |
| Drahtlose Standards | 802.11ac, 802.11n, 802.11a/g/b |
| Frequenzbandklasse | Dualband (2.4 GHz, 5 GHz) |
| Maximum LAN Data Rate | 1000 Mbit/s |
| Häfen | 4 x Ethernet (RJ-45), 1 x USB 2.0, 2 x RJ-11 (Phone) |
| Kompatible Geräte | Personal Computer, Network Devices |
| Empfohlene Verwendung | Heim |
| Im Lieferumfang enthaltene Komponenten | Stromversorgung |
| Artikelgewicht | 3 Pfund |
9. Sicherheitshinweise
- Setzen Sie das Gerät weder Wasser noch Feuchtigkeit aus.
- Öffnen Sie das Gerät nicht.asing. Alle Wartungsarbeiten sind qualifiziertem Personal zu überlassen.
- Verwenden Sie nur das mitgelieferte Netzteil.
- Halten Sie das Gerät von Wärmequellen und direkter Sonneneinstrahlung fern.
- Sorgen Sie für ausreichende Belüftung, um eine Überhitzung zu vermeiden.
10. Garantie und Support
For warranty information and technical support, please contact your Internet Service Provider (ISP) or the vendor from whom you purchased this device. The Calix GigaCenter 844E-1 is typically provided and supported by your ISP as part of your internet service package.
For general inquiries or to find more information about Calix products, you may visit the official Calix website (if available, search online for "Calix official webWebsite").


