1. Einleitung
This user manual provides comprehensive instructions for the installation, operation, and maintenance of the Axis Communications AXIS Q6225-LE PTZ Camera. Please read this manual thoroughly before using the product to ensure proper functionality and safety. This camera is designed for robust outdoor surveillance in challenging conditions.
2. Sicherheitshinweise
Observe the following safety precautions to prevent damage to the product or injury to personnel:
- Installation: Installation must be performed by qualified personnel in accordance with all local and national electrical and building codes.
- Stromversorgung: Use only the specified power supply (60 watts) for this device. Ensure the power source is stable and meets the camera's requirements.
- Umfeld: The camera is designed for outdoor use. However, avoid exposing it to extreme conditions beyond its specified operating range.
- Reinigung: Vor der Reinigung die Stromzufuhr unterbrechen. Ein weiches, trockenes Tuch verwenden. Keine flüssigen oder Aerosolreiniger verwenden.
- Änderungen: Do not attempt to modify or disassemble the camera. This may void the warranty and pose safety risks.
3. Packungsinhalt
Überprüfen Sie, ob alle Artikel im Paket vorhanden sind:
- AXIS Q6225-LE PTZ-Kamera
- Installationshandbuch
- Montagehalterung und Hardware
- Network Cable Connector
- Documentation and Software CD (if applicable)
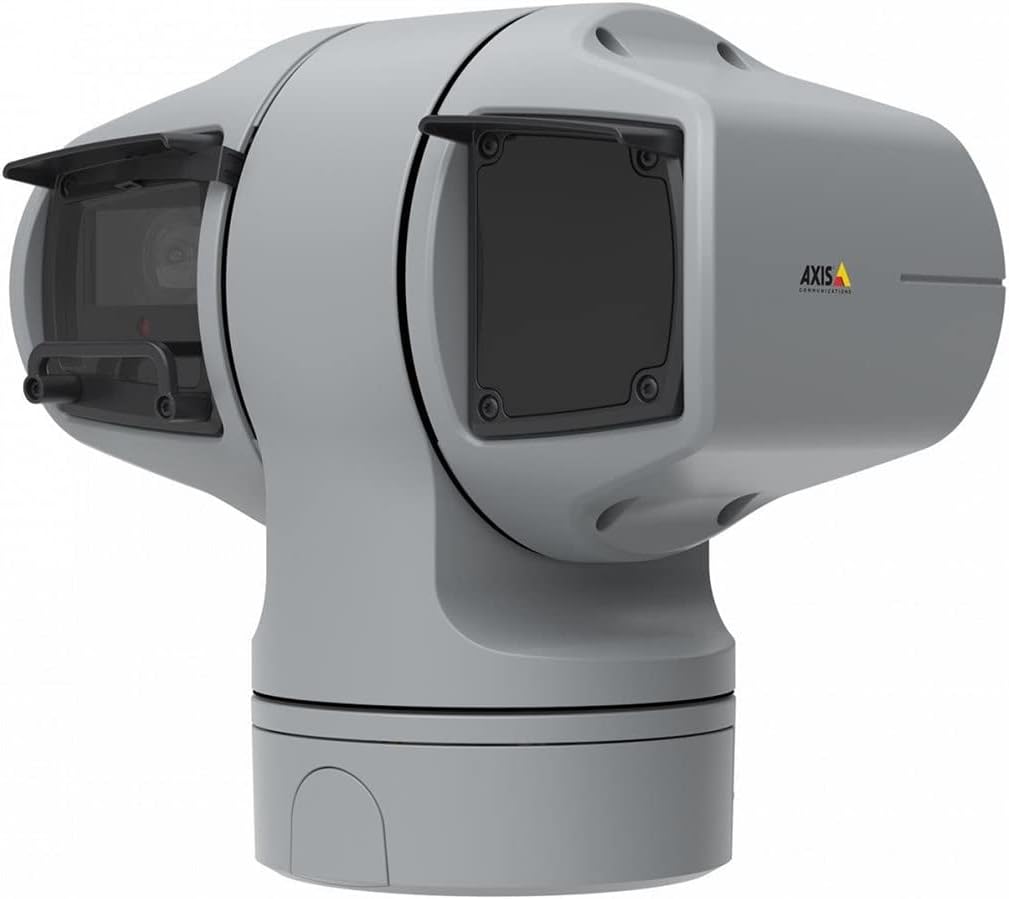
Abbildung 1: AXIS Q6225-LE PTZ Camera. This image displays the grey-colored PTZ camera unit, highlighting its robust housing and integrated lens system, designed for outdoor surveillance.
4. Einrichtung und Installation
4.1 Montage der Kamera
The AXIS Q6225-LE is designed for wall mount installation. Ensure the mounting surface is strong enough to support the camera's weight and withstand environmental conditions.
- Wählen Sie einen geeigneten Montageort, der das gewünschte Sichtfeld bietet. view und ist an das Stromnetz angebunden.
- Use the provided mounting template to mark drill holes on the wall.
- Drill pilot holes and secure the mounting bracket using appropriate screws and anchors.
- Attach the camera to the mounting bracket, ensuring it is firmly locked in place.
4.2 Strom- und Netzwerkanschluss
Connect the camera to power and network as follows:
- Leistung: Connect the power cable to a 60-watt power source. Ensure the connection is secure and weatherproof.
- Netzwerk: Connect an Ethernet cable from your network switch or router to the camera's network port. The camera supports Wi-Fi for wireless communication. Refer to the network configuration section for wireless setup.
4.3 Erstkonfiguration
After physical installation and connection, access the camera's web interface for initial configuration:
- Öffnen Sie ein web browser on a computer connected to the same network as the camera.
- Enter the camera's IP address in the browser's address bar. If the IP address is unknown, use the AXIS IP Utility tool to discover it.
- Follow the on-screen prompts to set up a new password for the administrator account.
- Configure basic network settings, date/time, and video stream settings.
5. Bedienung der Kamera
5.1 Schwenk-, Neige- und Zoomsteuerung (PTZ)
The AXIS Q6225-LE camera features full PTZ capabilities, allowing remote adjustment of its viewing angle and zoom level. Control is typically performed via the camera's web Schnittstelle oder kompatible Videomanagement-Software (VMS).
- Pfanne: Rotate the camera horizontally to cover a wider area.
- Neigung: Adjust the camera vertically to view objects at different heights.
- Optischer Zoom: Use the optical zoom feature to magnify distant objects without loss of image quality.
5.2 Bewegungserkennung und Benachrichtigungen
The camera supports motion-only alerts. Configure motion detection zones and sensitivity settings in the web interface to trigger recordings or notifications when movement is detected.
5.3 Infrared (IR) Illumination
Equipped with infrared light sources, the camera provides clear video surveillance in low-light or complete darkness. IR illumination activates automatically or can be manually controlled.
6. Wartung
6.1 Reinigung
Regular cleaning of the camera lens and housing is recommended to ensure optimal performance, especially in dusty or harsh environments.
- Gently wipe the lens with a soft, lint-free cloth. For stubborn dirt, use a lens cleaning solution specifically designed for optical surfaces.
- Reinigen Sie das Kameragehäuse mit einem Additiv.amp Mit einem Tuch abwischen. Vermeiden Sie scheuernde Reiniger oder Lösungsmittel.
6.2 Firmware-Updates
Überprüfen Sie regelmäßig die Axis Communications-Verbindungen. website for firmware updates. Keeping the camera's firmware up-to-date ensures access to the latest features, security enhancements, and bug fixes.
7. Fehlerbehebung
This section addresses common issues you might encounter with your AXIS Q6225-LE camera.
| Problem | Mögliche Ursache | Lösung |
|---|---|---|
| Kein Video-Feed | Stromausfall, Netzwerkproblem, falsche IP-Adresse. | Check power connection. Verify network cable or Wi-Fi connection. Confirm camera's IP address. |
| Schlechte Bildqualität | Dirty lens, improper focus, low light conditions. | Clean the lens. Adjust focus via web interface. Ensure adequate lighting or verify IR functionality. |
| PTZ-Steuerung reagiert nicht | Network latency, software glitch, motor issue. | Überprüfen Sie die Netzwerkverbindung. Starten Sie die Kamera neu. Sollte das Problem weiterhin bestehen, wenden Sie sich bitte an den Support. |
8. Spezifikationen
| Besonderheit | Detail |
|---|---|
| Modellnummer | 02316-002 |
| Marke | Axis Communications |
| Montagetyp | Wandhalterung |
| Farbe | Weiß |
| Material | Metall |
| Wastage | 60 Watt |
| Konnektivitätstechnologie | Kabellos, WLAN |
| Verwendung im Innen- und Außenbereich | Im Freien |
| Kontrollmethode | Fernbedienung |
| Fotosensor-Technologie | CMOS |
| Videoaufnahmeformat | MPEG-4 |
| Lichtquellentyp | Infrarot |
| Alarmtyp | Nur Bewegung |
| Zoomtyp | Optischer Zoom |
| Artikelgewicht | 0.01 Kilogramm (0.352 Unzen) |
| Im Lieferumfang enthaltene Komponenten | Kamera/Zubehör |
9. Garantie und Support
For warranty information and technical support, please refer to the official Axis Communications webBesuchen Sie unsere Website oder wenden Sie sich an Ihren autorisierten Händler. Bewahren Sie Ihren Kaufbeleg als Kaufnachweis auf.
Online-Ressourcen: www.axis.com


