1. Einleitung
This manual provides detailed instructions for the assembly, installation, operation, and maintenance of your AMANSON H07 ATX Mid Tower PC Case. Please read this manual thoroughly before beginning installation to ensure proper setup and safe operation. Keep this manual for future reference.

Figure 1.1: AMANSON H07 ATX Mid Tower PC Case with illuminated internal components.
2. Sicherheitshinweise
- Always disconnect the power supply from the wall outlet before performing any installation or maintenance inside the PC case.
- Alle Komponenten sind sorgfältig zu behandeln, um Beschädigungen zu vermeiden.
- Tragen Sie ein antistatisches Armband, um Schäden an empfindlichen elektronischen Bauteilen durch elektrostatische Entladung (ESD) zu verhindern.
- Halten Sie Kleinteile und Verpackungsmaterialien von Kindern fern.
- Sorgen Sie für ausreichende Belüftung rund um das PC-Gehäuse, um eine Überhitzung zu vermeiden.
3. Packungsinhalt
Überprüfen Sie, ob alle Artikel im Paket vorhanden sind:
- AMANSON H07 ATX Mid Tower PC Case
- Zubehörbox (Schrauben, Abstandshalter, Kabelbinder usw.)
- Benutzerhandbuch (dieses Dokument)
4. Komponente überview
The AMANSON H07 PC case features a panoramic design with tempered glass panels for full visibility of your internal components. It supports various motherboard sizes and extensive cooling configurations.

Figure 4.1: Top I/O Panel with power button, USB 3.0, USB 2.0, and audio ports.
The top I/O panel includes:
- Netzschalter
- Reset-Taste
- 2x USB 2.0-Anschlüsse
- 1x USB 3.0-Anschluss
- Audio-Ein-/Ausgangsbuchsen
5. Einrichtung und Installation
5.1. Vorbereitung des Falls
The AMANSON H07 features tool-less hinged tempered glass side panels for easy access. Gently open the side panel by pulling it from the rear edge. The panels can also be removed by lifting them off their hinges for full access during installation.

Abbildung 5.1: Seitliche Klappe aus gehärtetem Glas für einfachen Zugang.
5.2. Motherboard-Installation
The H07 supports E-ATX, ATX, Micro-ATX, and ITX motherboards. Install the necessary standoffs for your motherboard form factor. Carefully align your motherboard with the standoffs and I/O shield, then secure it with screws.
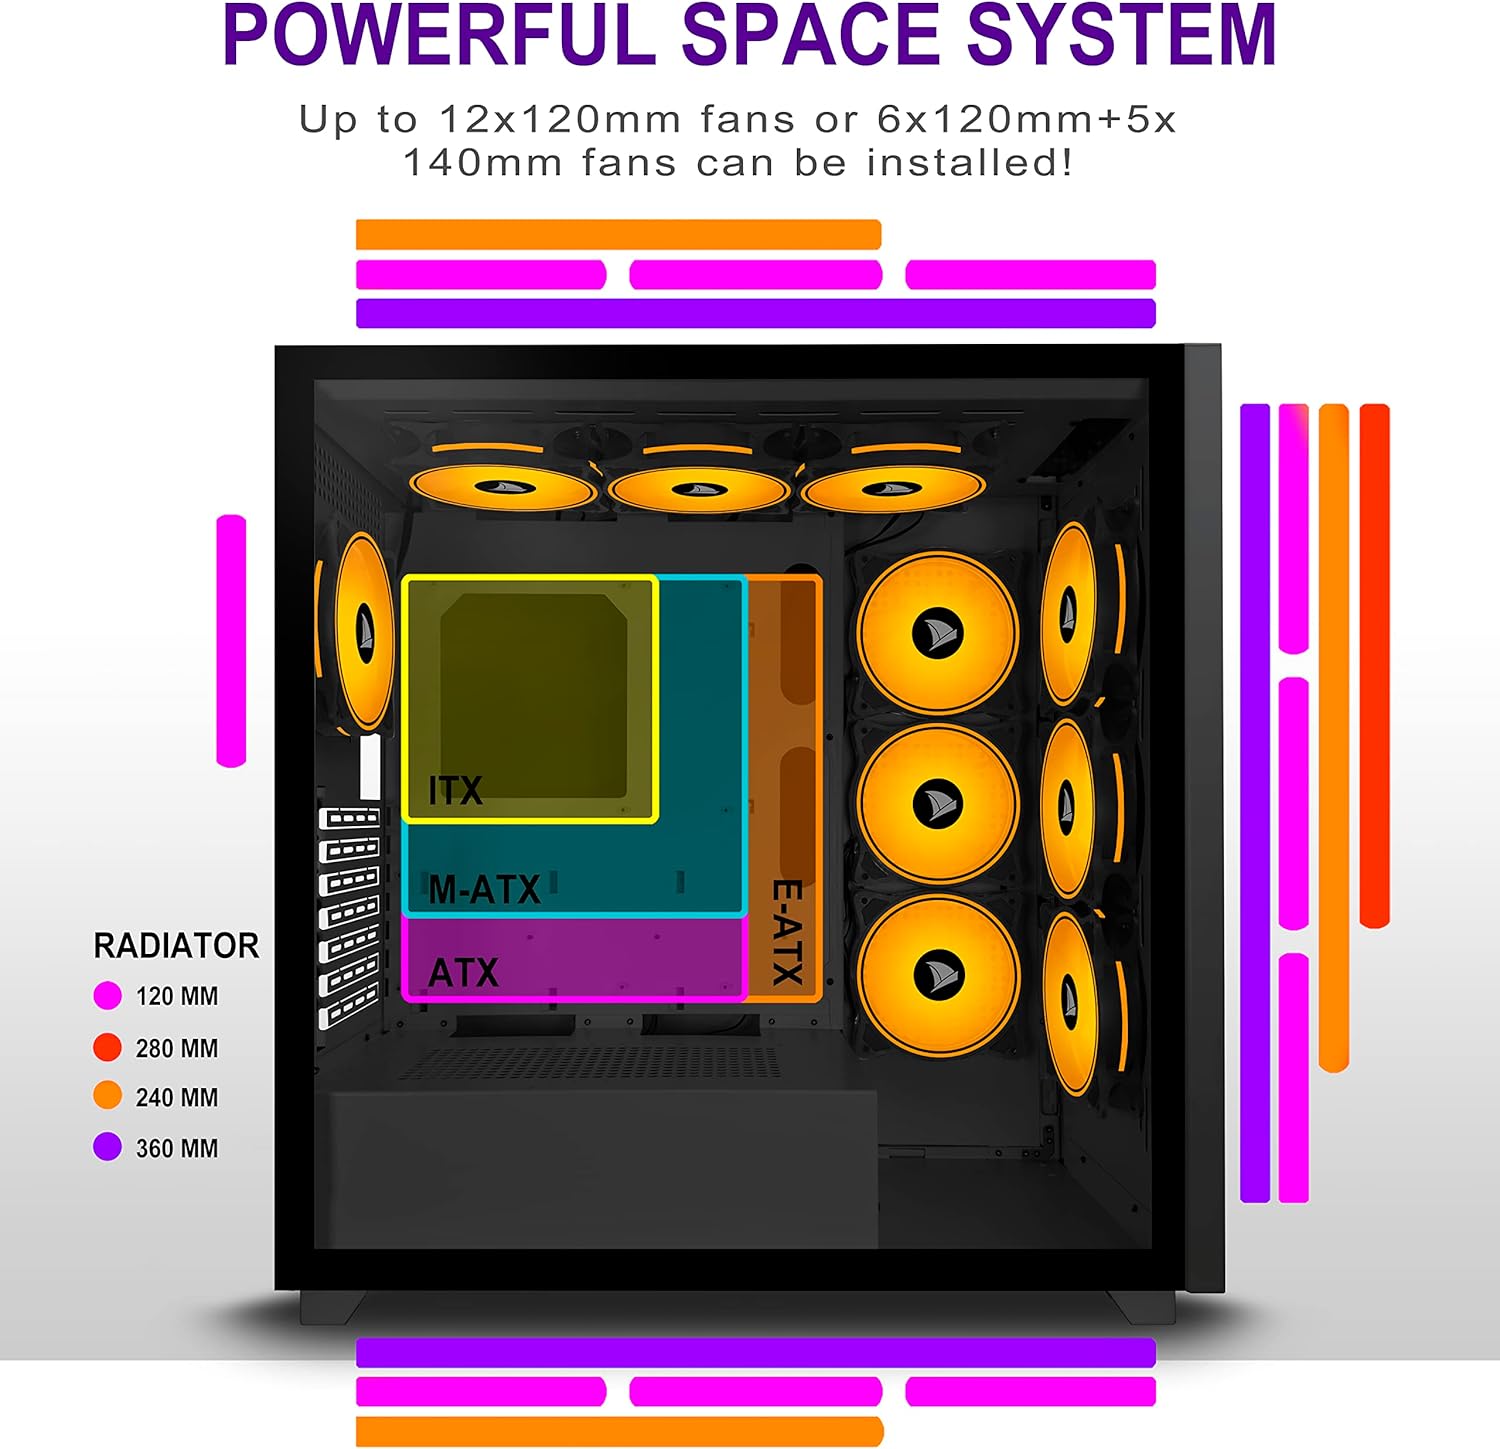
Figure 5.2: Motherboard and cooling component placement options.
5.3. Installation des Netzteils
Install your power supply unit (PSU) into the dedicated compartment at the bottom rear of the case. Secure it with screws from the rear of the case.
5.4. Installation des Speichermediums
The case provides multiple mounting points for storage devices. Install your 3.5" HDDs and 2.5" SSDs into the designated trays and mounting locations. Refer to the case diagram for specific locations.

Figure 5.3: Storage drive mounting options for HDDs and SSDs.
5.5. Expansion Card (GPU) Installation
Remove the necessary PCI-E slot covers from the rear of the case. Insert your graphics card or other expansion cards into the motherboard's PCI-E slots and secure them with screws.
5.6. Kabelmanagement
Nutzen Sie die Kabeldurchführungen und Befestigungspunkte hinter dem Mainboard-Tray, um die Kabel ordentlich zu verlegen. Dies verbessert die Luftzirkulation und sorgt für ein aufgeräumtes Erscheinungsbild.
6. Bedienungsanleitung
6.1. Ein-/Ausschalten
Press the power button located on the top I/O panel to turn on your PC. To shut down, use the operating system's shutdown function or press and hold the power button for several seconds.
6.2. Using Front I/O Ports
Connect USB devices to the USB 2.0 or USB 3.0 ports. Use the audio jacks for headphones, microphones, or speakers.
7. Wartung
7.1. Reinigung
Reinigen Sie die Außenseite des Gehäuses regelmäßig mit einem weichen, feuchten Tuch.amp cloth. For internal cleaning, use compressed air to remove dust from fans and components. Ensure the PC is powered off and unplugged before cleaning.
7.2. Staubfilter
The AMANSON H07 may include removable dust filters. Clean these filters periodically to maintain optimal airflow and cooling performance.
8. Fehlerbehebung
- Der PC lässt sich nicht einschalten: Check all power connections, including the PSU to the wall, the PSU to the motherboard, and the front panel power switch cable to the motherboard.
- Überhitzungsprobleme: Ensure all fans are properly installed and functioning. Verify that dust filters are clean and not obstructing airflow. Check thermal paste application on CPU cooler.
- USB-Anschlüsse funktionieren nicht: Confirm that the front panel USB cables are correctly connected to the motherboard headers.
- Audio jacks not working: Verify that the front panel audio cable is correctly connected to the motherboard's audio header.
9. Spezifikationen
Below are the technical specifications for the AMANSON H07 PC Case:
| Besonderheit | Detail |
|---|---|
| Modell | H07 |
| Gehäusetyp | Mittlerer Turm |
| Motherboard-Kompatibilität | E-ATX, ATX, Micro ATX, ITX |
| Material | Gehärtetes Glas |
| Produktabmessungen (L x B x H) | 19.69 x 13.78 x 19.69 Zoll (500 x 350 x 500 mm) |
| Artikelgewicht | 24.2 Pfund |
| Anzahl der USB 2.0-Anschlüsse | 2 |
| Anzahl der USB 3.0-Anschlüsse | 1 |
| Anzahl der Erweiterungssteckplätze | 8 |
| Kühlmethode | Luft |
| Montageart des Netzteils | Untere Montage |

Figure 9.1: AMANSON H07 PC Case dimensions (520mm height, 510mm length, 250mm width).
10. Garantieinformationen
Please refer to the product packaging or the official AMANSON webDie genauen Garantiebedingungen finden Sie auf der Website. Bewahren Sie Ihren Kaufbeleg für Garantieansprüche auf.
11. Unterstützung
For technical assistance or customer support, please visit the official AMANSON website or contact their customer service department. Contact details can typically be found on the product packaging or the brand's webWebsite.


