1. Produktüberschreitungview
The BOBLOV M7 Pro is a 4K GPS body worn camera designed for various recording needs, featuring a 180° rotatable lens, 256GB internal storage, and a long-lasting battery. This manual provides instructions for its proper use and maintenance.
1.1 Packungsinhalt
Bitte prüfen Sie, ob alle unten aufgeführten Artikel in Ihrem Paket enthalten sind. Sollten Artikel fehlen oder beschädigt sein, kontaktieren Sie bitte unseren Kundenservice.
- 1x M7 Pro Body Worn Camera
- 1x USB-C Kabel
- 1x Schnellladegerät
- 1x kurzer, um 360° drehbarer Clip
- 1x langer, um 360° drehbarer Clip
- 1x Benutzerhandbuch

Figure 1: Packaging List of BOBLOV M7 Pro
2. Einrichtung
2.1 Aufladen der Kamera
Before first use, fully charge the camera. The 4000mAh battery provides up to 14 hours of video recording and takes approximately 4-5 hours to fully charge using the provided fast charger.
- Schließen Sie das USB-C-Kabel an den Ladeanschluss der Kamera an.
- Stecken Sie das andere Ende des USB-C-Kabels in den Schnellladestecker.
- Stecken Sie den Stecker des Ladegeräts in eine Steckdose.
- Die Ladeanzeigeleuchte zeigt den Ladestatus an. Sie erlischt normalerweise oder ändert ihre Farbe, wenn der Akku vollständig geladen ist.

Figure 2: Charging the M7 Pro Body Camera
2.2 Anbringen der Clips
The M7 Pro comes with two types of rotatable clips for flexible mounting options: a short back clip and a long shoulder clip. Both support 360° rotation.
- Align the clip with the slot on the back of the camera.
- Slide the clip firmly into place until it clicks.
- To remove, press the release tab (if present) and slide the clip off.
- Attach the camera to your uniform, belt, or shoulder strap using the desired clip.
Video 1: Demonstrates how to attach and rotate the shoulder and back clips on the M7 Pro body camera.
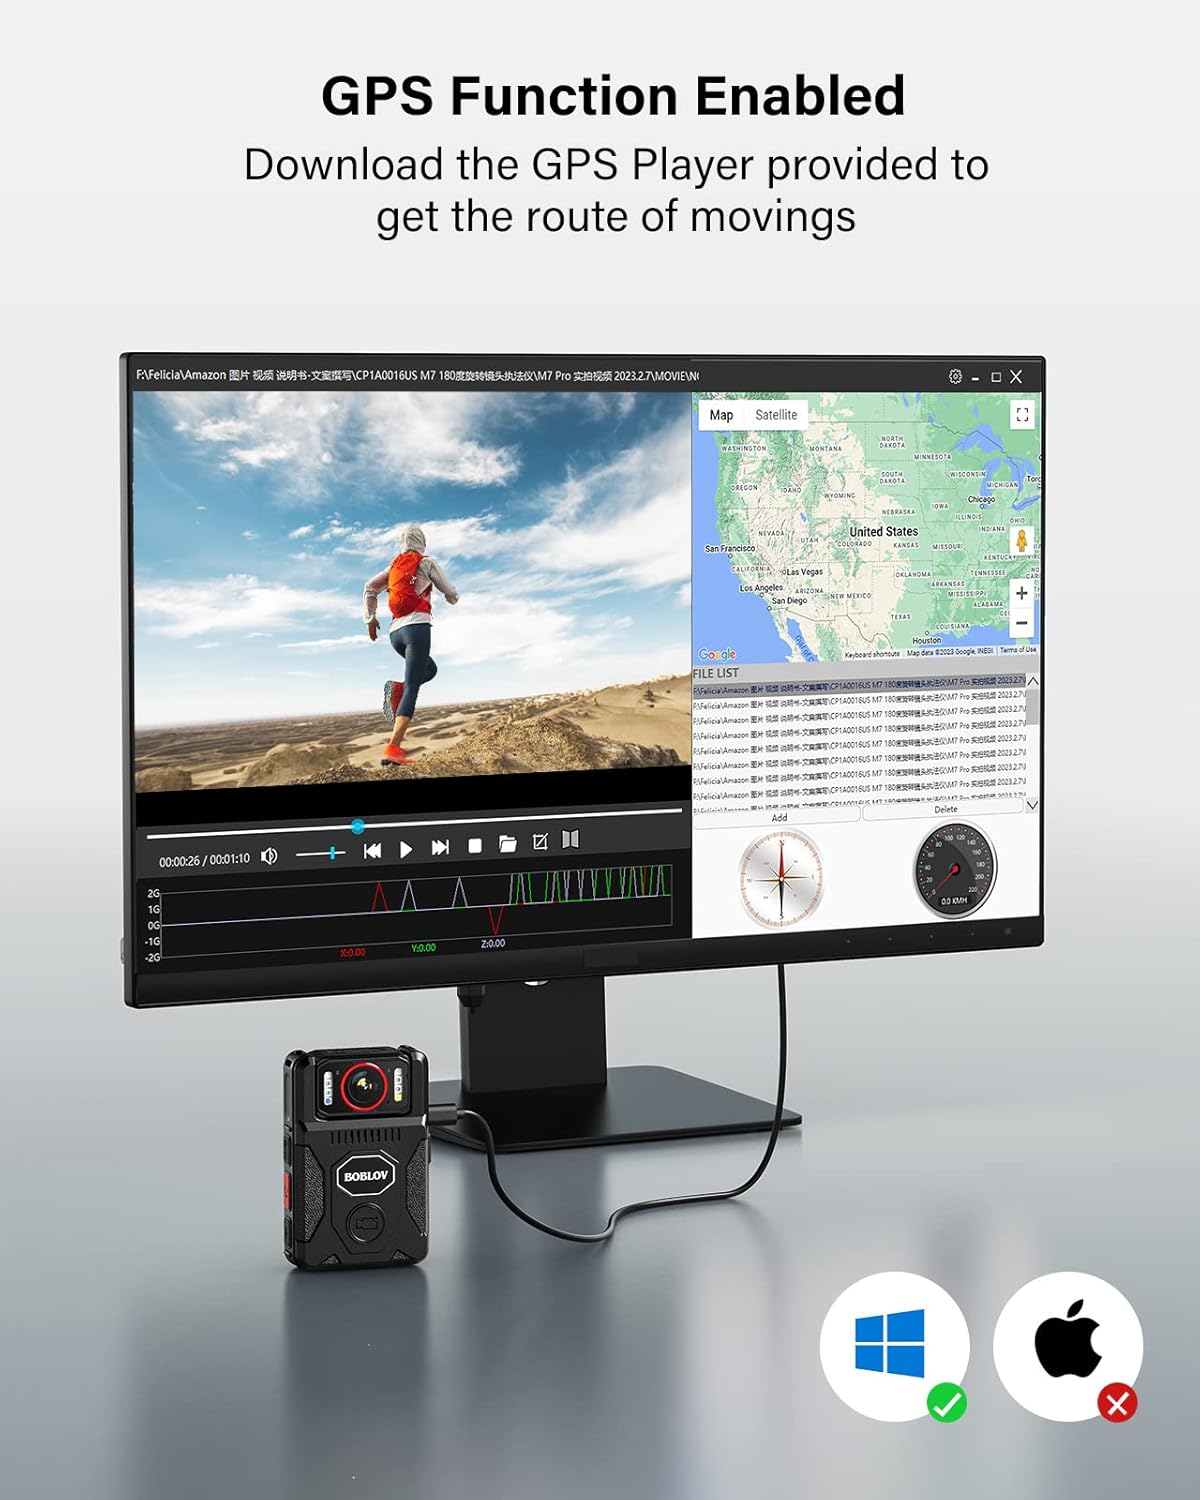
Figure 3: M7 Pro with Long Shoulder Clip

Figure 4: M7 Pro with Short Back Clip
2.3 Uhrzeit und Datum einstellen
Ensure the camera's time and date are correctly set for accurate record-keeping.
2.3.1 Without GPS (Manual Setting)
- Enter the camera's menu.
- Navigate to the 'Date&Time' setting option.
- Edit the date and time to your local settings.
- Exit the menu and verify the display.
2.3.2 With GPS (Automatic Synchronization)
For automatic time synchronization, ensure GPS is enabled and the camera can acquire a signal in an open area.
- In the camera's menu, set your local 'Time Zone'. For example, in the US, this is typically GMT -8:00. Adjust according to your specific location.
- Turn on the 'GPS' option in the menu.
- Take the M7 Pro to an open area to allow it to acquire a GPS signal.
- Once GPS is successfully located, the GPS icon on the display will change (e.g., from grey to green), and the time and date will automatically sync to the local time zone.
Video 2: Instructions on how to set the correct time for the M7 Pro body worn camera, both manually and using GPS synchronization.
3. Bedienungsanleitung
3.1 Ein-/Ausschalten und Aufnahme
The M7 Pro is designed for quick activation and recording.
- Einschalten: Halten Sie die Einschalttaste gedrückt, bis sich die Kamera einschaltet.
- Aufnahme starten: Press the dedicated video recording button (often red or clearly marked) to begin recording. The camera will typically provide an audio or visual cue (e.g., red light) to indicate recording has started.
- Aufnahme beenden: Press the video recording button again to stop recording.
- Ausschalten: Press and hold the power button until the camera powers off.
Video 3: Endeview of BOBLOV M7 Pro 4K GPS Body Worn Camera features, including power on, recording, and lens rotation.
3.2 180° drehbare Linse
The unique 180° rotatable lens allows for flexible shooting angles and auto-adjustment of image direction during standby or video recording.
- Manually rotate the lens to your desired angle.
- The camera will automatically adjust the image orientation on the display to ensure correct viewing, even if the camera body is inverted.
- Allow a few seconds for the camera to adjust the image direction after rotation.
Video 4: Guide on how to rotate the BOBLOV M7 Pro camera's lens and record videos, demonstrating the auto-orientation feature.

Abbildung 5: Um 180° drehbare Linse
3.3 Night Vision (IR Lights)
The M7 Pro is equipped with 4 IR lights for clear recording in low-light or nighttime conditions.
- After powering on, long press the dedicated night vision button (often marked with a moon or IR symbol) to turn on/off the four IR lights.
- The camera can operate in auto or manual night vision mode.

Figure 6: M7 Pro with IR Night Vision
3.4 White Light and Alarm Function
The camera includes a white light and an alarm function with red-blue flash lights for warning purposes.
- Weißes Licht: After powering on, short press the night vision button (often marked with a moon or IR symbol) to turn on/off the white light.
- Alarm Sound & Red-Blue Flash Lights: In standby mode, long press the photo button (often marked with a camera icon) to activate the alarm sound and red-blue flash lights.
- To deactivate the alarm sound, long press the photo button a second time.
- To turn off the lights (white and red-blue flash), long press the photo button a third time.
Video 5: Instructions on how to activate and deactivate the warning lights and alarm sound on the M7 Pro body camera.
3.5 GPS-Funktionalität
The integrated GPS allows for tracking driving routes via the provided GPS Player software.
- Ensure GPS is enabled in the camera's settings (refer to Section 2.3.2).
- Record video as usual. The GPS data will be embedded in the video files.
- Übertragen Sie das Video files zu einem Computer.
- Use the dedicated GPS Player software (provided by BOBLOV, typically available for download) to view the video and its corresponding route on a map.

Figure 7: GPS Functionality with GPS Player
3.6 Loop-Aufnahme
The M7 Pro supports loop recording, which automatically overwrites the oldest files wenn die Speicherkarte voll ist.
- Loop Recording is enabled by default.
- You can set the 'Video Duration' in the camera's menu to 5, 10, or 15 minutes per segment.
3.7 Erweiterte Nutzung als Dashcam
The M7 Pro can also be used as a dash camera for vehicle recording. An optional suction mount (not included) is required for this application.

Figure 8: M7 Pro Used as a Dash Camera
4. Wartung
4.1 Reinigung
- Verwenden Sie ein weiches, trockenes Tuch, um das Kameragehäuse zu reinigen.
- Verwenden Sie für die Linse ein spezielles Linsenreinigungstuch und eine spezielle Linsenreinigungslösung, um Kratzer zu vermeiden.
- Verwenden Sie keine aggressiven Chemikalien oder scheuernden Materialien.
4.2 Speicherung
- Bewahren Sie die Kamera an einem kühlen, trockenen Ort fern von direkter Sonneneinstrahlung und extremen Temperaturen auf.
- Avoid storing the camera in dusty or humid environments.
- Bei längerer Lagerung sollte darauf geachtet werden, dass der Akku teilweise geladen ist (etwa 50 %), um seine Lebensdauer zu verlängern.
5. Fehlerbehebung
If you encounter issues with your BOBLOV M7 Pro camera, refer to the following common problems and solutions:
| Problem | Mögliche Ursache | Lösung |
|---|---|---|
| Die Kamera lässt sich nicht einschalten. | Niedriger Akkustand; Kamera eingefroren. | Charge the camera fully. If frozen, try pressing the reset button (if available) or holding the power button for an extended period. |
| Schlechte Video-/Bildqualität. | Verschmutzte Linse; falsche Einstellungen; schlechte Lichtverhältnisse. | Clean the lens. Check video resolution settings (ensure 4K is selected). Activate IR night vision in low light. |
| GPS-Ortung nicht oder ungenau. | GPS disabled; obstructed signal; incorrect time zone. | Stellen Sie sicher, dass GPS in den Einstellungen aktiviert ist. Begeben Sie sich in ein offenes Gebiet mit klarem Himmel. view. Verify time zone settings. |
| Camera locks up or freezes. | Software glitch; internal memory issue. | Press the reset button (if available). Power off and restart. If persistent, contact customer support. |
| Cannot access recorded videos. | Connection issue; corrupted files. | Ensure proper USB connection to computer. Try a different USB port or cable. If files are corrupted, formatting the camera (which will erase data) might be necessary. |
If the problem persists after attempting these solutions, please contact BOBLOV customer support for further assistance.
6. Spezifikationen
Key technical specifications for the BOBLOV M7 Pro 4K GPS Body Worn Camera:
| Besonderheit | Detail |
|---|---|
| Marke | BOBLOV |
| Modellname | M7 Pro |
| Auflösung der Videoaufnahme | 4K |
| Fotosensor-Technologie | CMOS |
| Objektivtyp | Zoom, 180° Rotatable |
| Installierte Flash-Speichergröße | 256 GB |
| Batteriekapazität | 4000 mAh (up to 14 hours recording) |
| Ladezeit | 4-5 Stunden (mit Schnellladegerät) |
| Besonderheit | Infrared Night Vision, GPS |
| Bildschirmgröße | 2 Zoll |
| Konnektivitätstechnologie | USB |
| Wasserbeständigkeit | Nicht wasserfest |
| Betriebssystemkompatibilität | Android, iOS (for GPS Player software) |

Figure 9: M7 Pro Dimensions and Weight
7. Garantie und Support
7.1 Garantieinformationen
The BOBLOV M7 Pro Body Worn Camera comes with a 2 Jahr Garantie Diese Garantie gilt ab Kaufdatum und deckt Herstellungsfehler und Funktionsstörungen bei normalem Gebrauch ab. Sie deckt keine Schäden ab, die durch Missbrauch, Unfälle, unbefugte Änderungen oder Naturkatastrophen verursacht wurden.
7.2 Kundendienst
For any questions, technical assistance, or warranty claims, please contact BOBLOV customer service:
- E-Mail: Refer to the contact information provided in your product packaging or on the official BOBLOV webWebsite.
- Online-Ressourcen: Besuchen Sie die offizielle BOBLOV-Website. website for FAQs, software downloads (e.g., GPS Player), and additional support materials.


