1. Einleitung
This user manual provides essential information for the safe and efficient operation of your HYCHIKA 3.6V Cordless Electric Rechargeable Screwdriver Drill Set. Please read this manual thoroughly before first use and keep it for future reference.
The HYCHIKA 3.6V Cordless Electric Screwdriver is designed for various screwing and light drilling tasks around the home. It features a maximum torque of 6 N-m, a 6.35 mm quick-change chuck, and a versatile design that allows for both pistol and straight grip configurations.
2. Sicherheitshinweise
Beachten Sie beim Umgang mit Elektrowerkzeugen stets grundlegende Sicherheitsvorkehrungen, um das Risiko von Bränden, Stromschlägen und Verletzungen zu verringern.
- Sicherheit am Arbeitsplatz: Halten Sie Ihren Arbeitsbereich sauber und gut beleuchtet. Unordnung oder Dunkelheit erhöhen die Unfallgefahr. Betreiben Sie Elektrowerkzeuge nicht in explosionsgefährdeten Bereichen, z. B. in der Nähe von brennbaren Flüssigkeiten, Gasen oder Stäuben.
- Elektrische Sicherheit: Vermeiden Sie Körperkontakt mit geerdeten Oberflächen wie Rohren, Heizkörpern, Herden und Kühlschränken. Setzen Sie Elektrowerkzeuge weder Regen noch Nässe aus.
- Persönliche Sicherheit: Always wear eye protection. Use safety glasses, goggles, or a face shield. Wear hearing protection when operating noisy tools. Dress properly; avoid loose clothing or jewelry.
- Werkzeuggebrauch und -pflege: Wenden Sie keine Gewalt an. Verwenden Sie das für Ihren Anwendungszweck geeignete Elektrowerkzeug. Trennen Sie den Netzstecker und/oder entfernen Sie den Akku, bevor Sie Einstellungen vornehmen, Zubehör wechseln oder Elektrowerkzeuge lagern.
- Verwendung und Pflege des Akkus: Laden Sie den Akku nur mit dem vom Hersteller angegebenen Ladegerät auf. Verwenden Sie die Akkus nicht zusammen mit anderen Elektrowerkzeugen. Bewahren Sie den Akku bei Nichtgebrauch fern von anderen Metallgegenständen auf.
3. Packungsinhalt
Bitte prüfen Sie, ob alle unten aufgeführten Artikel in Ihrem Paket enthalten sind. Sollten Artikel fehlen oder beschädigt sein, kontaktieren Sie bitte unseren Kundenservice.
- 1 x HYCHIKA 3.6V Cordless Screwdriver
- 19 x Schraubendreher-Bits
- 1 x Erweiterungsleiste
- 1 x Ladeadapter
- 1 x Benutzerhandbuch

Figure 3.1: Contents of the HYCHIKA 3.6V Cordless Screwdriver package, including the screwdriver, various bits, and charging adapter.
4. Produktmerkmale und Komponenten
Familiarize yourself with the different parts of your cordless screwdriver.

Figure 4.1: Key components of the screwdriver, including the magnetic chuck, PUSH button, front LED light, On/Off switch, LED charger indicator, 3.5mm charger port, and forward & reverse button.
- Magnetic Chuck: 1/4 inch (6.35mm) quick-change chuck for easy bit installation and removal.
- LED-Frontlicht: Illuminates the work area for improved visibility in dark environments.
- Ein-/Ausschalter: Activates and deactivates the screwdriver.
- Forward & Reverse Button: Controls the rotation direction for screwing and unscrewing.
- LED Charger Indicator: Provides status of battery charging.
- 3.5mm Charger Port: Connection point for the charging adapter.
- Druckknopf: Used to adjust the grip configuration from pistol to straight.
5. Einrichtung
5.1 Laden des Akkus
The screwdriver is powered by a 3.6V 2000 mAh Lithium-Ion battery. Before first use, fully charge the battery.
- Connect the charging adapter to the 3.5mm charger port on the screwdriver.
- Stecken Sie den Ladeadapter in eine normale Steckdose.
- The LED charger indicator will illuminate during charging. Once fully charged, the indicator may change color or turn off depending on the model.
- Ziehen Sie den Stecker des Ladegeräts, sobald der Ladevorgang abgeschlossen ist.

Figure 5.1: The screwdriver connected to its charging adapter, indicating a full charge.
The screwdriver is designed to maintain full power output even when the battery is low, ensuring consistent performance until the battery is depleted.
5.2 Einsetzen der Schraubendreherbits
The screwdriver features a 1/4 inch (6.35mm) magnetic quick-change chuck for easy bit installation.
- Wählen Sie den passenden Schraubendreherbit für Ihre Aufgabe.
- Insert the bit into the magnetic chuck until it is securely seated. The magnetic chuck will hold the bit firmly in place.
- To remove a bit, simply pull it out of the chuck. Bits with grooves are designed for easier removal.

Figure 5.2: Visual guide for inserting a bit into the magnetic chuck and removing it.
6. Bedienungsanleitung
6.1 Adjusting Grip Configuration
The screwdriver can be used in two grip configurations: pistol grip or straight grip, for enhanced versatility and comfort.
- To change the grip, press and hold the "PUSH" button located at the top of the screwdriver.
- While holding the button, rotate the handle ninety degrees to switch between pistol and straight configurations.
- Release the "PUSH" button once the desired configuration is achieved. The handle will lock into place.
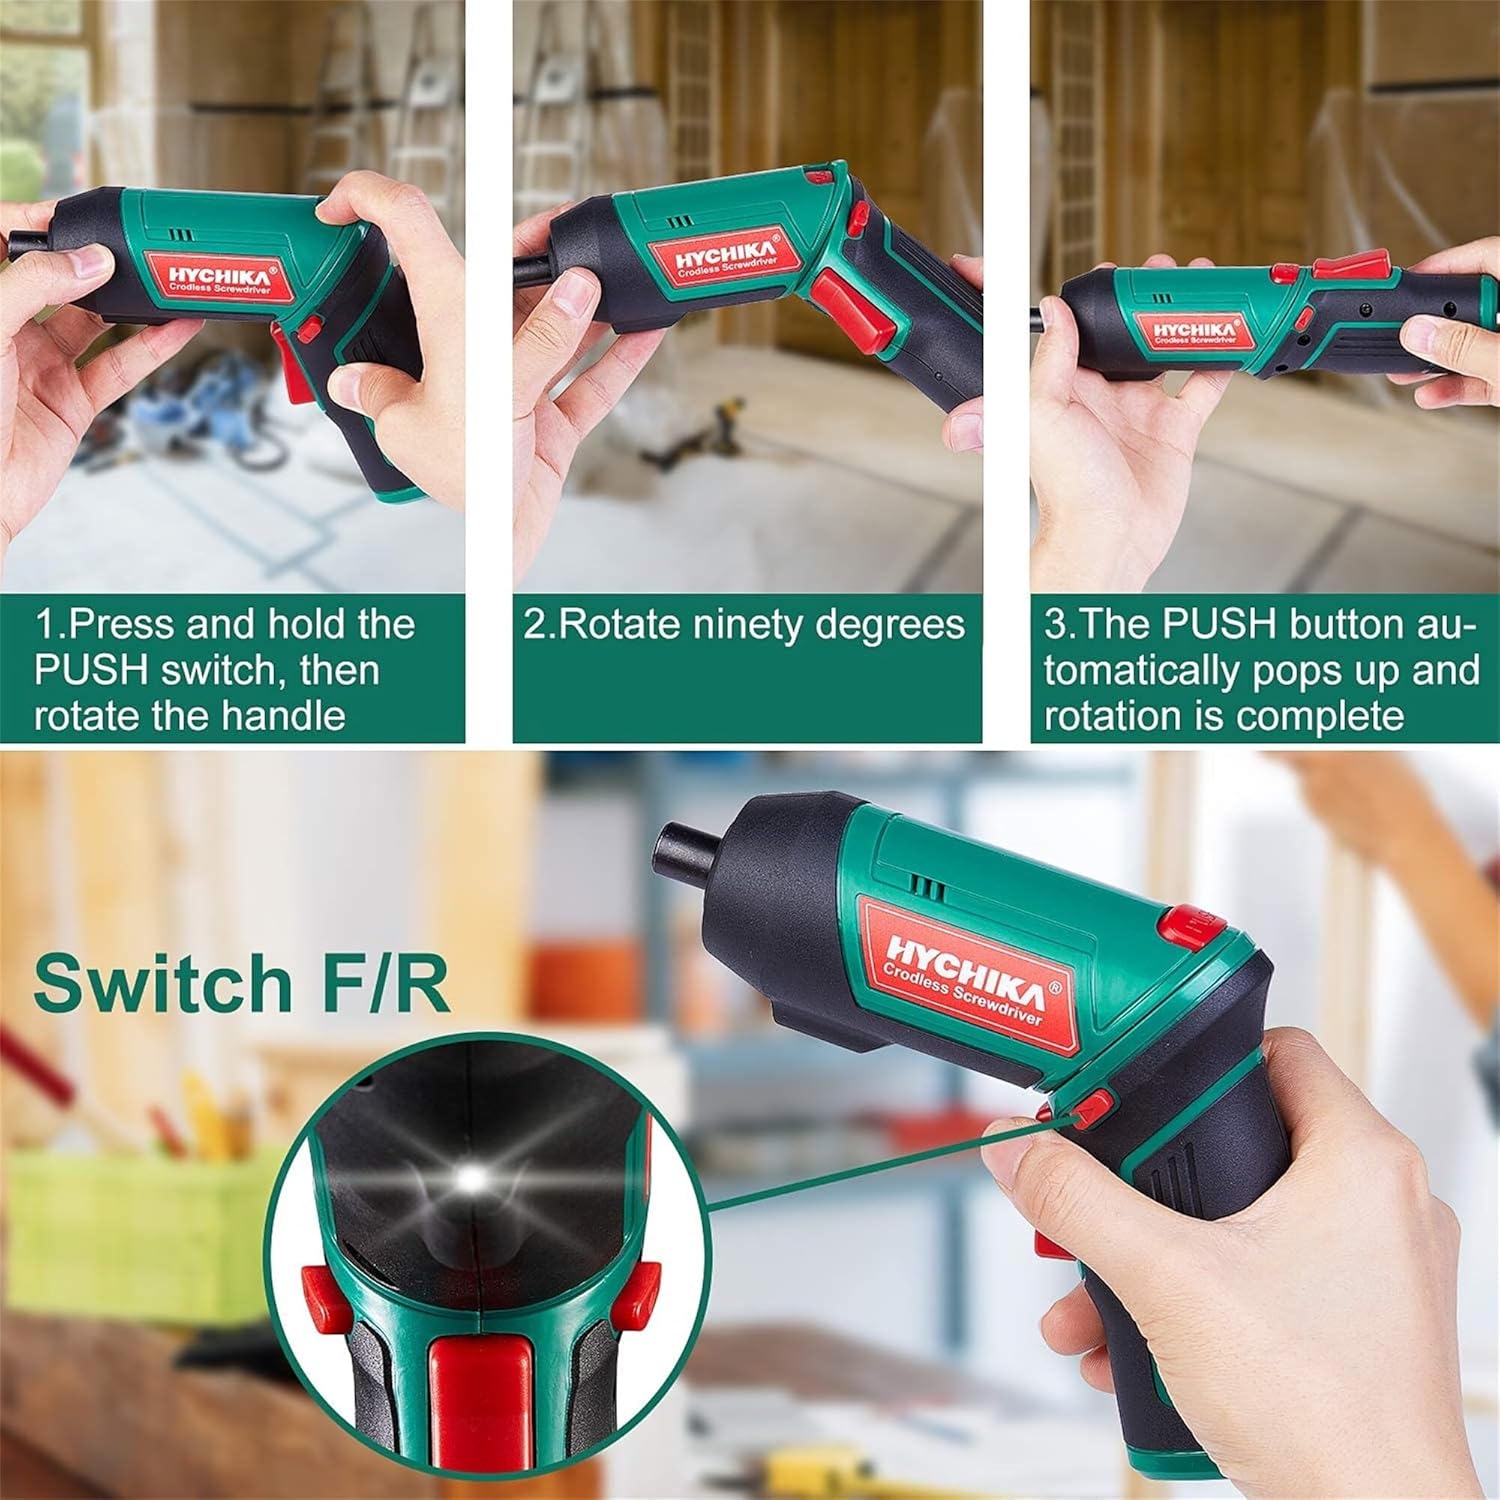
Figure 6.1: Demonstrates the process of transforming the screwdriver's grip by pressing the PUSH button and rotating the handle.
6.2 Vorwärts- und Rückwärtsbetrieb
The forward/reverse button controls the direction of rotation for screwing and unscrewing.
- To drive screws (forward rotation), push the forward/reverse button to the left (when viewvon der Rückseite des Werkzeugs aus bedient werden).
- To remove screws (reverse rotation), push the forward/reverse button to the right.
- When the button is in the center position, the tool is locked, preventing accidental activation.
6.3 Verwendung der LED-Arbeitsleuchte
The built-in LED light automatically illuminates when the screwdriver is in operation, providing visibility in dimly lit areas.

Figure 6.2: The integrated LED light provides clear illumination for working in dark environments.
7. Wartung
Regular maintenance ensures the longevity and optimal performance of your screwdriver.
- Reinigung: Keep the ventilation openings clean and free from dust. Use a soft, damp Tuch zum Reinigen des Werkzeugsasing. Verwenden Sie keine scharfen Chemikalien oder scheuernden Reinigungsmittel.
- Bit Care: Clean screwdriver bits after use. Store them in the provided case to prevent loss and damage.
- Batteriespeicher: If storing the tool for an extended period, ensure the battery is partially charged (around 50%) and store it in a cool, dry place. Recharge the battery every 3-6 months to maintain its health.
- Allgemeine Inspektion: Periodically check for any loose screws, damaged cords, or worn parts. Do not use the tool if any damage is observed.
8. Fehlerbehebung
This section addresses common issues you might encounter with your screwdriver.
| Problem | Mögliche Ursache | Lösung |
|---|---|---|
| Der Schraubendreher lässt sich nicht einschalten. | Batterie ist leer. Forward/Reverse switch is in the center (locked) position. | Laden Sie den Akku vollständig auf. Schieben Sie den Vorwärts-/Rückwärtsschalter nach links oder rechts. |
| Der Schraubendreher verliert schnell an Leistung. | Batterie nicht vollständig geladen. Battery life degraded. | Stellen Sie sicher, dass der Akku vor Gebrauch vollständig geladen ist. If battery life is significantly reduced, contact customer support for replacement options. |
| Bits are not held securely in the chuck. | Das Bit ist nicht vollständig eingefügt. Das Chuck ist verschmutzt oder beschädigt. | Push the bit firmly into the chuck until it clicks into place. Clean the chuck area. If damage is visible, contact customer support. |
Sollte das Problem nach Anwendung dieser Lösungsansätze weiterhin bestehen, wenden Sie sich bitte an den Kundendienst.
9. Spezifikationen
| Besonderheit | Spezifikation |
|---|---|
| Marke | Overstock (HYCHIKA) |
| Modellnummer | c131a012-0da9-4306-aeab-b1d9ff5cd4b7 |
| Bandtage | 3.6 Volt |
| Stromquelle | Batteriebetrieben |
| Geschwindigkeit | 180 U/min |
| Artikel Drehmoment | 6 Newton Meters (6 N-m) |
| Akku-Typ | Lithium-Ionen |
| Batteriekapazität | 2000 mAh |
| Chuck Größe | 1 mm (4/6.35 Zoll) |
| Material | Kunststoff, Gummi |
| Farbe | Grün |
| UPC | 616859793583 |
10. Garantie und Support
Overstock offers lifetime after-sales service for this product. For any questions, concerns, or technical assistance, please contact our customer support team.
Please have your model number (c131a012-0da9-4306-aeab-b1d9ff5cd4b7) and purchase information ready when contacting support.