1. Einleitung
This manual provides essential information for the safe and efficient operation of your DURATECH Hotsplash HS40-4KW Pool Heat Pump. Please read this manual thoroughly before installation, operation, or maintenance to ensure proper use and to prevent damage or injury.
The Hotsplash HS40-4KW is a compact and efficient heat pump designed for heating swimming pools up to 12 cubic meters. It features an environmentally friendly R32 gas refrigerant, a corrosion-resistant titanium heat exchanger, and an intuitive control panel for ease of use. It is designed to operate effectively in ambient temperatures of +10 °C and above.
2. Sicherheitshinweise
Always adhere to the following safety guidelines to prevent electric shock, fire, injury, or damage to the unit:
- Ensure the unit is installed by a qualified professional in accordance with local electrical and plumbing codes.
- Betreiben Sie das Gerät nicht, wenn das Netzkabel oder der Stecker beschädigt sind.
- Halten Sie Kinder und Haustiere während des Betriebs vom Gerät fern.
- Do not insert objects into the fan grille or any openings.
- Vor jeglichen Wartungs- oder Reinigungsarbeiten die Stromzufuhr unterbrechen.
- Sorgen Sie für eine ausreichende Belüftung rund um das Gerät.
3. Produktkomponenten
Familiarize yourself with the main components of your Hotsplash HS40-4KW heat pump:

Abbildung 3.1: Gesamt view of the Hotsplash HS40-4KW pool heat pump, blue and black, with power cord and water hose connected. This image shows the compact design and the main connections.

Abbildung 3.2: Front view of the Hotsplash HS40-4KW pool heat pump, showing the main fan and the "Hot Splash" logo, along with the water inlet and outlet connections. The fan draws air in for heat exchange.

Abbildung 3.3: Seite view of the Hotsplash HS40-4KW pool heat pump, highlighting the water inlet and outlet ports and the fan grille. These ports are crucial for connecting to your pool's filtration system.
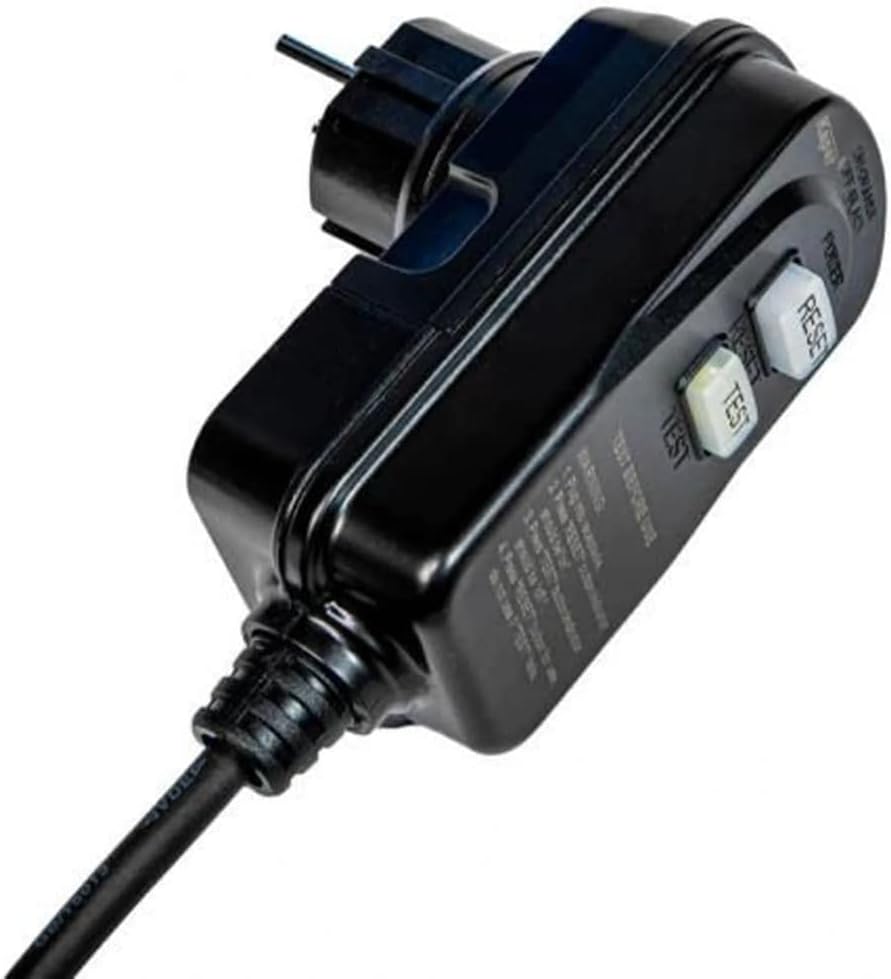
Abbildung 3.4: Close-up of the power plug for the Hotsplash HS40-4KW, featuring "TEST" and "RESET" buttons for safety. Always test the RCD/GFCI before each use.

Abbildung 3.5: A hand demonstrating the integrated carrying handle on the top of the Hotsplash HS40-4KW pool heat pump, highlighting its portability.
4. Einrichtung und Installation
Proper installation is crucial for the performance and longevity of your heat pump. The unit should be placed on a stable, level surface with adequate clearance for air circulation (at least 50 cm around the fan outlet).
4.1. Platzierung
- Place the heat pump outdoors, ensuring it is not exposed to direct sunlight for prolonged periods or heavy rain without adequate cover.
- Ensure the ambient temperature is above +10 °C for optimal operation.
- Consider the noise level and air discharge direction when choosing a location.
4.2. Wasseranschlüsse
Connect the heat pump to your pool's filtration system. The unit uses a full-flow technology, meaning the entire pool water flow passes through the heat pump.
- Identify the water inlet and outlet ports on the heat pump (refer to Figure 3.3).
- Connect the outlet of your pool filter pump to the heat pump's IN Hafen.
- Connect the heat pump's AUS port back to your pool's return line.
- Stellen Sie sicher, dass alle Verbindungen sicher und wasserdicht sind, um Leckagen zu vermeiden.
4.3. Elektrische Verbindung
The Hotsplash HS40-4KW comes with a pre-wired power cord and a safety plug (RCD/GFCI).
- Ensure the power outlet is suitable for the unit's electrical requirements (refer to specifications).
- Stecken Sie das Netzkabel in eine geerdete Steckdose.
- Before each use, press the "TEST" button on the plug, then the "RESET" button to ensure the safety device is functioning correctly.
5. Bedienungsanleitung
The Hotsplash HS40-4KW features an intuitive control panel with three buttons for easy operation.
5.1. Erstinbetriebnahme
- Ensure the pool filter pump is running and water is flowing through the heat pump. The heat pump requires water flow to operate.
- Plug in the heat pump and perform the RCD/GFCI test (Section 4.3).
- The unit will typically start automatically or can be turned on using the power button on the control panel.
5.2. Einstellen der gewünschten Temperatur
Use the control panel buttons to adjust the target water temperature. Refer to the display for the current water temperature and the set temperature.
- Drücken Sie die SATZ button to enter temperature adjustment mode.
- Verwenden Sie die UP Und RUNTER arrows to increase or decrease the desired temperature.
- Drücken SATZ again or wait a few seconds for the setting to be saved.
5.3. Normalbetrieb
The heat pump will automatically turn on and off to maintain the set temperature, provided there is continuous water flow from the pool pump. The fan will operate to draw in ambient air for heat exchange.
6. Wartung
Regelmäßige Wartung gewährleistet optimale Leistung und verlängert die Lebensdauer Ihrer Wärmepumpe.
6.1. Reinigung
- Reinigen Sie die Außenseite des Geräts regelmäßig mit einem weichen, feuchten Tuch.amp Tuch. Verwenden Sie keine scharfen Chemikalien oder Scheuermittel.
- Ensure the air intake and exhaust grilles are free from debris, leaves, and other obstructions. Blockages can reduce efficiency.
6.2. Winterization (If Applicable)
If you live in an area where temperatures drop below +10 °C and you will not be using the pool, it is recommended to winterize the heat pump:
- Trennen Sie die Stromversorgung.
- Drain all water from the heat pump by disconnecting the water hoses.
- Store the unit in a dry, protected area, or cover it with a breathable, waterproof cover if left outdoors.
7. Fehlerbehebung
Dieser Abschnitt bietet Lösungen für häufig auftretende Probleme.
| Problem | Mögliche Ursache | Lösung |
|---|---|---|
| Das Gerät lässt sich nicht einschalten | No power; RCD/GFCI tripped; Insufficient water flow | Check power connection; Reset RCD/GFCI; Ensure pool pump is running and water flow is adequate. |
| Schlechte Heizleistung | Low ambient temperature; Dirty coils/grilles; Incorrect temperature setting; Pool size too large | Ensure ambient temperature is above +10 °C; Clean unit; Verify temperature setting; Confirm pool volume is within recommended limits (up to 12 m³). |
| Ungewöhnliche Geräusche | Debris in fan; Loose components; Unit not level | Inspect and remove debris; Check for loose parts; Ensure unit is on a stable, level surface. |
| Wasserleck | Loose hose connections; Damaged O-rings | Alle Schlauchverbindungen festziehen; O-Ringe prüfen und gegebenenfalls ersetzen. |
Sollte das Problem nach Anwendung dieser Lösungsansätze weiterhin bestehen, wenden Sie sich bitte an den Kundendienst.
8. Spezifikationen
| Besonderheit | Spezifikation |
|---|---|
| Modellnummer | HS40 |
| Technische Daten | 30 cm (L) x 30 cm (B) x 35 cm (H) |
| Produktgewicht | 16 Kilogramm |
| Material | Plastik |
| Farbe | Blau |
| Sonderfunktion | Hot Water (Pool Heating) |
| Empfohlenes Poolvolumen | Bis zu 12 m³ |
| Minimale Betriebsumgebungstemperatur | +10 °C |
| Kältemittel | R32 (Umweltfreundlich) |
| Wärmetauscher | Titanium (Corrosion-resistant) |
9. Garantieinformationen
DURATECH products are manufactured to high-quality standards and are covered by a manufacturer's warranty. Please refer to the warranty card included with your product or visit the official DURATECH webDie detaillierten Garantiebedingungen finden Sie auf der Website. Bewahren Sie Ihren Kaufbeleg für Garantieansprüche auf.
10. Kundendienst
For technical assistance, troubleshooting beyond this manual, or spare parts inquiries, please contact DURATECH customer support. Have your product model number (HS40) and purchase details ready when contacting support.
You can typically find contact information on the DURATECH official webauf der Website oder auf der Verpackung Ihres Produkts.


