1. Einleitung
This user manual provides comprehensive instructions for the installation, operation, and maintenance of your HDWR videoCAR-L300 Dash Cam. Please read this manual thoroughly before using the device to ensure proper functionality and to maximize its lifespan. Keep this manual for future reference.
2. Produktüberschreitungview
The HDWR videoCAR-L300 is a versatile dash camera designed to enhance your driving safety and record your journeys. It functions as both a front and rear recording device, integrated into a rearview mirror with a touchscreen display.
Hauptmerkmale:
- Full-HD-Videoaufzeichnung: The front camera records in Full HD (1920x1080) resolution, providing clear and detailed video footage.
- Rear Camera Functionality: The rear camera offers VGA (640x480) recording resolution and can also serve as a reverse camera for parking assistance.
- Integrated 4.7-inch Touchscreen Display: The wide mirror, approximately 30 cm, features a built-in 4.7-inch touchscreen for easy operation and increased rear visibility.
- 120-Grad-Weitwinkelobjektiv: The front camera's lens offers a 120-degree viewing angle, capturing a broad area in front of your vehicle.
- Automatische Operation: Features include automatic camera start and stop, motion detection, and adjustable sensitivity.
- G-Sensor for Impact Detection: Automatically protects recordings from being overwritten in the event of sudden braking or a collision.
- Unterstützung für MicroSD-Karten: Supports microSD memory cards up to 32GB for storing recorded video and audio files.

Abbildung 2.1: Vorderseite view of the HDWR videoCAR-L300 Dash Cam, showing the mirror display with a car image.
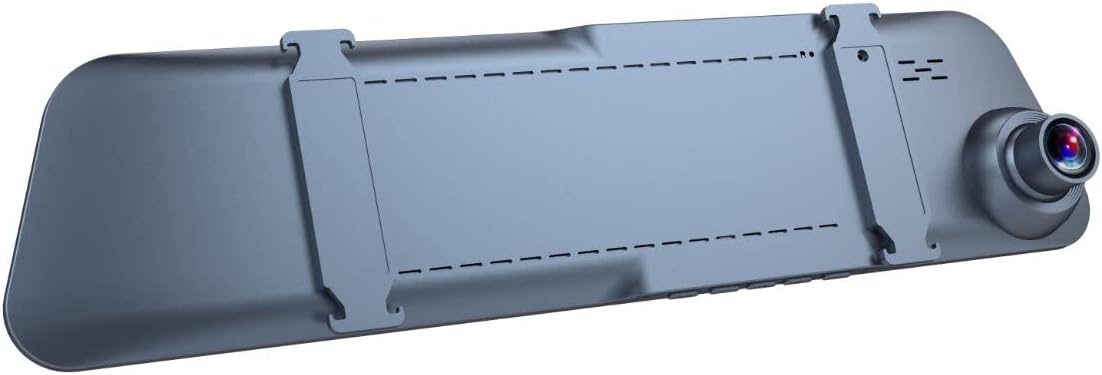
Abbildung 2.2: Rückseite view of the HDWR videoCAR-L300 Dash Cam, highlighting the mounting clips for installation.
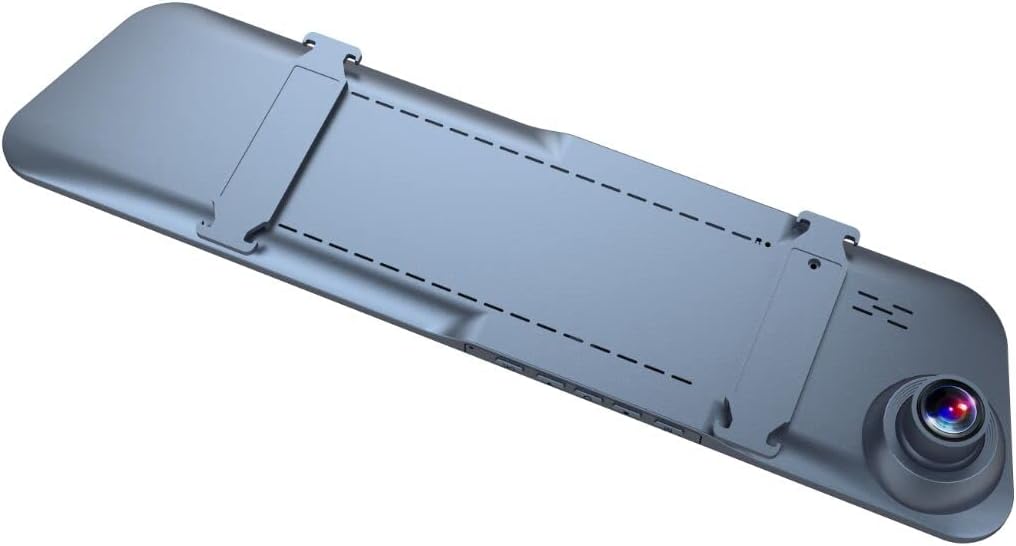
Abbildung 2.3: Schräge Rückseite view of the HDWR videoCAR-L300 Dash Cam, showing the camera lens and mounting clips.

Abbildung 2.4: Explosionsdarstellung view illustrating the various perspectives of the HDWR videoCAR-L300 Dash Cam.
3. Einrichtung und Installation
3.1 Was ist in der Box?
Bitte stellen Sie vor Beginn der Installation sicher, dass alle Komponenten vorhanden sind:
- HDWR videoCAR-L300 Dash Cam Unit
- Ladekabel
- Installationstool
- Benutzerhandbuch (dieses Dokument)
3.2 Installation Steps (Windshield Mount)
The videoCAR-L300 is designed for windshield mounting, typically over your existing rearview Spiegel.
- Bereiten Sie das Gerät vor: Gently unbox the dash cam and ensure the protective film is removed from the screen and lens.
- Montage: Befestigen Sie die Dashcam sicher am Heck Ihres Fahrzeugs.view mirror using the integrated clips. Ensure it is firmly in place and does not obstruct your view.
- Strom anschließen: Use the provided charging cable to connect the dash cam to your vehicle's 12V power outlet (cigarette lighter socket). Route the cable neatly to avoid interference with driving.
- Rückfahrkamera einbauen (optional): If using the rear camera, connect it to the main unit and route its cable to the rear of the vehicle. Mount the rear camera in a suitable location, typically near the license plate or inside the rear window, ensuring a clear view.
- MicroSD-Karte einlegen: Insert a compatible microSD card (up to 32GB, not included) into the designated slot on the dash cam. Ensure it is inserted correctly until it clicks into place.
- Erstes Einschalten: Start your vehicle. The dash cam should automatically power on. If not, press the power button.
- Winkel anpassen: Adjust the angle of the front camera lens to ensure it captures the road ahead clearly. Use the live view on the touchscreen display for precise alignment.

Figure 3.1: The dash cam installed on the vehicle's rearview mirror, showing its integration into the car's interior.
4. Bedienungsanleitung
4.1 Ein-/Ausschalten
- Automatische Operation: The device is designed to automatically power on and begin recording when your vehicle's ignition is turned on, and power is supplied. It will automatically power off when the ignition is turned off.
- Manuelle Bedienung: To manually power on or off, press and hold the power button located on the device.
4.2-Zoll-Touchscreen-Navigation
The 4.7-inch touchscreen display allows for intuitive navigation through menus and settings.
- Haupt-Schnittstelle: Zeigt Live-Anzeigen view from the front and/or rear cameras.
- Zugriff auf Menüs: Tap the screen to reveal menu icons. Swipe left/right or up/down to navigate through options.
- Optionen auswählen: Tippen Sie auf ein Symbol oder eine Option, um sie auszuwählen.

Figure 4.1: The dash cam's screen showing a live road view, indicating active recording.
4.3 Aufnahmemodi
- Loop-Aufnahme: Die Dashcam zeichnet Videos kontinuierlich in Segmenten auf (z. B. 1, 3 oder 5 Minuten). Wenn die Speicherkarte voll ist, wird das älteste ungesperrte Video automatisch gespeichert. files werden automatisch überschrieben.
- G-Sensor (Notfallaufzeichnung): In the event of sudden braking or a collision, the built-in G-Sensor detects the impact and automatically locks the current video segment, preventing it from being overwritten by loop recording.
- Bewegungserkennung: When enabled, the camera will automatically start recording if it detects movement in front of the vehicle while parked. This feature requires continuous power supply.
4.4 Wiedergabe
Um zu review aufgenommenes footage:
- From the main screen, tap to access the menu.
- Select the "Playback" or "Gallery" option.
- Browse through the recorded video and audio fileS. Gesperrt files (from G-Sensor events) will typically be in a separate folder.
- Tippen Sie auf file to play it back on the screen.
4.5 Einstellungsanpassung
Über das Einstellungsmenü können Sie verschiedene Parameter anpassen:
- Videoauflösung: Adjust recording quality (e.g., Full HD, VGA).
- Dauer der Loop-Aufnahme: Set the length of video segments.
- G-Sensor-Empfindlichkeit: Adjust the sensitivity of the impact detection.
- Bewegungserkennung: Aktivieren oder deaktivieren Sie diese Funktion.
- Datum/Uhrzeit Stamp: Ensure the correct date and time are set for accurate recording timestamps.
- Audioaufnahme: Mikrofonaufnahme aktivieren oder deaktivieren.
- Bildschirmschoner: Set the display to turn off after a period of inactivity to avoid distraction while driving.
5. Wartung
Regelmäßige Wartung gewährleistet optimale Leistung und Langlebigkeit Ihrer Dashcam.
- Reinigung der Linse: Verwenden Sie ein weiches, fusselfreies Tuch, um die Kameralinsen vorsichtig abzuwischen. Vermeiden Sie scheuernde Materialien oder aggressive Chemikalien, die die Linse zerkratzen könnten.
- Reinigen des Bildschirms: Wipe the touchscreen display with a soft, dry cloth. For stubborn smudges, slightly dampspülen Sie das Tuch mit Wasser aus.
- Wartung der microSD-Karte: Format the microSD card regularly (e.g., once a month) within the camera's settings to prevent data corruption and ensure smooth recording. Back up any important footage vor der Formatierung.
- Temperatur: Avoid exposing the device to extreme temperatures (very hot or very cold) for extended periods, as this can affect battery life and component performance.
- Sichere Montage: Überprüfen Sie regelmäßig, ob die Dashcam sicher befestigt ist, um zu verhindern, dass Vibrationen die Videoqualität beeinträchtigen oder zum Herunterfallen des Geräts führen.
6. Fehlerbehebung
If you encounter issues with your HDWR videoCAR-L300, refer to the following common problems and solutions:
| Problem | Mögliche Ursache | Lösung |
|---|---|---|
| Gerät lässt sich nicht einschalten. | No power supply; loose cable connection; faulty power adapter. | Check the charging cable connection to the device and the vehicle's power outlet. Ensure the vehicle's ignition is on. Try a different power outlet or cable if available. |
| Die Aufnahme stoppt oder friert ein. | Full or corrupted microSD card; slow microSD card; G-Sensor triggered too often. | Format the microSD card (back up data first). Use a high-speed (Class 10 or U1/U3) microSD card. Adjust G-Sensor sensitivity in settings. |
| Video footage ist verschwommen oder undeutlich. | Dirty lens; protective film still on lens; improper camera angle. | Clean the camera lens with a soft cloth. Remove any protective film. Adjust the camera angle to ensure a clear view der Straße. |
| Der Bildschirm reagiert nicht. | Vorübergehender Softwarefehler. | Perform a soft reset by pressing and holding the power button until the device restarts. If unresponsive, disconnect power and reconnect. |
| Die Rückkamera funktioniert nicht. | Loose connection; faulty cable or camera. | Überprüfen Sie die Verbindung des Rückkamerakabels mit dem Hauptgerät. Stellen Sie sicher, dass das Kabel nicht beschädigt ist. |
If the problem persists after trying these solutions, please contact HDWR customer support for further assistance.
7. Spezifikationen
| Besonderheit | Detail |
|---|---|
| Marke | HDWR |
| Modellname | videoCAR |
| Artikelmodellnummer | L300 |
| Technische Daten | 3.5D x 29.7W x 7H cm; 180 grams |
| Bildschirmgröße | 4.7 Zoll |
| Videoauflösung (Vorderseite) | Full HD (1920 x 1080p) |
| Videoauflösung (Rückseite) | VGA (640x480) |
| Viewing-Winkel | 120 Grad |
| Flash-Speichertyp | microSD (bis zu 32 GB) |
| Konnektivitätstechnologie | AUX |
| Besondere Merkmale | Motion Sensor, G-Sensor |
| Kontrollmethode | Berühren |
| Montagetyp | Windschutzscheibenhalterung |
| Batterien im Lieferumfang enthalten | NEIN |
| Kompatible Geräte | Smartphone |
8. Garantie und Support
For warranty information and technical support, please refer to the official HDWR website or contact their customer service directly. Details regarding warranty periods and service procedures are typically provided with your purchase documentation or on the manufacturer's webWebsite.
Für weitere Unterstützung besuchen Sie bitte: www.hdwr.eu


