1. Einleitung
Thank you for choosing the GenMachine Mini PC. This compact yet powerful computer is designed to deliver exceptional performance for a variety of tasks, including gaming, office productivity, and creative design. Equipped with an AMD Ryzen 7 3750H processor, ample memory, and fast storage, it offers a seamless computing experience. This manual provides essential information for setting up, operating, maintaining, and troubleshooting your new Mini PC.
2. Lieferumfang
Bitte überprüfen Sie beim Auspacken, ob alle Artikel vorhanden und in gutem Zustand sind.
- 1 x GenMachine Mini PC
- 1 x HDMI-Kabel
- 1 x Netzteil
- 1 x Benutzerhandbuch (dieses Dokument)
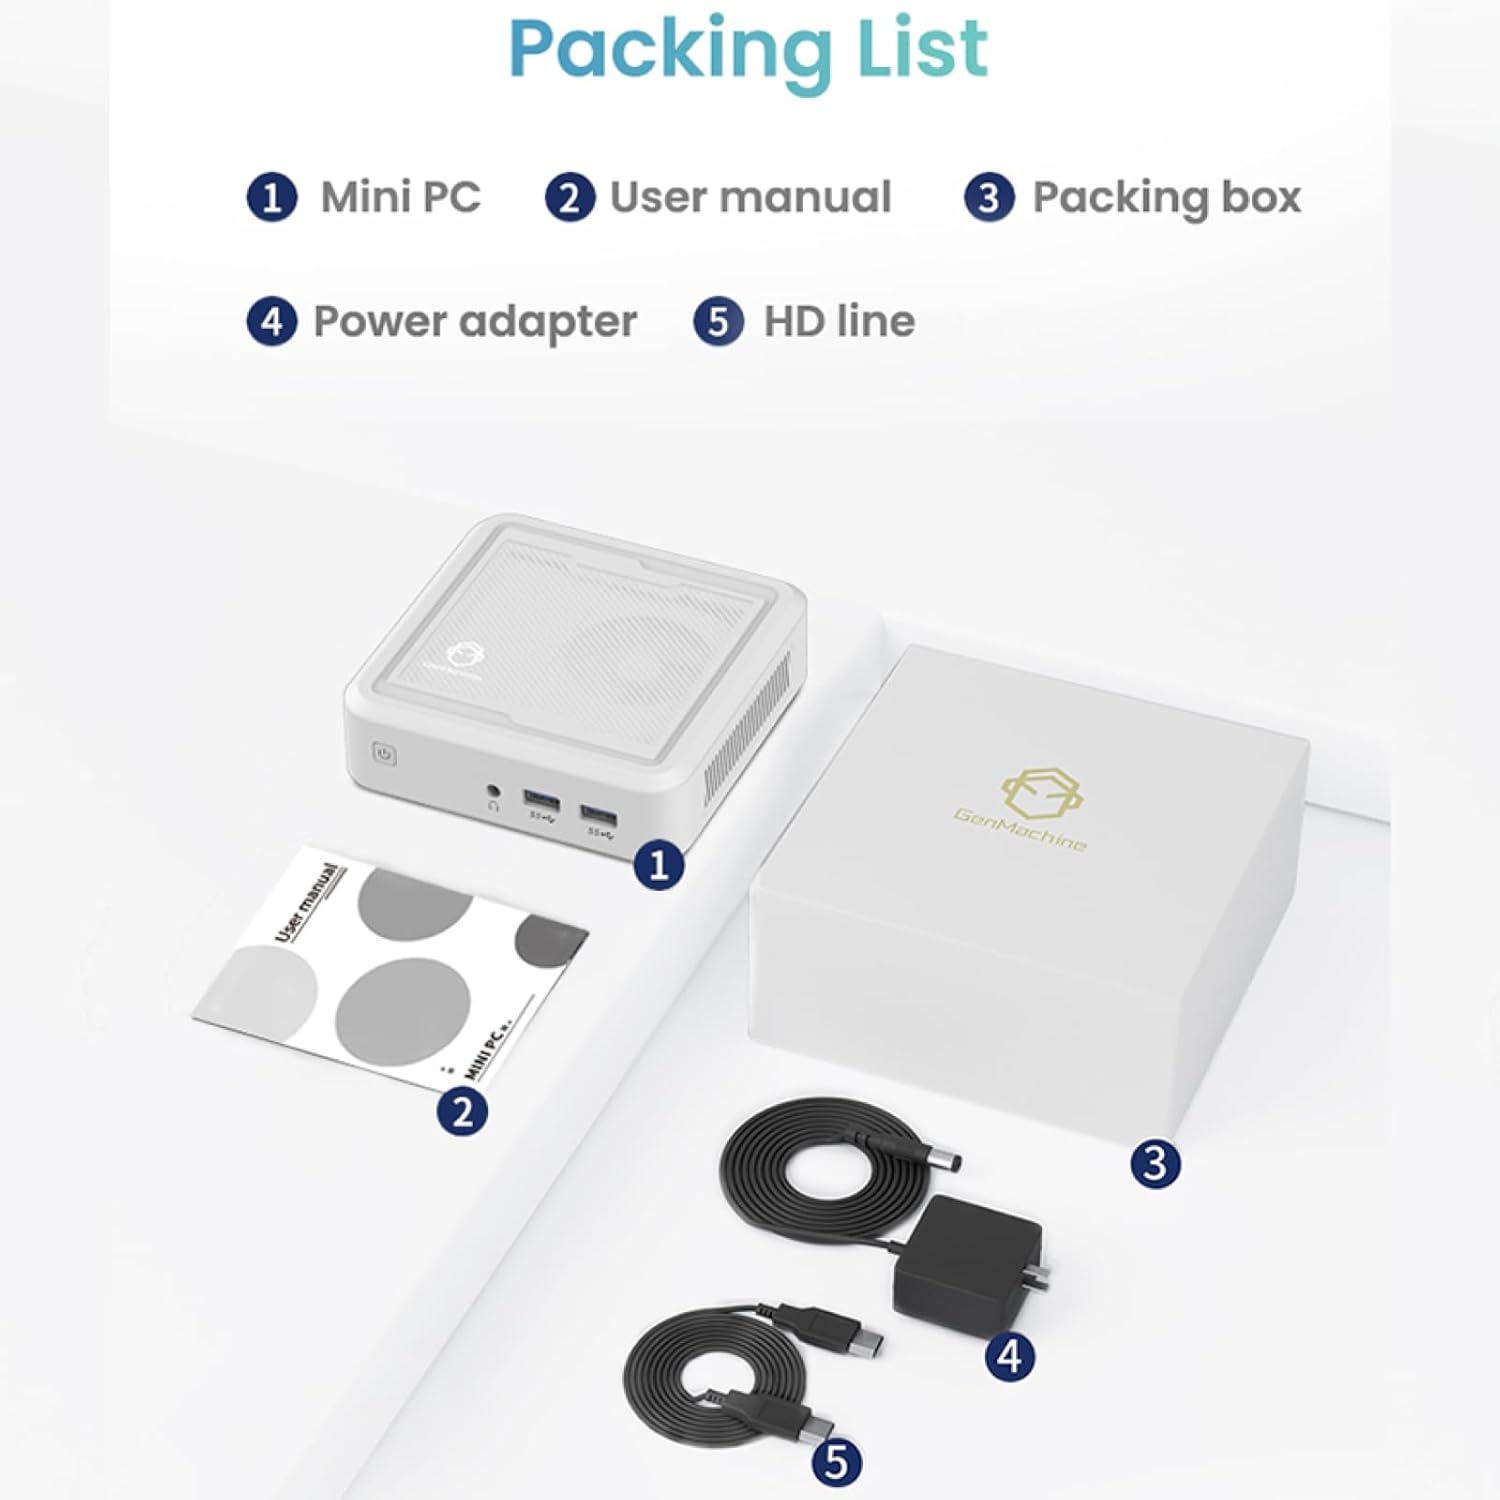
Figure 2.1: Packaging contents of the GenMachine Mini PC.
3. Produktmerkmale
The GenMachine Mini PC is engineered with features to enhance your computing experience:
- Starke Leistung: Equipped with an AMD Ryzen 7 3750H processor, delivering speeds up to 4.0GHz with 4 cores and 8 threads for demanding tasks.
- AmpSpeicher und Datenspeicherung: Features 8GB of DDR4 RAM and a 256GB SSD with M.2 NVMe support for seamless multitasking and quick file Zugang.
- Vielseitige Konnektivität: Advanced WiFi 6 and Bluetooth 5.2 capabilities ensure high-speed internet and smooth device pairing.
- Kompaktes Design: A sleek, small form factor that fits easily into any workspace or gaming setup.
- Mehrere Anzeigeoptionen: HDMI and DisplayPort outputs support dual 4K displays for expanded productivity and immersive visuals.

Abbildung 3.1: Vorderseite view of the GenMachine Mini PC.
3.1 Rich Interface for Easy Connection
The Mini PC offers a comprehensive set of ports to meet various connectivity needs:
- USB 3.0 x 4
- HDMI x 1
- DisplayPort (DP) x 1
- LAN (Ethernet) x 1
- 3.5mm Audio Jack x 1
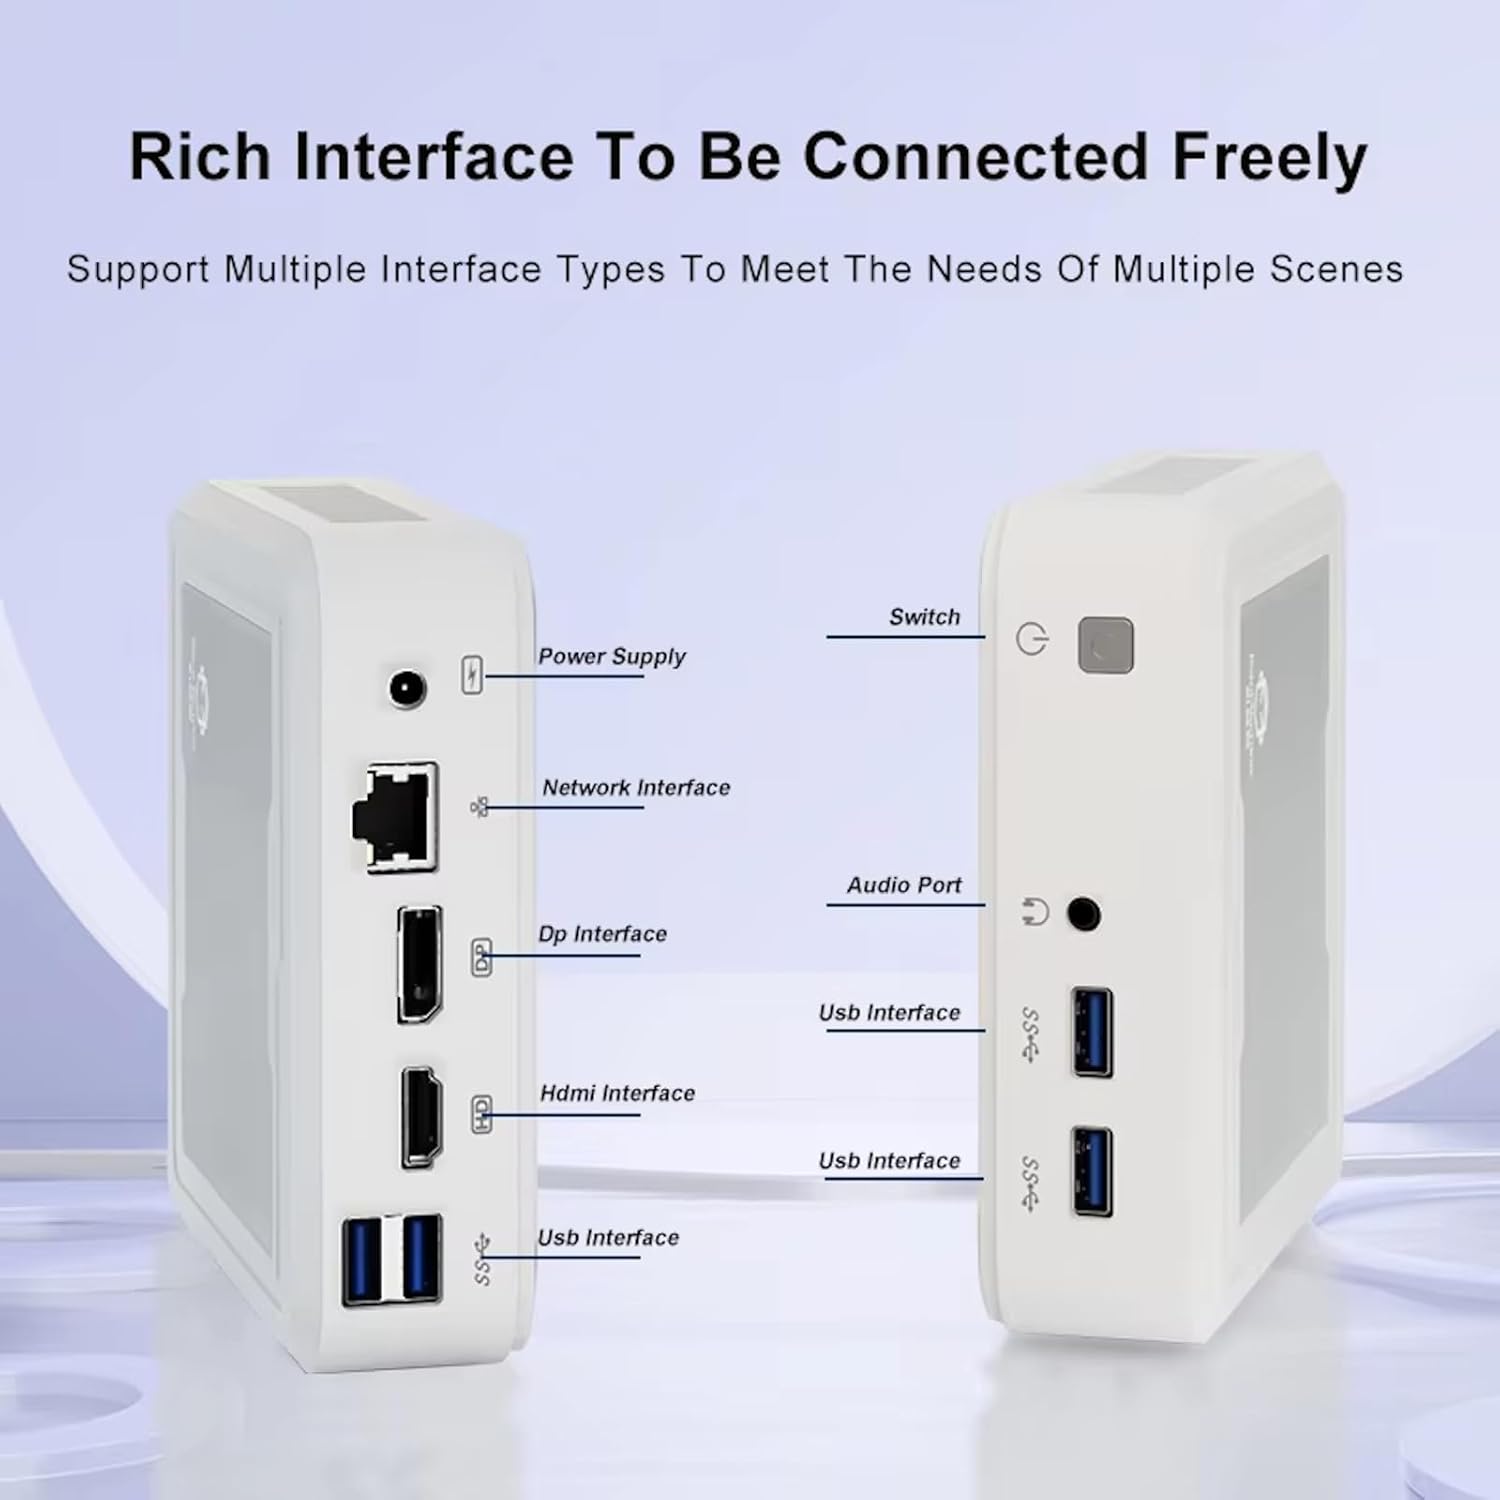
Figure 3.2: Available ports on the GenMachine Mini PC.
3.2 Dual Monitor Support
Enhance your productivity or gaming experience by connecting up to two 4K displays simultaneously using the HDMI and DisplayPort outputs.

Figure 3.3: Dual 4K display setup with the GenMachine Mini PC.
Video 3.1: Demonstration of the GenMachine Mini PC supporting two monitors simultaneously.
3.3 Energy Efficiency and Quiet Operation
Designed for low noise operation, the Mini PC maintains a quiet environment, making it suitable for various settings.

Figure 3.4: Noise level comparison of the GenMachine Mini PC.
3.4 Compact and Durable Design
The Mini PC features an ultra-durable, lightweight metal casing, making it space-saving and robust for any work environment.
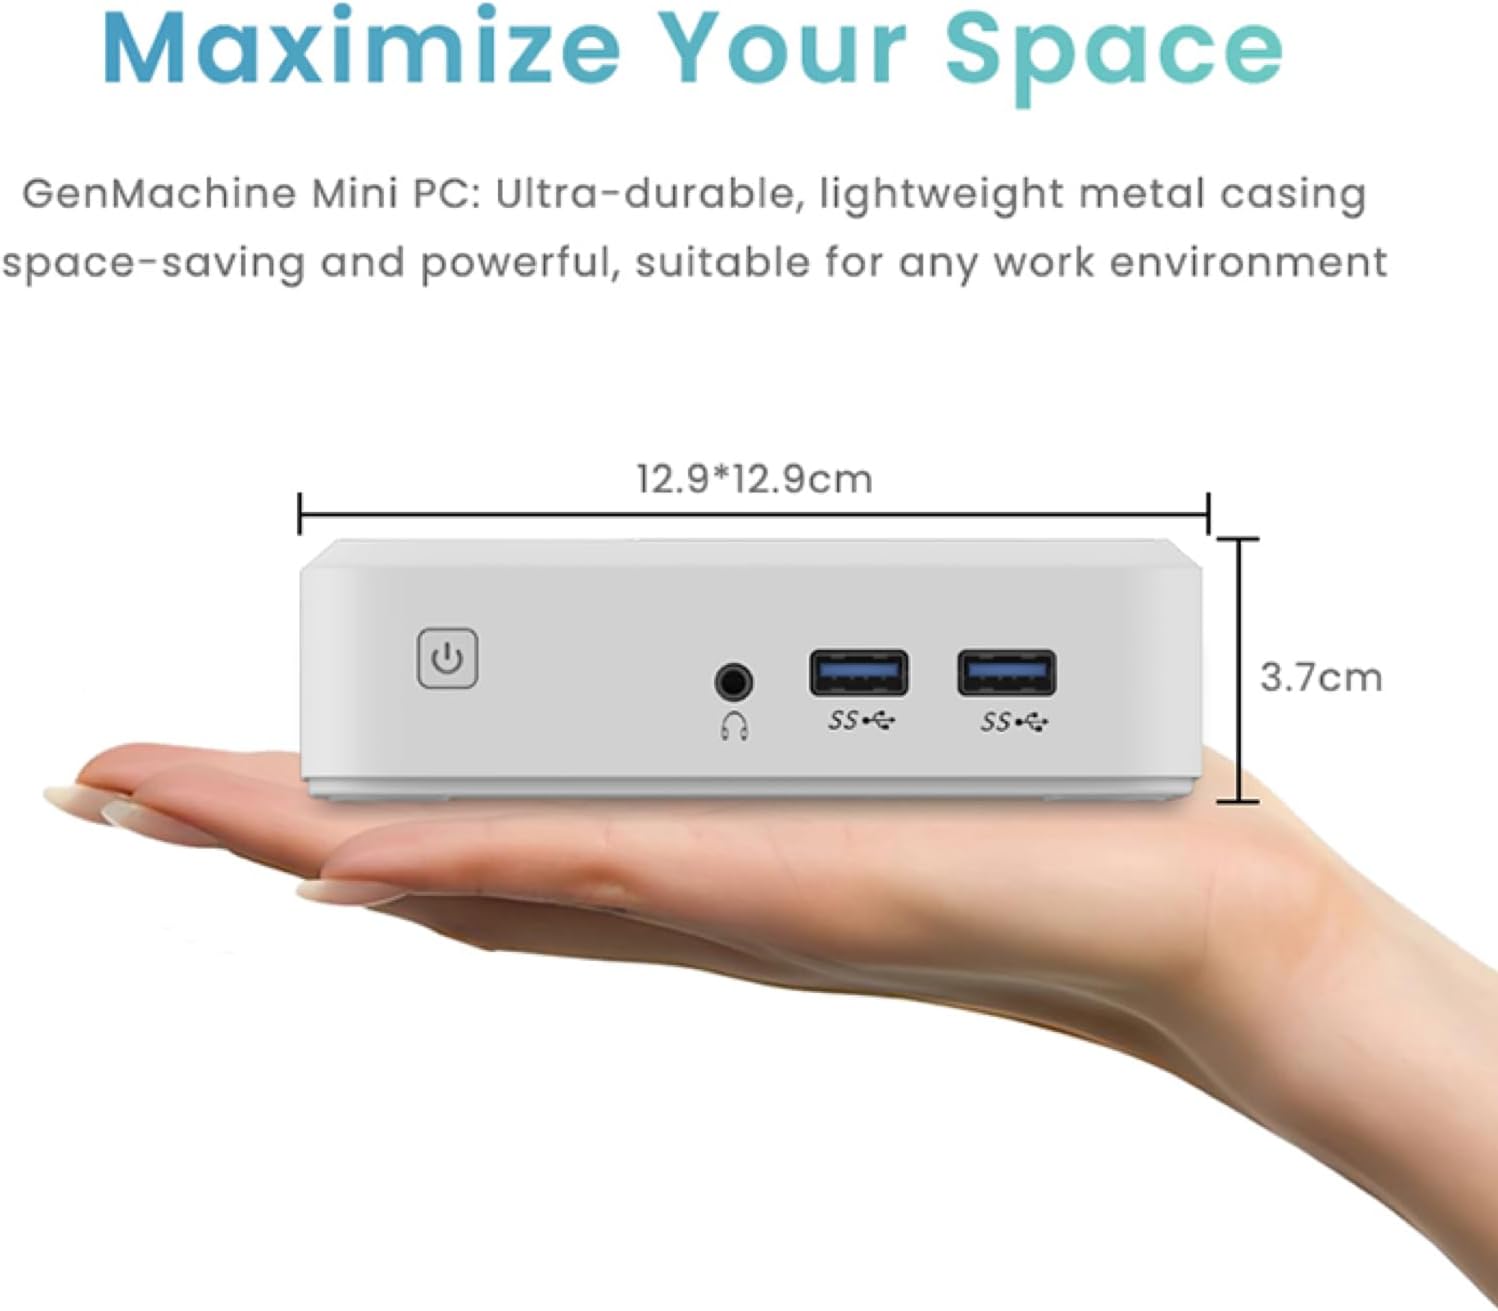
Figure 3.5: Compact size of the GenMachine Mini PC.
Video 3.2: Endeview of the GenMachine Mini PC's features and compact design.
4. Installationsanleitung
Follow these steps to set up your GenMachine Mini PC:
- Mini-PC auspacken: Entnehmen Sie vorsichtig alle Komponenten aus der Verpackung.
- Anschluss an ein Display: Use the provided HDMI cable to connect the Mini PC to your monitor or TV. If using a DisplayPort monitor, use a compatible DP cable (not included).
- Peripheriegeräte anschließen: Schließen Sie Ihre Tastatur, Maus und alle anderen USB-Geräte an die verfügbaren USB 3.0-Anschlüsse an.
- Netzwerkverbindung herstellen (optional): Für eine kabelgebundene Internetverbindung schließen Sie ein Ethernet-Kabel an den LAN-Anschluss an. Stellen Sie bei einer drahtlosen Verbindung sicher, dass Ihr WLAN-Netzwerk während der Ersteinrichtung verfügbar ist.
- Strom anschließen: Stecken Sie den Netzadapter in den DC-Eingang des Mini-PCs und stecken Sie den Adapter anschließend in eine Steckdose.
- Einschalten: Press the power button on the front of the Mini PC. The system should boot up.
5. Bedienungsanleitung
5.1 Erster Start und Einrichtung des Betriebssystems
Upon first power-on, the Mini PC will guide you through the operating system setup process. Follow the on-screen prompts to configure language, region, user accounts, and network settings.
5.2 Energieverwaltung
- Einschalten: Drücken Sie einmal die Einschalttaste.
- Abschalten: Access the power options through the operating system's start menu and select 'Shut down'.
- Neustart: Access the power options through the operating system's start menu and select 'Restart'.
- Schlafmodus: Access the power options through the operating system's start menu and select 'Sleep'.
5.3 Verbindung zu WLAN und Bluetooth
To connect to a wireless network or Bluetooth device, use the respective settings within your operating system. The Mini PC supports WiFi 6 and Bluetooth 5.2 for fast and reliable connections.
6. Wartung
Regelmäßige Wartung trägt dazu bei, die Langlebigkeit und optimale Leistung Ihres Mini-PCs zu gewährleisten:
- Reinigung: Use a soft, dry cloth to clean the exterior. For dust in vents, use compressed air. Ensure the device is powered off and unplugged before cleaning.
- Belüftung: Stellen Sie sicher, dass der Mini-PC an einem gut belüfteten Ort aufgestellt wird. Blockieren Sie die Lüftungsschlitze nicht.
- Software-Updates: Regularly update your operating system, drivers, and applications to ensure security and performance.
- Datensicherung: Sichern Sie wichtige Daten regelmäßig auf einer externen Festplatte oder in der Cloud.
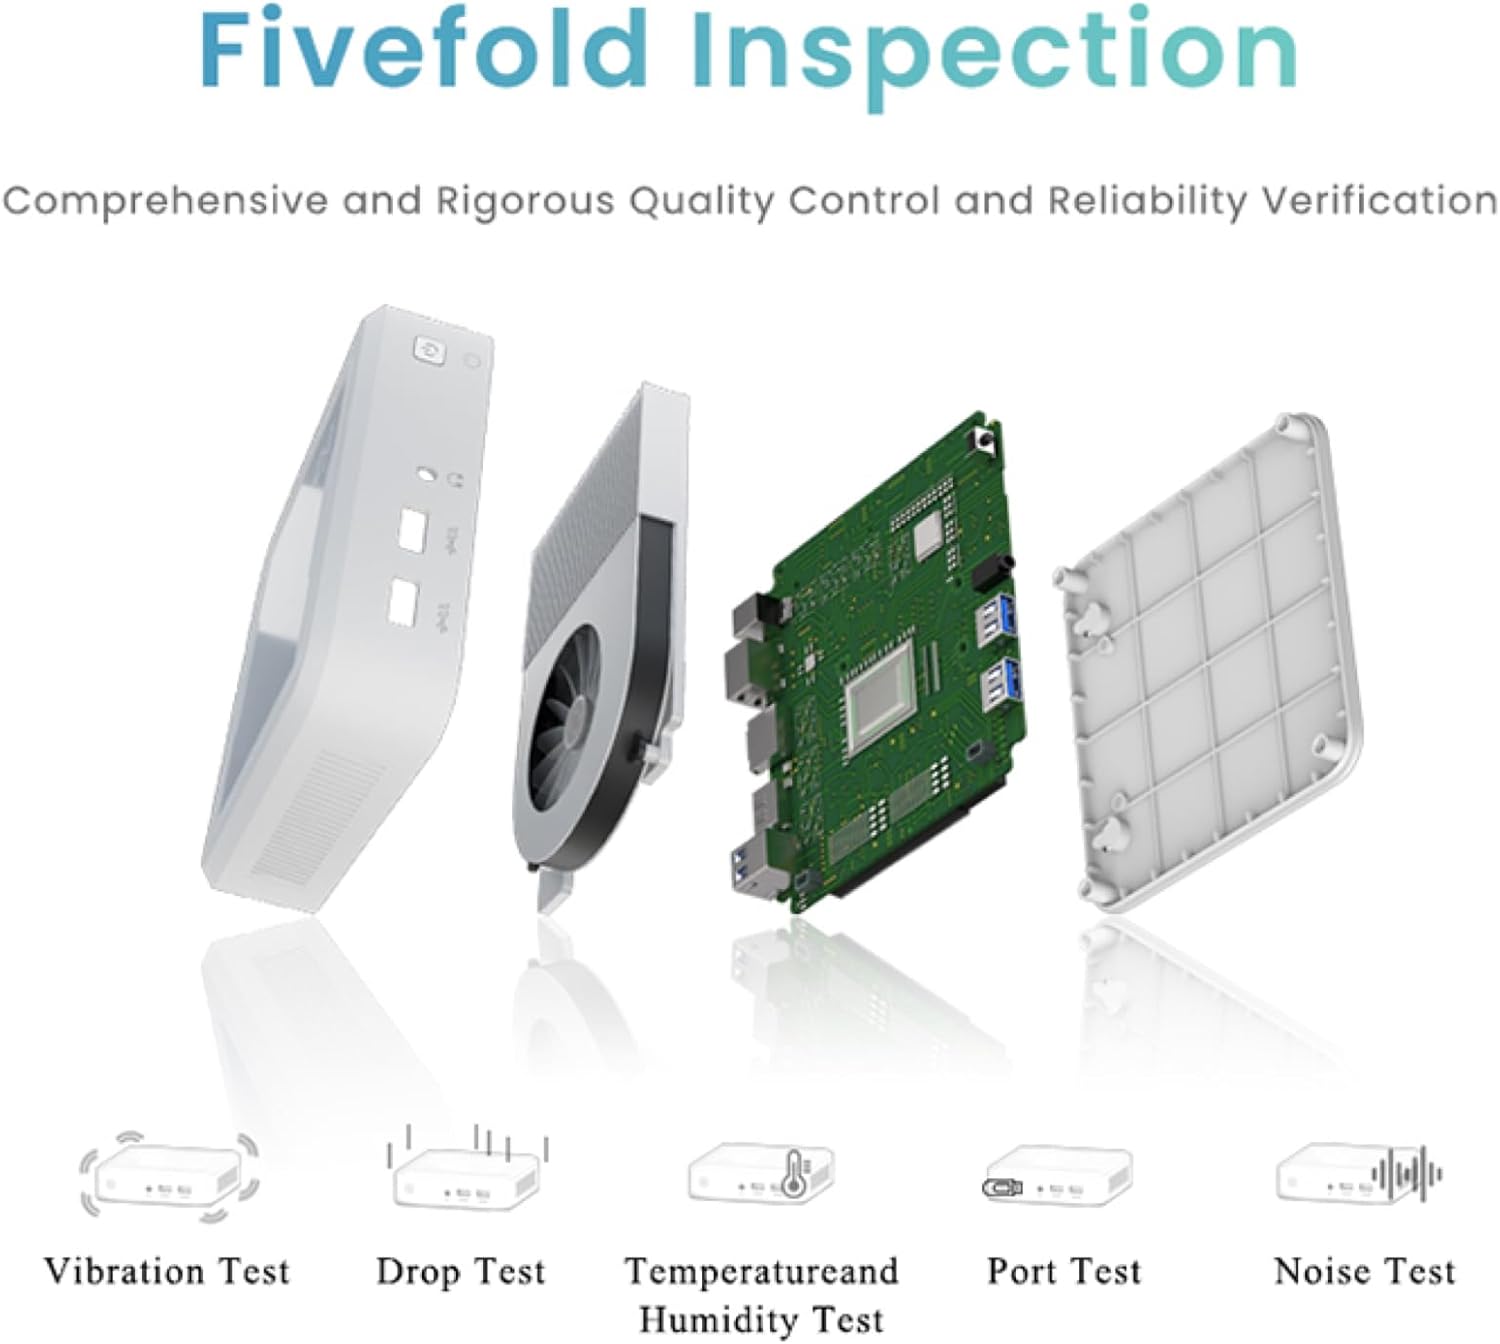
Figure 6.1: GenMachine's Fivefold Inspection process for quality control.
7. Fehlerbehebung
Sollten Sie Probleme mit Ihrem Mini-PC haben, beachten Sie bitte die folgenden häufig auftretenden Probleme und Lösungen:
- Kein Strom:
- Stellen Sie sicher, dass das Netzteil sowohl mit dem Mini-PC als auch mit einer funktionierenden Steckdose fest verbunden ist.
- Versuchen Sie es mit einer anderen Steckdose.
- Kein Bildschirm:
- Vergewissern Sie sich, dass das HDMI- oder DisplayPort-Kabel sowohl mit dem Mini-PC als auch mit dem Monitor fest verbunden ist.
- Stellen Sie sicher, dass der Monitor eingeschaltet und auf die richtige Eingangsquelle eingestellt ist.
- Versuchen Sie gegebenenfalls ein anderes Displaykabel oder einen anderen Monitor.
- System Freezes or Unresponsive:
- Führen Sie einen Hard-Reset durch, indem Sie den Netzschalter 5-10 Sekunden lang gedrückt halten, bis sich das Gerät ausschaltet, und starten Sie es anschließend neu.
- Stellen Sie sicher, dass Betriebssystem und Treiber auf dem neuesten Stand sind.
- Check for overheating; ensure proper ventilation.
- Run a system diagnostic or memory test if the issue persists.
- Keine Internetverbindung:
- Bei kabelgebundenen Verbindungen überprüfen Sie bitte den Status des Ethernet-Kabels und des Routers.
- Stellen Sie bei WLAN-Verbindungen sicher, dass WLAN im Betriebssystem aktiviert ist und Sie mit dem richtigen Netzwerk und dem richtigen Passwort verbunden sind.
- Starten Sie Ihren Router/Ihr Modem neu.
8. Spezifikationen
| Besonderheit | Spezifikation |
|---|---|
| Prozessor | AMD Ryzen 7 3750H (4 cores, 8 threads, up to 4.0GHz) |
| RAM | 8 GB DDR4 |
| Lagerung | 256GB SSD (with M.2 NVMe support) |
| Grafik-Coprozessor | AMD Radeon Vega 10-Grafik |
| Maximale Bildschirmauflösung | 3840 x 2160 Pixel (4K) |
| Kabelloser Typ | 802.11ac (WiFi 6), Bluetooth 5.2 |
| USB-Anschlüsse | 4 x USB 3.0 |
| Videoausgänge | HDMI, DisplayPort |
| Betriebssystem | Betriebssystem (vorinstalliert) |
| Artikelgewicht | 2.1 Pfund |
| Technische Daten | 4.9 x 4.9 x 1.4 Zoll |
| Farbe | Schwarz |
9. Garantie und Support
For warranty information and technical support, please refer to the warranty card included with your product or visit the official GenMachine webBewahren Sie Ihren Kaufbeleg als Kaufnachweis für Garantieansprüche auf.
If you require further assistance, please contact GenMachine customer support through the channels provided on their official webWebsite.


