1. Einleitung
Vielen Dank für Ihren Einkauf.asing the Audizio Adria DAB/Internet Radio Tuner. This device offers a versatile audio experience, combining Internet Radio, DAB+, FM radio, Bluetooth connectivity, and Spotify Connect. This manual provides essential information for setting up, operating, and maintaining your tuner to ensure optimal performance and longevity.
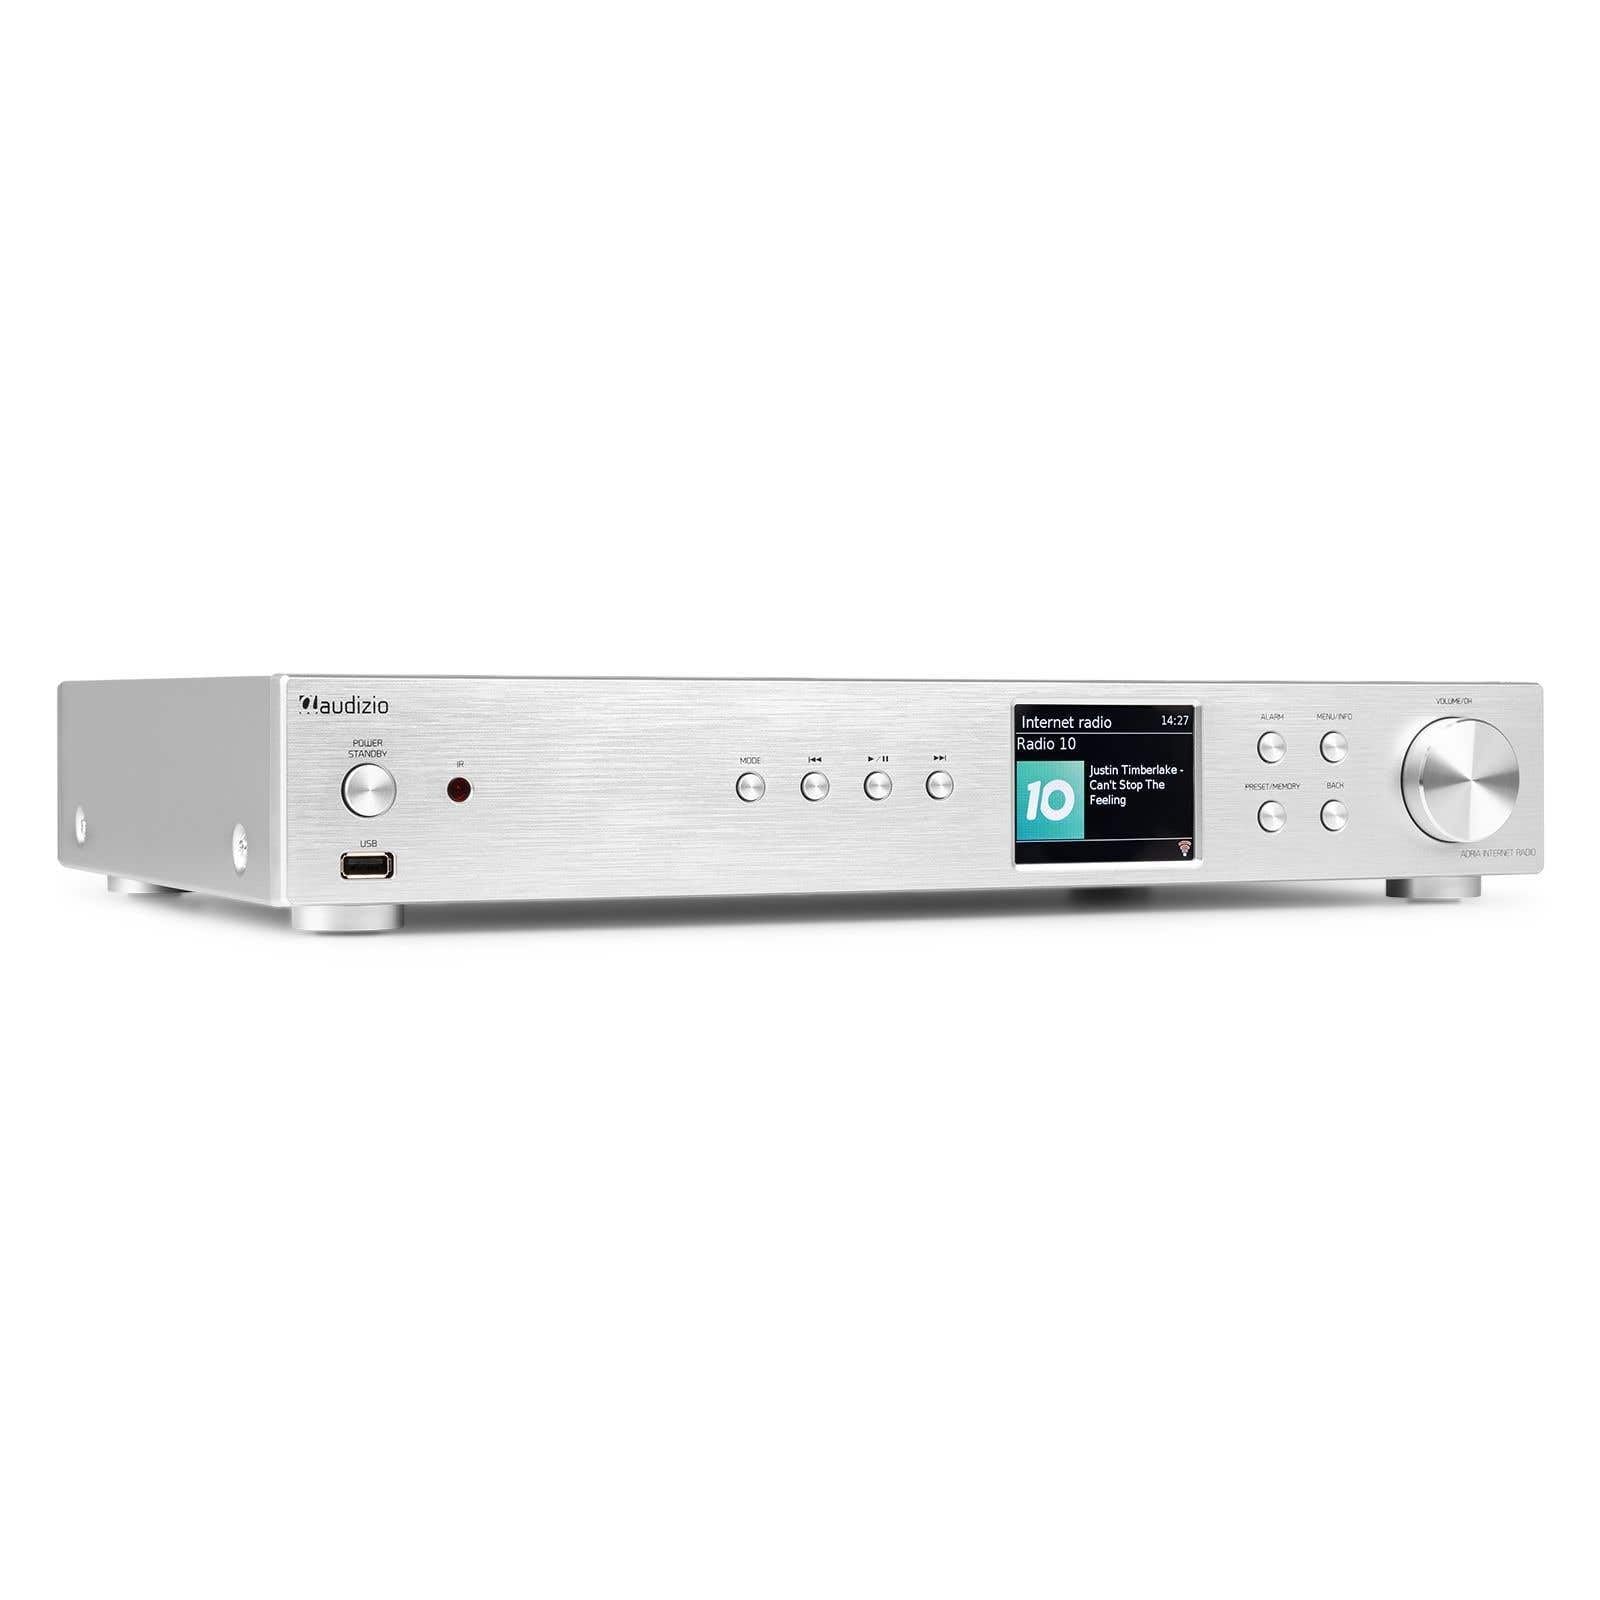
Figure 1.1: Audizio Adria DAB/Internet Radio Tuner with included remote control and antenna.
2. Sicherheitshinweise
- Lesen Sie vor der Verwendung alle Anweisungen sorgfältig durch.
- Keep the unit away from water, moisture, and direct heat sources.
- Blockieren Sie keine Lüftungsöffnungen. Sorgen Sie für ausreichend Platz um das Gerät herum, um eine ordnungsgemäße Luftzirkulation zu gewährleisten.
- Verwenden Sie nur das mit dem Gerät mitgelieferte Netzteil.
- Versuchen Sie nicht, das Gerät selbst zu reparieren oder zu modifizieren. Überlassen Sie alle Wartungsarbeiten qualifiziertem Fachpersonal.
- Dispose of batteries responsibly. The remote control uses 1 AAA battery.
3. Packungsinhalt
Überprüfen Sie, ob alle Artikel im Paket vorhanden sind:
- Audizio Adria DAB/Internet Radio Tuner Unit
- Remote Control (requires 1x AAA battery, included)
- Netzteil
- DAB/UKW-Antenne
- Bedienungsanleitung
4. Produktüberschreitungview
4.1 Frontplatte

Abbildung 4.1: Bedienelemente und Anzeige auf der Vorderseite
- Power / Standby Button: Schaltet das Gerät ein oder aus.
- USB-Anschluss: Zur Medienwiedergabe von USB-Speichergeräten.
- Modus-Taste: Switches between Internet Radio, DAB+, FM, Bluetooth, and Media Player modes.
- Wiedergabe-/Pause-Taste: Controls playback in media modes.
- Skip-/Tune-Tasten: Navigates tracks or tunes radio frequencies.
- Bildschirm: Zeigt Senderinformationen, Menüs und Einstellungen an.
- Alarmknopf: Greift auf die Alarmeinstellungen zu.
- Menü-/Info-Schaltfläche: Enters menu or displays information.
- Preset/Memory Button: Speichert oder ruft Lieblingssender ab.
- Zurück-Schaltfläche: Kehrt zum vorherigen Menü oder Bildschirm zurück.
- Volume / OK Knob: Rotates to adjust volume or navigate menus; presses to confirm selections.
4.2 Rückseite

Abbildung 4.2: Anschlüsse auf der Rückseite
- Leistungsaufnahme: Schließen Sie hier das mitgelieferte Netzteil an.
- DAB/FM Antenna Input: Connect the included DAB/FM antenna.
- Analogausgang (RCA): Verbinden mit einem ampVerstärker oder Aktivlautsprecher mit RCA-Kabeln.
- AUX-Eingang: Connect external audio sources via a 3.5mm jack.
- USB-Ladeanschluss: Zum Laden externer Geräte.
- Optischer Digitalausgang: Verbinden mit einem amplifier or DAC with an optical cable.
- Koaxialer Digitalausgang: Verbinden mit einem amplifier or DAC with a coaxial cable.
5. Einrichtung
5.1 Connecting Power and Antennas
- Connect the supplied DAB/FM antenna to the DAB/FM Antenna Input on the rear panel. Extend the antenna fully for best reception.
- Connect the power adapter to the Power Input on the rear panel, then plug it into a wall outlet.
5.2 Anschluss an ein Audiosystem
Choose one of the following methods to connect the Adria tuner to your ampVerstärker oder Aktivlautsprecher:
- Analogausgang (RCA): Use RCA cables to connect the Analog Output ports on the Adria to the corresponding input on your ampschwerer.
- Optischer Digitalausgang: Use an optical cable to connect the Optical Digital Output to an optical input on your ampLifier oder DAC.
- Koaxialer Digitalausgang: Use a coaxial cable to connect the Coaxial Digital Output to a coaxial input on your ampLifier oder DAC.
5.3 Erste Inbetriebnahme und Netzwerkeinrichtung
- Press the Power/Standby button on the front panel or remote control to turn on the unit.
- The display will show the Audizio logo, then guide you through the initial setup wizard.
- Follow the on-screen prompts to select your language, time zone, and connect to your Wi-Fi network. You will need your Wi-Fi network name (SSID) and password.
- Use the Volume/OK knob to navigate menus and confirm selections.
6. Bedienungsanleitung
6.1 Modusauswahl
Drücken Sie die Modus button on the front panel or remote control to cycle through available modes: Internet Radio, DAB+, FM, Bluetooth, and Media Player (USB).
6.2 Internetradio
Figure 6.1: Internet Radio Mode Display
- Wählen Sie den Internetradio-Modus.
- Use the Volume/OK knob to browse stations by location, genre, or search.
- Press the Volume/OK knob to select a station.
- Um einen Sender als Voreinstellung zu speichern, halten Sie die Taste gedrückt. Voreinstellung/Speicher Schaltfläche. Wählen Sie eine voreingestellte Nummer und bestätigen Sie.
- Um eine Voreinstellung aufzurufen, drücken Sie die Taste Voreinstellung/Speicher button briefly, then select the desired preset.
6.3 DAB/DAB+-Radio

Figure 6.2: DAB Radio Mode Display
- Select DAB+ mode. The unit will automatically scan for available stations on first use.
- Use the Volume/OK knob to scroll through the list of stations.
- Press the Volume/OK knob to select a station.
- Saving and recalling presets works the same as for Internet Radio.
6.4 UKW-Radio
In FM mode, use the Skip/Tune buttons to manually tune frequencies or press and hold to auto-scan. Saving and recalling presets works the same as for Internet Radio.
6.5 Bluetooth-Konnektivität
- Select Bluetooth mode. The unit will enter pairing mode automatically.
- On your smartphone, tablet, or other Bluetooth device, search for available devices and select "Audizio Adria".
- Once paired, you can stream audio from your device to the tuner.
6.6 Spotify Connect
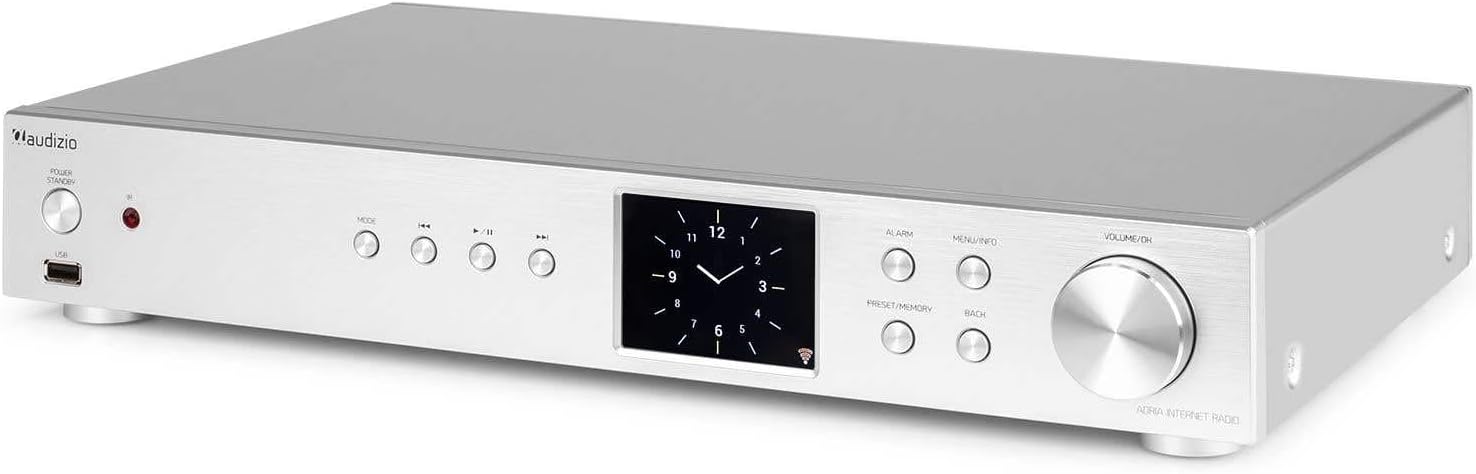
Figure 6.3: Spotify Connect Display
So verwenden Sie Spotify Connect:
- Ensure your Audizio Adria is connected to the same Wi-Fi network as your smartphone or tablet running the Spotify app.
- Open the Spotify app on your device and play a song.
- Tap the "Devices Available" icon (usually a speaker or computer icon) at the bottom of the screen.
- Select "Audizio Adria" from the list of available devices. The music will now play through your tuner.
6.7 Alarmfunktion

Figure 6.4: Clock and Alarm Display
Drücken Sie die Alarm button to access and set up alarms. You can configure alarm time, source (buzzer, Internet Radio, DAB, FM), and frequency (daily, once, weekends, weekdays).
7. Fernbedienung

Abbildung 7.1: Layout der Fernbedienung
The remote control provides full functionality for operating your Audizio Adria tuner. Ensure the included AAA battery is correctly inserted. Point the remote control directly at the unit's front panel for optimal response.
- SCHLUMMER: Der Alarm wird vorübergehend stummgeschaltet.
- Netzschalter: Schaltet das Gerät ein oder aus.
- Navigationsschaltflächen (Hoch, Runter, Links, Rechts, OK): Zur Menünavigation und -auswahl.
- LAUTSTÄRKE+/-: Passt die Lautstärke an.
- MODUS: Durchläuft die Eingangsmodi.
- SPEISEKARTE: Greift auf das Hauptmenü zu.
- ZURÜCK: Kehrt zum vorherigen Bildschirm zurück.
- INFO: Zeigt detaillierte Informationen über den aktuellen Bahnhof oder die aktuelle Strecke an.
- SCAN: Startet einen Scan nach Radiosendern.
- EQ: Greift auf die Equalizer-Einstellungen zu.
- Ziffernblock (0-9): Zur direkten Eingabe oder zur Auswahl von Voreinstellungen.
- VOREINSTELLUNG: Speichert oder ruft Lieblingssender ab.
8. Wartung
To ensure the longevity and optimal performance of your Audizio Adria tuner, follow these maintenance guidelines:
- Reinigung: Reinigen Sie die Außenseite des Geräts mit einem weichen, trockenen Tuch. Verwenden Sie keine Scheuermittel, Wachse oder Lösungsmittel.
- Belüftung: Ensure that the ventilation openings are not blocked. Dust accumulation can be removed with a soft brush or vacuum cleaner.
- Lagerung: Wenn Sie das Gerät über einen längeren Zeitraum lagern, trennen Sie es vom Stromnetz und bewahren Sie es an einem kühlen, trockenen Ort auf.
- Antennenpflege: Handle the antenna gently to avoid damage.
9. Fehlerbehebung
If you encounter issues with your Audizio Adria tuner, consult the following table for common problems and solutions:
| Problem | Mögliche Ursache | Lösung |
|---|---|---|
| Kein Strom | Stromkabel nicht angeschlossen; Steckdose defekt. | Überprüfen Sie den Netzanschluss; versuchen Sie es mit einer anderen Steckdose. |
| Kein Ton | Lautstärke zu niedrig; falscher Audioausgang ausgewählt; ampVerstärker/Lautsprecher ausgeschaltet oder abgeklemmt. | Increase volume; check audio cable connections; ensure amplifier/speakers are on and set to correct input. |
| Keine Verbindung zum WLAN möglich | Falsches Passwort; schwaches Signal; Routerproblem. | Verify Wi-Fi password; move unit closer to router; restart router. |
| Schlechter DAB/FM-Empfang | Antenne nicht ausgefahren; schwaches Signal. | Fully extend and reposition the antenna; consider an external antenna if available. |
| Die Bluetooth-Kopplung schlägt fehl | Device not in pairing mode; device too far; interference. | Ensure both devices are in pairing mode; move devices closer; turn off other Bluetooth devices. |
10. Spezifikationen
| Besonderheit | Spezifikation |
|---|---|
| Marke | Audizio |
| Modellnummer | Adria |
| Farbe | Silber |
| Anzeigegröße | 3.2 Zoll |
| Konnektivitätstechnologie | Optical, Coaxial, Bluetooth |
| Besondere Merkmale | Bluetooth, Internet Radio, DAB+, FM, Spotify Connect |
| Unterstützte Funkbänder | DAB, DAB+, UKW |
| Stromquelle | Kabelgebundene Elektrik |
| Produktabmessungen (L x B x H) | 43.4 x 7.5 x 31 cm |
| Artikelgewicht | 3.2 Kilogramm |
| Im Lieferumfang enthaltene Komponenten | Fernbedienung |
| Kompatible Geräte | Smartphone, Tablet, Laptop |
11. Garantieinformationen
This product is covered by a manufacturer's warranty. Please refer to the warranty card included in your package or contact your retailer for specific terms and conditions. Keep your proof of purchase for warranty claims.
12. Unterstützung
For technical assistance, troubleshooting beyond this manual, or service inquiries, please contact Audizio customer support or your local dealer. Contact information can typically be found on the manufacturer's webWebsite oder Ihre Kaufdokumentation.


