1. Einleitung
This manual provides comprehensive instructions for the iClever MD179 Multi-Device Wireless Mouse. It covers setup, operation, maintenance, and troubleshooting to ensure optimal performance and a seamless user experience. Please read this manual thoroughly before using the product.
2. Packungsinhalt
Überprüfen Sie, ob alle Artikel in Ihrem Paket vorhanden sind:
- iClever MD179 Wireless Mouse
- USB 2.4GHz Receiver (stored inside the mouse)
- USB-C-Ladekabel
- Benutzerhandbuch (dieses Dokument)
3. Produktüberschreitungview
Machen Sie sich mit den Komponenten und Bedienelementen der Maus vertraut:

Abbildung 1: iClever MD179 Mouse Button Layout
- Rechtsklick-Schaltfläche: Standardmäßige Rechtsklick-Funktionalität.
- Linksklick-Taste: Standardmäßige Linksklick-Funktionalität.
- Scrollrad / Mittlere Maustaste: For scrolling and middle-click actions.
- Vorwärts-Taste: Navigiert vorwärts in web Browser bzw file explorers (Windows only).
- Zurück-Schaltfläche: Navigiert rückwärts in web Browser bzw file explorers (Windows only).
- DPI-Umschalttaste: Passt die Cursorempfindlichkeit (DPI) an.
- EIN/AUS-Schalter: Located on the bottom of the mouse to turn it on or off.
- 2.4GHz / Bluetooth 1 / Bluetooth 2 Channel Indicator: Displays the active connection mode.
4. Einrichtung
4.1 Aufladen der Maus
Before initial use, fully charge the mouse.
- Connect the provided USB-C cable to the charging port on the front of the mouse and to a USB power source (e.g., computer USB port, USB wall adapter).
- Die Ladeanzeigeleuchte leuchtet während des Ladevorgangs und erlischt, sobald der Akku vollständig geladen ist.
- A full charge typically provides up to 2 months of use, depending on usage.
- The mouse can be used wirelessly while it is charging.
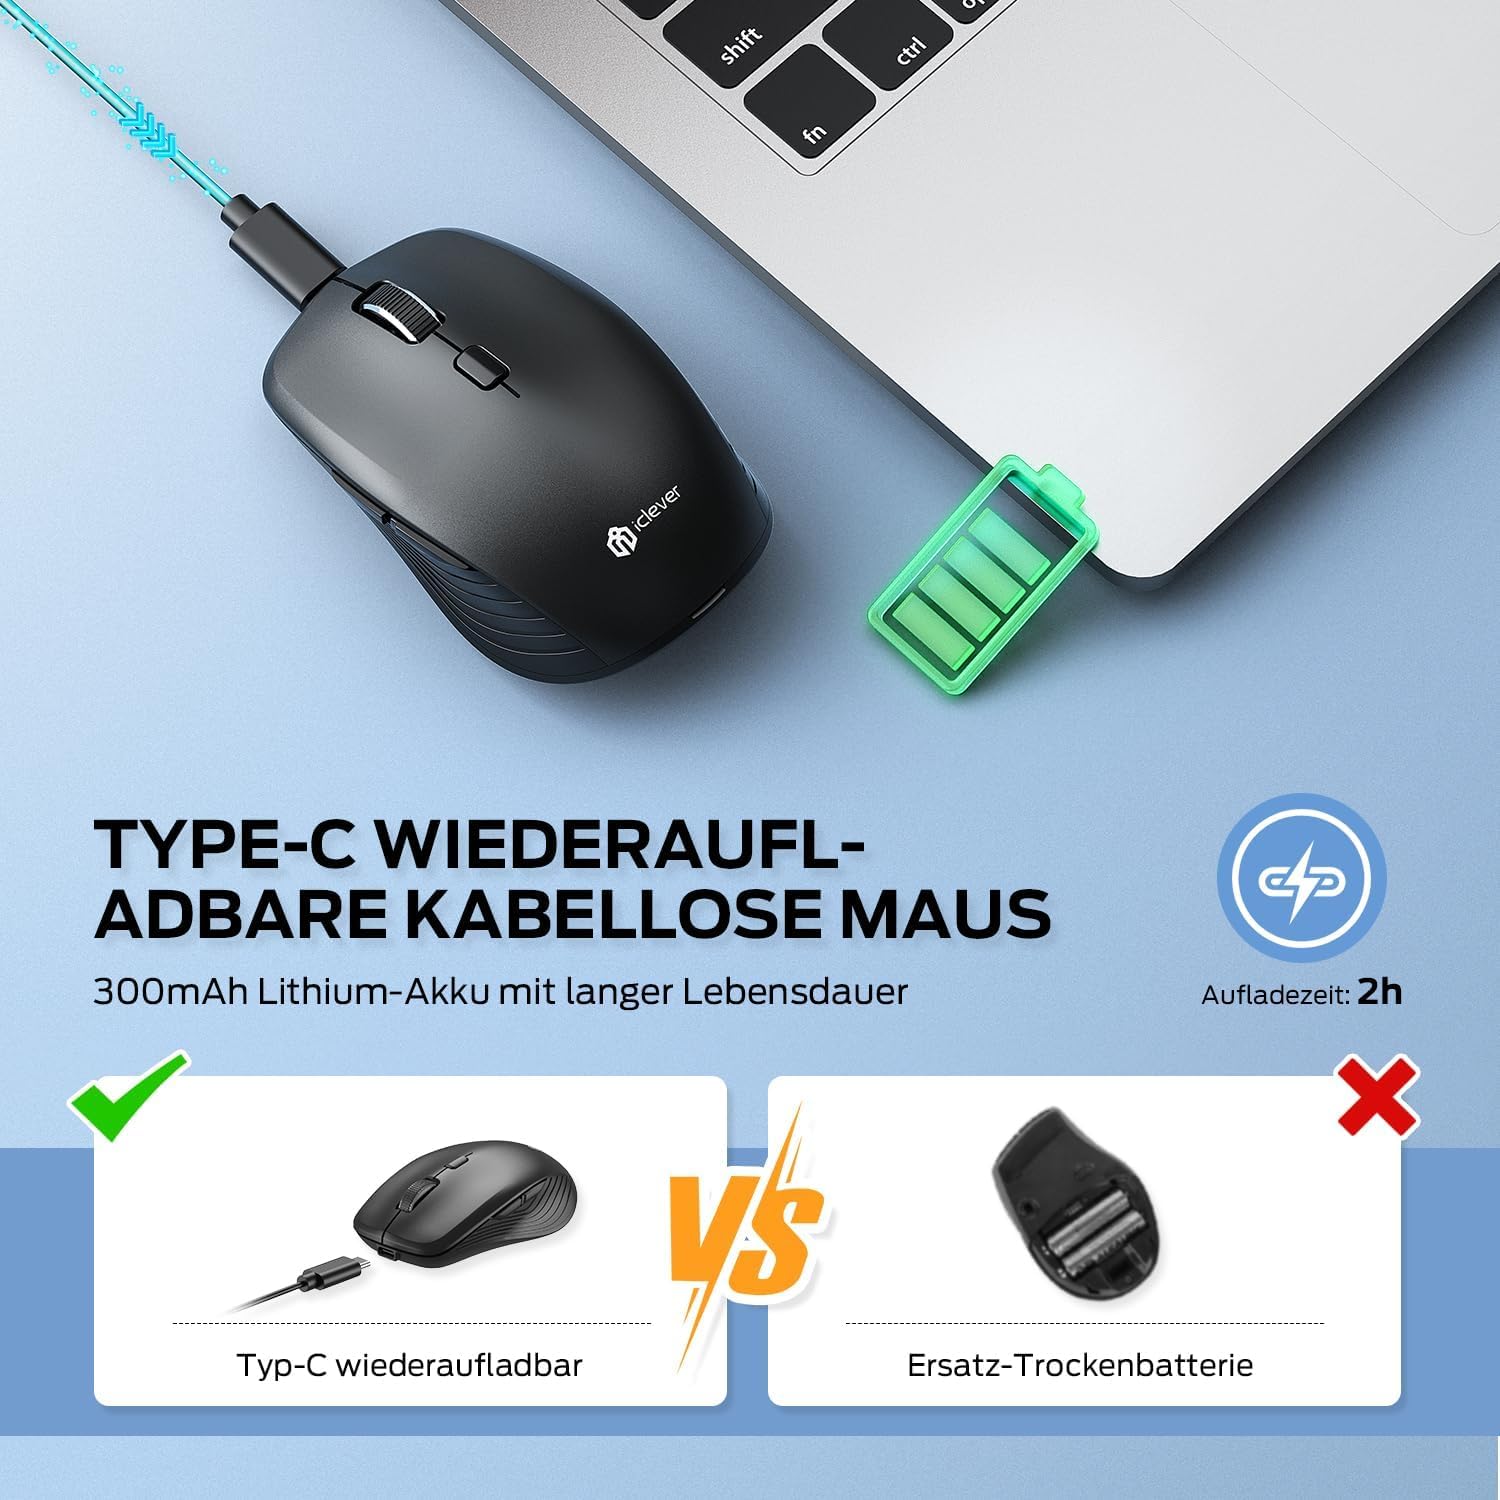
Abbildung 2: USB-C-Ladefunktion
4.2 Verbindung über 2.4-GHz-Funk
For a stable and quick connection:
- Locate the USB 2.4GHz receiver. It is stored in a compartment under the magnetic top cover of the mouse. Gently lift the top cover to access it.
- Stecken Sie den USB-Empfänger in einen freien USB-Port Ihres Computers.
- Schalten Sie die Maus mit dem EIN/AUS-Schalter an der Unterseite ein.
- Switch the connection mode to 2.4GHz (refer to the channel indicator on the bottom).
- Die Maus sollte sich automatisch verbinden.

Abbildung 3: Verbindungsoptionen
4.3 Verbindung über Bluetooth (BT1 / BT2)
The mouse supports two Bluetooth connections:
- Schalten Sie die Maus mit dem EIN/AUS-Schalter an der Unterseite ein.
- Switch the connection mode to either Bluetooth 1 (BT1) or Bluetooth 2 (BT2) using the channel switch button on the bottom. The indicator light will confirm the selected channel.
- Press and hold the channel switch button for 3-5 seconds until the indicator light flashes rapidly. This indicates the mouse is in pairing mode.
- On your device (PC, Mac, laptop, tablet), go to Bluetooth settings.
- Suchen nach "iClever MD179" or a similar name in the list of available devices and select it to pair.
- Wiederholen Sie diese Schritte für ein zweites Bluetooth-Gerät unter Verwendung des anderen Bluetooth-Kanals (BT2).

Abbildung 4: Konnektivität mehrerer Geräte
4.4 Umschalten zwischen Geräten
So wechseln Sie zwischen verbundenen Geräten:
- Use the channel switch button on the bottom of the mouse to cycle between the 2.4GHz, Bluetooth 1, and Bluetooth 2 connections.
- The indicator light will confirm the currently active channel.
5. Bedienungsanleitung

Abbildung 5: Mouse in Use with Multiple Devices
5.1 DPI-Anpassung
Adjust the cursor sensitivity to match your preference or task:
- Press the DPI switch button (button 6 in Product Overview) to cycle through the available DPI settings: 800, 1200, 1600, and 2400 DPI.
- The indicator light may flash briefly to confirm the DPI change.
- Higher DPI settings result in faster cursor movement across the screen.
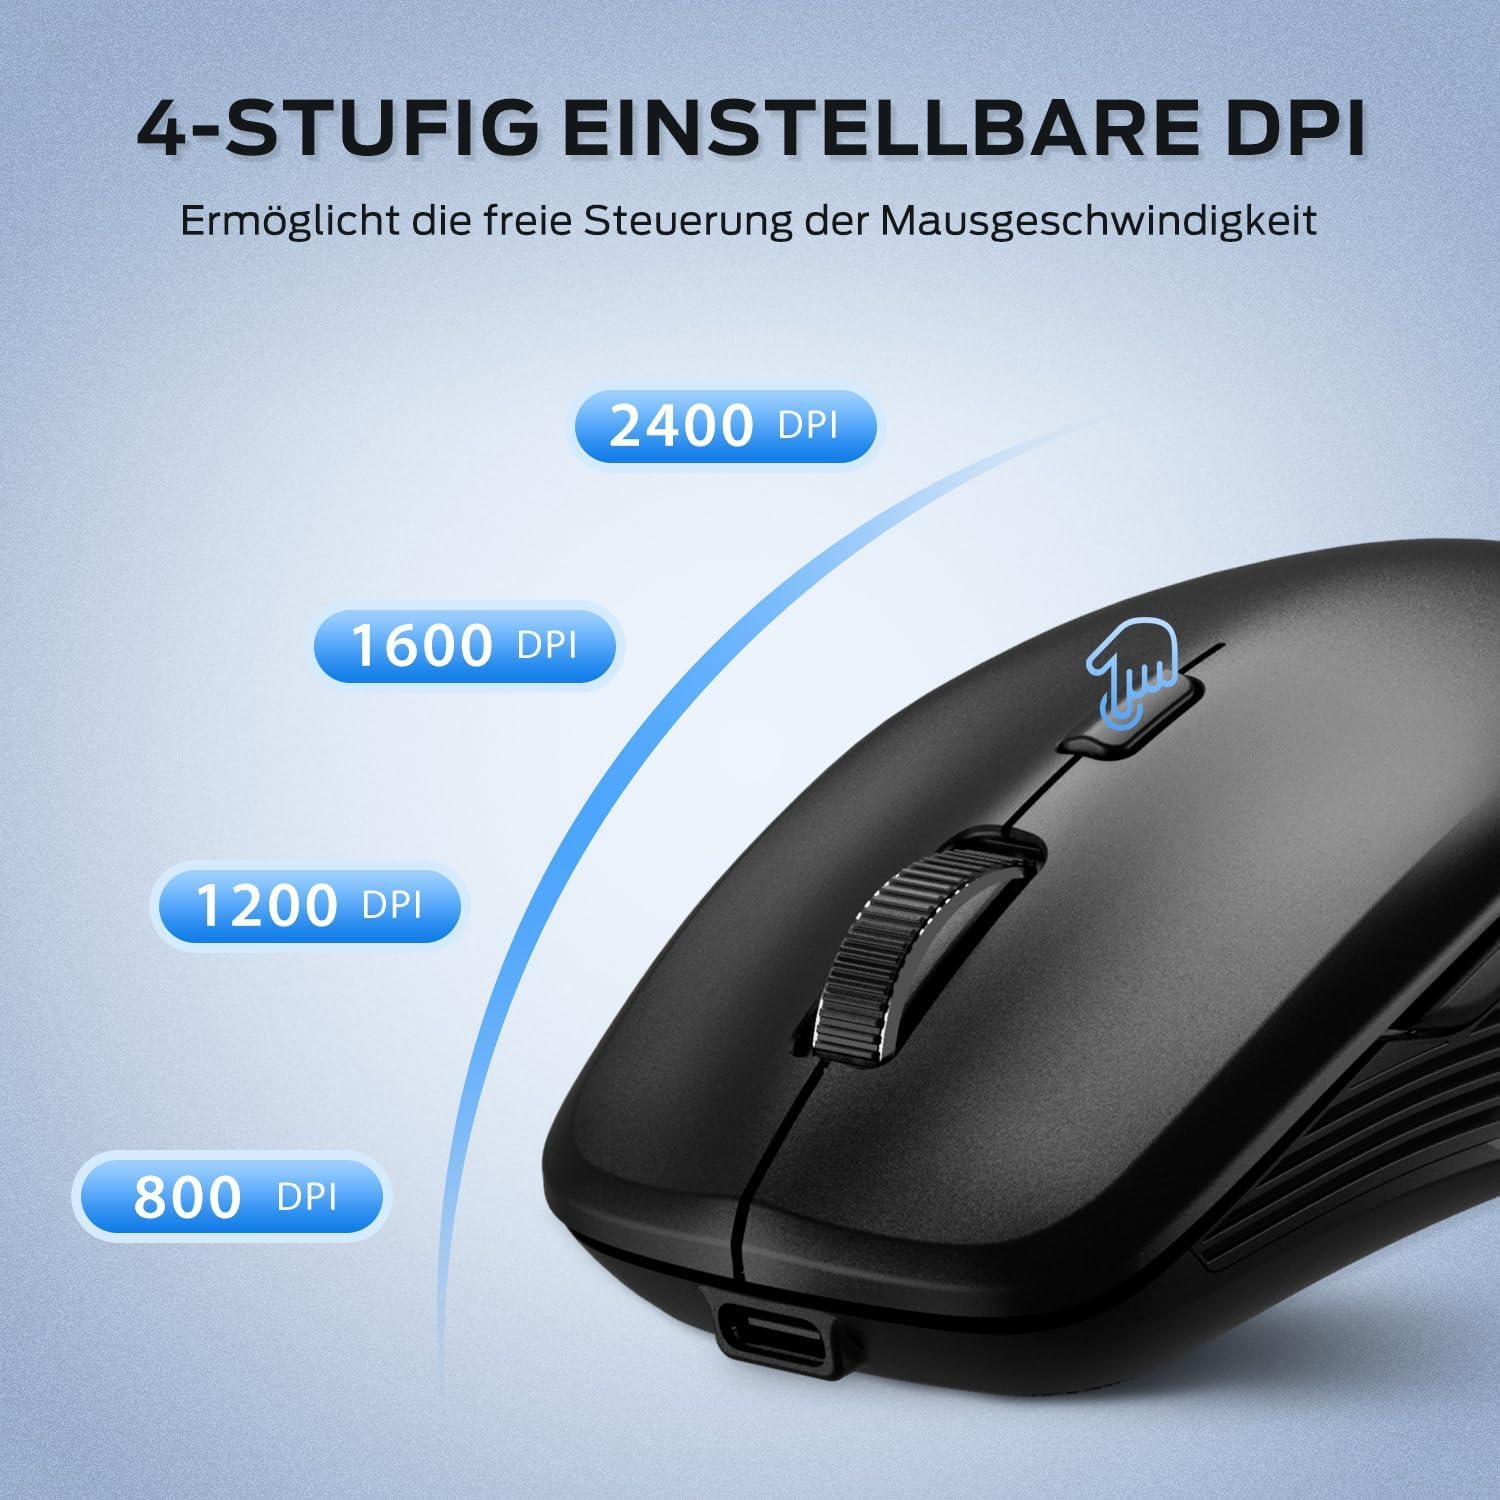
Abbildung 6: Anpassbare DPI-Einstellungen
5.2 Funktion für geräuschloses Klicken
The iClever MD179 mouse is designed with silent left and right click buttons to minimize noise, making it ideal for quiet environments such as libraries, offices, or late-night use at home.

Abbildung 7: Silent Click Benefits
5.3 Side Buttons (Forward/Back)
The forward and back buttons (buttons 4 and 5 in Product Overview) provide convenient navigation in web Browser und file explorers. Please note that these buttons are primarily functional on Windows operating systems. Their functionality may vary or require specific software configuration on macOS or other operating systems.
5.4 Energieverwaltung
The mouse incorporates features to optimize battery life:
- Automatischer Schlafmodus: The mouse will enter an automatic sleep mode after a period of inactivity to conserve power. Move the mouse or click any button to wake it up.
- Ein / Aus Schalter: For extended periods of non-use, it is recommended to turn off the mouse completely using the ON/OFF switch (button 7 in Product Overview) located on the bottom.
6. Wartung
6.1 Reinigung
Damit Ihre Maus in optimalem Zustand bleibt:
- Wischen Sie die Mausoberfläche vorsichtig mit einem weichen, leicht feuchten Tuch ab.amp Tuch.
- Vermeiden Sie die Verwendung von aggressiven Chemikalien, Scheuermitteln oder Lösungsmitteln, da diese die Oberfläche beschädigen können.
- Stellen Sie sicher, dass keine Flüssigkeit in die internen Komponenten der Maus eindringt.
- Periodically clean the optical sensor on the bottom of the mouse with a dry cotton swab to ensure accurate tracking.
6.2 Batteriepflege
Proper battery care extends the lifespan of your mouse:
- Charge the mouse regularly and avoid letting the battery fully deplete frequently.
- If storing the mouse for an extended period, charge it to approximately 50% and turn it off using the power switch.
- Avoid exposing the mouse to extreme temperatures, which can affect battery performance.

Abbildung 8: USB-Empfängerspeicher
7. Fehlerbehebung
If you encounter issues with your iClever MD179 mouse, refer to the following common solutions:
- Maus reagiert nicht:
- Ensure the mouse is powered on using the ON/OFF switch.
- Prüfen Sie den Batteriestand und laden Sie die Maus gegebenenfalls auf.
- For 2.4GHz connection: Verify the USB receiver is securely plugged into a working USB port and the mouse is set to 2.4GHz mode. Try a different USB port.
- For Bluetooth connection: Ensure Bluetooth is enabled on your device, the mouse is in the correct Bluetooth mode (BT1/BT2), and it is paired correctly. Try removing the mouse from your device's Bluetooth list and re-pairing it.
- Starten Sie Ihren Computer oder Ihr Gerät neu.
- Die Cursorbewegung ist unregelmäßig oder langsam:
- Reinigen Sie den optischen Sensor an der Unterseite der Maus.
- Stellen Sie sicher, dass Sie die Maus auf einer geeigneten Oberfläche verwenden (nicht reflektierend, nicht transparent).
- Adjust the DPI setting to a higher value using the DPI switch button if the cursor is too slow.
- Wechsel zwischen Geräten nicht möglich:
- Ensure the channel switch button on the bottom of the mouse is pressed firmly.
- Verify that each device is correctly connected to its respective channel (2.4GHz, BT1, BT2).
8. Spezifikationen
| Besonderheit | Beschreibung |
|---|---|
| Marke | IClever |
| Modell | MD179 Bluetooth Mouse |
| Technische Daten | 10.1 x 6.1 x 3.4 cm |
| Artikelgewicht | 70 Gramm |
| Betriebssystemkompatibilität | Windows, macOS, ChromeOS |
| Hardware-Plattform | Linux, Mac, PC |
| Kompatible Geräte | PC, Tablet |
| Besondere Merkmale | Wireless, Silent Click, Multi-Device Connectivity |
| Stromquelle | Batteriebetrieben (wiederaufladbar über USB-C) |
| Konnektivitätstechnologie | Bluetooth, 2.4 GHz Wireless |
| Bewegungssensor-Technologie | Optisch |
| Handausrichtung | Beidhändig |
| DPI-Einstellungen | 800 / 1200 / 1600 / 2400 DPI |
| Batteriekapazität | 300 mAh Lithium |
9. Garantie und Support
iClever products are designed for reliability and performance. For detailed warranty information, technical support, or service inquiries, please visit the official iClever webBesuchen Sie die Website oder kontaktieren Sie direkt den Kundendienst. Bewahren Sie Ihren Kaufbeleg für Garantieansprüche auf.