1. Einleitung
This manual provides detailed instructions for the URayCoder 4K HDMI Video Streaming Encoder, Model UHE265-1S-4K. This device is designed to convert HDMI video and audio signals into various IP streaming formats, enabling live broadcasts and remote video transmission. Please read this manual thoroughly before operating the device to ensure proper setup and optimal performance.
2. Produktüberschreitungview
The URayCoder 4K HDMI Video Streaming Encoder is a hardware device capable of encoding 4K UHD video input into H.265 or H.264 formats for IP streaming. It supports multiple streaming protocols and simultaneous output of up to four video streams.
2.1 Hauptmerkmale
- 4K UHD Video Support: Supports up to 3840x2160 resolution at 30fps input/output, or 1920x1080 at 60fps input/output.
- Multiple Streaming Protocols: Compatible with HTTP, RTSP, RTMP(S), SRT, HLS(M3U8), UDP, RTP, MP4, Multicast, Unitcast, ONVIF, and FLV.
- Simultaneous Multi-Stream Output: Outputs up to 4 video streams concurrently, each configurable with different protocols.
- Customizable Video Streams: Add static text, scrolling text, logos, or time overlays. Adjust resolution, frame rate, bitrate, crop, rotate, flip, and mirror options.
- Adjustable Audio Output: Control audio parameters for optimal sound quality.
- Breite Plattformkompatibilität: Supports live broadcasting to platforms such as YouTube, Facebook, Ustream, Livestream, Twitch, Vimeo, Streamspot, Dacast, Tikilive, and Netrmedi.
2.2 Geräteaufbau
The encoder features essential ports for power, video input, audio input, and network connectivity.

Abbildung 2.2.1: Vorder- und Rückseite view of the URayCoder 4K HDMI Video Streaming Encoder, showing power input, reset button, HDMI input, audio input, and LAN port.

Abbildung 2.2.2: Nahaufnahme view of the encoder's ports, including DC 12V power, RESET button, HDMI IN, AUDIO IN, and LAN port.

Abbildung 2.2.3: Überview of URayCoder Encoder features, highlighting H.265/H.264 encoding, multi-streaming, OSD settings, 1000 Base-T, HDCP support, 7x24 working, firmware upgradeability, multi-protocol support, 4K UHD resolution, and low latency.
3. Einrichtung
3.1 Physische Verbindungen
- HDMI-Quelle anschließen: Connect your HDMI video source (e.g., camera, computer, set-top box) to the HDMI IN port on the encoder using an HDMI cable.
- Audioquelle anschließen (optional): If using an external audio source, connect it to the AUDIO IN port. Otherwise, audio will be extracted from the HDMI input.
- Mit Netzwerk verbinden: Verbinden Sie LAN port of the encoder to your network router or switch using an Ethernet cable.
- Einschalten: Connect the 12V DC power adapter to the Gleichstrom 12 V port and plug it into a power outlet. The device will power on automatically.

Figure 3.1.1: Diagram illustrating the connection of HDMI audio and external line-in audio to the encoder.
3.2 Netzwerkkonfiguration
After physical connections, the encoder will obtain an IP address via DHCP by default. To access the web-basierte Verwaltungsschnittstelle:
- Ensure your computer is on the same network as the encoder.
- Use a network scanning tool (e.g., IP Scanner) to find the encoder's IP address on your network. The default IP address is often 192.168.1.168, but this can vary based on your network's DHCP server.
- Öffnen Sie ein web browser and enter the encoder's IP address in the address bar.
- Log in using the default credentials (refer to the included quick start guide for default username and password).

Figure 3.2.1: Icon representing network security. It is recommended to change default login credentials for security.
Wichtig: For security, it is highly recommended to change the default password immediately after the first login. You may also configure a static IP address if required for your network setup.
3.3 Anschlussdiagramme

Figure 3.3.1: Diagram illustrating a typical live broadcast connection setup. An HDMI source connects to the URayTech Video Encoder, which sends video streams to a router/switch, then over the internet to various live streaming servers like YouTube, Twitch, and Facebook.

Figure 3.3.2: Diagram illustrating remote video transmission. An HDMI source connects to the URayTech Video Encoder, which sends streams via LAN/WAN to devices like laptops/phones or a URayTech Decoder connected to a display monitor.
4. Bedienungsanleitung
The encoder's functions are managed through its web-basierte Schnittstelle.
4.1 Statusüberwachung
The "Status" page provides real-time information about the device's operation, including running time, CPU usage, memory usage, codec usage, video size, collected frames, and network packet statistics. This page is crucial for verifying input signal and stream health.

Figure 4.1.1: Partial screenshot of the encoder's web interface "Status" page, displaying device status, video stream details, and network information.
4.2 Video Stream Settings
Navigate to the "Encoder" section to configure video parameters for the main stream and substreams.
- Kodierungstyp: Select H.264 or H.265.
- Codierte Größe: Choose the output resolution (e.g., 3840x2160, 1920x1080, 1280x720).
- FPS (Frame Rate): Set the desired frame rate.
- Bitratensteuerung: Select VBR (Variable Bit Rate) or CBR (Constant Bit Rate).
- Bitrate (kbit): Adjust the video bitrate. Higher bitrates generally result in better quality but require more bandwidth.
- Streaming Protocols: Enable and configure the desired streaming protocols (RTSP, RTMP, HLS, UDP, SRT, etc.) for each stream.

Figure 4.2.1: Partial screenshot of the encoder's web interface "Video" settings page, showing options for encoding type, resolution, frame rate, bitrate, and streaming protocol configuration.

Figure 4.2.2: Diagram illustrating the various streaming protocols supported by the encoder, including MP4, RTSP, HTTP, RTMP(S), Onvif, SRT, HLS, and UDP.
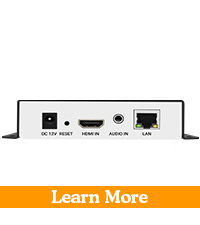
Figure 4.2.3: Icons representing various streaming protocols such as RTMP(S), RTSP, MP4, FLV, HLS, UDP, SRT, and Onvif.

Figure 4.2.4: Visual comparison demonstrating the difference in detail between 1080p and 4K resolutions.
4.3 Audioeinstellungen
In the "Audio" section, you can configure audio input and encoding parameters.
- Audioeingang: Choose between Digital (HDMI) or Analog (Line-in).
- Sampling-Rate: Set the audio sampling rate (e.g., 44100 Hz).
- Encoder: Select the audio encoding format (e.g., AAC, MP3).
- Bitrate: Adjust the audio bitrate.
- Digital Volume Gain: Passen Sie die Lautstärke an.
- Entrauschen: Enable or disable audio noise reduction.

Figure 4.3.1: Partial screenshot of the encoder's web interface "Audio" settings page, showing options for audio input, sampling rate, encoder type, bitrate, and volume gain.
4.4 OSD (On-Screen Display) Settings
The "OSD" section allows you to add overlays to your video streams.
- Textüberlagerungen: Add static or scrolling text, customize font size, color, and position.
- Logo Overlays: Upload and position a custom logo image.
- Time Overlays: Display current time on the video.

Figure 4.4.1: Partial screenshot of the encoder's web interface "OSD" settings page, showing options for configuring text overlays, including zone, alpha, type, position, font size, background color, and font color.
4.5 Supported Platforms and Software
The encoder is compatible with a wide range of streaming platforms and software for receiving and managing streams.

Figure 4.5.1: Icons representing supported streaming platforms such as Dacast, Twitch, Livestream, Wowza, YouTube, Ustream, Vimeo, and Facebook Live.

Figure 4.5.2: Icons representing compatible software and tools like Wirecast, OBS, Flash Player, XSplit, vMix, Ffmpeg, Potplayer, and VLC.

Figure 4.5.3: Illustration of a live event streaming scenario, showing a camera feeding into the URayCoder encoder, with output viewed on a laptop and mobile devices.
5. Wartung
5.1 Firmware-Updates
URayCoder provides free lifetime technical support and firmware updates. Regularly checking for and applying firmware updates can improve performance, add new features, and resolve potential issues. Firmware updates are typically performed through the web interface under the "System" or "Upgrade" section. Contact URayCoder support for the latest firmware files und Anleitungen.
5.2 Reinigung
Keep the device clean and free from dust. Use a soft, dry cloth for cleaning. Do not use liquid cleaners or solvents. Ensure ventilation holes are not obstructed.
5.3 Werksreset
If you encounter persistent issues or forget your login credentials, a factory reset can restore the device to its default settings. This can be done via the web interface (under "System" -> "Factory Reset") or by pressing the physical RESET button on the device for several seconds while it is powered on. Refer to the quick start guide for the exact procedure for your model.
6. Fehlerbehebung
| Problem | Mögliche Ursache | Lösung |
|---|---|---|
| Kein Videosignal empfangen. |
|
|
| Kein Zugriff möglich web Schnittstelle. |
|
|
| Streaming issues (buffering, no stream). |
|
|
| No audio in stream. |
|
|
7. Spezifikationen
| Besonderheit | Detail |
|---|---|
| Modellnummer | UHE265-1S-4K |
| Videoeingang | 1 x HDMI |
| Audioeingang | 1x HDMI Embedded Audio, 1x 3.5mm Line-in Audio |
| Videokodierung | H.265 / H.264 |
| Maximale Eingangsauflösung | 3840x2160@30fps (4K) |
| Maximale Ausgabeauflösung | 3840x2160@30fps (4K) or 1920x1080@60fps |
| Streaming-Protokolle | HTTP, RTSP, RTMP(S), SRT, HLS(M3U8), UDP, RTP, MP4, Multicast, Unitcast, ONVIF, FLV |
| Netzwerkschnittstelle | 1x RJ45 Ethernet (10/100/1000Mbps) |
| Stromversorgung | Gleichstrom 12 V |
| Maße | 6.1 x 6.02 x 2.05 Zoll (Verpackungsmaße) |
| Gewicht | 12.6 Unzen |
| Hersteller | URay |
8. Garantie und Support
All URayCoder video encoders include free lifetime technical support and warranty.
- Technische Unterstützung: For any technical assistance, troubleshooting, or inquiries, please contact URayCoder customer support.
- Firmware/Software Development: SDK and API documentation, along with CGI control protocol documents, are available for secondary development.
- Customization Services: URayCoder offers various customization options, including shell pattern printing, control panel logo addition, and firmware/hardware function development.
Please refer to the official URayCoder website or your purchase documentation for specific contact details and warranty terms.


