1. Einleitung
The PHOTONTEK XT 1000W CO2 Pro LED is a high-performance grow light designed for professional indoor cultivation. This fixture delivers a balanced, full-spectrum light with high Photosynthetic Photon Flux Density (PPFD) levels, optimized for plant growth cycles. It is engineered for use in 5'x5' coverage areas, particularly when supplemented with CO2, but can also be adapted for 6'x6' areas without CO2 supplementation. This manual provides essential information for the safe and effective installation, operation, and maintenance of your PHOTONTEK XT 1000W CO2 Pro LED grow light.
2. Sicherheitshinweise
Please read all safety warnings and instructions carefully before installing or operating the PHOTONTEK XT 1000W CO2 Pro LED. Failure to follow these instructions may result in electric shock, fire, or other serious injury.
- Always disconnect power before installation, maintenance, or moving the fixture.
- Do not operate the fixture with a damaged cord or plug.
- Stellen Sie sicher, dass die Leuchte sicher befestigt ist, um ein Herunterfallen zu verhindern.
- Do not look directly at the operating LEDs; prolonged exposure can cause eye damage.
- Sorgen Sie für ausreichende Belüftung rund um das Gerät, um eine Überhitzung zu vermeiden.
- Dieses Produkt ist nur für die Verwendung in Innenräumen bestimmt.
- Von Wasser und anderen Flüssigkeiten fernhalten.
3. Lieferumfang
Prüfen Sie nach dem Auspacken, ob alle Komponenten vorhanden und unbeschädigt sind.
- PHOTONTEK XT 1000W CO2 Pro LED Panel
- Netzkabel
- Hanging Kit (typically includes hangers/ratchets)
- Bedienungsanleitung (dieses Dokument)

Abbildung 1: The PHOTONTEK XT 1000W CO2 Pro LED grow light, showing the multi-bar design and central driver box. This image illustrates the complete fixture as it would appear when assembled and ready for hanging.
4. Einrichtung und Installation
4.1 Auspacken und Prüfen
- Entnehmen Sie vorsichtig alle Komponenten aus der Verpackung.
- Inspect the fixture for any signs of damage during transit. Contact your supplier immediately if any damage is found.
- Ensure all listed components in "What's in the Box" are present.
4.2 Montage des Geräts
The PHOTONTEK XT 1000W CO2 Pro LED is designed to be suspended above your plant canopy.
- Identify a sturdy overhead structure capable of supporting the weight of the fixture (approximately 39.7 pounds or 17.999 kg).
- Attach the provided hanging cables or ratchets to the designated hanging points on the fixture.
- Securely attach the other end of the hanging system to your overhead structure.
- Adjust the hanging height to achieve the desired distance from the plant canopy. Refer to the "Operating Instructions" section for recommended hanging heights based on CO2 usage.

Abbildung 2: Seitenprofifile of the PHOTONTEK XT 1000W CO2 Pro LED, illustrating its slim design and the distribution of LED bars. This view helps in understanding the fixture's dimensions for proper placement.
4.3 Elektrischer Anschluss
Stellen Sie sicher, dass die Stromquelle mit der Lautstärke übereinstimmttage requirements of the fixture (277 Volts AC).
- Connect the power cord to the input port on the fixture's driver box. Ensure a secure connection.
- Stecken Sie das andere Ende des Netzkabels in eine geerdete Steckdose.
- If using a dimmer or external controller (Control Method: App, Switch Style: Dimmer, Push Button), connect it according to its specific instructions to the designated dimming ports on the fixture.
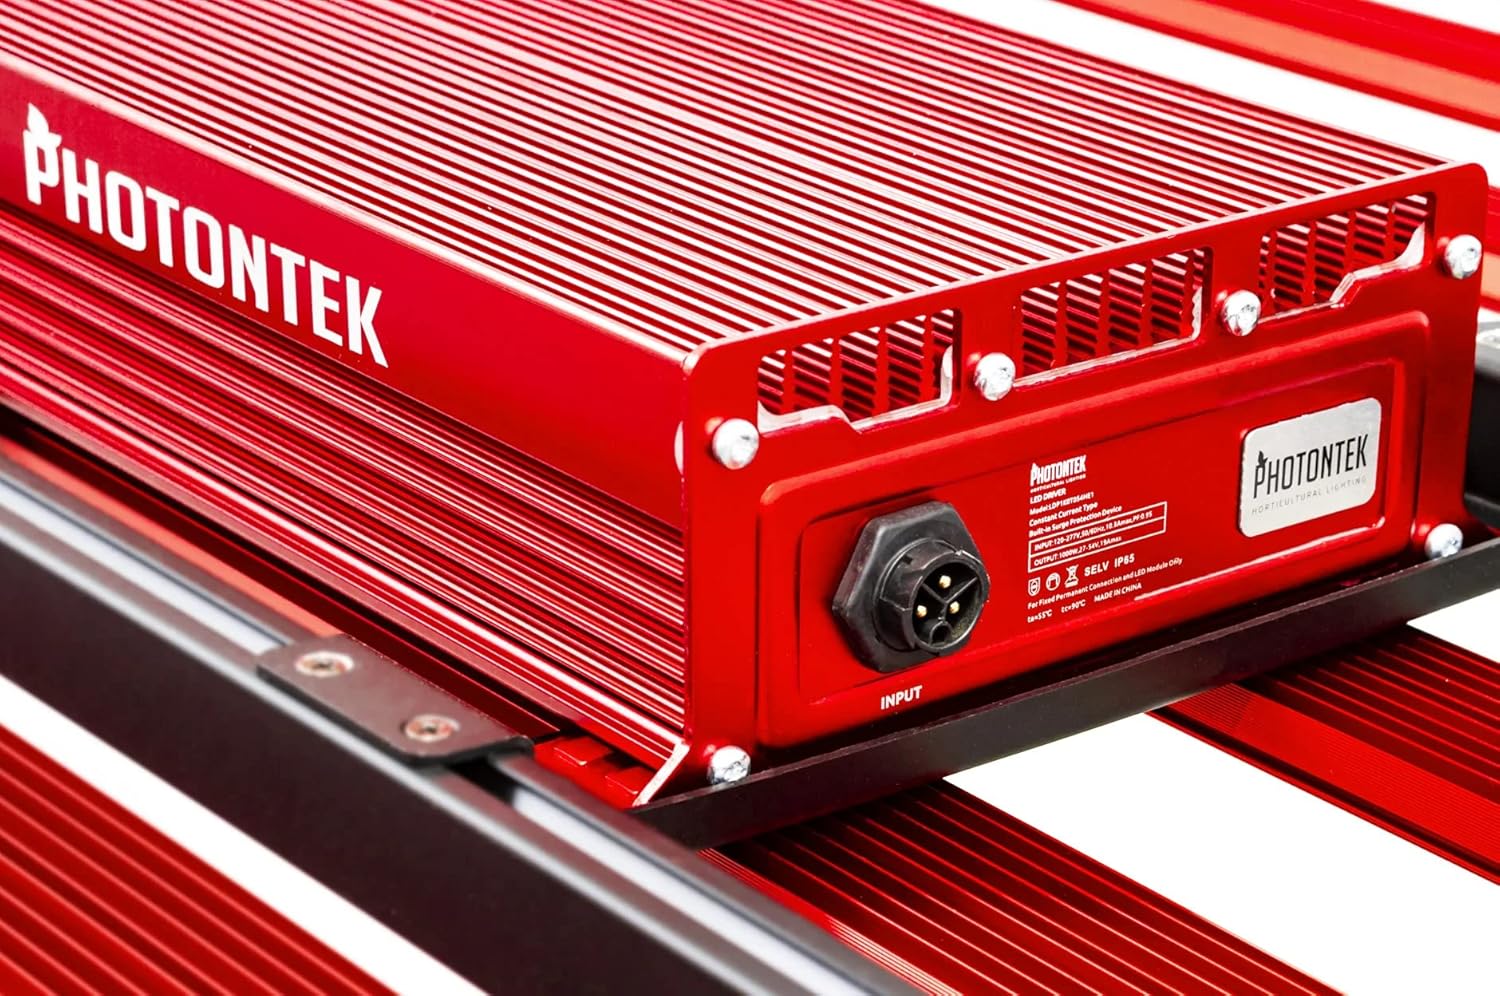
Abbildung 3: Detaillierte view of the PHOTONTEK XT 1000W CO2 Pro LED driver box, highlighting the input port and product labeling. This shows where the main power connection is made.
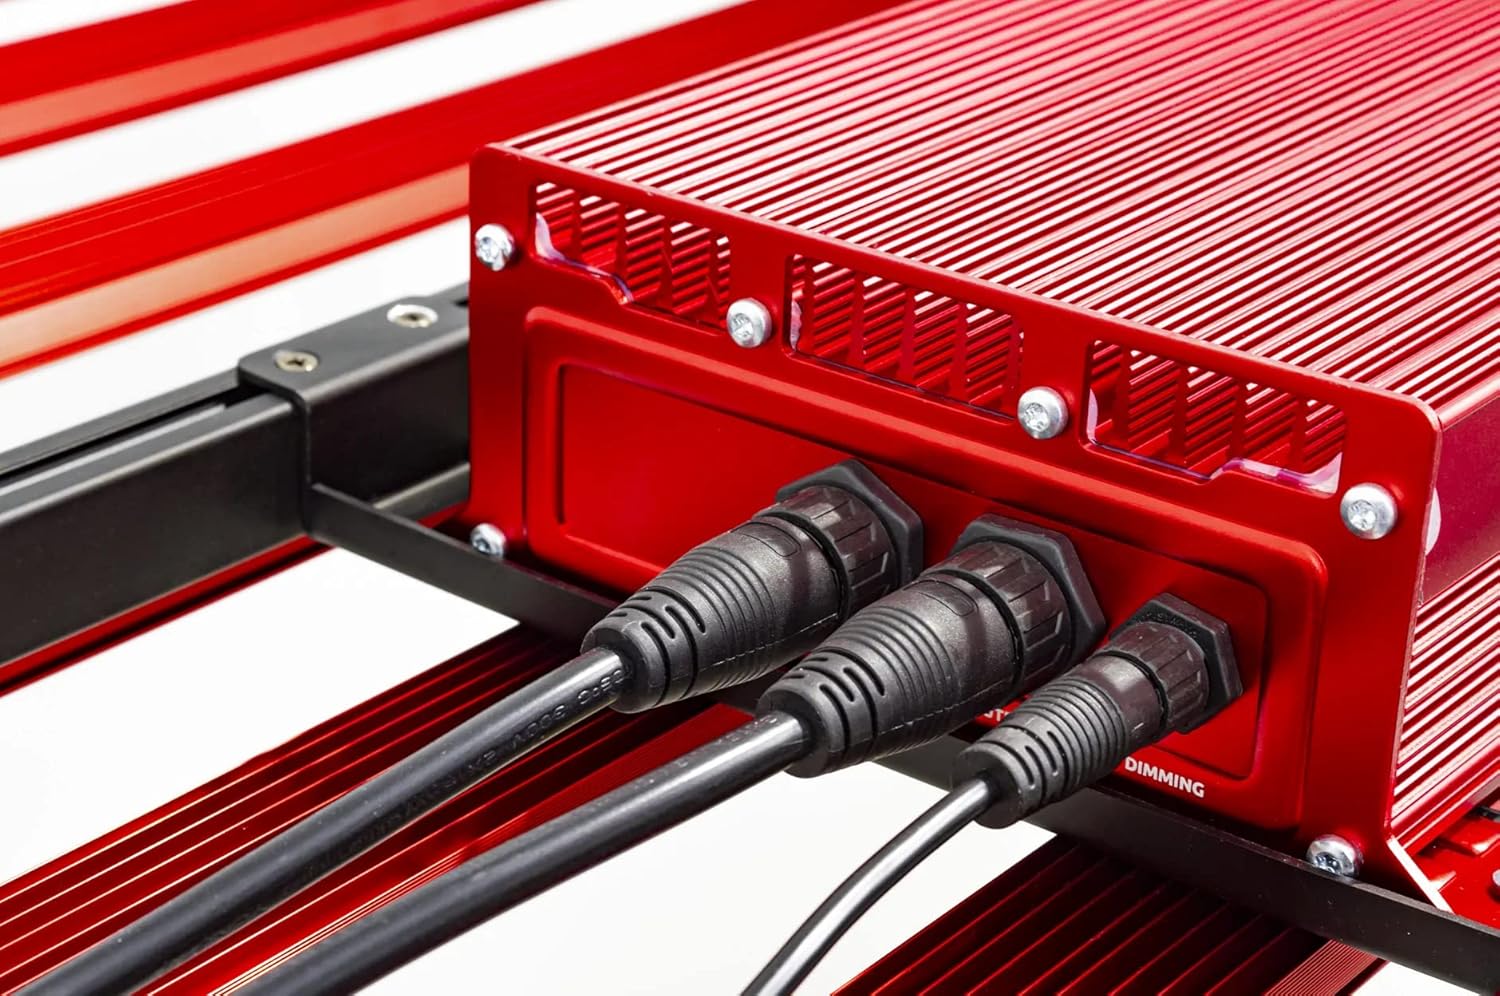
Abbildung 4: Close-up of the connection ports on the PHOTONTEK XT 1000W CO2 Pro LED driver, showing both power input and dimming control ports. This image clarifies where to connect the power cord and any optional dimming accessories.
5. Bedienungsanleitung
5.1 Ein-/Ausschalten
Once the fixture is securely mounted and connected to power, it can be turned on.
- To power on, ensure the power cord is plugged into a live outlet. If using a timer, set the desired light cycle.
- To power off, disconnect the power cord from the outlet or use a connected timer/controller.
5.2 Light Intensity and Spectrum
The PHOTONTEK XT 1000W CO2 Pro LED provides a full spectrum light. The intensity can be adjusted using the integrated dimmer or an external app/controller.
- Dimmersteuerung: Use the push-button dimmer switch (if present) or the app control to adjust light output from 0-100%.
- Recommended PPFD Levels:
- For 5'x5' coverage with CO2 supplementation: Aim for PPFD levels up to 1500 µmol/s/m². Maintain CO2 levels up to 1500 PPM, matching PPFD levels 1:1 once exceeding 1000 µmol/s/m².
- For 6'x6' coverage without CO2 supplementation: Increase the distance between the fixture and the plant canopy to achieve optimal PPFD levels for the specific growth stage. This will result in lower overall PPFD intensity compared to CO2-supplemented setups.

Abbildung 5: Nahaufnahme view of the individual LED diodes on one of the light bars of the PHOTONTEK XT 1000W CO2 Pro LED. This illustrates the quality and density of the light-emitting components.
6. Wartung
Regular maintenance ensures optimal performance and longevity of your PHOTONTEK XT 1000W CO2 Pro LED.
- Reinigung: Periodically clean the LED bars and driver box with a soft, dry cloth to remove dust and debris. Ensure the fixture is unplugged and cool before cleaning. Do not use abrasive cleaners or solvents.
- Inspektion: Regularly inspect the power cord, hanging cables, and all connections for any signs of wear or damage. Replace any damaged components immediately.
- Belüftung: Ensure that the ventilation openings on the driver box are not obstructed to allow for proper heat dissipation.
7. Fehlerbehebung
If you encounter issues with your PHOTONTEK XT 1000W CO2 Pro LED, refer to the following common problems and solutions.
| Problem | Mögliche Ursache | Lösung |
|---|---|---|
| Gerät lässt sich nicht einschalten. | No power supply; loose connection; faulty power cord/outlet. | Check power cord connection; verify outlet is live; try a different outlet; inspect power cord for damage. |
| Die Lichtausbeute ist schwach oder flackert. | Dimmer setting too low; loose connection; power supply issue. | Adjust dimmer setting; check all electrical connections; ensure stable power supply. |
| Fixture is overheating. | Poor ventilation; obstructed vents. | Ensure adequate airflow around the fixture; clear any obstructions from vents. |
| App-Steuerung funktioniert nicht. | Connectivity issue; app malfunction; incorrect setup. | Check Bluetooth/Wi-Fi connection; restart the app and fixture; refer to app-specific instructions. |
If the problem persists after attempting these solutions, please contact PHOTONTEK customer support.
8. Spezifikationen
Detailed technical specifications for the PHOTONTEK XT 1000W CO2 Pro LED.
| Besonderheit | Detail |
|---|---|
| Marke | PHOTONTEK |
| Modell | XT 1000W CO2 Pro LED |
| Lichtart | LED |
| Besonderheit | Volles Spektrum |
| Wastage | 1000 Watt |
| Lichtfarbe | Tageslichtweiß |
| Bandtage | 277 Volt (Wechselstrom) |
| Einheitenanzahl | 1.0 Anzahl |
| Anzahl der Artikel | 1 |
| Material | Aluminium, Kunststoff |
| Verwendung im Innen- und Außenbereich | Innenbereich |
| Stromquelle | Kabelgebundene Elektrik |
| Energieaufnahme | 1000 Watt |
| Lichtquellentyp | LED |
| Artikelgewicht | 39.7 Pfund (17.999 kg) |
| Lichtquelle Wattage | 1000 Watt |
| Kontrollmethode | App |
| Durchschnittliches Leben | 5 Jahre |
| Effizienz | 2.9 µmol/J |
| Stil | Modern |
| UPC | 751448506226 |
| Teilenummer | 751448506226 |
| Anzahl der Lichter | 1 (fixture) |
| Im Lieferumfang enthaltene Komponenten | LED-Panel |
| Schirmmaterial | Plastik |
| Lichtrichtung | LED (Direct) |
| Stil wechseln | Dimmer, Push Button |
| Schalterinstallationstyp | Wall Mount (for external controller) |
| Datum der ersten Verfügbarkeit | 13. Juli 2022 |
9. Garantie und Support
PHOTONTEK products are manufactured to high standards and are designed for durability.
- Garantieinformationen: Specific warranty terms and conditions are typically provided with your purchase documentation or can be found on the official PHOTONTEK webBitte bewahren Sie Ihren Kaufbeleg für Garantieansprüche auf.
- Kundendienst: For technical assistance, troubleshooting beyond this manual, or warranty inquiries, please contact PHOTONTEK customer support directly through their official webWebsite oder die mit Ihrem Produkt gelieferten Kontaktinformationen.


