Einführung
This manual provides essential instructions for the safe operation, setup, maintenance, and troubleshooting of your BLACK+DECKER BCD003C1 18V Cordless Variable Speed Hammer Drill Machine. Please read this manual thoroughly before using the tool to ensure proper and safe usage. Keep this manual for future reference.
Allgemeine Sicherheitsinformationen
WARNUNG: Lesen Sie alle Sicherheitshinweise, Anweisungen, Abbildungen und technischen Daten, die diesem Elektrowerkzeug beiliegen. Die Nichtbeachtung der unten aufgeführten Anweisungen kann zu Stromschlag, Brand und/oder schweren Verletzungen führen.
- Beim Bedienen von Elektrowerkzeugen stets Augen- und Gehörschutz tragen.
- Halten Sie Ihren Arbeitsbereich sauber und gut beleuchtet. Überladene oder dunkle Bereiche laden zu Unfällen ein.
- Betreiben Sie Elektrowerkzeuge nicht in explosionsgefährdeten Bereichen, in denen sich beispielsweise brennbare Flüssigkeiten, Gase oder Staub befinden.
- Halten Sie Kinder und andere Personen während der Benutzung des Elektrowerkzeugs fern.
- Ziehen Sie sich angemessen an. Tragen Sie keine weite Kleidung oder Schmuck. Halten Sie Haare und Kleidung von beweglichen Teilen fern.
- Vermeiden Sie versehentliches Einschalten. Stellen Sie sicher, dass sich der Schalter in der Aus-Position befindet, bevor Sie das Gerät an den Akku anschließen, es anheben oder tragen.
- Verwenden Sie das richtige Elektrowerkzeug für Ihre Anwendung.
- Trennen Sie den Akku vom Elektrowerkzeug, bevor Sie Einstellungen vornehmen, Zubehörteile wechseln oder Elektrowerkzeuge lagern.
- Warten Sie Elektrowerkzeuge und Zubehör sorgfältig. Achten Sie auf Fehlausrichtung oder Festfressen beweglicher Teile, Bruchstellen oder andere Zustände, die die Funktion des Elektrowerkzeugs beeinträchtigen können.
- Verwenden Sie das Elektrowerkzeug, das Zubehör und die Werkzeugeinsätze gemäß dieser Anleitung und unter Berücksichtigung der Arbeitsbedingungen und der auszuführenden Arbeiten.
Produkt überview
Familiarize yourself with the components of your BLACK+DECKER BCD003C1 Cordless Hammer Drill.

Abbildung 1: Vorderseite view of the BLACK+DECKER BCD003C1 Cordless Hammer Drill, showing the chuck, clutch, and battery attached.
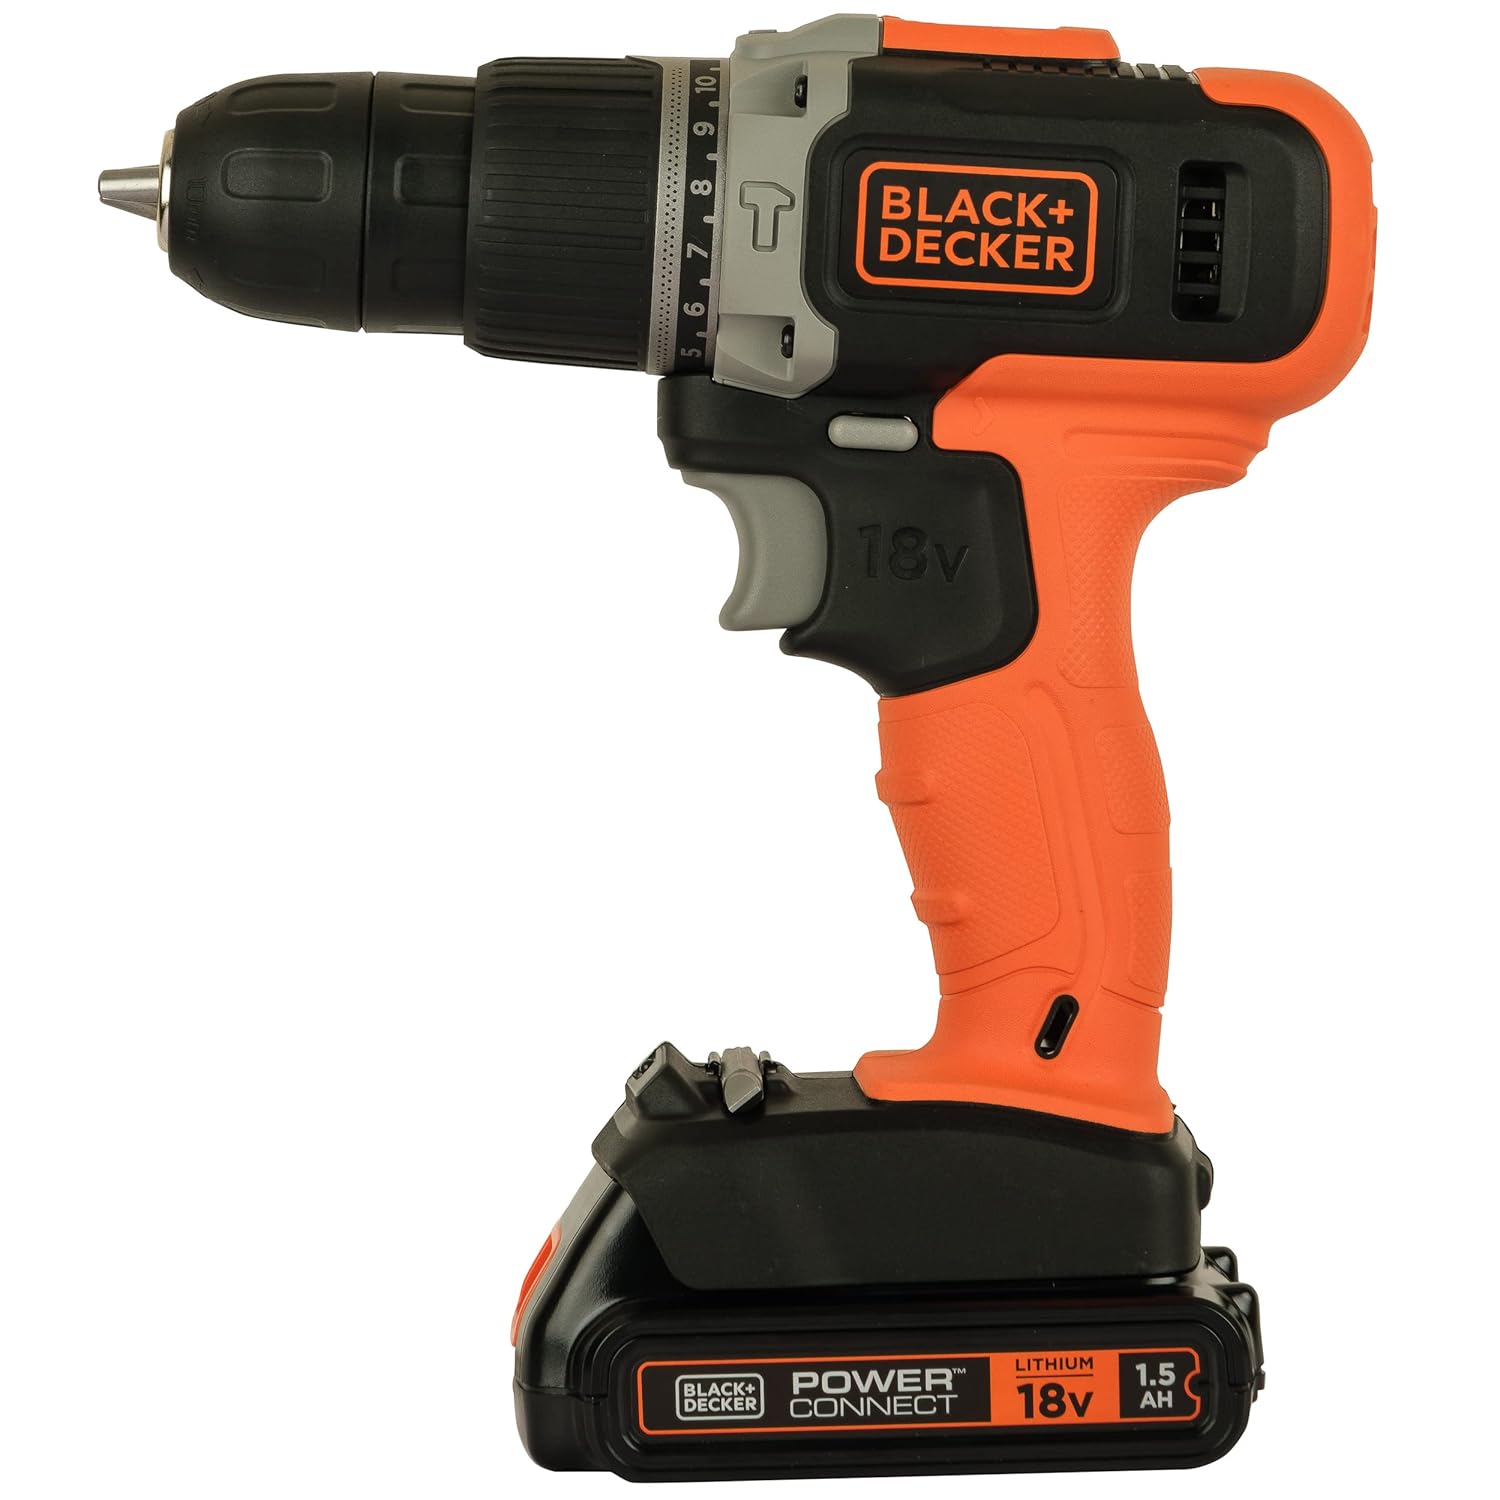
Abbildung 2: Seite view of the BLACK+DECKER BCD003C1 Cordless Hammer Drill, highlighting the variable speed trigger and forward/reverse switch.

Figure 3: A user demonstrating the ergonomic grip of the BLACK+DECKER BCD003C1 Cordless Hammer Drill.
Schlüsselkomponenten:
- Futter: Hält Bohrer und Schraubendreherbits.
- Clutch Collar: Adjusts torque settings for screwdriving and selects drill/hammer drill mode.
- Auslöser mit variabler Geschwindigkeit: Controls the rotational speed of the chuck.
- Vorwärts-/Rückwärtsschalter: Ändert die Drehrichtung.
- Batteriepack: Provides power to the drill.
- Anti-slip Soft Grip: Enhances user comfort and control.
Aufstellen
1. Laden des Akkus
Before first use, fully charge the 18V Li-Ion battery pack. Refer to the separate battery charger manual for detailed charging instructions. Ensure the charger is compatible with the 1.5Ah Li-Ion battery.
2. Einsetzen und Entfernen des Akkus
- So installieren Sie: Align the battery pack with the receptacle on the bottom of the drill handle. Slide the battery pack into the handle until it clicks securely into place.
- So entfernen Sie: Press the battery release button (usually located on the front or sides of the battery pack) and slide the battery pack out of the handle.
3. Einsetzen und Entfernen von Bohrern/Zubehör
- So installieren Sie: Rotate the chuck collar counter-clockwise until the chuck jaws are open wide enough to insert the bit. Insert the bit fully into the chuck. Rotate the chuck collar clockwise to tighten the jaws firmly around the bit. For best results, hand-tighten the chuck, then use the drill's power to give it a final tighten by briefly pressing the trigger.
- So entfernen Sie: Drehen Sie den Spannfutterkragen gegen den Uhrzeigersinn, um die Backen zu lösen und den Bohrer zu entnehmen.
Bedienungsanleitung
1. Ein-/Ausschalten und Drehzahlregelung
The drill is equipped with a variable speed trigger. To start the drill, press the trigger. To stop, release the trigger. The speed of rotation is controlled by the amount of pressure applied to the trigger; pressing harder increases the speed (0-650 RPM).
2. Vorwärts/Rückwärts-Schalter
The forward/reverse switch is located above the trigger. Push the switch to the left for forward rotation (drilling/screwing in) and to the right for reverse rotation (removing screws). Ensure the switch is in the center position to lock the trigger and prevent accidental starting when not in use.
3. Clutch Settings and Modes
The clutch collar allows you to select the appropriate torque setting for screwdriving or switch to drilling/hammer drilling modes. The 10-position clutch provides precise control.
- Schrauben: Rotate the clutch collar to one of the numbered settings (1-10). Lower numbers are for smaller screws and softer materials, higher numbers for larger screws and harder materials. This prevents over-driving screws and stripping screw heads.
- Bohren: Rotate the clutch collar to the drill symbol. This bypasses the clutch for continuous power, ideal for drilling into wood or metal.
- Hammerbohren: Rotate the clutch collar to the hammer drill symbol. This mode combines rotary action with a hammering action, suitable for drilling into masonry or concrete.
Maximale Bohrleistung:
- Holz: 25mm
- Stahl: 10mm
Maximales Drehmoment: 30 Nm.
Wartung
Regelmäßige Wartung gewährleistet die Langlebigkeit und optimale Leistung Ihrer Bohrmaschine.
1. Reinigung
- Um eine Überhitzung zu vermeiden, sollten die Lüftungsschlitze des Werkzeugs sauber gehalten werden.
- Use a soft brush or dry cloth to remove dust and debris from the tool. Do not use water or chemical cleaners.
- Reinigen Sie die Spannbacken regelmäßig, um einen sicheren Halt der Bohrer zu gewährleisten.
2. Batteriepflege
- Akkus sollten an einem kühlen, trockenen Ort, fern von direkter Sonneneinstrahlung und extremen Temperaturen, aufbewahrt werden.
- Do not store battery packs in a discharged state for extended periods. Charge them periodically.
- Versuchen Sie nicht, den Akku zu öffnen oder zu verändern.
3. Speicherung
When not in use, store the drill and its accessories in a secure, dry place, out of reach of children. Ensure the forward/reverse switch is in the center (locked) position.
Fehlerbehebung
Sollten Sie Probleme mit Ihrer Bohrmaschine haben, beachten Sie bitte die folgenden häufig auftretenden Probleme und Lösungen:
| Problem | Mögliche Ursache | Lösung |
|---|---|---|
| Der Bohrer startet nicht. | Battery is not charged or not properly installed. Forward/reverse switch is in the center (locked) position. | Ensure battery is fully charged and securely installed. Move the forward/reverse switch to the left or right. |
| Reduzierte Leistung oder Performance. | Battery charge is low. Bit is dull or incorrect for the material. | Recharge the battery. Replace or sharpen the bit. Ensure the correct clutch setting or mode is selected. |
| Chuck hält das Gebiss nicht richtig fest. | Die Spannbacken sind verschmutzt oder abgenutzt. Der Gebissschaft ist beschädigt. | Clean chuck jaws. Replace damaged bits. Ensure chuck is tightened properly. |
| Überhitzung während des Gebrauchs. | Ventilation slots are blocked. Excessive load on the motor. | Clear ventilation slots. Reduce pressure on the drill. Allow the tool to cool down. |
If you experience issues that cannot be resolved with the above steps, or if you require replacement parts, please contact BLACK+DECKER customer service. Note that availability of spare parts, such as chargers, may vary by region and product model. It is advisable to check with authorized service centers for specific part availability.
Technische Daten
| Besonderheit | Detail |
|---|---|
| Marke | BLACK+DECKER |
| Modell | BCD003C1 |
| Stromquelle | Batteriebetrieben |
| Bandtage | 18 Volt |
| AmpAlter | 1.5 Amps |
| Maximale Drehzahl | 650 U/min |
| Maximale Futtergröße | 10 Millimeter |
| Besonderheit | Variable Geschwindigkeit |
| Material (Grip) | Plastik |
| Maximales Drehmoment | 30 Newtonmeter |
| Anzahl der Geschwindigkeiten | 1 |
| Bohrertyp | Schlagbohrer |
| Bohrleistung (Holz) | 25 Millimeter |
| Bohrkapazität (Metall) | 10 Millimeter |
Garantie und Support
Garantieinformationen
BLACK+DECKER products are manufactured to high-quality standards and are guaranteed against manufacturing defects. For specific warranty terms and conditions applicable to your region and product, please refer to the warranty card included with your purchase or visit the official BLACK+DECKER webBewahren Sie Ihren Kaufbeleg für Garantieansprüche auf.
Kundenservice
For technical assistance, service, or to locate an authorized service center, please visit the official BLACK+DECKER webSie können sich auch an den Kundendienst wenden. Die Kontaktdaten finden Sie in der Regel auf der Produktverpackung oder der offiziellen Website. webWebsite.
Offizieller BLACK+DECKER WebWebsite: Www.blackanddecker.com


