Einführung
Thank you for choosing the GEARSTONE Foldable Magnetic Exercise Bike. This manual provides essential information for the safe assembly, operation, and maintenance of your exercise bike. Please read this manual thoroughly before use and keep it for future reference.
Wichtige Sicherheitsinformationen
- Konsultieren Sie Ihren Arzt, bevor Sie mit einem Trainingsprogramm beginnen.
- Vor dem Training immer aufwärmen und danach abkühlen.
- Vor jedem Gebrauch sicherstellen, dass alle Schrauben und Muttern fest angezogen sind.
- Stellen Sie das Heimtrainer auf eine ebene, stabile Fläche.
- Halten Sie Kinder und Haustiere während des Gebrauchs vom Gerät fern.
- Die maximale Benutzergewichtskapazität für dieses Fahrrad beträgt 120 kg (264 lbs).
- Brechen Sie das Training sofort ab, wenn Ihnen schwindelig wird oder Sie Schmerzen verspüren.
- Tragen Sie angemessene Sportkleidung und -schuhe.
Packungsinhalt
Carefully unpack the box and ensure all parts are present. Refer to the diagram below for a visual representation of the components.

Abbildung 1: Package Contents. This image displays the various components and tools included with your exercise bike, such as the main frame, pedals, seat, backrest, and assembly tools.
Das Paket sollte enthalten:
- Hauptrahmenbaugruppe
- Linkes und rechtes Pedal
- Sitz und Rückenlehne
- Handlebar with LCD Monitor
- Stabilisatoren (vorn und hinten)
- Hardware Kit (bolts, nuts, washers)
- Assembly Tools (wrench, Allen key)
- Bedienungsanleitung
Einrichtung und Montage
Follow these steps to assemble your GEARSTONE Foldable Magnetic Exercise Bike. It is recommended to have two people for assembly.
- Stabilisatoren anbringen: Befestigen Sie die vorderen und hinteren Stabilisatoren mit den mitgelieferten Schrauben und Muttern am Hauptrahmen. Achten Sie auf einen festen Sitz, um die Stabilität zu gewährleisten.
- Pedale installieren: Identifizieren Sie das linke (L) und das rechte (R) Pedal. Das linke Pedal wird gegen den Uhrzeigersinn, das rechte im Uhrzeigersinn festgeschraubt. Schrauben Sie sie in die Kurbelarme und ziehen Sie sie fest an.
- Sitz und Rückenlehne montieren: Insert the seat post into the main frame and adjust to your desired height. Secure it with the locking pin. Attach the backrest to the seat support.
- Attach Handlebar and Monitor: Connect the handlebar assembly to the main frame. Ensure all cables for the LCD monitor and pulse sensors are properly connected. Secure the handlebar with the designated bolts.
- Endkontrolle: Before first use, double-check all connections and ensure all bolts and nuts are tightened.

Abbildung 2: Assembly Steps. This diagram illustrates the key stages of assembling the exercise bike, from attaching the base supports to installing the seat and pedals.
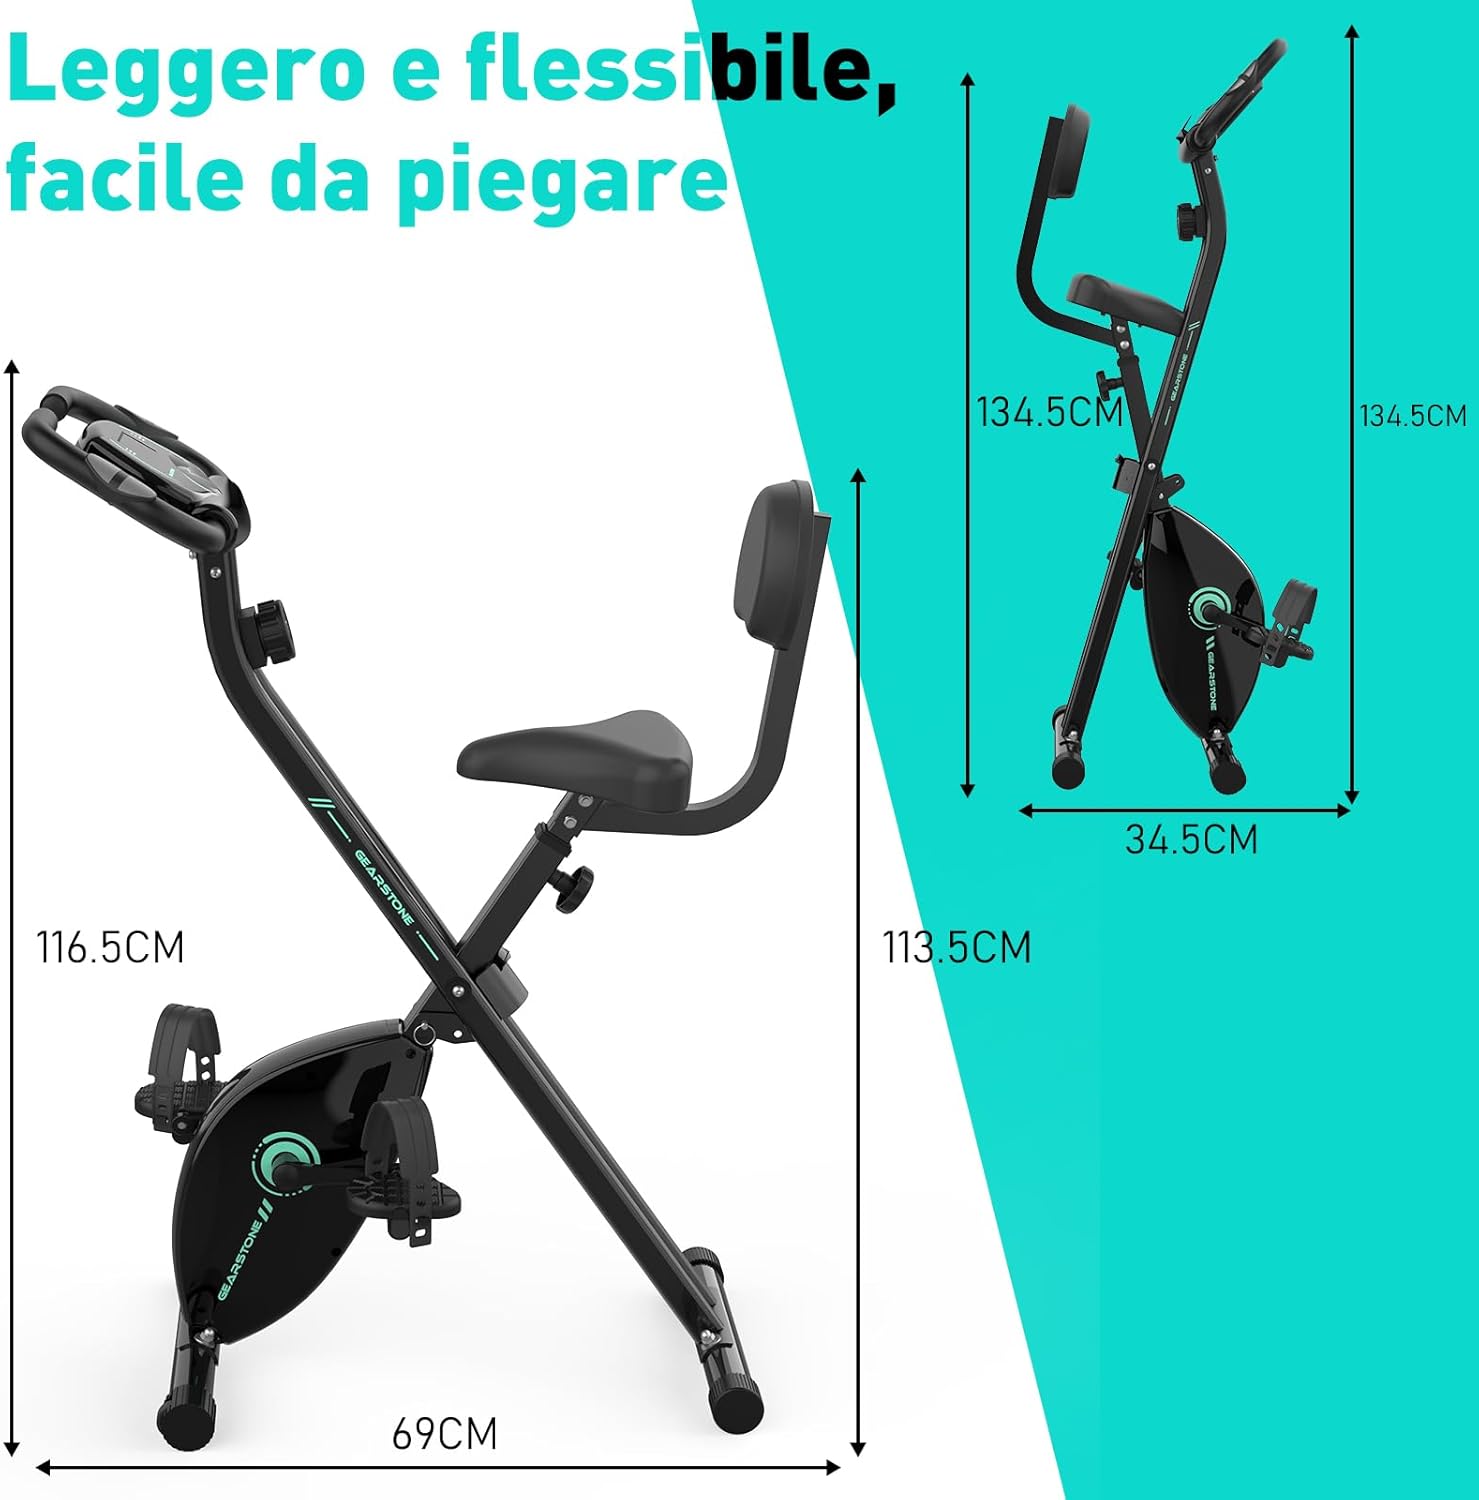
Abbildung 3: Assembled Bike Dimensions. This image shows the fully assembled exercise bike with its dimensions, highlighting its compact and foldable nature.
Bedienungsanleitung
Einstellen der Sitzhöhe
The seat height can be adjusted to five different levels to accommodate various user heights. Loosen the adjustment knob located on the seat post, slide the seat to the desired height, and then tighten the knob securely. Ensure your knees have a slight bend at the bottom of the pedal stroke.

Abbildung 4: Seat and Resistance Adjustment. This image highlights the knob for adjusting magnetic resistance and the mechanism for adjusting seat height.
Widerstand einstellen
The bike features 8 levels of magnetic resistance. Turn the resistance knob, located below the LCD monitor, clockwise to increase resistance and counter-clockwise to decrease it. Start with a lower resistance and gradually increase as your fitness improves.
Verwendung des LCD-Monitors
The LCD monitor displays key workout data. It is battery-powered. The monitor automatically turns on when you start pedaling or press a button.
- SCAN: Durchläuft automatisch alle Anzeigefunktionen im Sekundentakt.
- ZEIT: Zeigt die Dauer Ihres Trainings an.
- GESCHWINDIGKEIT: Zeigt Ihre aktuelle Fahrradgeschwindigkeit an.
- ENTFERNUNG: Zeigt die während Ihres aktuellen Trainings zurückgelegte Strecke an.
- KALORIEN: Schätzt den Kalorienverbrauch während des Trainings.
- KILOMETERZÄHLER (ODO): Zeigt die gesamte zurückgelegte Strecke an.
- IMPULS: Zeigt Ihre Herzfrequenz an, wenn Sie die Pulssensoren am Lenker halten.
To reset the monitor, press and hold the button for a few seconds, or remove and reinsert the batteries.

Abbildung 5: LCD Monitor Display. This image provides a detailed view of the LCD monitor and its various data display functions.

Abbildung 6: Resistance Control and Monitor Interaction. This image illustrates how to adjust the resistance level and interact with the LCD monitor's buttons.
Verwenden des Telefonhalters
A phone holder is integrated into the LCD monitor panel. Place your smartphone or tablet securely in the holder to enjoy videos or music during your workout.
Folding the Bike for Storage
To fold the bike, loosen the main folding knob (usually located near the base of the frame). Carefully fold the frame inwards until it locks into its compact position. This design allows for easy storage and space-saving.
Wartung
- Reinigung: Wischen Sie das Fahrrad mit Werbung abamp Nach jedem Gebrauch mit einem Tuch abwischen, um Schweiß und Staub zu entfernen. Keine Scheuermittel verwenden.
- Inspektion: Prüfen Sie regelmäßig alle Schrauben, Muttern und beweglichen Teile auf festen Sitz und Verschleiß. Ziehen Sie lose Befestigungselemente fest.
- Schmierung: The magnetic resistance system and belt drive are generally maintenance-free. Do not lubricate internal components unless specifically instructed by customer support.
- Lagerung: Lagern Sie das Fahrrad an einem kühlen, trockenen Ort, geschützt vor direkter Sonneneinstrahlung und extremen Temperaturen.
- Batteriewechsel: Replace the LCD monitor batteries when the display becomes dim or unresponsive.
Fehlerbehebung
| Problem | Mögliche Ursache | Lösung |
|---|---|---|
| Kein Bild auf dem LCD-Monitor | Die Batterien sind leer oder falsch eingelegt. | Tauschen Sie die Batterien aus oder stellen Sie sicher, dass sie mit der richtigen Polarität eingesetzt sind. |
| Ungenaue Pulsmessung | Hands not firmly on sensors; sensors are dirty. | Ensure firm contact with both pulse sensors. Clean sensors with a dry cloth. |
| Das Fahrrad ist instabil oder wackelt. | Lose Schrauben; unebene Oberfläche. | Check and tighten all assembly bolts. Move the bike to a flat, level surface. |
| Widerstand ändert sich nicht | Widerstandskabel abgetrennt oder beschädigt. | Überprüfen Sie die Widerstandskabelverbindung. Wenden Sie sich bei Beschädigung an den Kundendienst. |
| Ungewöhnliche Geräusche während des Betriebs | Loose parts; friction from moving components. | Check all bolts and nuts for tightness. Ensure no foreign objects are caught in moving parts. If noise persists, contact customer support. |
Technische Daten
| Besonderheit | Detail |
|---|---|
| Modellname | cyclette pieghevole |
| Marke | ZAHNRAD |
| Widerstandsmechanismus | Magnetisch |
| Widerstandsstufen | 8 einstellbare Stufen |
| Antriebssystem | Gürtel |
| Hauptmaterial | Steel, Metal, Foam/Leather |
| Maximale Gewichtskapazität | 120 Kilogramm (264 Pfund) |
| Produktabmessungen (L x B x H) | 69 x 39 x 116.5 cm (27.2 x 15.4 x 45.9 Zoll) |
| Artikelgewicht | 15.6 Kilogramm (34.4 Pfund) |
| Stromversorgung (Monitor) | Batteriebetrieben (Batterien nicht im Lieferumfang enthalten) |
| Besondere Merkmale | Foldable design, LCD monitor, Pulse sensors, Phone holder, Adjustable seat (5 levels) |
Garantie und Support
GEARSTONE provides a ein Jahr Garantie Diese Garantie gilt für dieses Produkt ab Kaufdatum. Sie deckt Herstellungsfehler und Materialmängel bei normalem Gebrauch ab.
If you encounter any issues with your exercise bike or have questions regarding its operation or maintenance, please do not hesitate to contact our customer support team. Provide your purchase details and a description of the issue for prompt assistance.
Kontaktieren Sie den Support: Bitte konsultieren Sie Ihre Kaufunterlagen oder die des Händlers. website for the most up-to-date contact information (e.g., email address or support portal).
Weitere Informationen
For more information about GEARSTONE products and fitness tips, visit our official webWebsite oder Social-Media-Kanäle.


