1. Einleitung
The Gemini GMU-M100 is a handheld UHF wireless microphone system designed for a variety of audio applications. This system provides wireless freedom, allowing users to move without cable restrictions, and is suitable for performances, presentations, karaoke, and more. The system operates within the 512 to 541.7 MHz frequency range (for the US market) and offers a stable signal transmission.
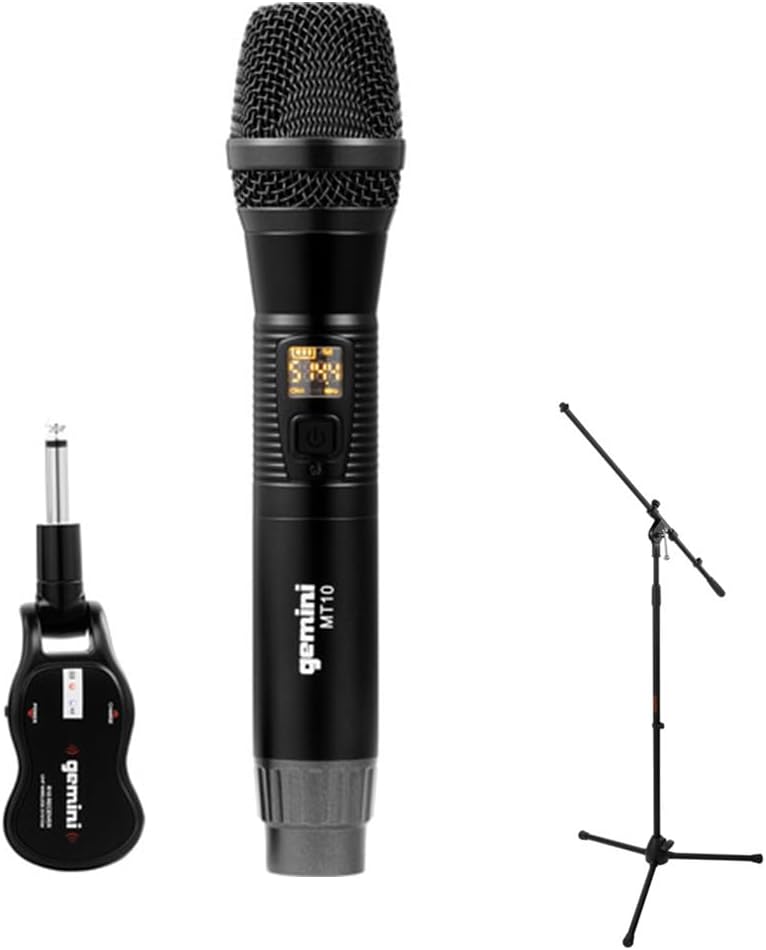
Image 1.1: The Gemini GMU-M100 Handheld UHF Wireless Microphone System, including the handheld microphone, plug-in receiver, and an optional microphone stand.
2. Packungsinhalt
Bitte überprüfen Sie den Packungsinhalt, um sicherzustellen, dass alle Artikel vorhanden und in gutem Zustand sind:
- GMU-M100 Handheld Wireless Microphone
- GMU-M100 Plug-in Wireless Receiver
- Rechargeable Lithium Batteries (pre-installed or included for both units)
- Micro-USB-Ladekabel
- Benutzerhandbuch (dieses Dokument)
Note: Additional accessories such as a microphone stand may be included if purchased as part of a bundle.
3. Produktüberschreitungview
3.1 Handheld Microphone (MT10)
The handheld microphone features a dynamic capsule with a cardioid pickup pattern, designed to focus on the sound source while minimizing background noise. It includes an LED screen for displaying battery life and frequency information, and a SET button for frequency adjustment.
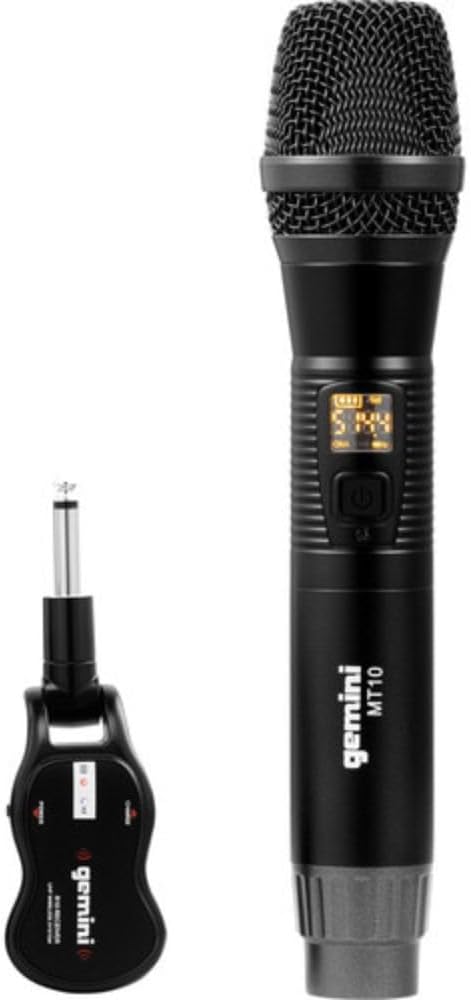
Image 3.1: The GMU-M100 handheld microphone and its compact plug-in receiver.
3.2 Plug-in Receiver (R10)
The compact receiver connects directly to your audio equipment via a standard 1/4" TS plug. It receives the wireless signal from the microphone and outputs it to your PA system, ampVerstärker oder Mischer.

Bild 3.2: Schräg view highlighting the design of the microphone and receiver.
4. Einrichtung
4.1 Aufladen der Geräte
Both the microphone and receiver are powered by rechargeable lithium batteries. Before first use, ensure both units are fully charged.
- Locate the Micro-USB charging port on the bottom of the microphone and on the side of the receiver.
- Connect the included Micro-USB cable to the charging port of each unit and plug the other end into a USB power source (e.g., computer USB port, USB wall adapter).
- The LED indicator on each unit will show charging status (refer to the unit's specific LED behavior for full charge indication).

Image 4.1: Close-up of the microphone's Micro-USB charging port (DC-5V).

Image 4.2: The Micro-USB charging cable provided for both units.
4.2 Battery Installation (Microphone)
The microphone uses a user-replaceable 18650 1200mAh battery. If the battery needs replacement or initial installation:
- Schrauben Sie die untere Kappe des Mikrofons ab.
- Insert the 18650 battery, ensuring correct polarity (+/-).
- Schrauben Sie die untere Kappe wieder fest zu.

Image 4.3: The microphone with its battery compartment open, revealing the 18650 battery.
4.3 Anschließen des Empfängers
The receiver connects directly to your audio input device.
- Plug the 1/4" TS connector of the receiver into an available 1/4" input jack on your PA speaker, ampVerstärker, Mischpult oder andere Audiogeräte.
- Ensure the audio equipment is powered off before connecting the receiver.
4.4 Einschalten und Koppeln
The microphone and receiver are designed for automatic pairing.
- Schalten Sie Ihre Audiogeräte ein.
- Press and hold the power button on the handheld microphone until the LED screen illuminates.
- Press and hold the power button on the plug-in receiver.
- The units will automatically pair. A successful connection is typically indicated by a stable signal icon on the microphone's LED screen.
5. Bedienungsanleitung
5.1 Lautstärkeregelung
The output volume can be controlled directly from the handheld microphone using the designated volume buttons (if present) or through the connected audio equipment's input gain/volume controls.
5.2 Frequenzeinstellung
If you experience interference, you can change the operating frequency of the microphone system:
- With the microphone powered on, press the SATZ Taste.
- The microphone will cycle through available UHF frequencies. The receiver will automatically sync to the new frequency.
- Select a clear frequency to ensure optimal performance.
5.3 Drahtlose Reichweite
The GMU-M100 system offers a wireless range of over 164 feet (50 meters) in optimal conditions. Obstacles, other wireless devices, and environmental factors can affect this range.
6. Wartung
6.1 Batteriepflege
- Die Batterien vor längerer Lagerung vollständig aufladen.
- Vermeiden Sie, Batterien extremen Temperaturen auszusetzen.
- If the microphone will not be used for a long period, remove the 18650 battery.
6.2 Reinigung
- Wischen Sie Mikrofon und Empfänger mit einem weichen, trockenen Tuch ab.
- Verwenden Sie keine aggressiven Chemikalien oder Scheuermittel.
- Avoid moisture contact with electronic components.
7. Fehlerbehebung
| Problem | Mögliche Ursache | Lösung |
|---|---|---|
| Keine Tonausgabe | Microphone or receiver not powered on; low battery; incorrect connection; receiver not paired. | Ensure both units are charged and powered on. Check all cable connections. Verify pairing (power cycle both units). Adjust volume on microphone and audio equipment. |
| Störungen oder statische Aufladung | Operating on a crowded frequency; proximity to other wireless devices; environmental interference. | Drücken Sie die SATZ button on the microphone to change to a different frequency. Move away from other wireless devices or sources of electromagnetic interference. |
| Kurze Funkreichweite | Obstacles between microphone and receiver; low battery; environmental factors. | Ensure a clear line of sight between microphone and receiver. Fully charge batteries. Reduce distance between units. |
| Microphone LED screen off | Microphone is off; battery is depleted. | Press the power button to turn on. Charge the microphone battery. |
8. Spezifikationen
| Besonderheit | Spezifikation |
|---|---|
| Modell | GMU-M100 |
| Mikrofon-Formfaktor | Handheld-Mikrofonsystem |
| Frequenzbereich (USA) | 512 - 541.7 MHz |
| Drahtlose Reichweite | Über 164 Fuß (50 Meter) |
| Stromquelle | Rechargeable Lithium Battery (USB Powered) |
| Mikrofonbatterie | 18650 1200mAh (user-replaceable) |
| Empfängeranschluss | 1/4" TS Plug |
| Material | Metall |
| Richtcharakteristik | Unidirektional (Niere) |
| Anzahl der Kanäle | 16 |
| Artikelgewicht | 15.7 Unzen (ca. 445 g) |
| Verpackungsabmessungen | 13 x 5.6 x 2.6 Zoll (ca. 33 x 14.2 x 6.6 cm) |
9. Garantie und Support
For warranty information, technical support, or service inquiries, please refer to the official Gemini webBesuchen Sie die Website oder kontaktieren Sie direkt den Kundendienst. Bewahren Sie Ihren Kaufbeleg für eventuelle Garantieansprüche auf.
Gemini Customer Support: Besuchen Sie www.geminisound.com/support Für aktuelle Supportinformationen und Kontaktdaten.


