1. Einleitung
Thank you for choosing the WORKPRO 1500W Rotary Hammer Drill. This heavy-duty tool is designed for demanding tasks such as drilling in concrete, wood, and steel, as well as chiseling applications. This manual provides essential information for the safe and efficient operation, maintenance, and troubleshooting of your rotary hammer drill. Please read it thoroughly before first use and keep it for future reference.

Image 1.1: WORKPRO 1500W Rotary Hammer Drill and included accessories.
2. Allgemeine Sicherheitshinweise
Beachten Sie stets die grundlegenden Sicherheitsvorkehrungen, um das Risiko von Bränden, Stromschlägen und Verletzungen zu verringern. Die Nichtbeachtung dieser Anweisungen kann zu schweren Verletzungen führen.
- Sicherheit am Arbeitsplatz: Halten Sie den Arbeitsbereich sauber und gut beleuchtet. Unordnung oder Dunkelheit erhöhen die Unfallgefahr. Betreiben Sie Elektrowerkzeuge nicht in explosionsgefährdeten Bereichen, z. B. in der Nähe von brennbaren Flüssigkeiten, Gasen oder Stäuben.
- Elektrische Sicherheit: Der Stecker von Elektrowerkzeugen muss zur Steckdose passen. Der Stecker darf niemals verändert werden. Vermeiden Sie jeglichen Körperkontakt mit geerdeten Oberflächen. Setzen Sie Elektrowerkzeuge weder Regen noch Nässe aus.
- Persönliche Sicherheit: Always wear eye protection. Use hearing protection when operating the tool for extended periods. Wear a dust mask if drilling in dusty conditions. Dress properly; avoid loose clothing or jewelry.
- Werkzeuggebrauch und -pflege: Wenden Sie keine Gewalt an. Verwenden Sie das für Ihren Anwendungszweck geeignete Elektrowerkzeug. Trennen Sie den Netzstecker, bevor Sie Einstellungen vornehmen, Zubehör wechseln oder Elektrowerkzeuge lagern.
- Wartung: Pflegen Sie Elektrowerkzeuge. Prüfen Sie auf Fehlausrichtung oder Festsitzen beweglicher Teile, Bruch von Teilen und andere Zustände, die den Betrieb des Elektrowerkzeugs beeinträchtigen können.
3. Product Components and Included Items
Familiarize yourself with the parts of your WORKPRO Rotary Hammer Drill and the accessories provided.

Image 3.1: Key components of the rotary hammer drill, including SDS-PLUS Chuck, Four Functions Switch, Grease Pot, Shock Absorber, On/Off Switch, Cushioned Handle, Variable Speed Control, 360° Rotatable Handle, and Heat Outlet.
Mitgeliefertes Zubehör:

Image 3.2: The complete set of accessories includes a carrying case, rotary hammer drill, SDS-plus point flat bit (250mm), SDS-plus point chisel bit (250mm), wrench, grease, SDS-plus drill bits (8mm, 10mm, 12mm), and a dust collector.
- 1 x Heavy-duty Rotary Hammer Drill
- 3 x SDS-plus Drill Bits (8 mm, 10 mm, 12 mm)
- 1 x Round Shank Chisel (Φ14 × 250 mm)
- 1 x Flat Chisel (Φ14 × 250 mm)
- 1 x Grease container
- 1 x Carbon Brush set
- 1 x Staubschutz
- 1 x Schraubenschlüssel
- 1 x Tragetasche
4. Aufbau und Montage
4.1 Anbringen des Hilfsgriffs
The 360° rotatable handle provides better control and comfort. Loosen the handle clamp, position the handle to your desired angle, and tighten the clamp sicher.
4.2 Inserting and Removing SDS-plus Bits
The SDS-plus chuck allows for quick and secure bit changes.
- Einfügen: Clean the bit shank. Pull back the chuck collar, insert the bit into the chuck until it clicks into place. Release the collar. Pull on the bit to ensure it is securely locked.
- Entfernen: Pull back the chuck collar and pull the bit out.

Image 4.1: Illustration of the auto-lock SDS-plus chuck for secure bit clamping.
4.3 Attaching the Dust Collector
For cleaner operation and to protect the user, attach the dust collector to the front of the tool when drilling.

Image 4.2: The anti-dust cover protects users and the machine from dust and debris.
5. Bedienungsanleitung
The WORKPRO Rotary Hammer Drill features four operating modes and variable speed control for versatile applications.
5.1 Modusauswahl
Use the four-function switch located on the side of the tool to select the desired operating mode:
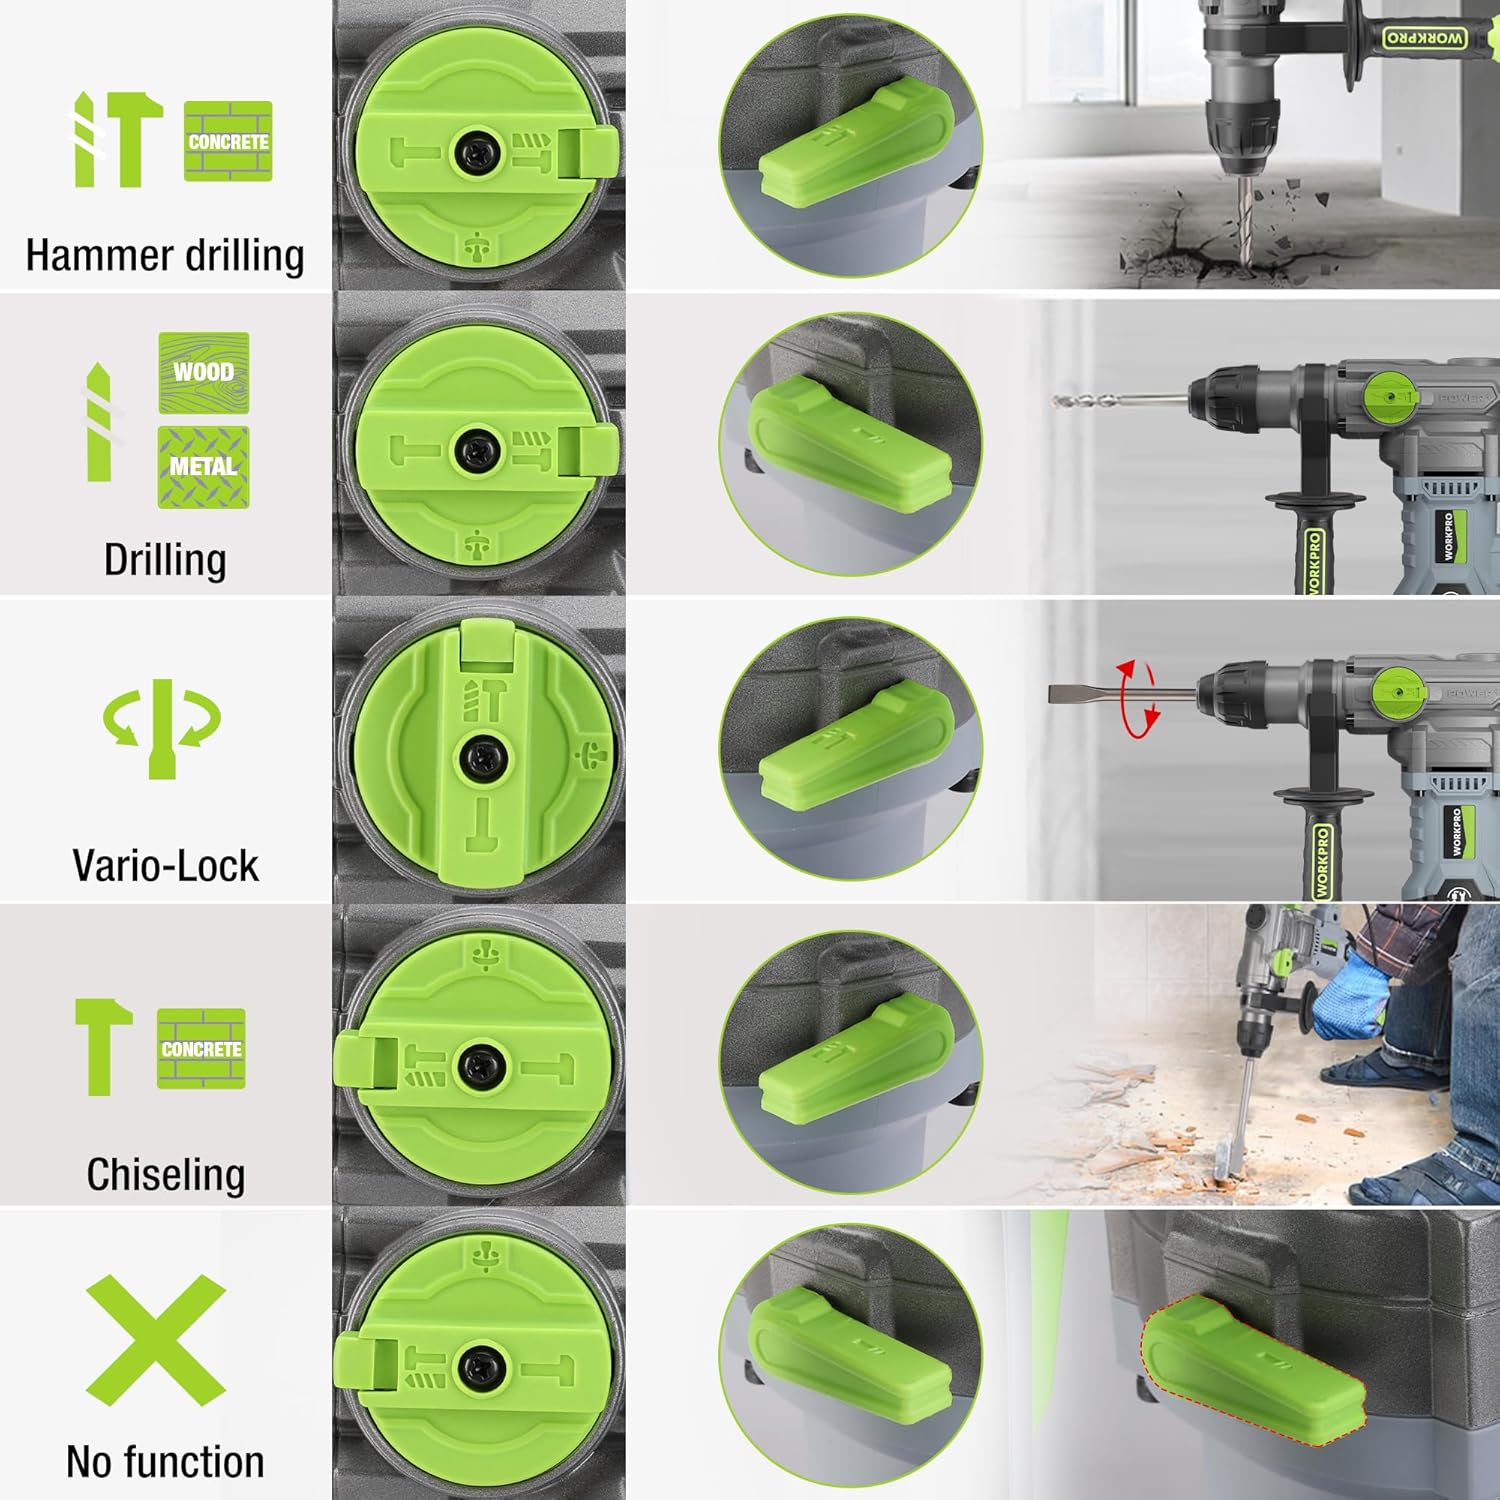
Image 5.1: The four-function switch allows selection between Hammer Drilling, Drilling, Vario-Lock (Chisel Adjust), and Chiseling modes.
- Hammerbohren: For drilling in concrete and masonry with impact.
- Bohren: Zum Bohren in Holz, Metall und Kunststoff ohne Beschädigung.
- Meißeln (nur mit dem Hammer): For light chiseling work in concrete and masonry.
- Vario-Lock (Chisel Adjust): Allows you to rotate and lock the chisel in various positions to optimize the working angle.

Image 5.2: Visual representation of the hammer drilling, drilling, hammer, and chisel adjust modes.
5.2 Drehzahlregelung
The variable speed control allows you to adjust the rotation speed (0-930 RPM) and impact frequency (0-4300 BPM) to match the material and application.
- Rotate the speed adjustment dial to increase or decrease the speed.
- Start with a lower speed for precise drilling and increase as needed.
5.3 Drilling Capacities
The tool offers excellent drilling performance across various materials:
- Beton: Bis zu 32 mm
- Holz: Bis zu 42 mm
- Stahl: Bis zu 13 mm
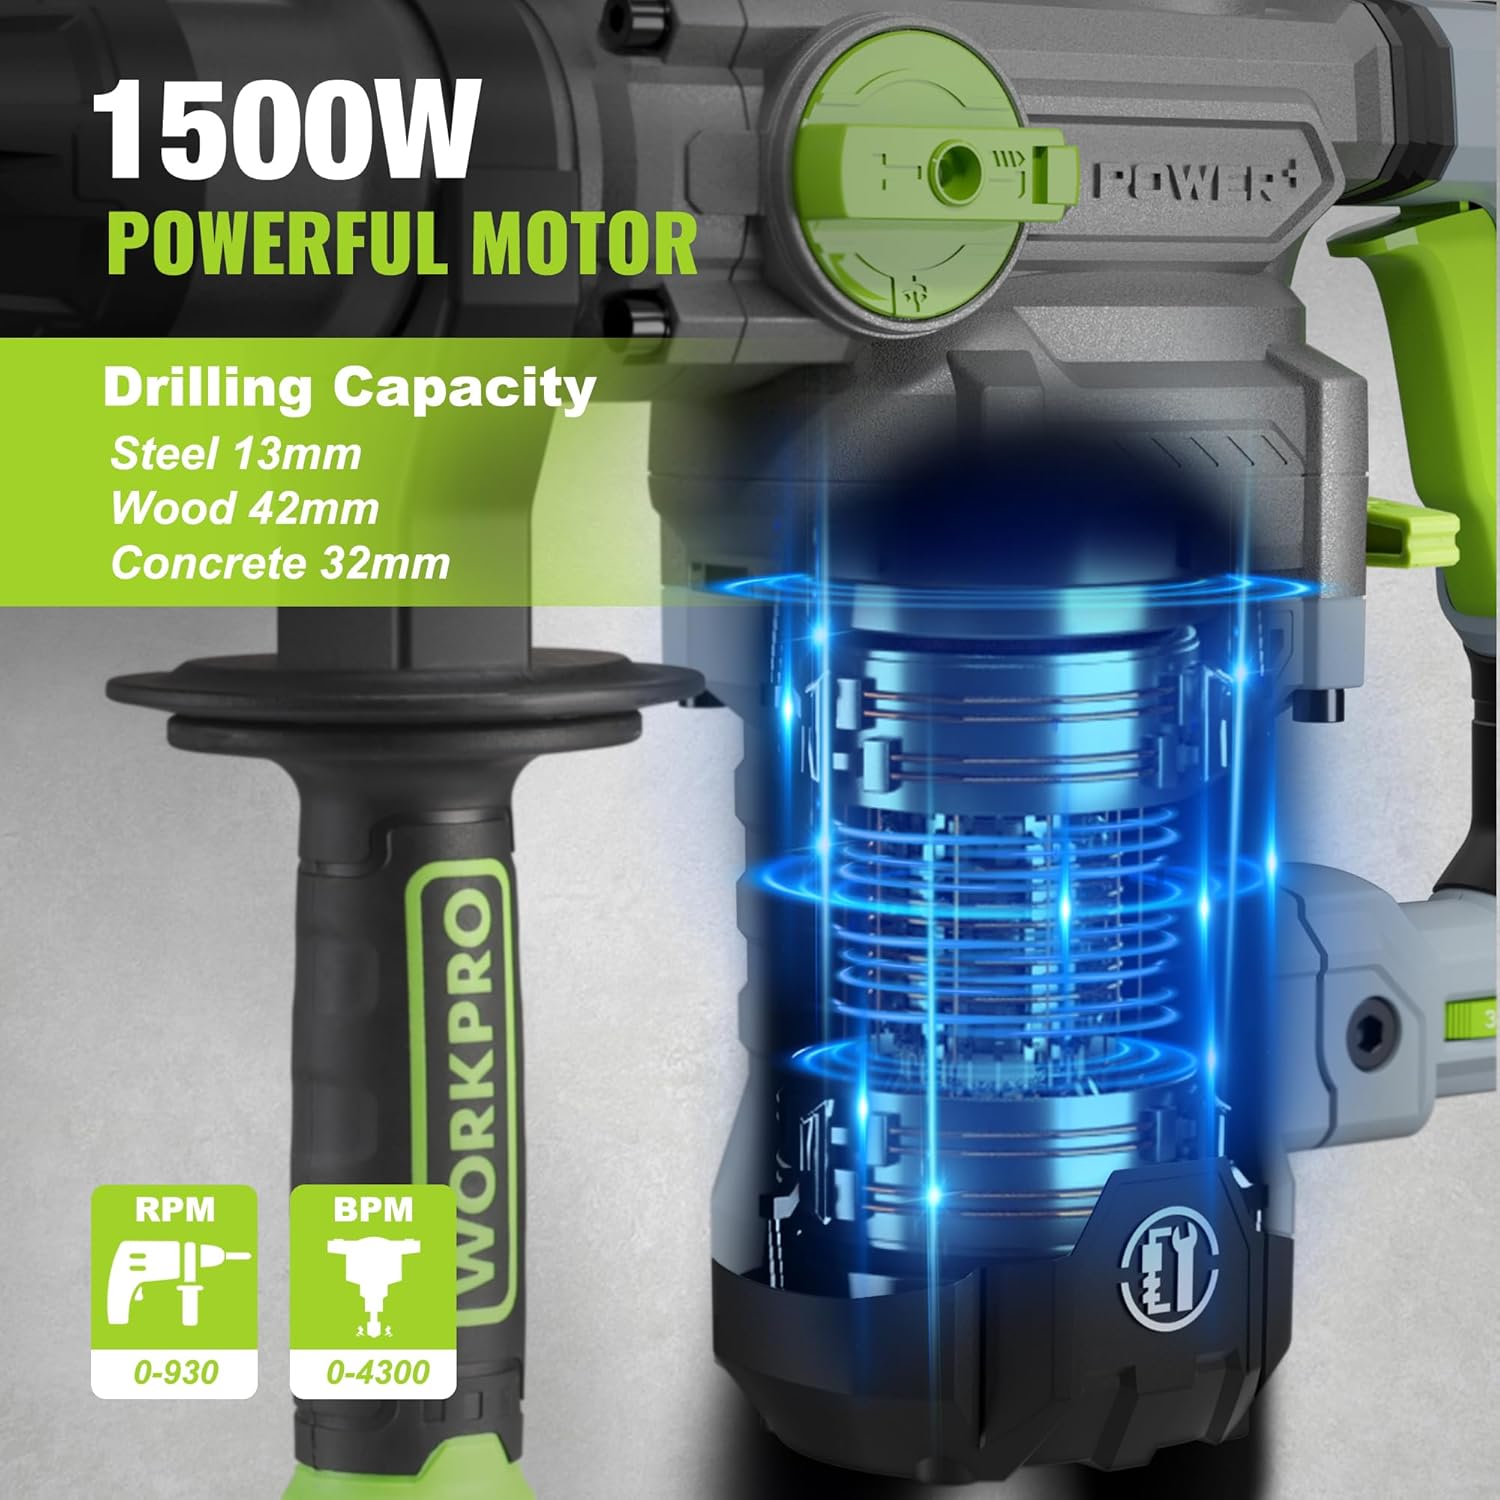
Image 5.3: The 1500W motor provides sufficient power for drilling in steel, wood, and concrete.
5.4 Anwendungsbeispielamples

Image 5.4: The tool is suitable for various tasks including chiseling concrete, removing tiles, concrete drilling, and floor breaking.
6. Wartung
Regelmäßige Wartung gewährleistet die Langlebigkeit und optimale Leistung Ihres Werkzeugs.
6.1 Reinigung
- Vor der Reinigung muss das Gerät immer vom Stromnetz getrennt werden.
- Reinigen Sie die Lüftungsschlitze regelmäßig, um eine Überhitzung zu vermeiden.
- Wischen Sie das Werkzeuggehäuse mit einem weichen, fusselfreien Tuch ab.amp Tuch. Verwenden Sie keine scharfen Chemikalien oder Scheuermittel.
- The tool features a dust-proof design and anti-dust bottom structure to extend its service life.
6.2 Grease Replenishment
To maintain optimal performance and durability, replenish the grease every 30-40 hours of cumulative use.
- Use the provided wrench to open the grease pot.
- Apply the advanced lubricant (grease) as instructed.
- Securely close the grease pot after replenishment.
Image 6.1: Instructions for grease replenishment using the provided spanner and grease.
6.3 Kohlebürstenwechsel
Carbon brushes are wear parts and should be checked periodically. Replace them when they are worn down to their limit to ensure consistent motor performance.
7. Fehlerbehebung
Dieser Abschnitt behandelt häufig auftretende Probleme. Bei Problemen, die hier nicht aufgeführt sind, wenden Sie sich bitte an den Kundendienst.
| Problem | Mögliche Ursache | Lösung |
|---|---|---|
| Werkzeug startet nicht | Keine Stromversorgung; Defekter Schalter; Abgenutzte Kohlebürsten | Check power connection; Test switch; Replace carbon brushes |
| Verminderte Bohrleistung | Dull drill bit; Incorrect mode selected; Insufficient grease | Replace or sharpen drill bit; Select correct mode; Replenish grease |
| Übermäßige Vibration/Lärm | Loose components; Damaged bit; Internal issue | Check all connections; Replace bit; Contact service center |
| Überhitzung | Verstopfte Lüftungsschlitze; Längere intensive Nutzung | Clean ventilation slots; Allow tool to cool down |
8. Technische Daten
| Besonderheit | Spezifikation |
|---|---|
| Modellnummer | W125244A |
| Eingangslautstärketage | 230-240 V |
| Frequenz | 50 Hz |
| Nenneingangsleistung | 1500 Watt |
| Leerlaufdrehzahl | 0-930 rpm ±10% |
| Aufprallhäufigkeit | 0-4300 bpm ±10% |
| Einzelaufprallkraft | 5.5 J |
| Bohrleistung (Beton) | 32 mm |
| Bohrleistung (Holz) | 42 mm |
| Bohrkapazität (Stahl) | 13 mm |
| Spannfuttertyp | SDS-plus |
| Produktabmessungen (L x B x H) | 38.6 x 10.4 x 26.4 cm |
| Gewicht | 8.34 kg |
| Stromquelle | Kabelgebundene Elektrik |
| Anzahl der Gänge | 6 (Variable Speed) |
9. Garantie- und Supportinformationen
For warranty details, product support, or service inquiries, please refer to the warranty card included with your purchase or contact WORKPRO customer service directly. Keep your proof of purchase for any warranty claims.