1. Einleitung
This manual provides comprehensive instructions for the installation, operation, and maintenance of your Dioche 7-inch Video Intercom Doorbell System. This system is designed to enhance home security by allowing you to see, hear, and speak with visitors before opening the door, and to monitor your outdoor environment.
2. Produktmerkmale
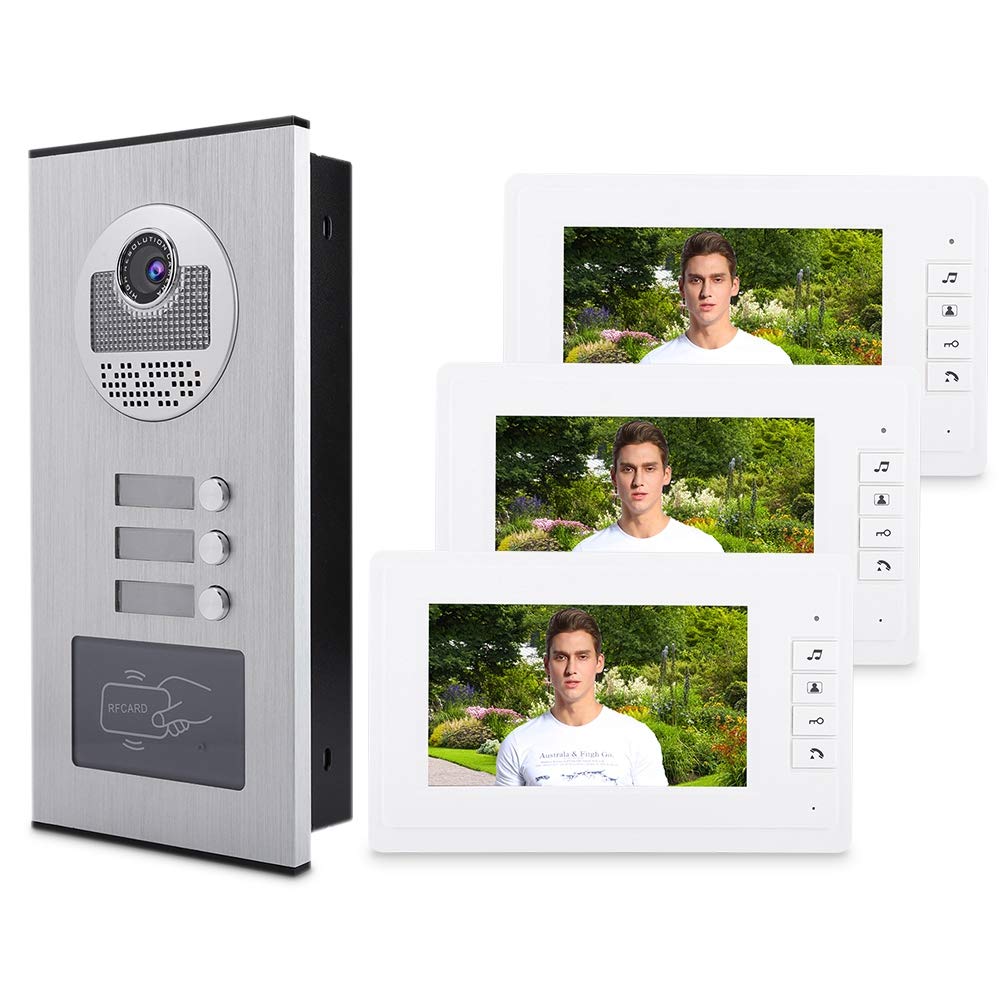
- HD Vision and IR Night Vision: The system includes an HD doorbell camera with infrared fill light, providing clear wide-screen images day and night. Advanced infrared illumination allows for visitor identification in low-light conditions.
- Multi-Monitor System: One HD doorbell camera connects to three 7-inch video monitors, enabling communication with visitors from multiple locations within your home.
- Einstellbare Lautstärke: Customize the call volume and ringtone to suit your preferences. The system also allows for monitoring outdoor sounds within a 2-meter range.
- Echtzeitüberwachung: Actively monitor the outdoor view even when no one rings the doorbell by pressing the "Monitor" button.
- Separate Calling: Each indoor monitor can be called and used for communication independently, ensuring privacy and efficient communication within multi-floor residences.
3. Packungsinhalt
Bitte überprüfen Sie, ob alle unten aufgeführten Artikel in Ihrem Paket enthalten sind. Sollten Artikel fehlen oder beschädigt sein, kontaktieren Sie bitte unseren Kundenservice.
- 1 x Außenkameraeinheit
- 3 x 7-Zoll-Innenmonitore
- 3 x Power Adapters for Monitors
- 3 x Power Cables for Monitors
- 3 x Hanging Boards for Monitors
- 1 x Benutzerhandbuch
- 5 x Access Cards (for outdoor unit)
- Connection Cables (4-wire connection cable, 1 meter + 2-wire cable for electric lock)
- Befestigungsschrauben und Dübel

4. Installationsanleitung
This section outlines the general steps for installing your video intercom system. Professional installation is recommended for optimal performance and safety.
4.1 Outdoor Camera Unit Installation
- Ort wählen: Select a suitable location near your entrance, ensuring clear visibility and protection from direct weather if possible. The camera unit is designed for embedded installation.
- Montage: Securely mount the outdoor camera unit using the provided screws and wall plugs. Ensure it is at an appropriate height for visitors to use and for the camera to capture faces clearly.
- Verdrahtung: Connect the 4-wire connection cable from the outdoor unit to the indoor monitor(s). If connecting to an electric lock, use the provided 2-wire cable. Refer to the wiring diagram in the detailed manual for specific connections.

4.2 Installation des Innenmonitors
- Ort wählen: Select a convenient location for each indoor monitor, such as a wall in a common area or near a frequently used entrance. The monitors are designed for wall mounting.
- Montage: Attach the hanging board to the wall using screws. Then, slide the indoor monitor onto the hanging board.
- Verdrahtung: Connect the 4-wire cable from the outdoor unit to the designated input on the back of the indoor monitor. Connect the power adapter to the monitor and plug it into a power outlet (AC220V-50Hz DC15V 1.2A).
- DIP-Schalterkonfiguration: For multiple indoor monitors, configure the DIP switches on the back of each monitor to assign unique IDs. Refer to the detailed wiring diagram and DIP switch settings in the full manual.

4.3 Videoinstallationsanleitung
Eine visuelle Anleitung zum Installationsprozess finden Sie im folgenden Video:
5. Bedienungsanleitung
5.1 Einen Anruf annehmen
When a visitor presses the doorbell button on the outdoor unit, all connected indoor monitors will ring. To answer the call, press the "Talk" button on any indoor monitor. You can then see and speak with the visitor.
5.2 Überwachung des Außenbereichs
Zu view the outdoor area without a visitor pressing the doorbell, press the "Monitor" button on any indoor monitor. The screen will display the live feed from the outdoor camera. Press the button again to turn off monitoring.
5.3 Tür aufschließen
If your system is connected to an electric lock, you can unlock the door remotely by pressing the "Unlock" button on the indoor monitor during a call or while monitoring.

5.4 Lautstärke und Klingeltöne einstellen
The indoor monitors feature controls to adjust the talk volume and ring volume. You can also change the ringtone. Refer to the monitor's specific buttons or on-screen menu for these adjustments.

5.5 Video Operating Guide
For a visual guide on the system's operation, please refer to the following video:
5.6 Mobile App Integration (if applicable)
Some models may support mobile app integration for remote access and control. If your model supports this, scan the QR code on the back of the indoor unit or refer to the separate mobile app manual for setup instructions.
6. Wartung
- Reinigung: Use a soft, dry cloth to clean the surfaces of the outdoor unit and indoor monitors. Avoid using abrasive cleaners or solvents.
- Kameraobjektiv: Reinigen Sie die Kameralinse vorsichtig mit einem Mikrofasertuch, um eine klare Bildqualität zu gewährleisten.
- Umweltschutz: While the outdoor unit is designed to be weather-resistant, avoid exposing it to extreme conditions or direct water jets.
7. Fehlerbehebung
| Problem | Mögliche Ursache | Lösung |
|---|---|---|
| Kein Bild auf dem Monitor im Innenbereich. | Power supply issue, loose connection, incorrect wiring. | Check power connections to both outdoor unit and indoor monitor. Verify all wiring is secure and correctly connected according to the diagram. |
| Kein Ton während der Sprechanlage. | Volume too low, microphone/speaker issue, wiring problem. | Adjust the talk volume on the indoor monitor. Check the audio wiring between the units. |
| Die Türklingel klingelt nicht. | Ringtone volume too low, doorbell button malfunction, wiring issue. | Increase the ring volume on the indoor monitor. Check the doorbell button on the outdoor unit. Verify wiring. |
| Türschloss lässt sich nicht öffnen. | Incorrect wiring to electric lock, lock malfunction, power issue to lock. | Ensure the electric lock is correctly wired and receiving power. Test the lock independently if possible. |
8. Spezifikationen
- Marke: Dioche
- Modellnummer: TerlLrY2hcZ3xY-01
- Material: Metall (Außeneinheit)
- Monitorgröße: 7 Zoll
- Bildschirmauflösung: 800 * RGB * 480
- Kamera Sensor: HD Color CCD or COMS (up to 700 lines)
- Nachtsichtbereich: 2 Meter (Infrarot)
- Stromversorgungsmodus: AC220V-50Hz DC15V 1.2A (Switched Power Supply)
- Call Delay Time: 120S ± 10%
- Monitoring Delay Time: 40S ± 10%
- Monitor Installation Method: Wandhalterung
- Camera Installation Method: Eingebettet
- Konnektivitätstechnologie: Verdrahtet
- Drahtlose Kommunikationstechnologie: WiFi (if applicable for app features)
- Auflösung der Videoaufnahme: 480p
- Paketabmessungen: 39.4 x 37.5 x 21.8 cm; 3.3 kg
- Erforderliche Batterien: NEIN
9. Garantie und Support
For warranty information and technical support, please refer to the warranty card included in your package or contact Dioche customer service directly. Keep your purchase receipt as proof of purchase.
Kundendienst: Bitte besuchen Sie die Dioche Store Für weitere Informationen oder zur Kontaktaufnahme mit dem Support.


