TAB Fairy 10

TAB Fairy10 Saug- und Wischroboter – Benutzerhandbuch

Model: Fairy 10

1. Einleitung

Thank you for choosing the TAB Fairy10 Robot Vacuum and Mop Combo. This advanced cleaning device is designed to provide a comprehensive and hands-free cleaning experience for your home. Featuring powerful suction, intelligent navigation, and a multifunctional docking station, the Fairy10 simplifies floor maintenance. This manual provides essential information for setup, operation, and maintenance to ensure optimal performance and longevity of your device.

2. Sicherheitshinweise

Bitte lesen Sie vor der Benutzung des Geräts alle Sicherheitshinweise sorgfältig durch. Bewahren Sie diese Bedienungsanleitung zum späteren Nachschlagen auf.

3. Packungsinhalt

Überprüfen Sie, ob alle Komponenten im Paket vorhanden sind:

Package contents of TAB Fairy10 including robot, docking station, brushes, filters, and manuals.

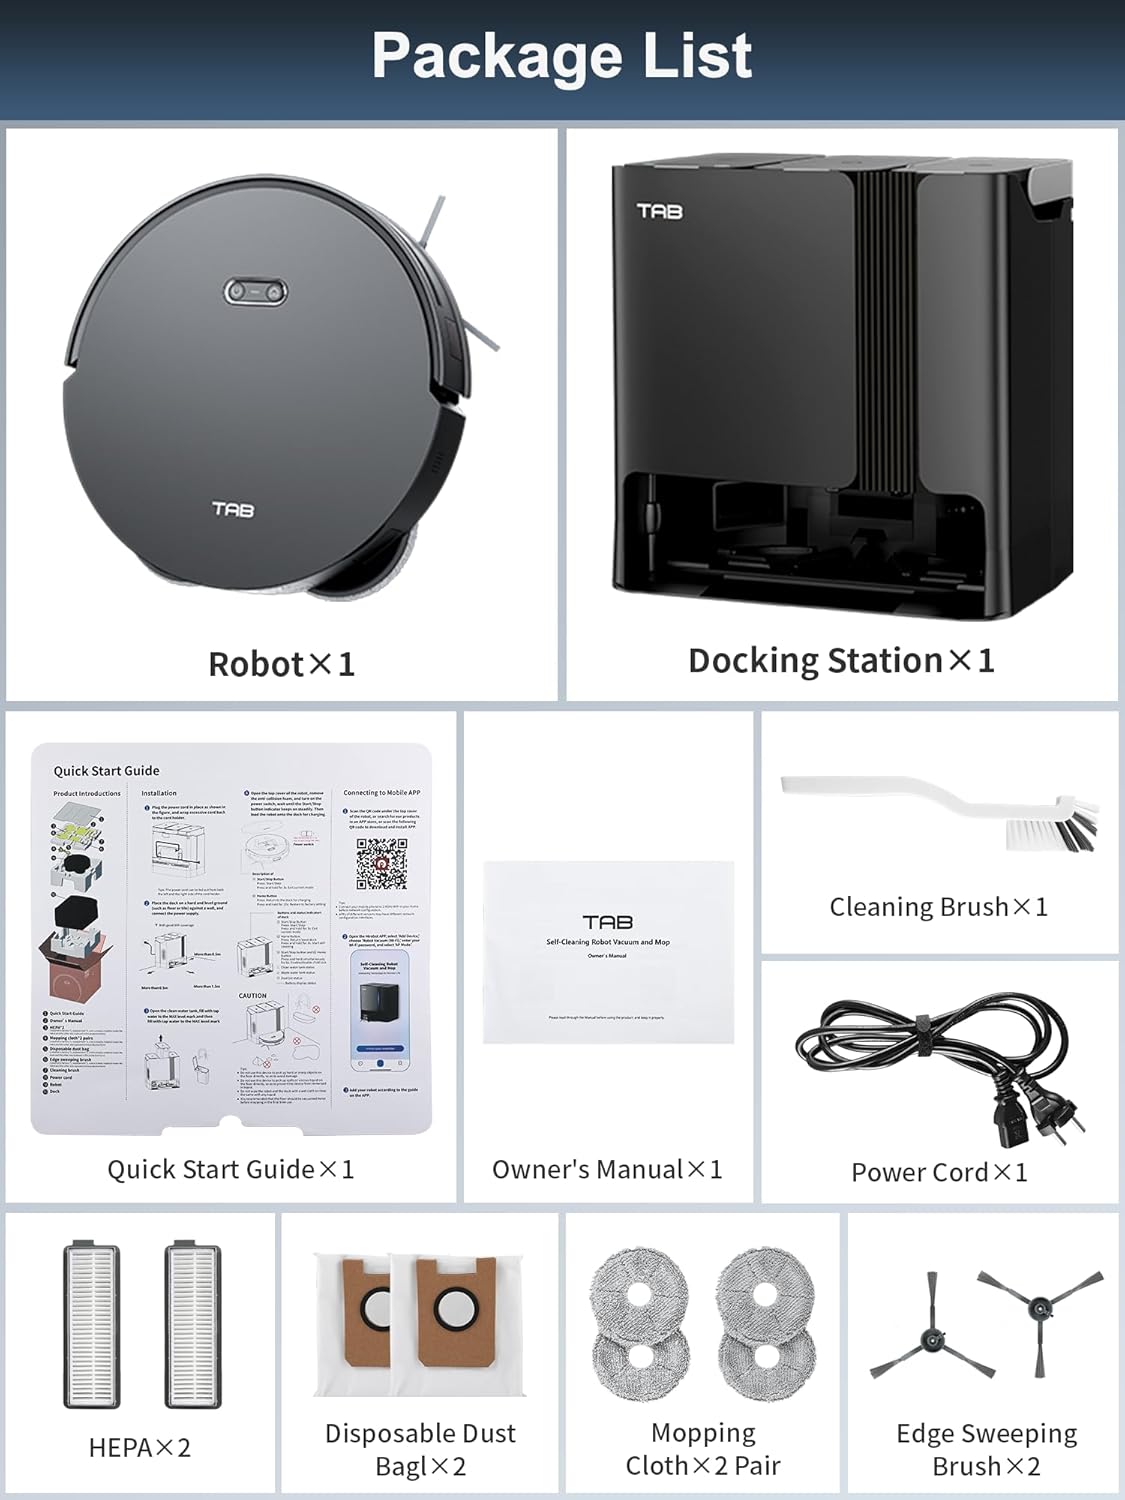
Image: All components included in the TAB Fairy10 package, neatly laid out.

4. Produktüberschreitungview

The TAB Fairy10 consists of the robot vacuum and a multifunctional docking station.

TAB Fairy10 Robot Vacuum and Mop Combo with its docking station and a smartphone displaying the app interface.

Image: The TAB Fairy10 robot vacuum positioned in front of its docking station, with a smartphone showing the companion app.

4.1 Roboterstaubsauger

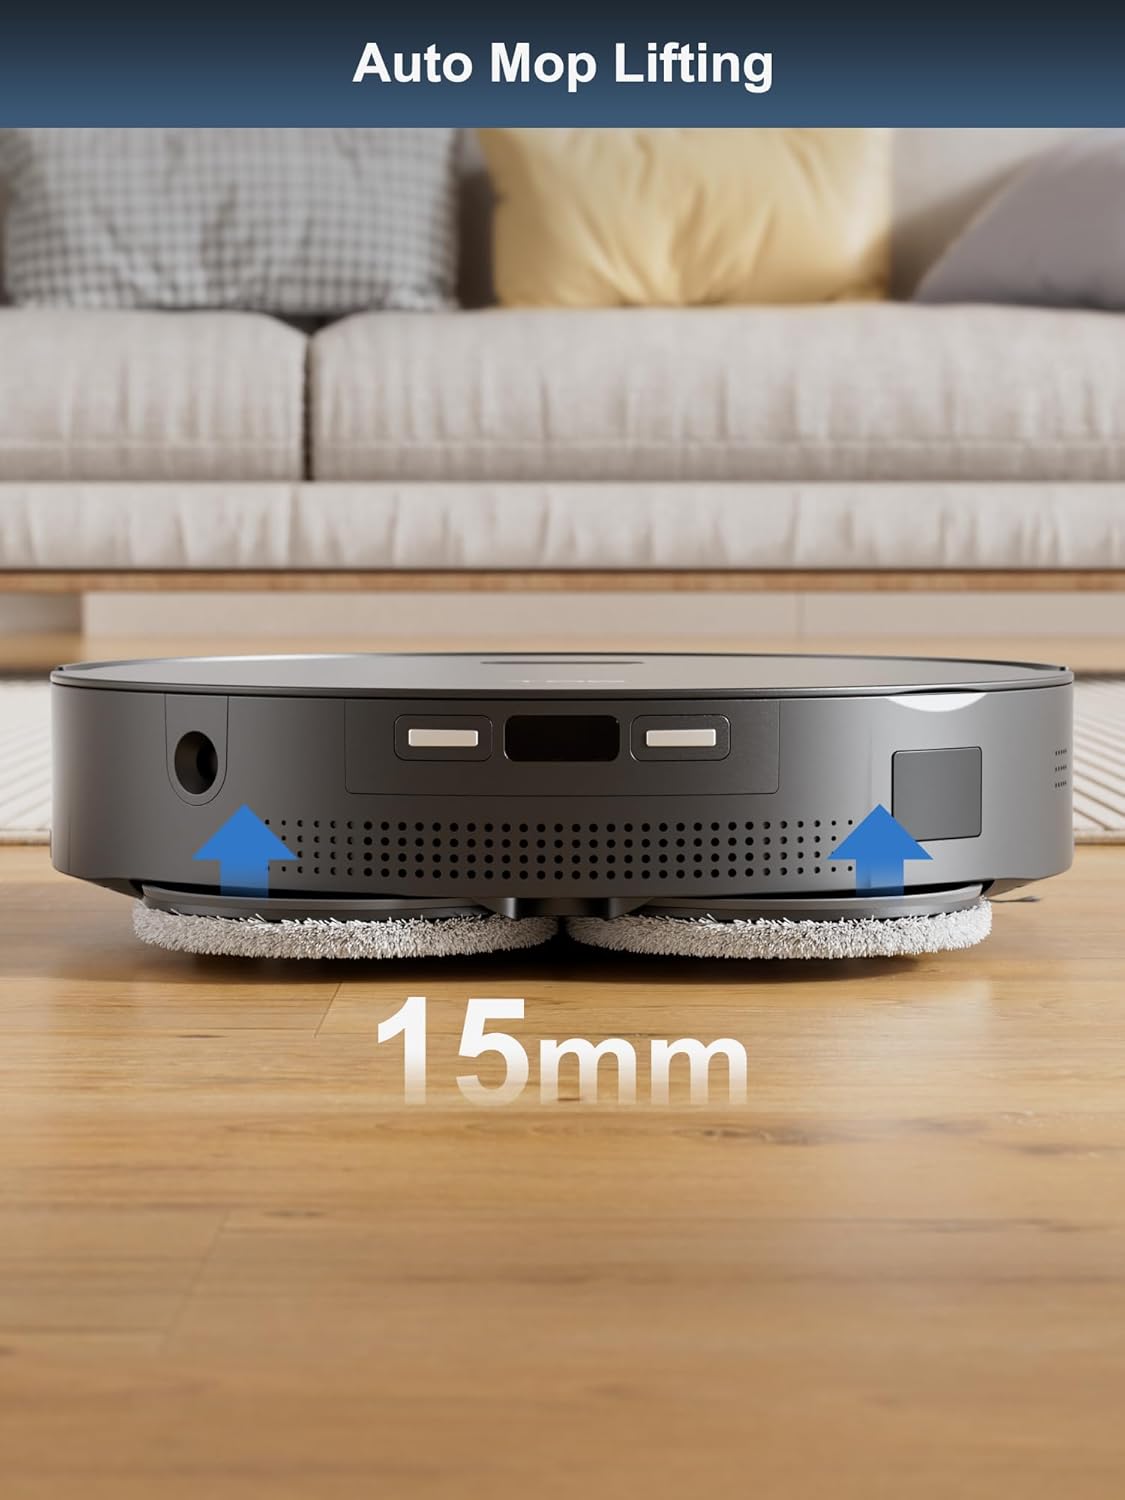
The robot features a compact design with hidden LiDAR navigation, allowing it to access tighter spaces. It is equipped with a multi-directional floating brush and dual rotary mops for effective cleaning.

4.2 Multifunctional Docking Station

The docking station serves as an all-in-one hub for the robot, providing self-draining, self-washing, self-drying, self-cleaning, and self-refilling capabilities.

Diagram showing the four main functions of the docking station: Self-Mop Cleaning, Self-Dust Emptying, Self-Mop Drying, and Self-Refilling.

Image: A visual representation of the docking station's capabilities, including self-mop cleaning, self-dust emptying, self-mop drying, and self-refilling.

5. Einrichtung

5.1 Auspacken

Alle Komponenten vorsichtig aus der Verpackung entnehmen. Verpackungsmaterialien für späteren Transport oder Lagerung aufbewahren.

5.2 Platzierung der Dockingstation

Place the docking station on a hard, level surface against a wall. Ensure there is at least 0.5 meters (1.6 feet) of clear space on both sides and 1.5 meters (4.9 feet) in front of the station for the robot to dock properly. Connect the power adapter to the docking station and plug it into a wall outlet.

5.3 Robot Preparation

Install the side brushes by pressing them into their slots until they click. Ensure the mop pads are securely attached to the mop module.

5.4 Erstaufladung

Place the robot onto the docking station. Ensure the charging contacts align. The robot will begin charging automatically. For first use, fully charge the robot before operation.

5.5 App-Installation und Verbindung

Download the official TAB app from your smartphone's app store. Follow the in-app instructions to connect your Fairy10 robot. This typically involves creating an account, adding the device, and connecting it to your home Wi-Fi network.

5.6 Zuordnung

Once connected, initiate a mapping run through the app. The hidden LiDAR navigation system will efficiently scan and map your home, creating a detailed floor plan for optimized cleaning routes.

Robot vacuum using LiDAR to quickly map a room, showing blue laser lines and a generated map on a smartphone.

Image: The robot vacuum actively mapping a room using its LiDAR system, with a visual representation of the map being created on a smartphone screen.

6. Bedienungsanleitung

6.1 Starten/Beenden der Reinigung

You can start or stop a cleaning cycle using the button on the robot or through the TAB app. The robot will automatically return to the docking station upon completion or when its battery is low.

6.2 Reinigungsmodi

The Fairy10 offers versatile cleaning modes to suit your needs:

Four cleaning modes: Only Sweep, Only Mop, Sweep Then Mop, and Mop While Sweep, each with an illustrative image of the robot performing the task.

Bild: Visuelles Beispielamples of the four available cleaning modes: sweep only, mop only, sweep then mop, and mop while sweeping.

Robot vacuum cleaning a carpet, with '6000Pa' text indicating powerful suction.

Image: The robot vacuum demonstrating its powerful 6000Pa suction on a carpeted surface.

Robot vacuum with dual rotating mops cleaning a hard floor, highlighting 180 RPM rotation, 15mm lift, and 10N pressure.

Image: The robot vacuum actively mopping a hard floor, showcasing its dual rotating mops and key specifications like rotation speed, lift, and pressure.

6.3 Geplante Reinigung

Set specific cleaning times via the app to automate your cleaning routine. The robot will start and return to the dock as scheduled.

Robot vacuum returning to its docking station after a scheduled cleaning, with a notification 'Scheduled cleaning setting success'.

Image: The robot vacuum returning to its base, indicating a successful scheduled cleaning setup.

6.4 Targeted Cleaning Zones

Use the app to define specific areas for cleaning, such as the kitchen, living room, or bedroom, allowing for customized cleaning preferences.

Smartphone app showing a floor plan with marked cleaning zones, alongside images of the robot cleaning in a kitchen, living room, and bedroom.

Image: The app interface displaying targeted cleaning zones, with corresponding images of the robot cleaning different rooms.

6.5 Sperrzonen

Set virtual boundaries or no-go zones in the app to prevent the robot from entering specific areas, protecting delicate items or preventing access to certain rooms.

Robot vacuum operating in a living room, with a 'NO-GO ZONE' indicated in an adjacent dining area, demonstrating virtual boundary setting.

Image: The robot vacuum avoiding a designated 'No-Go Zone' in a home environment.

6.6 Kindersicherung

Activate the child lock feature in the app to prevent unintended operation by children or pets, ensuring safety.

A child playing on the floor near the robot vacuum, with a shield icon indicating the child lock feature is active.

Image: The robot vacuum with a child lock icon, illustrating its safety feature when children or pets are present.

6.7 Lidar Navigation and Obstacle Avoidance

The hidden LiDAR navigation system allows the robot to create precise maps and navigate efficiently, even in tight spaces. AI 3.0 Obstacle Avoidance helps the robot detect and avoid objects on the floor, reducing the need for pre-cleaning.

Robot vacuum with hidden LiDAR navigation moving under a sofa, showing its compact design.

Image: The robot vacuum demonstrating its hidden LiDAR navigation by cleaning under a sofa, highlighting its ability to access tight spaces.

Robot vacuum using AI 3.0 obstacle avoidance to detect and navigate around a teddy bear and books on the floor.

Image: The robot vacuum employing AI 3.0 obstacle avoidance to detect and navigate around various items on the floor.

6.8 Automatisches Anheben des Wischmopps

The robot automatically lifts its mops by 15mm when it detects carpets, preventing them from getting wet during vacuuming cycles.

Robot vacuum automatically lifting its mops by 15mm when transitioning from hard floor to carpet.

Image: The robot vacuum demonstrating its auto mop lifting feature, raising its mops by 15mm as it approaches a carpet.

7. Wartung

Regular maintenance ensures the optimal performance and longevity of your TAB Fairy10.

7.1 Self-Cleaning Features

The docking station automates several maintenance tasks:

Two panels showing 'Self-cleans Mop' with water jets cleaning the mop pads, and 'Hot Air Drying' with air circulating to dry the pads.

Image: The self-cleaning and hot air drying processes for the mop pads within the docking station.

Transparent view of the docking station showing dust being emptied from the robot into the dust bag.

Bild: Ein transparentes view of the docking station illustrating the automatic dust emptying process.

7.2 Reinigung des Roboters

7.3 Cleaning the Docking Station

7.4 Verbrauchsmaterialien ersetzen

Replace consumables according to usage or as indicated by the app:

8. Fehlerbehebung

If you encounter issues with your TAB Fairy10, refer to the following common solutions:

ProblemMögliche UrsacheLösung
Roboter lässt sich nicht einschaltenSchwache Batterie; Netzschalter ausgeschaltetLaden Sie den Roboter auf; Stellen Sie sicher, dass der Netzschalter eingeschaltet ist.
Roboter kann nicht andockenDocking station obstructed; Incorrect placementClear obstacles around the dock; Ensure proper placement as per setup instructions
Schlechte ReinigungsleistungFull dustbin; Clogged brushes/filters; Worn mop padsEmpty dustbin/replace dust bag; Clean brushes/filters; Replace mop pads
Probleme mit der App-KonnektivitätFalsches WLAN-Passwort; Roboter zu weit vom Router entfernt; App veraltetVerify Wi-Fi credentials; Move robot closer to router; Update app to latest version
Mops not dryingAir vents blocked; Drying cycle not initiatedCheck for obstructions in air vents; Ensure drying function is enabled in app

For further assistance, please refer to the support section of the TAB app or visit the official TAB webWebsite.

9. Spezifikationen

BesonderheitSpezifikation
MarkeTAB
ModellnameFairy 10
BesonderheitAuto Mop Washing, Auto-Docking, Automatic Dust Collection
FarbeSchwarz
Technische Daten18.8 Zoll L x 18.8 Zoll B x 19.2 Zoll H
FiltertypPatrone
Akkulaufzeit120 Мinuten
StromquelleBatteriebetrieben
KontrollmethodeApp
Kompatible GeräteSmartphones
Artikelgewicht42.1 Pfund

10. Garantie und Support

For warranty information and customer support, please refer to the official TAB website or contact their customer service directly. Details can typically be found in the TAB app under the 'Support' or 'About Us' sections.

Online-Ressourcen:

Zugehörige Dokumente - Fairy 10

Vorview TAB T6-Pro Smart Akku-Nass-Trocken-Staubsauger und Mopp – Bedienungsanleitung
Ausführliche Bedienungsanleitung für den kabellosen Nass-Trocken-Staubsauger und Wischmopp TAB T6-Pro Smart, die Sicherheitshinweise, Montage, Bedienung, Wartung und Fehlerbehebung umfasst.
Vorview Bedienungsanleitung für die Teppichreinigungsmaschine TAB R6
Ausführliches Benutzerhandbuch für die Teppichreinigungsmaschine TAB R6, einschließlich Sicherheitshinweisen, Produkteinführung, Vorbereitung, Bedienungsanleitung, Wartung und Fehlerbehebung.
Vorview Produktinformationen und Leitfaden für generalüberholte Artikel der Serien EG200/EG300.
Informationen zu den Produkten der Serien EG200 und EG300, einschließlich Hinweisen zu Zubehör, Modellvarianten und Richtlinien für generalüberholte Geräte. Dieses Dokument dient als Anleitung und Support-Leitfaden.
Vorview Produktinformationen und Hinweise zur TAB EG200/EG300-Serie
Überview Dieses Dokument enthält allgemeine Informationen und wichtige Hinweise zu Zubehör, Abbildungen und dem Umgang mit generalüberholten Geräten der TAB EG200- und EG300-Serie, einschließlich der Modelle EG201, EG351 und EG351A.
Vorview Bedienungsanleitung für die Teppichreinigungsmaschine TAB R6
Benutzerhandbuch für die Teppichreinigungsmaschine TAB R6 mit umfassenden Anweisungen für sicheren Betrieb, Wartung und Fehlerbehebung.
Vorview TAB e.module L5.1 Lithium-Ionen-Energiespeichersystem – Bedienungsanleitung
Dieses Handbuch enthält umfassende Anweisungen zur Installation, zum Betrieb und zu den Sicherheitsvorkehrungen für das Lithium-Ionen-Energiespeichersystem TAB e.module L5.1. Erfahren Sie mehr über seine Funktionen, Spezifikationen, Bedienelemente an der Vorderseite und die korrekte Handhabung.