1. Produktüberschreitungview
The TCNEWCL RCA to USB 2.0 Video Grabber (Model VC200) is designed to convert analog video and audio signals from various source devices into digital files on your computer. This device allows you to preserve old VHS tapes, camcorder footage, or DVD content by digitizing them for modern playback and storage.
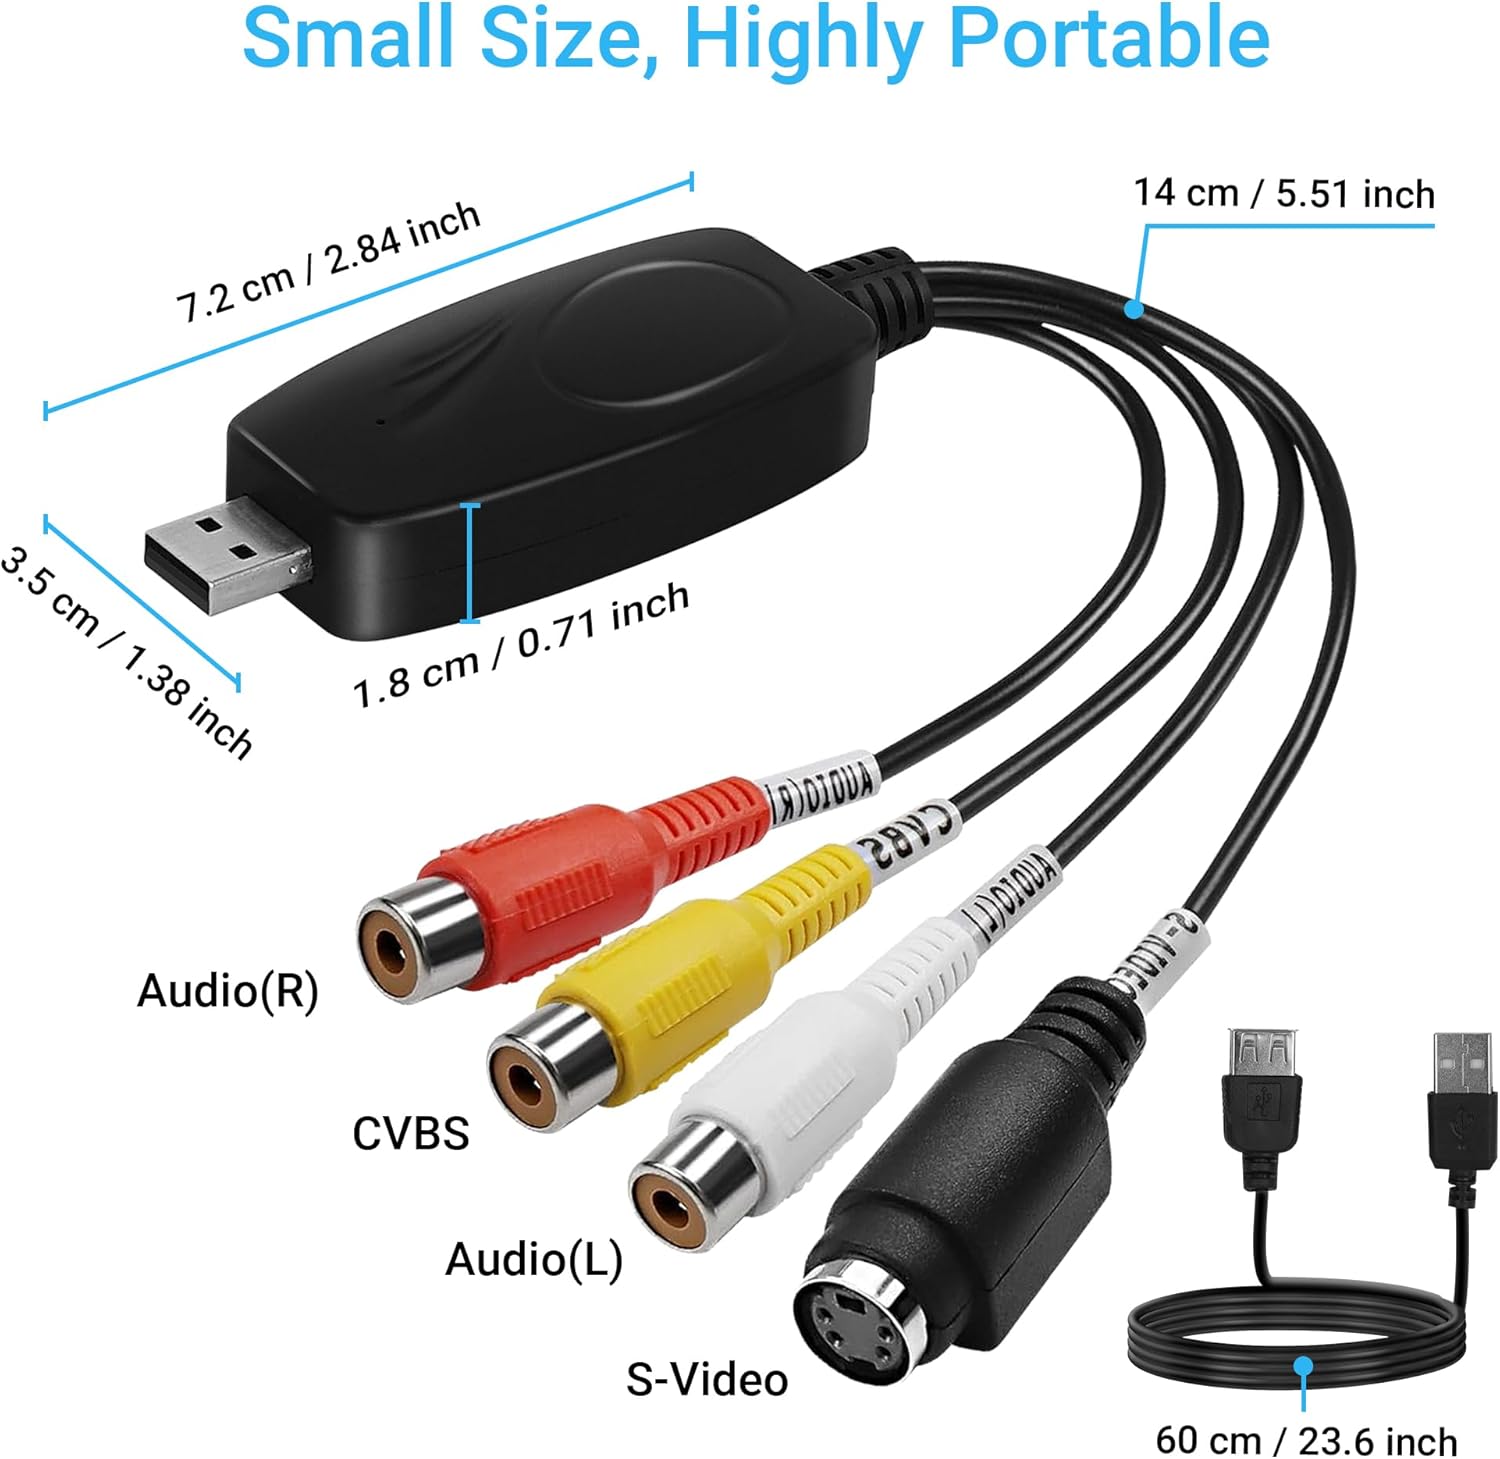
Figure 1: Product Dimensions and Ports. This image shows the compact size and dimensions of the TCNEWCL RCA to USB 2.0 Video Grabber. The main unit measures 7.2 cm (2.84 inches) in length, 3.5 cm (1.38 inches) in width, and 1.8 cm (0.71 inches) in height. The attached RCA/S-Video cable is 14 cm (5.51 inches) long, and the USB extension cable is 60 cm (23.6 inches) long. It features RCA connectors for Audio (R), CVBS (Video), Audio (L), and an S-Video port.
2. Packungsinhalt
Bitte überprüfen Sie, ob alle Artikel in Ihrem Paket vorhanden sind:
- TCNEWCL RCA to USB 2.0 Video Grabber (Model VC200)
- USB-Verlängerungskabel
- Software-Installations-CD

Abbildung 2: Packungsinhalt. This image shows the main components included with the TCNEWCL RCA to USB 2.0 Video Grabber: the grabber device itself with its integrated RCA and S-Video cables, a USB extension cable, and a software installation CD. The CD is labeled 'VIDEO CAPTURE USB 2.0 Video Adapter with Audio' and includes a model number and installation software details.
3. Systemanforderungen
- Betriebssystem: Windows (XP, Vista, 7, 8, 10, 11) or Mac OS
- Hardware-Schnittstelle: USB 2.0-Anschluss
- Kompatible Geräte: DV/V8/Hi8/VHS/DVD players, video game consoles, TV set-top boxes, camcorders, etc.

Figure 3: Software Compatibility. This image highlights the compatibility of the TCNEWCL RCA/S-Video to USB 2.0 Video Grabber with various Windows operating systems (XP, 7/8/10, Vista) and Mac OS. It also shows logos of compatible software applications for video capture and streaming, including VLC, OBS, Facebook Live, AfreecaTV, Skype, and YouTube.
4. Einrichtung und Installation
4.1 Hardware-Anschluss
- Connect the RCA (red for Audio R, white for Audio L, yellow for CVBS Video) or S-Video cable from your analog source device (e.g., VCR, DVD player, camcorder) to the corresponding input ports on the TCNEWCL Video Grabber.
- Connect the USB plug of the Video Grabber to an available USB 2.0 port on your computer. You may use the provided USB extension cable if needed.
- Ensure your analog source device is powered on and ready to play the content you wish to digitize.

Abbildung 4: Anschlussdiagramm. This diagram illustrates how to connect the TCNEWCL Video Grabber. The grabber connects to a PC or Laptop via USB. On the input side, it features S-Video, Audio (L), CVBS (Video), and Audio (R) ports, which can be connected to source devices such as a Camcorder, DVD player, or VHS player.
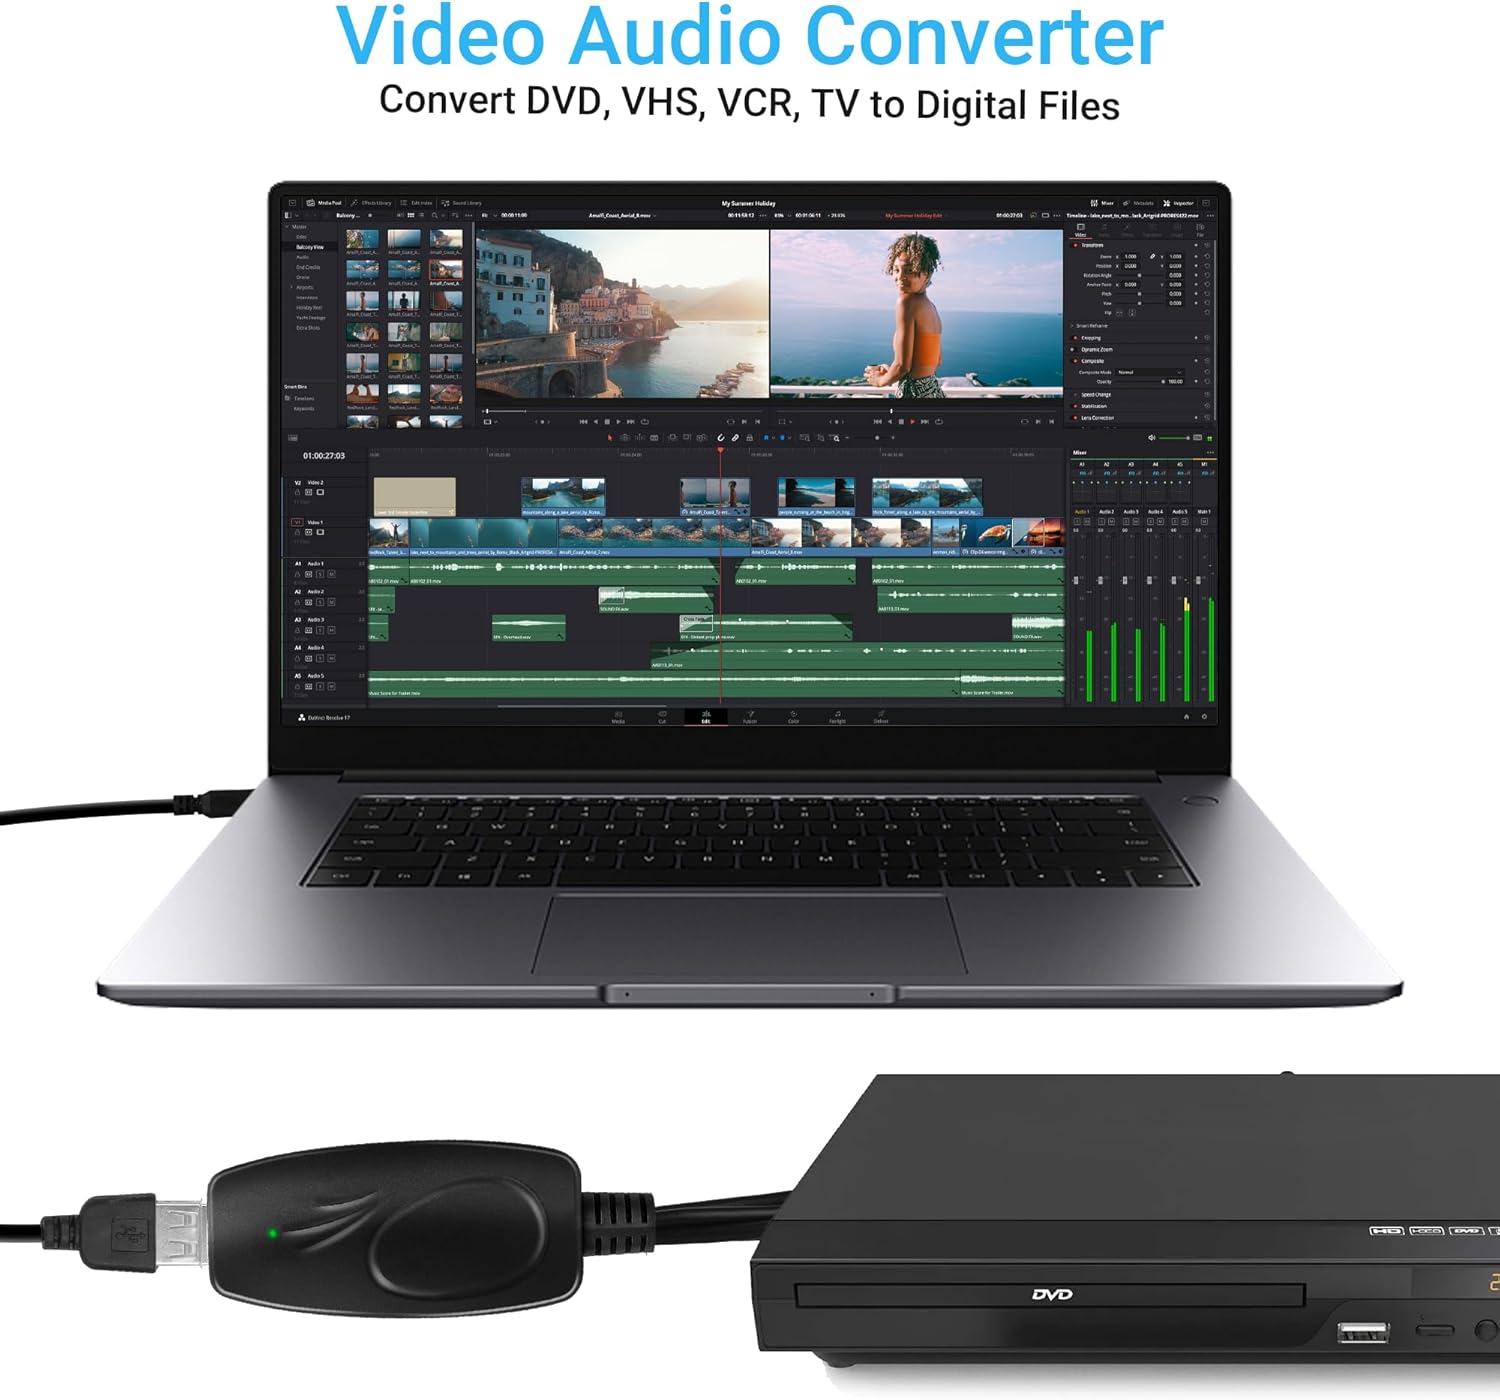
Abbildung 5: Bspample-Verbindung. This image displays the TCNEWCL Video Audio Converter in use, connected to a laptop and a DVD player. The grabber's indicator light is green, signifying an active connection. This setup demonstrates how to convert video and audio from a DVD player to digital files on a laptop.
4.2 Software Installation (Windows)
For Windows OS, you can use the included HONESTECH VHStoDVD SE software or OBS Studio. If you have an older version of EzCap, ShowBiz, or ArcSoft on your device, it is recommended to completely uninstall it using its original installation media before proceeding.
- Using HONESTECH VHStoDVD SE: Insert the provided software CD into your computer's CD/DVD drive and follow the on-screen instructions to install the software.
- Mit OBS Studio: Download and install OBS Studio from its official webSeite? ˅ (obsproject.com).
4.3 Software Installation (Mac OS)
For Mac OS, you can directly use QuickTime Player, which is pre-installed on most Mac systems. No additional software installation is typically required.
5. Bedienungsanleitung
5.1 Capturing Video on Windows (using OBS Studio)
- OBS Studio starten.
- Klicken Sie im Bereich „Quellen“ auf „+' Symbol zum Hinzufügen einer neuen Quelle.
- Wählen 'Videoaufnahmegerät' from the list and click 'OK'.
- Im Eigenschaftenfenster wählen Sie „AV: TO USB 2.0' as the device.
- Under 'Audio Output Mode', select 'Benutzerdefiniertes Audiogerät verwenden' and choose 'USB 2.0 MIC' as the audio device.
- Adjust resolution and other settings as needed, then click 'OK'.
- Klicken Sie auf „Aufnahme starten' in the 'Controls' panel to begin capturing your video.

Figure 6: OBS Studio Setup Steps. This image outlines the steps for capturing video on Windows using OBS Studio. It demonstrates adding a 'Video Capture Device' source, selecting 'AV: TO USB 2.0' as the device, configuring audio input to 'USB 2.0 MIC', and finally clicking 'Start Recording' to begin the capture process.
5.2 Capturing Video on Mac OS (using QuickTime Player)
- Connect the Video Grabber to your Mac and the analog source device.
- Open QuickTime Player.
- From the menu bar, go to 'File' > 'Neue Filmaufnahme'.
- In the recording window, click the small arrow next to the record button to open the options menu.
- Wählen 'AV TO USB 2.0' for the 'Camera' (video input) and 'USB 2.0 MIC' for the 'Microphone' (audio input).
- Adjust the quality setting (e.g., High, Maximum).
- Click the record button to start capturing your video.

Figure 7: QuickTime Player Setup Steps. This image provides a step-by-step guide for capturing video on Mac OS using QuickTime Player. It shows navigating to 'File' -> 'New Movie Recording' and then selecting 'AV TO USB 2.0' as the camera input and 'USB 2.0 MIC' for audio input within QuickTime's recording settings.
6. Wartung
- Halten Sie das Gerät sauber und staubfrei. Verwenden Sie zum Reinigen ein weiches, trockenes Tuch.
- Setzen Sie das Gerät keinen extremen Temperaturen, Feuchtigkeit oder direkter Sonneneinstrahlung aus.
- Versuchen Sie nicht, das Gerät selbst zu zerlegen oder zu reparieren. Wenden Sie sich an den Kundendienst, um Hilfe zu erhalten.
7. Fehlerbehebung
7.1 Kein Videosignal
- Ensure all cables (RCA/S-Video and USB) are securely connected.
- Verify that the analog source device is powered on and playing content.
- Check if the correct video input source is selected in your capture software (e.g., 'AV TO USB 2.0').
- Versuchen Sie, den Grabber an einen anderen USB-Anschluss Ihres Computers anzuschließen.
7.2 Kein Ton
- Confirm that the red (Audio R) and white (Audio L) RCA cables are correctly connected.
- Ensure 'USB 2.0 MIC' or equivalent is selected as the audio input device in your capture software.
- Check your computer's audio settings to ensure the USB audio device is recognized and not muted.
7.3 Software Not Recognizing Device
- Starten Sie Ihren Computer neu und versuchen Sie es erneut.
- Ensure you have installed the necessary drivers (if applicable, usually included with the software CD for Windows).
- If using Windows, check Device Manager to see if the 'USB 2.0 Video' or similar device is listed without errors.
- Versuchen Sie es mit einem anderen USB-Port.
8. Spezifikationen
- Marke: TCNEWCL
- Modellname: VC200
- Hardware-Schnittstelle: AV, USB 2.0
- Videoaufnahmeauflösung: 480p, 576p
- Videostandard: MPEG-4
- Betriebssystemkompatibilität: Windows (XP, Vista, 7, 8, 10, 11), Mac OS
- Enthaltene Komponenten: USB extension cable, Software on CD, AV extension cable (1.5m)
- Kompatible Geräte: MP3 player, Laptop, Projector (Note: Compatibility with MP3 players and projectors may refer to general device connectivity, not direct video capture.)
9. Garantie und Support
TCNEWCL products are designed for reliability and performance. For warranty information, please refer to the documentation included with your purchase or visit the official TCNEWCL webWebsite.
If you encounter any issues or have questions regarding the TCNEWCL RCA to USB 2.0 Video Grabber, please contact our customer support team. Contact details can typically be found on the product packaging or the TCNEWCL official webWebsite.


