1. Einleitung
This manual provides essential instructions for the safe and efficient operation, maintenance, and troubleshooting of your KIMO Electric Tacker, Model QM-9418. This cordless tool is designed for various fastening tasks, offering both finish nailing and stapling capabilities. Please read this manual thoroughly before initial use and retain it for future reference.

Figure 1: KIMO Electric Tacker QM-9418 and included accessories.
2. Sicherheitshinweise
Always prioritize safety when operating power tools. Failure to follow these instructions may result in injury or damage to the tool.
- Tragen Sie persönliche Schutzausrüstung (PSA): Always wear safety glasses, hearing protection, and gloves when operating the tacker.
- Sicherheit am Arbeitsplatz: Halten Sie den Arbeitsbereich sauber und gut beleuchtet. Unordnung oder dunkle Bereiche führen zu Unfällen.
- Mis-fire Prevention Device: The tool is equipped with a mis-fire prevention mechanism. It will only fire when the contact arm is fully pressed against the workpiece. Do not attempt to bypass this safety feature.
- Three-Step Operation: For precise and safe nailing, follow the three-step process: 1) Press the nailer front against the material, 2) Press the cartridge, 3) Lock with the lock lever.
- Empty Shot Prevention: The tool features an empty shot prevention function, which prevents firing when the magazine is empty, reducing wear and tear and preventing damage to the workpiece.
- Batteriesicherheit: Use only KIMO-approved batteries and chargers. Do not expose batteries to extreme temperatures or moisture.
- Werkzeughandhabung: Always hold the tool firmly with both hands during operation. Keep fingers away from the firing mechanism.
3. Produktüberschreitungview
The KIMO Electric Tacker QM-9418 is a versatile cordless tool designed for various fastening applications. It combines the functionality of a finish nailer and a stapler.
3.1 Komponenten
- KIMO Electric Tacker Main Unit
- 20V/2.0Ah Lithium-ion Battery (x2)
- Ladegerät
- Schutzhülle
- Finish Nails (700 pieces, 20-50mm)
- Staples (300 pieces, 4x19-40mm)
- Allen Wrench (for jam clearing)
- Bedienungsanleitung
3.2 Hauptmerkmale
- Kabelloser Betrieb: Powered by 20V 2.0Ah lithium-ion batteries, eliminating the need for air compressors or power cords.
- 2-in-1-Funktionalität: Supports both finish nails (20-50mm) and staples (4x19-40mm).
- Tiefeneinstellung: Easily adjust the nailing depth to suit different materials and desired finishes.
- Zwei Feuermodi: Switch between single-shot mode for precision and continuous-shot mode for rapid fastening (up to 80 nails/minute).
- Integriertes LED-Licht: Beleuchtet den Arbeitsbereich und sorgt so für bessere Sichtverhältnisse bei schlechten Lichtverhältnissen.
- Ergonomisches Design: Lightweight (2.8kg main unit) and compact with a comfortable grip for extended use.
- Sicherheitsschloss: Prevents accidental firing.
- High-Efficiency Heat Dissipation: Designed for stable performance during continuous operation.
4. Einrichtung
4.1 Laden und Einsetzen des Akkus
- Ensure the battery is fully charged before use. Connect the charger to a power outlet and insert the battery. The charger indicator will show the charging status.
- Once charged, slide the battery into the battery slot at the base of the tacker until it clicks securely into place.
- Um die Batterie zu entfernen, drücken Sie den Entriegelungsknopf und schieben Sie die Batterie heraus.

Figure 2: Battery installation and charge indicator.
4.2 Einlegen von Nägeln oder Klammern
The KIMO Electric Tacker supports both finish nails and staples. Follow these steps to load fasteners:
- Release the Magazine: Operate the lever to release the magazine.
- Befestigungselemente einsetzen: Place the strip of nails or staples into the magazine, ensuring they are oriented correctly with the points facing forward.
- Sichern Sie sich das Magazin: Push the magazine back until the snap lock securely engages.

Figure 3: Three-step fastener loading process.
4.3 Adjusting Nailing Depth
The nailing depth can be adjusted to prevent damage to the material surface and achieve the desired finish.
- Locate the depth adjustment dial or lever on the tool.
- Rotate the dial or move the lever to increase or decrease the nailing depth. Test on a scrap piece of material to ensure the correct depth is set.
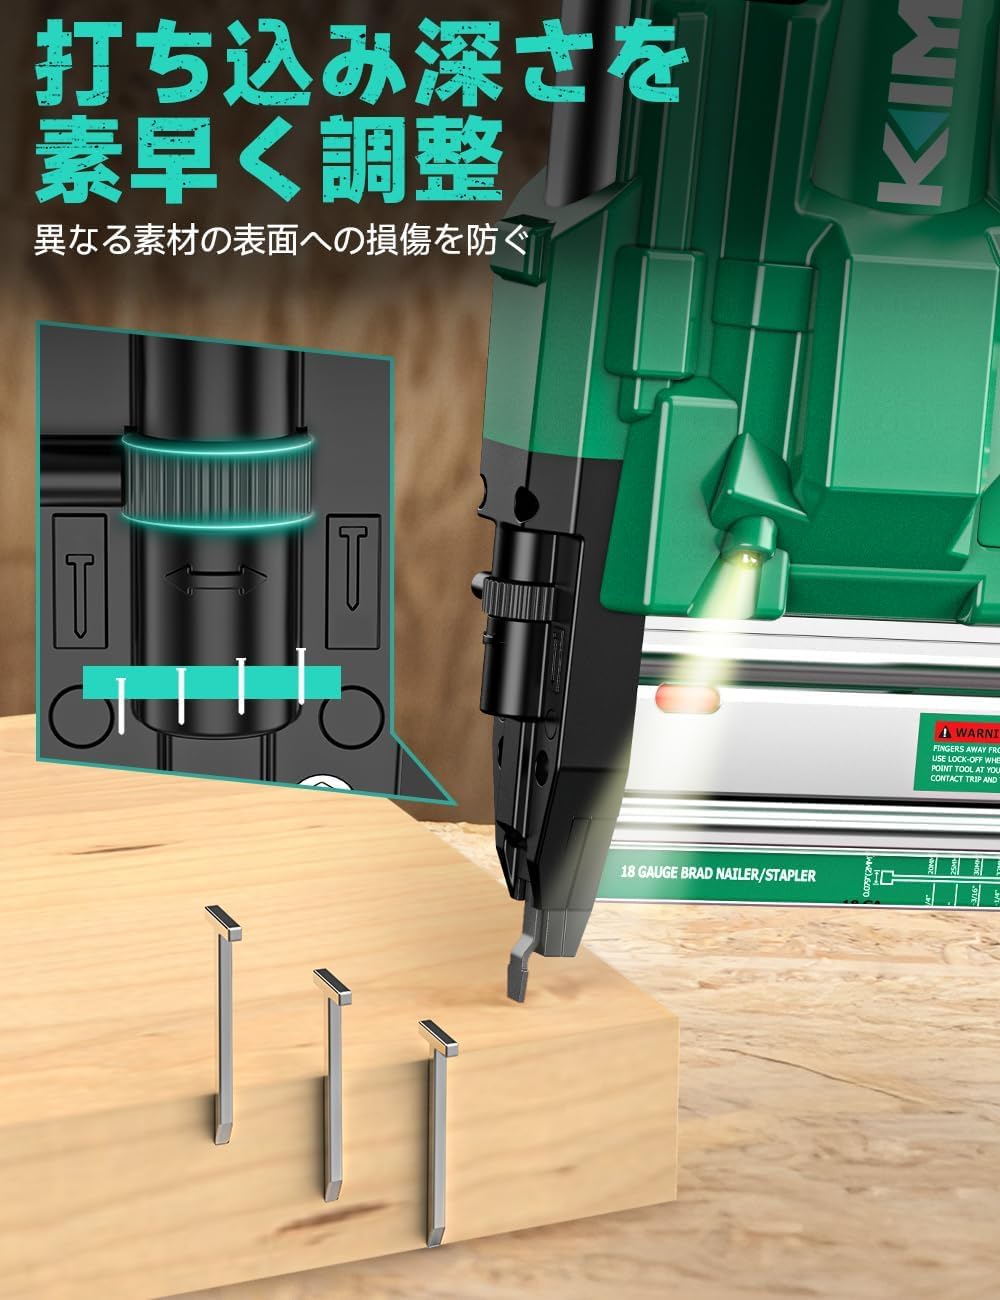
Figure 4: Depth adjustment mechanism.
5. Bedienungsanleitung
5.1 Auswahl des Feuermodus
The tacker offers two firing modes: single-shot and continuous-shot.
- Locate the mode selection switch on the tool.
- Bewegen Sie den Schalter in den gewünschten Modus:
- Single-Shot Mode: For precise fastening, one fastener is driven per trigger pull.
- Continuous-Shot Mode: For rapid fastening, fasteners are driven continuously as long as the trigger is held and the contact arm is pressed.
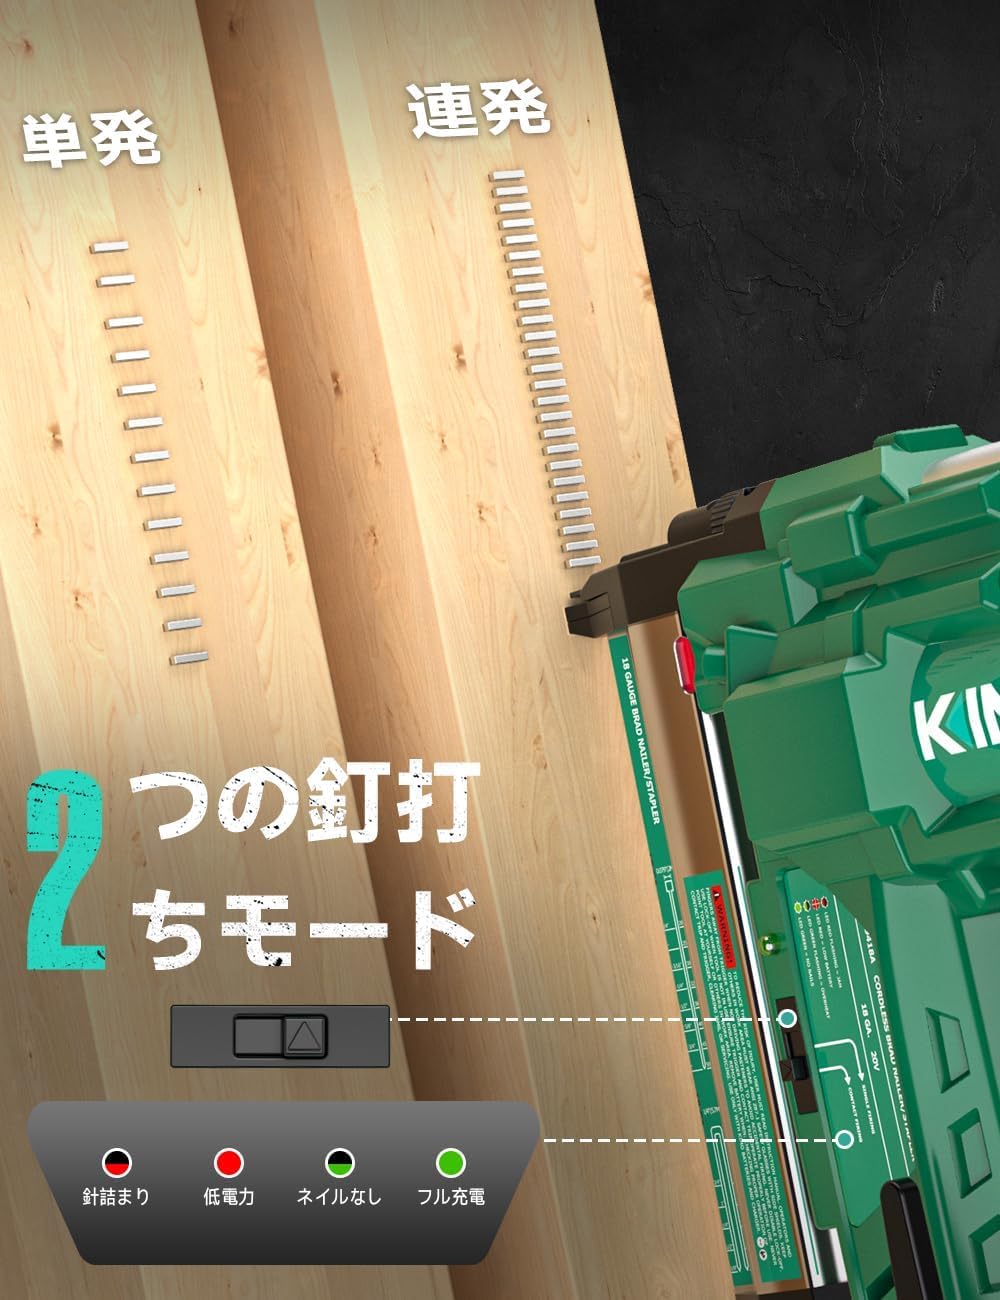
Figure 5: Firing mode selection switch.
5.2 Nagelverfahren
- Stellen Sie sicher, dass die Batterie eingesetzt und die Befestigungselemente angebracht sind.
- Select the appropriate firing mode.
- Place the nose of the tacker firmly against the workpiece where the fastener is to be driven. Ensure the contact arm is fully depressed.
- Ziehen Sie den Auslöser, um das Befestigungselement einzutreiben.
- Den Auslöser loslassen und das Werkzeug vom Werkstück abheben.
5.3 LED-Arbeitsleuchte
The integrated LED light automatically illuminates the work area when the tool is in operation, providing better visibility in low-light conditions.
5.4 Applicable Materials and Uses
This tacker is suitable for a wide range of materials and applications, including:
- Woodworking (e.g., furniture assembly, decorative trim)
- Construction (e.g., securing plasterboard, insulation, temporary fixtures)
- DIY Projekte
- Innenausstattung
- Cardboard pallet reinforcement
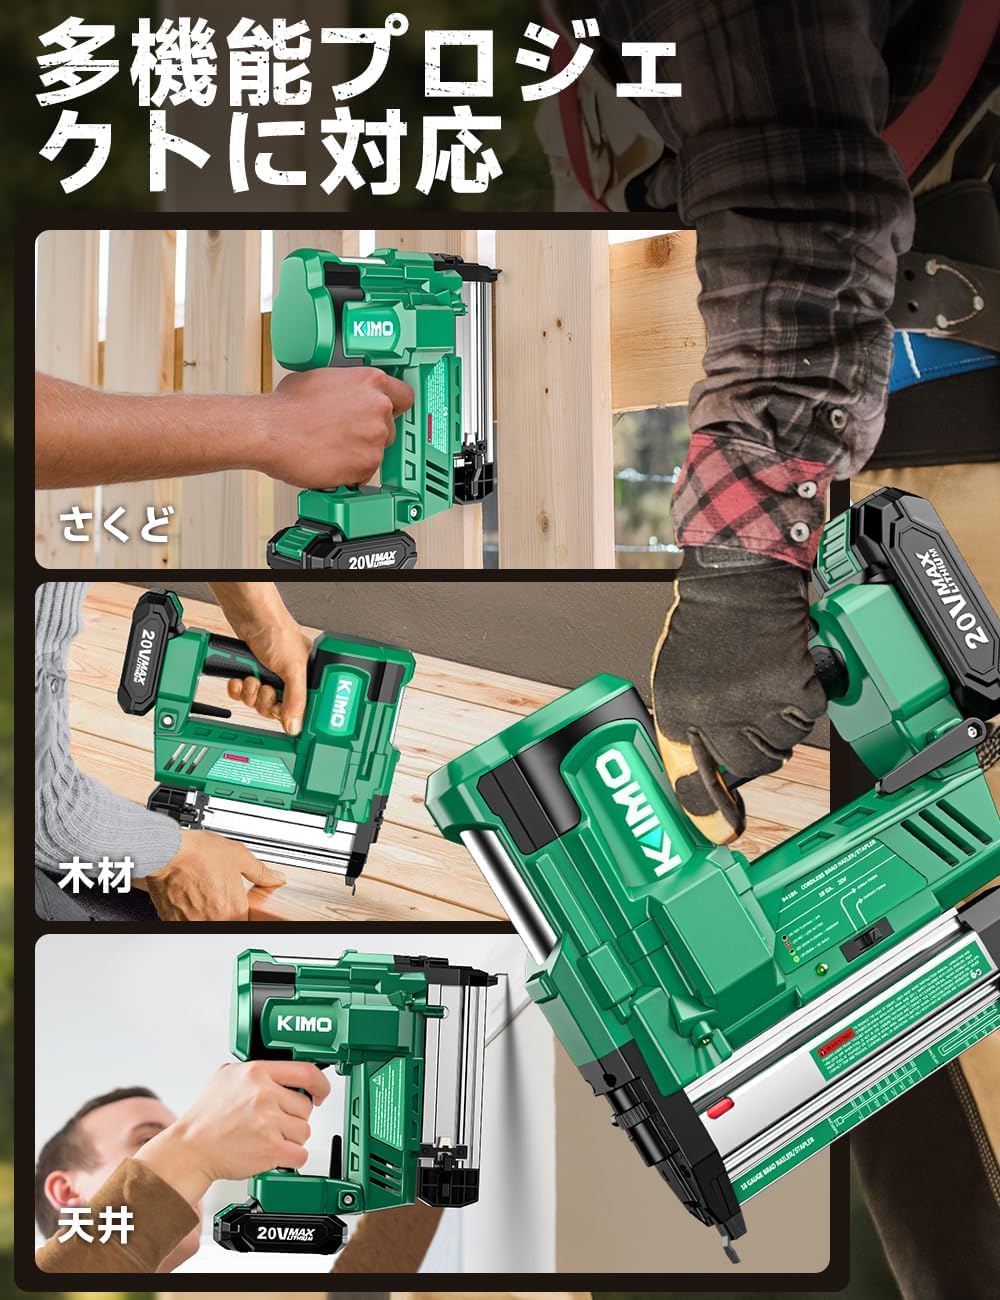
Abbildung 6: Bspamples of tacker applications.
6. Wartung
6.1 Clearing Fastener Jams
In the event of a fastener jam, follow these steps:
- Stromversorgung trennen: Vor dem Versuch, eine Blockade zu beheben, muss immer die Batterie entfernt werden.
- Open the Magazine: Release the magazine as if loading new fasteners.
- Remove Jammed Fastener: Use the provided Allen wrench or pliers to carefully remove any jammed nails or staples from the firing mechanism or magazine. Do not force them out.
- Überprüfen: Check for any damage to the magazine or firing pin.
- Close Magazine: Securely close the magazine.
6.2 Allgemeine Reinigung und Lagerung
- Keep the tool clean and free of dust and debris. Use a dry cloth to wipe down the exterior.
- Store the tool and batteries in a dry, cool place, away from direct sunlight and moisture.
- Remove the battery from the tool when not in use for extended periods.
7. Fehlerbehebung
This section addresses common issues you might encounter with your KIMO Electric Tacker.
| Problem | Mögliche Ursache | Lösung |
|---|---|---|
| Werkzeug löst nicht aus | Batterie nicht installiert oder entladen Contact arm not fully depressed Magazine empty (empty shot prevention) Fastener jam | Batterie einsetzen/laden Press tool firmly against workpiece Befestigungselemente Clear jam (see Section 6.1) |
| Fasteners not driven fully | Nailing depth set too shallow Niedriger Akkuladestand Incorrect fastener size for material | Adjust depth setting deeper Akku aufladen Use appropriate fastener size |
| Befestigungselemente klemmen häufig | Beschädigte Befestigungselemente Falsche Befestigungsgröße Magazine or firing mechanism dirty | Verwenden Sie neue, unbeschädigte Befestigungselemente. Ensure correct fastener size Clean magazine and firing area |
| Werkzeug überhitzt | Längerer Dauereinsatz | Allow the tool to cool down. The high-efficiency heat dissipation design helps manage temperature, but breaks are recommended during extended use. |
If you encounter a problem not listed here or if the issue persists after attempting the solutions, please contact KIMO customer support.
8. Spezifikationen
| Besonderheit | Detail |
|---|---|
| Marke | KIMO |
| Modellnummer | QM-9418 |
| Batterie Voltage | 20 V |
| Batteriekapazität | 2.0Ah Lithium-ion (x2 included) |
| Finish Nail Length | 20mm - 50mm (700 pcs included) |
| Heftklammergröße | Width 4mm, Length 19mm - 40mm (300 pcs included) |
| Max Firing Speed | 80 nails/minute (continuous mode) |
| Tool Weight (main unit) | 2.8 kg |
| Zertifizierung | PSE-zertifiziert |
| UPC | 731029251059 |
9. Garantie und Support
9.1 Herstellergarantie
The KIMO Electric Tacker QM-9418 comes with a 1-year manufacturer's warranty. This warranty covers defects in materials and workmanship under normal use. Please retain your proof of purchase for warranty claims.
If a battery becomes unusable within one year of purchase, contact after-sales service for a replacement.
9.2 Kundendienst
For any questions, technical assistance, or warranty claims, please contact KIMO customer support through the retailer where the product was purchased or visit the official KIMO webWebsite für Kontaktinformationen.


