1. Einleitung
The Trevi DAB 7F80 R is a portable digital radio offering DAB, DAB+, and FM reception, along with Bluetooth connectivity. It features a high-readability Dot Matrix display, a programmable alarm clock, and a headphone jack. This manual provides instructions for the proper setup, operation, and maintenance of your device.
2. Sicherheitshinweise
- Lesen Sie alle Anweisungen sorgfältig durch, bevor Sie das Gerät verwenden.
- Das Gerät darf weder Wasser, Feuchtigkeit noch extremen Temperaturen ausgesetzt werden.
- Use only the specified power source (4 x AAA batteries or a compatible 5V DC adapter, not included).
- Versuchen Sie nicht, das Gerät zu zerlegen, zu reparieren oder zu verändern. Überlassen Sie alle Wartungsarbeiten qualifiziertem Fachpersonal.
- Batterien sind gemäß den örtlichen Vorschriften verantwortungsvoll zu entsorgen.
- Halten Sie das Gerät von starken Magnetfeldern fern.
3. Packungsinhalt
Bitte überprüfen Sie, ob die folgenden Artikel in Ihrem Paket enthalten sind:
- Trevi DAB 7F80 R Main Unit
- Benutzerhandbuch (dieses Dokument)
- Garantie-Zertifikat
4. Produktüberschreitungview
Familiarize yourself with the components and controls of your Trevi DAB 7F80 R radio.
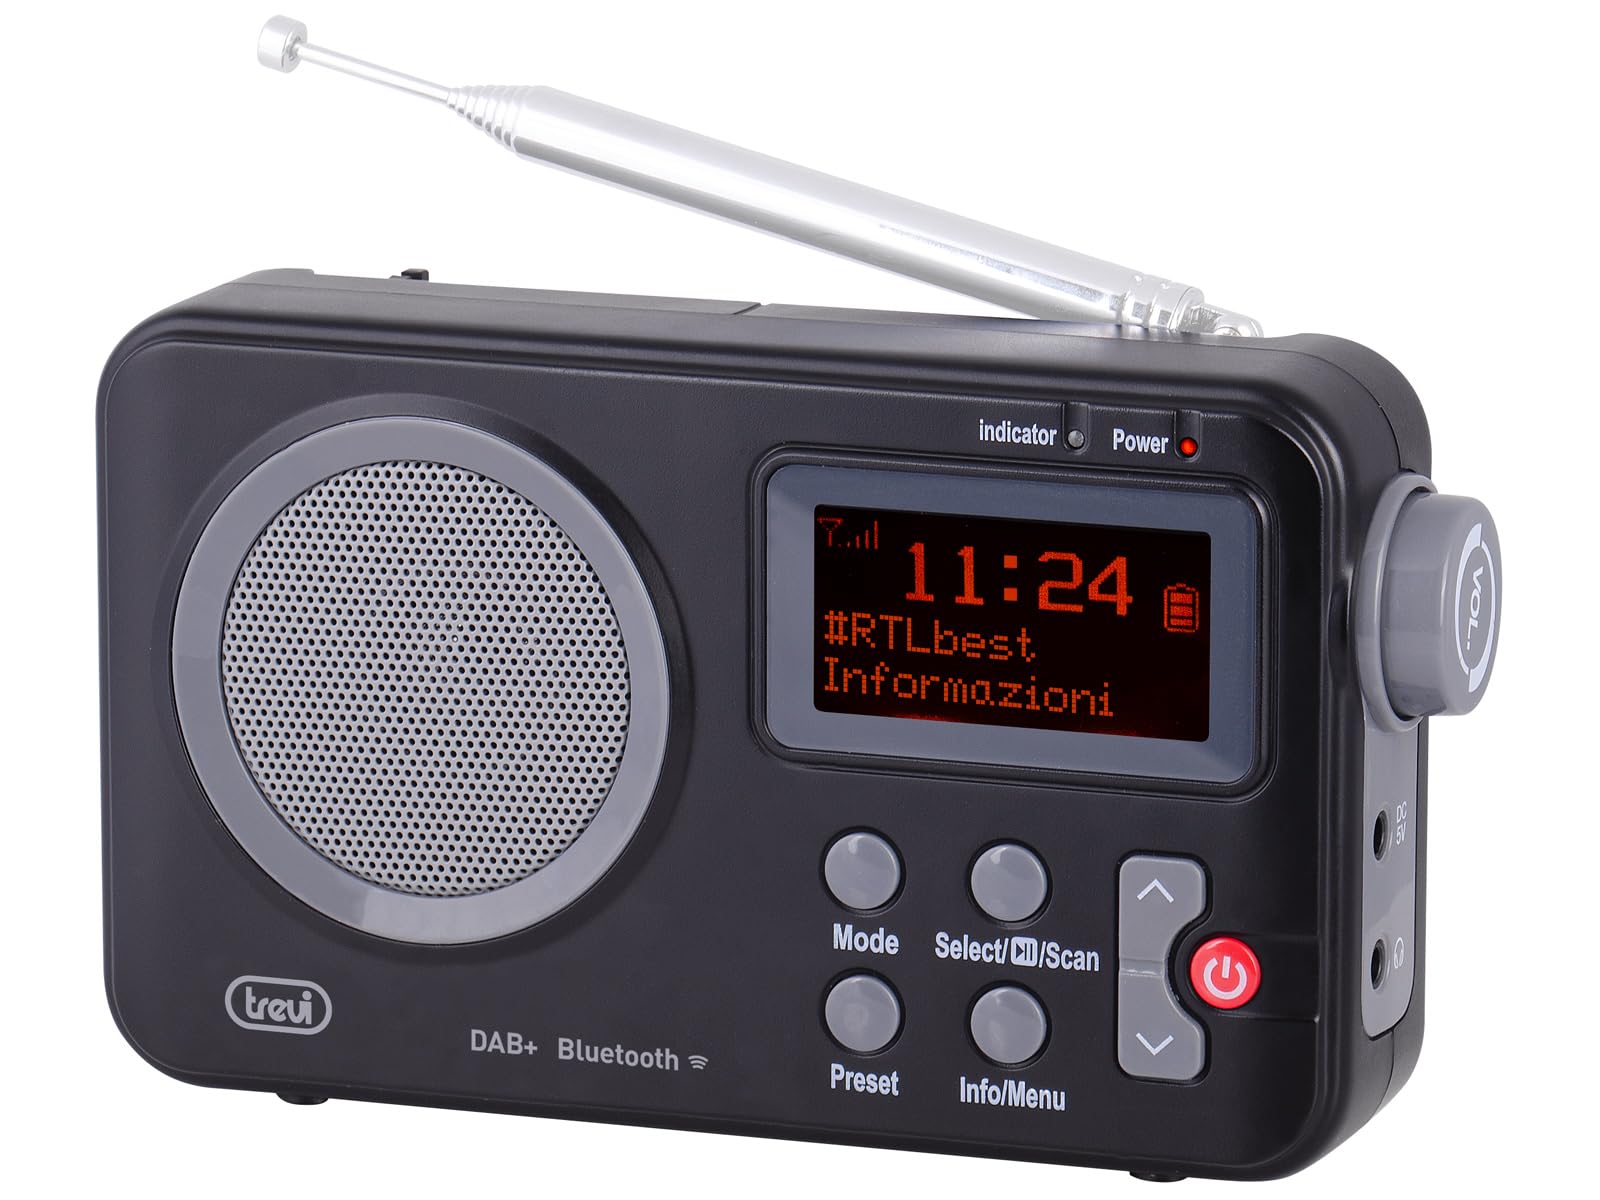
Abbildung 1: Front view of the Trevi DAB 7F80 R radio. This image displays the Dot Matrix screen, the main speaker grille, and the primary control buttons including Mode, Select/Scan, Preset, Info/Menu, and Power. The extendable telescopic antenna is visible at the top.
Bedienelemente und Funktionen:
- Anzeige: High-readability Dot Matrix screen for station information, time, and menu navigation.
- Lautsprecher: Integrierter Lautsprecher für die Audioausgabe.
- Netzschalter: Schaltet das Radio ein/aus.
- Modus-Taste: Switches between DAB/DAB+, FM, and Bluetooth modes.
- Select/Scan Button: Confirms selections in menus, initiates station scans.
- Preset-Taste: Accesses and stores favorite radio stations.
- Info-/Menütaste: Displays station information and accesses system settings.
- Auf-/Abwärtspfeiltasten: Navigates through menus, adjusts volume, changes stations.
- Kopfhöreranschluss: 3.5-mm-Ausgang für privates Hören.
- Antenne: Ausziehbare Teleskopantenne für verbesserten Radioempfang.
5. Einrichtung
5.1 Einschalten des Geräts
The Trevi DAB 7F80 R can be powered by batteries or an external AC adapter.
- Einlegen der Batterie: Open the battery compartment cover on the back of the unit. Insert 4 x AAA batteries (not included), ensuring correct polarity (+/-). Close the cover securely.
- Netzteil (optional): For continuous power, connect a compatible 5V DC, 1A AC adapter (not included) to the DC IN port on the side of the radio.
Wichtige Warnung: Do not use batteries in the device when it is connected to an AC adapter for extended periods. This may lead to battery leakage or damage to the unit. If using the AC adapter, remove the batteries. If using batteries, disconnect the AC adapter.
5.2 Erstes Einschalten und Stationsscan
- Für optimalen Empfang die Teleskopantenne vollständig ausziehen.
- Drücken Sie die Leistung Taste, um das Radio einzuschalten.
- Bei der ersten Benutzung werden Sie möglicherweise vom Radio aufgefordert, eine Sprache auszuwählen. Verwenden Sie die Pfeil nach oben / unten Schaltflächen zur Navigation und Auswählen/Scannen zur Bestätigung.
- The radio will automatically perform a full scan for DAB/DAB+ stations. This process may take a few minutes. Once complete, the first available station will begin playing.
6. Bedienungsanleitung
6.1 Radio Mode (DAB/DAB+, FM)
- Umschalten der Modi: Drücken Sie die Modus button repeatedly to cycle between DAB, FM, and Bluetooth modes.
- Sendersuche:
- In DAB mode, a full scan is usually performed on first use. To perform a new scan, press and hold Auswählen/Scannen.
- Drücken Sie im UKW-Modus Auswählen/Scannen um automatisch nach dem nächsten verfügbaren Sender zu suchen.
- Sender auswählen: Verwenden Sie die Pfeil nach oben / unten Schaltflächen zum Durchsuchen der verfügbaren Sender.
- Speichern von Voreinstellungen: The radio can store up to 20 DAB/DAB+ and 20 FM stations.
- Stellen Sie den gewünschten Sender ein.
- Halten Sie die Vorgabe Drücken Sie die Taste so lange, bis „Voreinstellungen speichern“ auf dem Display erscheint.
- Verwenden Sie die Pfeil nach oben / unten Tasten zur Auswahl einer voreingestellten Zahl (1-20).
- Drücken Auswählen/Scannen um die Station zu bestätigen und zu speichern.
- Voreinstellungen abrufen: Drücken Sie die Vorgabe Drücken Sie kurz die Taste. Verwenden Sie die Pfeil nach oben / unten Tasten zum Auswählen der gewünschten Voreinstellungsnummer, dann drücken Auswählen/Scannen.
- RDS/DLS Information: In FM or DAB mode, press the Info/Menü button repeatedly to cycle through available information such as station name, program type, time, and song title (if broadcast).
6.2 Bluetooth-Modus
- Drücken Sie die Modus button until 'Bluetooth' appears on the display. The radio will enter pairing mode, indicated by a flashing Bluetooth icon.
- Aktivieren Sie Bluetooth auf Ihrem Smartphone, Tablet oder Laptop und suchen Sie nach verfügbaren Geräten.
- Select 'Trevi DAB 7F80 R' from the list of devices to pair. Once connected, the Bluetooth icon will stop flashing.
- You can now play audio from your connected device through the radio. Use your device's controls for playback and the radio's volume controls for audio level.
6.3 Uhr- und Weckerfunktionen
The radio features an integrated clock and two programmable alarms.
- Einstellen der Uhrzeit:
- Halten Sie die Info/Menü Taste, um das Hauptmenü aufzurufen.
- Verwenden Pfeil nach oben / unten buttons to navigate to 'Time/Date' and press Auswählen/Scannen.
- Select 'Set Time/Date' and adjust the hour, minute, day, month, and year using the Pfeil nach oben / unten buttons and confirming each step with Auswählen/Scannen.
- Setting Alarms (Alarm 1 / Alarm 2):
- From the main menu, navigate to 'Alarm' and press Auswählen/Scannen.
- Select 'Alarm 1 Setup' or 'Alarm 2 Setup'.
- Configure the alarm settings: 'On Time' (hour/minute), 'Duration', 'Source' (Buzzer or last used radio station), 'Volume', and 'Frequency' (Daily, Weekdays, Weekends, Once). Use Pfeil nach oben / unten Tasten zum Einstellen von Werten und Auswählen/Scannen um jede Einstellung zu bestätigen.
- Ensure the alarm is set to 'On' in the alarm setup menu.
- Deactivating a sounding alarm: Drücken Sie die Leistung Taste, um den Alarm auszuschalten.
6.4 Kopfhörernutzung
To listen privately, insert standard 3.5mm headphones into the headphone jack located on the side of the radio. The internal speaker will automatically mute.
7. Wartung
- Reinigung: Reinigen Sie das Radio mit einem weichen, trockenen und fusselfreien Tuch. Verwenden Sie keine Scheuermittel, Wachse oder Lösungsmittel.
- Batteriewechsel: When the low battery indicator appears on the display, replace all four AAA batteries with new ones.
- Lagerung: If the radio will not be used for an extended period, remove the batteries to prevent leakage and potential damage. Store the device in a cool, dry place.
8. Fehlerbehebung
If you encounter issues with your Trevi DAB 7F80 R, please refer to the following common problems and solutions:
- Das Radio lässt sich nicht einschalten:
- Prüfen Sie, ob die Batterien richtig eingelegt und nicht leer sind. Tauschen Sie sie gegebenenfalls aus.
- Wenn Sie ein Netzteil verwenden, vergewissern Sie sich, dass es ordnungsgemäß angeschlossen ist und die Steckdose funktioniert.
- Kein Ton oder schlechte Tonqualität:
- Regeln Sie die Lautstärke.
- Ensure headphones are not connected if you want sound from the speaker.
- Check radio reception. Extend and adjust the antenna. Try moving the radio to a different location.
- For Bluetooth, ensure the device is paired and audio is playing from the source.
- Clock resets after power loss or battery change:
- This model does not feature a backup battery for the clock. It is normal for the time to reset when power is completely removed (e.g., batteries removed or AC adapter unplugged). You will need to re-set the time manually as described in section 6.3.
- Kurze Akkulaufzeit:
- Battery life can vary depending on usage and battery quality. Use high-quality alkaline batteries for best performance.
- For prolonged use, consider using a compatible 5V DC AC adapter (not included).
- Difficulty with setup or navigation (e.g., station search, alarm setup):
- The radio uses a limited number of buttons for various functions. Refer to the specific operating instructions in section 6 for detailed, step-by-step guidance. Some functions may require pressing buttons multiple times or holding them down.
- Radio turns off when switching between battery and AC power:
- This is expected behavior. The radio will power cycle when changing its primary power source. Ensure you have saved any settings or presets before switching.
9. Spezifikationen
| Marke | Trevi |
| Modell | DAB 7F80 R |
| Farbe | Schwarz |
| Tuning-Technologie | DAB/DAB+, UKW |
| Unterstützte Funkbänder | DAB, DAB+, FM (3 bands) |
| Bluetooth | Ja |
| Anzeige | High-readability Dot Matrix |
| Alarm | 2 programmierbare Alarme |
| Voreinstellungen | 20 DAB/DAB+, 20 FM |
| Stromquelle | 4 x AAA batteries (not included) or 5V DC adapter (not included) |
| Kompatible Geräte | Smartphone, Tablet, Laptop |
| Produktabmessungen (L x B x H) | 14 x 3.5 x 8.5 cm |
| Im Lieferumfang enthaltene Komponenten | Main unit, user manual, warranty certificate |
10. Garantie und Support
This product is supplied with a warranty certificate. For detailed information regarding warranty terms and conditions, please refer to the certificate included in your package.
For technical support, troubleshooting beyond this manual, or warranty claims, please contact your retailer or the manufacturer's customer service using the contact information provided with your purchase.