1. Einleitung
Vielen Dank für Ihren Einkauf.asing the Singer SN777αIII Computerized Sewing Machine. This machine is designed for ease of use and versatility, offering 100 stitch patterns, including alphanumeric characters, to support a wide range of sewing projects. Please read this manual thoroughly before operating your machine to ensure safe and efficient use.

Image: The Singer SN777αIII sewing machine is available in white, pink, and a white and pink combination, allowing users to choose a color that suits their preference or room decor.
2. Einrichtung
2.1 Auspacken und Aufstellen
- Nehmen Sie die Maschine und sämtliches Zubehör vorsichtig aus der Verpackung.
- Stellen Sie die Maschine auf eine stabile, ebene Fläche. Achten Sie darauf, dass um die Maschine herum ausreichend Platz für eine komfortable Bedienung vorhanden ist.
2.2 Stromanschluss
- Stellen Sie sicher, dass sich der Netzschalter in der Position „AUS“ befindet.
- Schließen Sie das Netzkabel an das Gerät und anschließend an eine geeignete Steckdose an.
2.3 Spulenwicklung
- Setzen Sie eine Garnrolle auf den Garnrollenstift.
- Follow the winding path indicated on the machine.
- Setzen Sie eine leere Spule auf die Spulenwickelspindel und schieben Sie sie nach rechts.
- Start winding by pressing the foot controller or start/stop button. Stop when the bobbin is full.
2.4 Einfädeln des Obergewindes
- Heben Sie den Nähfußhebel an.
- Follow the numbered threading path on the machine, ensuring the thread is correctly seated in all guides and the tension discs.
- Use the automatic needle threader for easy threading of the needle eye.
2.5 Setting the Lower Thread (Bobbin)
- Öffnen Sie die Spulenabdeckung.
- Setzen Sie die aufgewickelte Spule in das Spulengehäuse ein und achten Sie darauf, dass sich der Faden in die richtige Richtung abwickelt.
- Guide the bobbin thread through the tension spring and out the bobbin case opening.
- Close the bobbin cover. The easy bobbin setting feature allows you to start sewing without pulling up the bobbin thread manually.
2.6 Anbringen von Zubehör
- Breiter Tisch: Attach the wide table to the machine to expand your work area, especially useful for larger projects.
- Fußregler: Connect the foot controller to the designated port on the machine for hands-free speed control.
3. Bedienungsanleitung
3.1 Bedienfeld vorbeiview
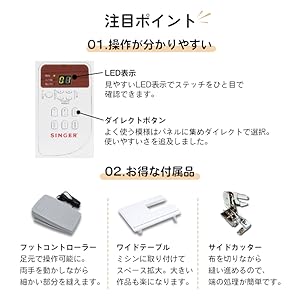
Image: The control panel features a clear LED display to show the selected stitch and direct buttons for frequently used patterns, simplifying operation.
- LED-Anzeige: Shows the selected stitch pattern number and other relevant settings.
- Direct Buttons: Allows quick selection of commonly used stitch patterns.
- Stichauswahl-Schaltflächen: Use these to navigate and select from the 100 available stitch patterns.
3.2 Auswahl von Stichmustern

Image: The machine offers 100 stitch patterns, including utility stitches, decorative stitches, buttonholes, satin stitches, cross stitches, patchwork quilt stitches, and alphanumeric characters (numbers and alphabets).
- Refer to the stitch chart on the machine or in the manual.
- Use the stitch selection buttons to choose the desired pattern. The selected pattern number will appear on the LED display.
- For alphanumeric stitches, select the corresponding pattern and then use the adjustment buttons to choose specific letters or numbers.
3.3 Basic Sewing Operations

Image: This illustration highlights key operational features such as hand-focused controls for start/stop, automatic buttonhole creation, the free arm for cylindrical sewing, stepless speed adjustment, drop feed for free-motion quilting, and the presser foot lifter button for smooth sewing over varying fabric thicknesses.
- Start/Stopp-Taste: Press to start and stop sewing.
- Geschwindigkeitsanpassung: Use the slide control for stepless speed adjustment from low to high.
- Reverse Stitch Button: Press and hold to sew in reverse for securing stitches.
- Nadel-Auf/Ab-Taste: Positions the needle up or down.
- Presser Foot Lifter Button: Automatically keeps the presser foot horizontal, making it easy to start sewing thick fabrics.
3.4 Sonderfunktionen
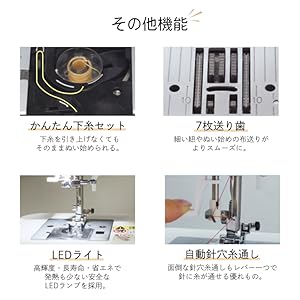
Image: This illustration details the easy bobbin setting for quick starts, the 7-point feed dog for smooth fabric feeding, the bright LED light for clear visibility, and the automatic needle threader for effortless threading.
- Automatischer Nadeleinfädler: A lever-operated system that threads the needle automatically.
- 7-Punkt-Fütterungshund: Ensures smooth and consistent fabric feeding, especially for delicate or thick materials.
- LED-Licht: Provides bright, long-lasting, and energy-efficient illumination of the sewing area.
- Freier Arm: Remove the accessory box to reveal the free arm, ideal for sewing cuffs, sleeves, and other cylindrical items.
- Fully Automatic Buttonhole: Simply set the button, and the machine automatically creates a perfectly sized buttonhole.
- Drop Feed: Lower the feed dogs for free-motion quilting or darning.
4. Wartung
4.1 Reinigung
- Vor der Reinigung das Gerät immer ausschalten und vom Stromnetz trennen.
- Regularly clean lint and dust from the bobbin case area and under the needle plate using the brush provided.
- Wipe the exterior of the machine with a soft, dry cloth. Do not use harsh chemicals.
4.2 Nadelwechsel
- Schalten Sie die Maschine aus und ziehen Sie den Stecker.
- Lösen Sie die Nadel clamp Schraube und entfernen Sie die alte Nadel.
- Setzen Sie eine neue Nadel mit der flachen Seite nach hinten ein und schieben Sie sie so weit wie möglich nach oben.
- Ziehen Sie die Nadel clamp fest verschrauben.
5. Fehlerbehebung
This section addresses common issues you might encounter. For problems not listed here, please consult the full instruction DVD or contact customer support.
| Problem | Mögliche Ursache | Lösung |
|---|---|---|
| Maschine startet nicht | Power cord not connected; Power switch off; Foot controller not connected. | Check power connections; Turn on power switch; Ensure foot controller is plugged in. |
| Ausgelassene Stiche | Incorrect needle; Bent needle; Incorrect threading. | Use correct needle type for fabric; Replace bent needle; Re-thread machine carefully. |
| Fadenbrüche | Incorrect tension; Poor quality thread; Improper threading; Needle bent or dull. | Adjust tension; Use good quality thread; Re-thread machine; Replace needle. |
| Stoff wird nicht zugeführt | Feed dogs lowered; Presser foot pressure too low. | Raise feed dogs; Adjust presser foot pressure. |
6. Spezifikationen

Image: The Singer SN777αIII machine's dimensions are 404mm width x 188mm depth x 298mm height, with a weight of 5.8 kg.
- Modell: SN777αIII
- Hersteller: Sänger
- Abmessungen (Produkt): 40.4 cm (Breite) x 18.8 cm (Tiefe) x 29.8 cm (Höhe)
- Gewicht (Produkt): 5.8 kg
- Material: Acrylnitril-Butadien-Styrol (ABS)
- Stichmuster: 100 types (including numbers and alphabets)
6.1 Mitgeliefertes Zubehör

Image: A comprehensive diagram illustrating all standard accessories, including various presser feet, bobbins, screwdrivers, a seam ripper, needle set, seam guide, spool caps, auxiliary spool pin, spool pin felt, soft cover, power cord, instruction manual, and instruction DVD.
- Zick-Zack-Fuß
- Reißverschlussfuß
- Knopflochfuß
- Knopf Nähen Fuß
- Bewölkter Fuß
- Blindstichfuß
- Satinstichfuß
- Spulen
- Triangular Screwdriver
- Kleiner Schraubendreher
- Seam Ripper with Brush
- Nadelset
- Nahtführung
- Spool Cap (Large)
- Spool Cap (Small)
- Zusätzlicher Garnrollenstift
- Spulenstift Filz
- Softcover
- Netzkabel
- Bedienungsanleitung
- Anleitungs-DVD
- Fußschalter
- Breiter Tisch
- Seitenschneider
7. Garantie und Support
For warranty information, please refer to the warranty card included with your product or contact your retailer. For technical support or service inquiries, please refer to the contact information provided in your purchase documentation or visit the official Singer webWebsite.


