1. Einleitung
The WHATOOK 2-in-1 Computer Vacuum Cleaner and Compressed Air Duster Blower is a versatile and powerful tool designed for efficient cleaning of electronic devices, car interiors, and various household items. Featuring a high-speed motor, adjustable airflow modes, and a rechargeable battery, this device offers both blowing and suction capabilities to effectively remove dust, debris, and dirt from hard-to-reach areas. Its portable and cordless design, coupled with multiple nozzles and brushes, makes it an ideal solution for comprehensive cleaning tasks.

Figure 1.1: The WHATOOK 2-in-1 Computer Vacuum Cleaner and Air Duster, showcasing the main unit, various nozzles, cleaning brushes, and USB-C charging cable.
2. Sicherheitshinweise
Bitte lesen Sie vor der Benutzung des Geräts alle Sicherheitshinweise sorgfältig durch. Die Nichtbeachtung dieser Hinweise kann zu Stromschlag, Brand oder schweren Verletzungen führen.
- Halten Sie das Gerät von Wasser und anderen Flüssigkeiten fern. Bedienen Sie es nicht mit nassen Händen.
- Do not block the air intake or outlet during operation to prevent overheating.
- Verwenden Sie zum Aufladen ausschließlich das mitgelieferte USB-C-Ladekabel und ein kompatibles Netzteil (nicht im Lieferumfang enthalten).
- Zerlegen, reparieren oder verändern Sie das Gerät nicht selbst. Wenden Sie sich an den Kundendienst.
- Außerhalb der Reichweite von Kindern und Haustieren aufbewahren. Dieses Gerät ist kein Spielzeug.
- Avoid pointing the air duster directly at eyes, ears, or other sensitive body parts.
- Do not use the device in environments with flammable gases or liquids.
- Bewahren Sie das Gerät bei Nichtgebrauch an einem kühlen, trockenen Ort auf.
3. Packungsinhalt
Überprüfen Sie, ob alle Artikel im Paket vorhanden sind:
- WHATOOK 2-in-1 Computer Vacuum Cleaner / Air Duster Unit
- USB-Kabel Typ C.
- 8 x Interchangeable Nozzles (various shapes and sizes for blowing and vacuuming)
- 3 x Cleaning Brushes (for different cleaning needs)
- Aufbewahrungstasche
- Benutzerhandbuch (dieses Dokument)

Figure 3.1: Visual representation of the items included in the product package, including the main unit, various attachments, charging cable, and storage bag.
4. Einrichtung
4.1 Aufladen des Geräts
Before first use, fully charge the device. Connect the provided USB Type-C charging cable to the charging port on the device and plug the other end into a compatible USB power source (e.g., wall adapter, computer USB port, power bank). The LED indicator will show charging status and turn off when fully charged.
- Ladezeit: Ungefähr 3 Stunden für eine vollständige Ladung.
- Runtime: Up to 50 minutes depending on the speed setting.

Figure 4.1: The device connected to a power source via its USB Type-C charging cable, illustrating convenient and fast charging capabilities.
4.2 Anbringen der Düsen
Select the appropriate nozzle for your cleaning task. The device supports both blowing and vacuuming functions, each requiring specific nozzle attachments.
- For Blowing Mode: Firmly push the desired blowing nozzle onto the front air outlet of the device until it clicks into place.
- Für den Vakuummodus: Attach the vacuum collection cup to the rear of the device, then firmly push the desired vacuum nozzle onto the opening of the collection cup.

Figure 4.2: Step-by-step guide on how to properly install nozzles for both the blowing and vacuuming functions of the device.
5. Bedienungsanleitung
5.1 Ein-/Ausschalten und Einstellen der Geschwindigkeit
The device features three adjustable airflow modes for versatile cleaning.
- Ein-/Ausschalten: Halten Sie die Power-Taste 3 Sekunden lang gedrückt.
- Geschwindigkeit anpassen: Once powered on, short press the power button to cycle through the three speed settings:
- Gang 1 (Niedrige Geschwindigkeit): 60,000 RPM / 6,000 PA (approx. 55 minutes runtime)
- Gear 2 (Medium Speed): 80,000 RPM / 8,000 PA (approx. 35 minutes runtime)
- Gang 3 (Hohe Geschwindigkeit): 100,000 RPM / 10,000 PA (approx. 20 minutes runtime)

Figure 5.1: Illustration of the three-speed control system, detailing the motor speed, pressure, and approximate runtime for each gear.
5.2 Using Blowing Mode (Air Duster)
Attach a blowing nozzle. Point the nozzle towards the area to be cleaned and activate the device. Use the appropriate speed setting for the task. The integrated LED light illuminates the cleaning area for better visibility.
- Ideal for keyboards, computer components, camera lenses, and other delicate electronics.
- Effective for removing dust from air conditioner filters and hard-to-reach crevices.
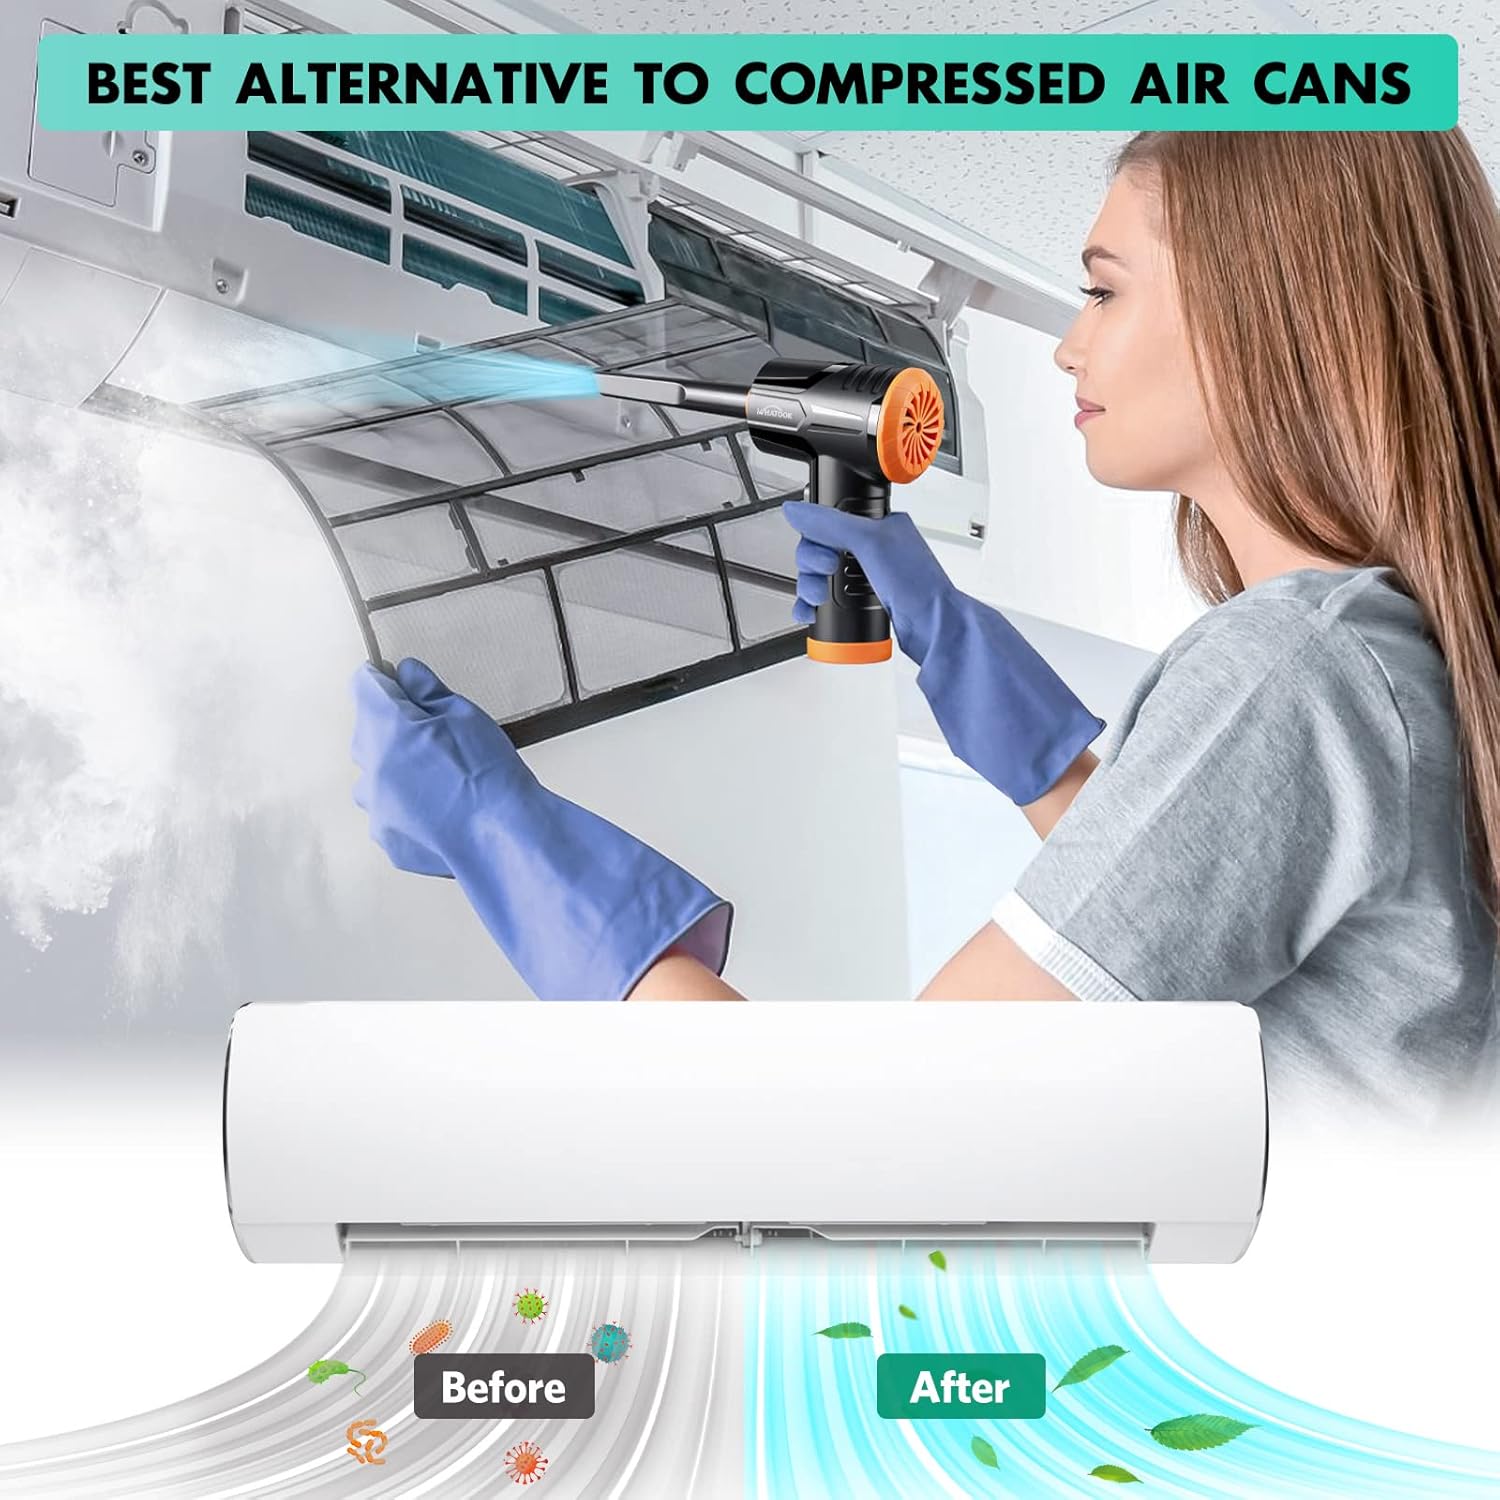
Figure 5.2: The air duster being used to clean a dusty air conditioner filter, demonstrating its effectiveness as an alternative to canned air.
5.3 Using Vacuum Mode (Mini Hoover)
Attach the vacuum collection cup and a vacuum nozzle. Activate the device and move the nozzle over the surface to suction up dust and small debris.
- Suitable for cleaning car interiors, desk surfaces, sofa crevices, and pet hair.
- The vacuum mode is designed for light debris and dust, not heavy-duty vacuuming.

Figure 5.3: The device shown in both its dust blowing mode (top) and vacuuming mode (bottom), illustrating its dual functionality for comprehensive cleaning.

Abbildung 5.4: Bspamples of the device's versatility, showing its application for cleaning various surfaces and objects around the home and in a car.
6. Wartung
6.1 Reinigen des Filters
Regularly clean the filter in the vacuum collection cup to maintain optimal suction performance. A clogged filter can reduce efficiency.
- Remove the vacuum collection cup from the device.
- Twist and pull out the filter assembly from the collection cup.
- Clean the filter by rinsing it under running water. Ensure all dust and debris are removed.
- Allow the filter to air dry completely before reassembling. Do not use the device with a wet filter.
- Reinsert the dry filter assembly into the collection cup and attach it back to the device.
Figure 6.1: Detailed steps for maintaining the device's vacuum filter, ensuring prolonged performance and hygiene.
6.2 Allgemeine Reinigung
Reinigen Sie die Außenseite des Geräts mit einem weichen, trockenen Tuch. Verwenden Sie keine scharfen Chemikalien oder Scheuermittel.
7. Fehlerbehebung
| Problem | Mögliche Ursache | Lösung |
|---|---|---|
| Gerät lässt sich nicht einschalten. | Batterie ist leer. | Laden Sie das Gerät mit dem mitgelieferten USB-C-Kabel vollständig auf. |
| Weak airflow or suction. | Der Filter ist mit Staub/Schmutz verstopft. Die Batterie ist schwach. Nozzle is not properly attached. | Clean the filter as described in Section 6.1. Laden Sie das Gerät auf. Stellen Sie sicher, dass die Düse sicher befestigt ist. |
| Das Gerät macht ungewöhnliche Geräusche. | Normal operating noise (70 dB). Obstruction in air path. | This is within normal operating parameters. Check for any foreign objects in the air intake or outlet and remove them. |
| Der Akku entlädt sich schnell. | Using high-speed mode frequently. Batterieverschlechterung im Laufe der Zeit. | High-speed mode consumes more power. Use lower speeds when sufficient. Contact customer support if runtime significantly decreases. |
8. Spezifikationen
| Marke | WAS GEHT |
| Modellname | LH220251-M1 |
| Motordrehzahl | Bis zu 100,000 U/min |
| Saugleistung | Bis zu 10,000 kPa |
| Batteriekapazität | 7600 mAh (ungefähr) |
| Laufzeit | Up to 50 minutes (varies by speed setting) |
| Ladeart | USB Typ C |
| Geräuschpegel | 70 dB |
| Anzahl der Geschwindigkeiten | 3 |
| Artikelgewicht | 1.5 Pfund |
| Verpackungsabmessungen | 8.39 x 5.59 x 2.72 Zoll |
9. Garantie und Support
WHATOOK is committed to providing quality products and excellent customer service.
- Garantie: Für dieses Produkt gilt eine Garantie von 24 Monaten ab Kaufdatum.
- Kundendienst: For any inquiries, technical assistance, or warranty claims, please contact WHATOOK customer support. We offer 12-hour response times, 7*24 hour stand-by support, and lifetime after-sales support.
- Die genauen Kontaktdaten entnehmen Sie bitte Ihren Kaufunterlagen.


