1. Wichtige Sicherheitshinweise
Lesen und verstehen Sie alle Sicherheitshinweise und Anweisungen, bevor Sie diesen Hochdruckreiniger in Betrieb nehmen. Die Nichtbeachtung dieser Anweisungen kann zu schweren Verletzungen oder Sachschäden führen.
- Tragen Sie stets geeignete persönliche Schutzausrüstung (PSA), einschließlich Augenschutz, Gehörschutz und Handschuhe.
- Richten Sie die Spritzpistole niemals auf Personen, Haustiere oder elektrische Geräte. Der Hochdruckstrahl kann schwere Verletzungen verursachen.
- Stellen Sie sicher, dass alle Verbindungen fest sitzen, bevor Sie das Gerät in Betrieb nehmen.
- Um eine Kohlenmonoxidvergiftung zu vermeiden, betreiben Sie den Hochdruckreiniger in einem gut belüfteten Bereich.
- Do not operate the unit if any parts are damaged or missing.
- Halten Sie Kinder und Unbeteiligte vom Arbeitsbereich fern.
- Always turn off the engine and relieve pressure before performing any maintenance or moving the unit.
- Verwenden Sie nur zugelassenes Zubehör und Ersatzteile.
2. Produktüberschreitungview
The GENMAX GPW3000-LT is a gasoline-powered pressure washer designed for heavy-duty cleaning tasks. It features a powerful engine and an axial cam pump to deliver efficient cleaning performance.
Hauptmerkmale:
- Motor: Genmax 212cc engine with low oil shutdown.
- Pumpe: Maintenance-free Axial cam pump.
- Leistung: Delivers 3000 PSI and 2.4 GPM.
- Düsen: 5 quick-change color-coded nozzle tips (0°, 15°, 25°, 40°, soap).
- Schlauch: 25 ft. abrasion-resistant high-pressure hose.
- Seifenbehälter: Onboard 1-gallon soap tank.
- Mobilität: Equipped with large wheels for easy movement across various terrains.
Komponentendiagramm:
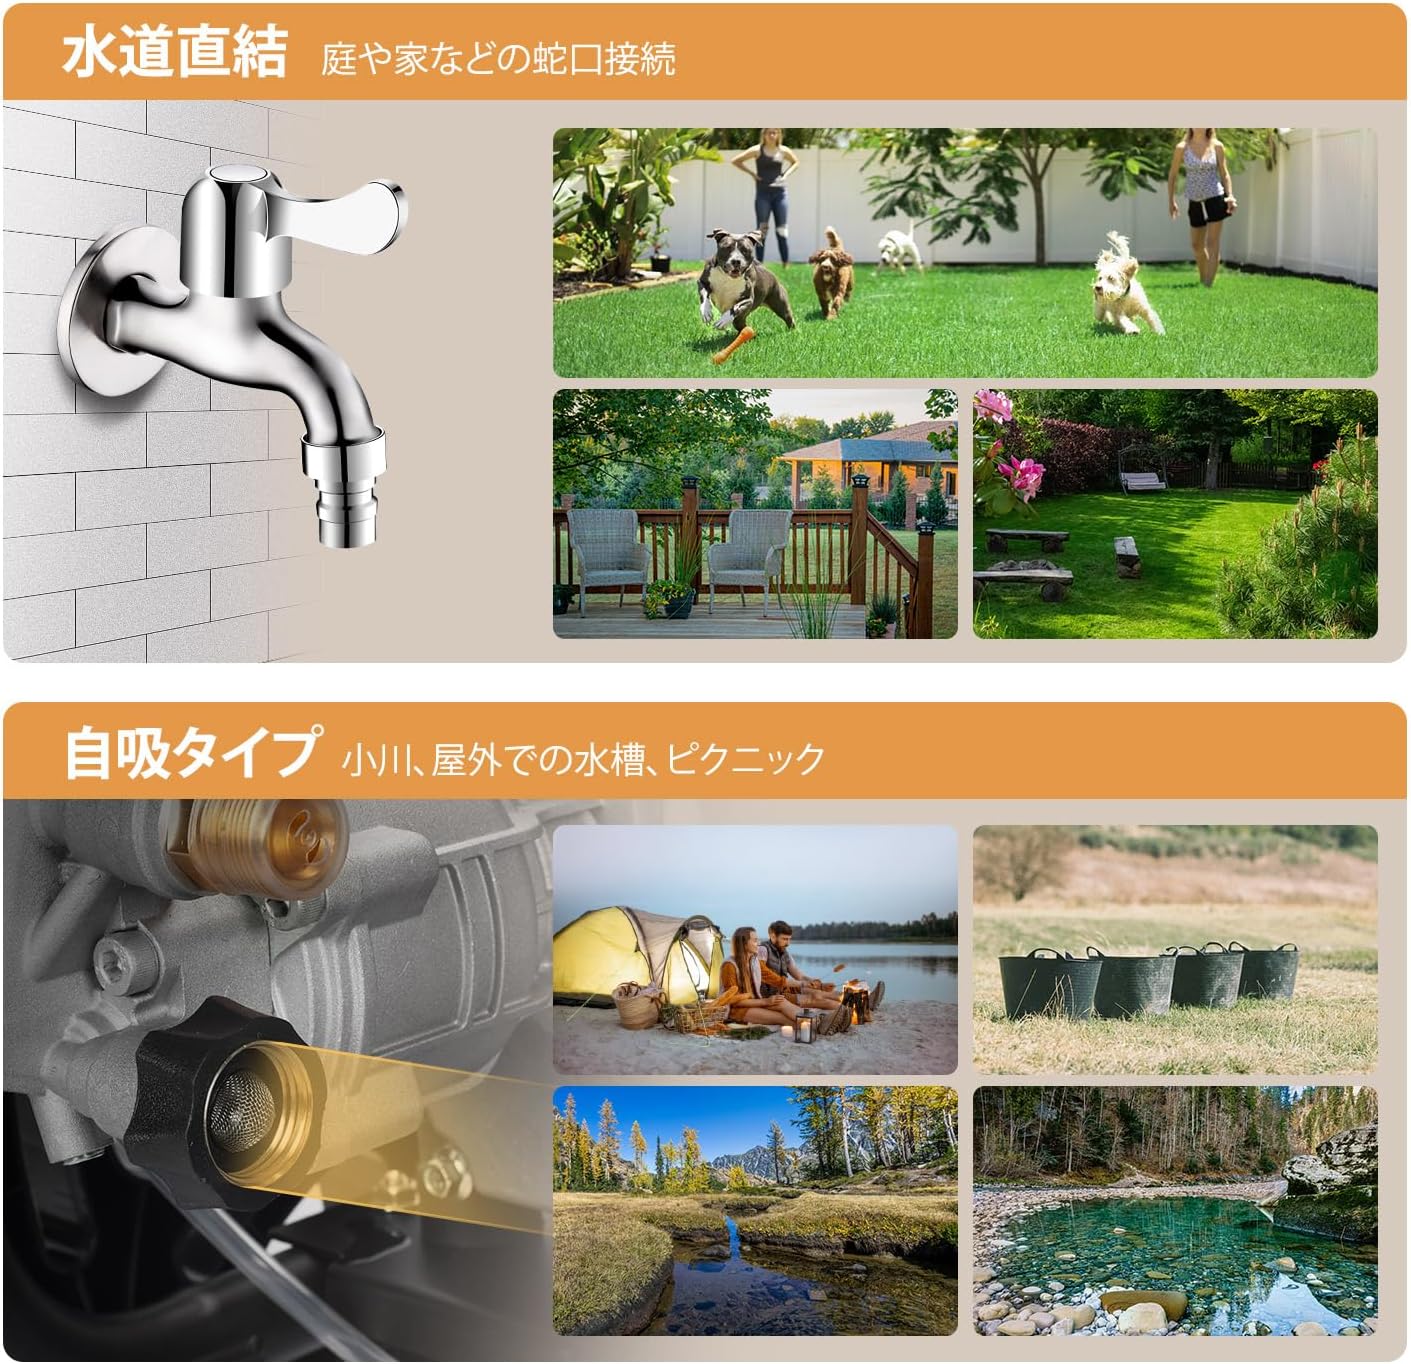
Bild: Überview of the GENMAX GPW3000-LT pressure washer, highlighting its main components such as the engine, pump, hose reel, and handle.

Bild: Detailliert view of the pressure washer's features, including the 212cc strong engine, powerful axial-cam pump, safety lock on the gun, 5 quick-connect nozzle tips, 0.5-gallon onboard soap tank, and 9.5-inch big wheels.
3. Aufbau und Montage
The main body of the pressure washer is designed for quick assembly, typically within 10 minutes by one person. Follow these steps for initial setup.
Mitgeliefertes Zubehör:

Image: Display of included accessories: 10m high-pressure hose, spray gun, gun rack, spark plug wrench, 5 quick-connect nozzles, funnel, and nozzle cleaning pin.
- Hauptrahmen
- Handhaben
- Waffenhaken
- Räder
- 5/8 in. x 25 ft. high-pressure hose
- 5 quick-connect nozzles
- Trigger gun and spray wand
Montageschritte:
- Attach the handle to the main frame using the provided hardware.
- Secure the gun hook to the handle.
- Install the wheels onto the axle.
- Connect the high-pressure hose to the pump outlet and the spray gun inlet.
- Select and attach the desired quick-connect nozzle to the spray wand.
Wasseranschluss:
The pressure washer supports two types of water connections:
- Direct Water Supply: Connect a standard garden hose directly to the pressure washer's water inlet. Ensure the water source is turned on fully.
- Self-Suction Type: For drawing water from an external source like a bucket, pond, or tank. Ensure the suction hose is properly connected and submerged.

Image: Illustrates two water connection methods: direct connection to a faucet and self-suction from an external water source like a bucket or natural body of water.
4. Bedienungsanleitung
Starten des Hochdruckreinigers:

Image: Step-by-step guide on starting the pressure washer, including adding engine oil, adding gasoline, turning on the engine switch, sliding the choke to START, turning the fuel valve to ON, pulling the rope to start, and sliding to RUN position.
- Motoröl hinzufügen: Pour 0.16 gallons of appropriate engine oil into the engine's oil reservoir. (Note: Some units may come with oil pre-filled in the pump, but engine oil must be added.)
- Benzin hinzufügen: Fill the fuel tank with 0.95 gallons of fresh, unleaded gasoline.
- Motorschalter: Den Motorschalter in die Position „EIN“ drehen.
- Drossel: Slide the choke lever to the "START" position.
- Kraftstoffventil: Drehen Sie den Kraftstoffhahn in die Position "EIN".
- Starte den Motor: Pull the recoil start rope firmly until the engine starts.
- Run Position: Once the engine starts, gradually slide the choke lever to the "RUN" position.
- Reinigung beginnen: Squeeze the trigger gun to start the water flow and begin cleaning.
Verwendung von Düsen:
The pressure washer includes 5 quick-connect nozzles, each designed for specific cleaning tasks. Always select the appropriate nozzle for the job to prevent damage to surfaces.
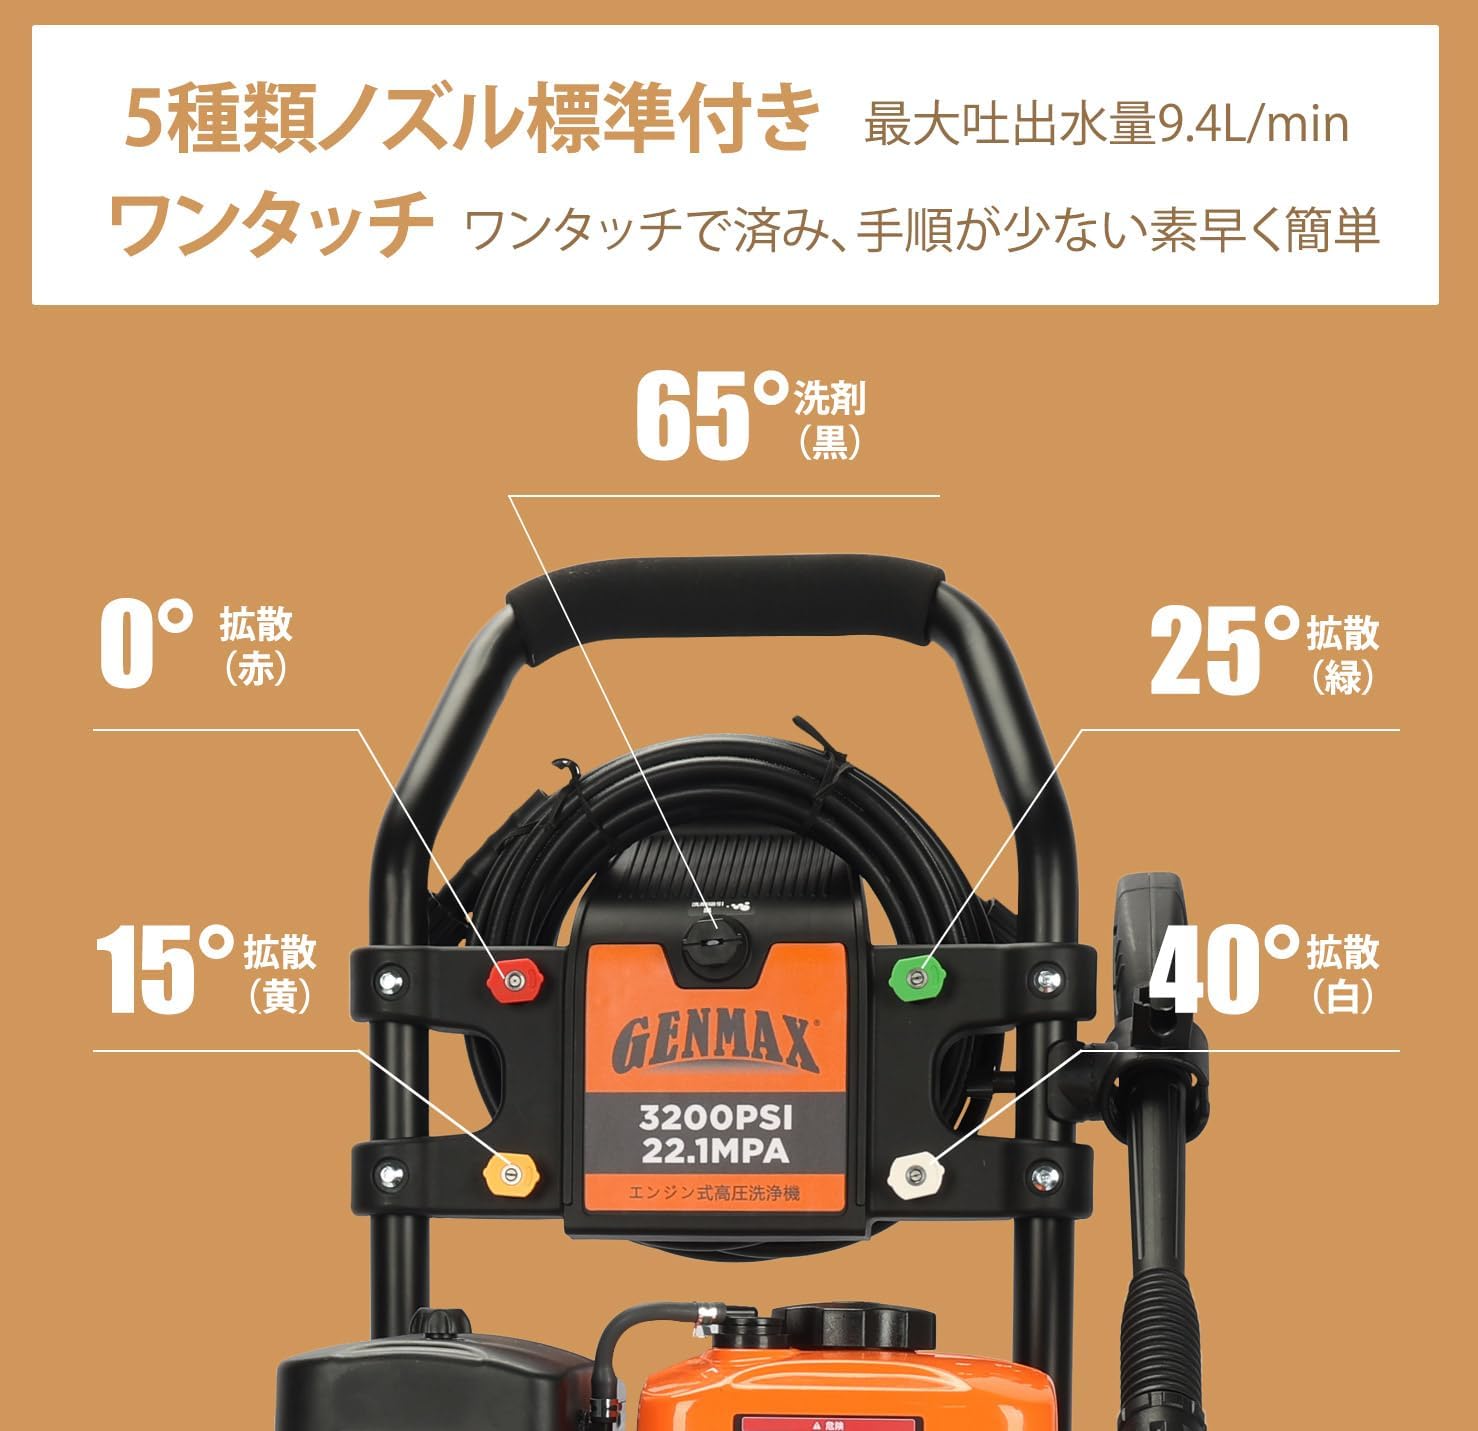
Image: Illustration of the five color-coded quick-connect nozzles: 0° (red) for concentrated stream, 15° (yellow) for intense cleaning, 25° (green) for general cleaning, 40° (white) for wide spray, and a black nozzle for soap application.
- 0° Rote Düse: Pin-point stream for stubborn stains and hard-to-reach areas. Use with extreme caution.
- 15° Gelbe Düse: Schmaler, kraftvoller Sprühstrahl zur intensiven Reinigung kleiner Flächen.
- 25° Grüne Düse: Mittelstrahliger Sprühstrahl zur allgemeinen Reinigung der meisten Oberflächen.
- 40° Weiße Düse: Wide-angle spray for gentle cleaning and rinsing of delicate surfaces.
- Black Soap Nozzle: Niederdrucksprühgerät zum Auftragen von Reinigungsmitteln.
Anwendung des Reinigungsmittels:
The onboard 1-gallon soap tank allows for easy application of detergents. Use the black soap nozzle for detergent application. Ensure the detergent is suitable for pressure washers.
Anwendungen:
The GENMAX GPW3000-LT is suitable for a wide range of cleaning tasks:

Bild: Examples of pressure washer applications, including cleaning cars, driveways, patios, fences, and outdoor furniture.
- Decks and Patios
- Sidewalks and Driveways
- Siding and Fences
- Garage Floors and Exterior Walls
- Cars and Patio Furniture
5. Wartung
Regular maintenance ensures the longevity and optimal performance of your pressure washer. Always turn off the engine and disconnect the spark plug wire before performing any maintenance.
Motorwartung:
- Ölstandskontrolle: Check the engine oil level before each use. Add oil if necessary.
- Ölwechsel: Change the engine oil after the first 5 hours of use, then every 25 hours or annually, whichever comes first.
- Luftfilter: Überprüfen und reinigen Sie den Luftfilter regelmäßig. Ersetzen Sie ihn, falls er beschädigt ist.
- Zündkerze: Inspect the spark plug annually. Clean or replace as needed. Use the included spark plug wrench.
- Kraftstoffsystem: To prevent carburetor issues, run the engine until it runs out of fuel before storing for extended periods. Alternatively, use a fuel stabilizer.
Pumpenwartung:
- Wassereinlassfilter: Reinigen Sie das Wassereinlassfiltersieb regelmäßig, um zu verhindern, dass Schmutz in die Pumpe gelangt.
- Überwinterung: If storing in freezing temperatures, winterize the pump with pump protector or RV antifreeze to prevent damage.
Düsenwartung:
- Düsenreinigung: If a nozzle becomes clogged, use the included nozzle cleaning pin to clear any obstructions.
6. Fehlerbehebung
This section provides solutions to common issues you might encounter with your pressure washer.
| Problem | Mögliche Ursache | Lösung |
|---|---|---|
| Motor startet nicht |
|
|
| Niederdruckausgang |
|
|
| Pulsierender Strahl |
|
|
7. Spezifikationen
| Besonderheit | Detail |
|---|---|
| Marke | GENMAX |
| Modellnummer | GPW3000-LT (also referred to as 3200PSI in some documentation) |
| Stromquelle | Benzinbetrieben |
| Motor | 212 ccm |
| Maximaler Druck | 3000 PSI |
| Maximaler Durchfluss | 2.4 GPM |
| Schlauchlänge | 25 Fuß |
| Seifenbehältervolumen | 1 Gallone |
| Produktabmessungen (L x B x H) | 20" x 19" x 23" |
| Artikelgewicht | 55 Pfund (25 Kilogramm) |
| UPC | 784728733104 |
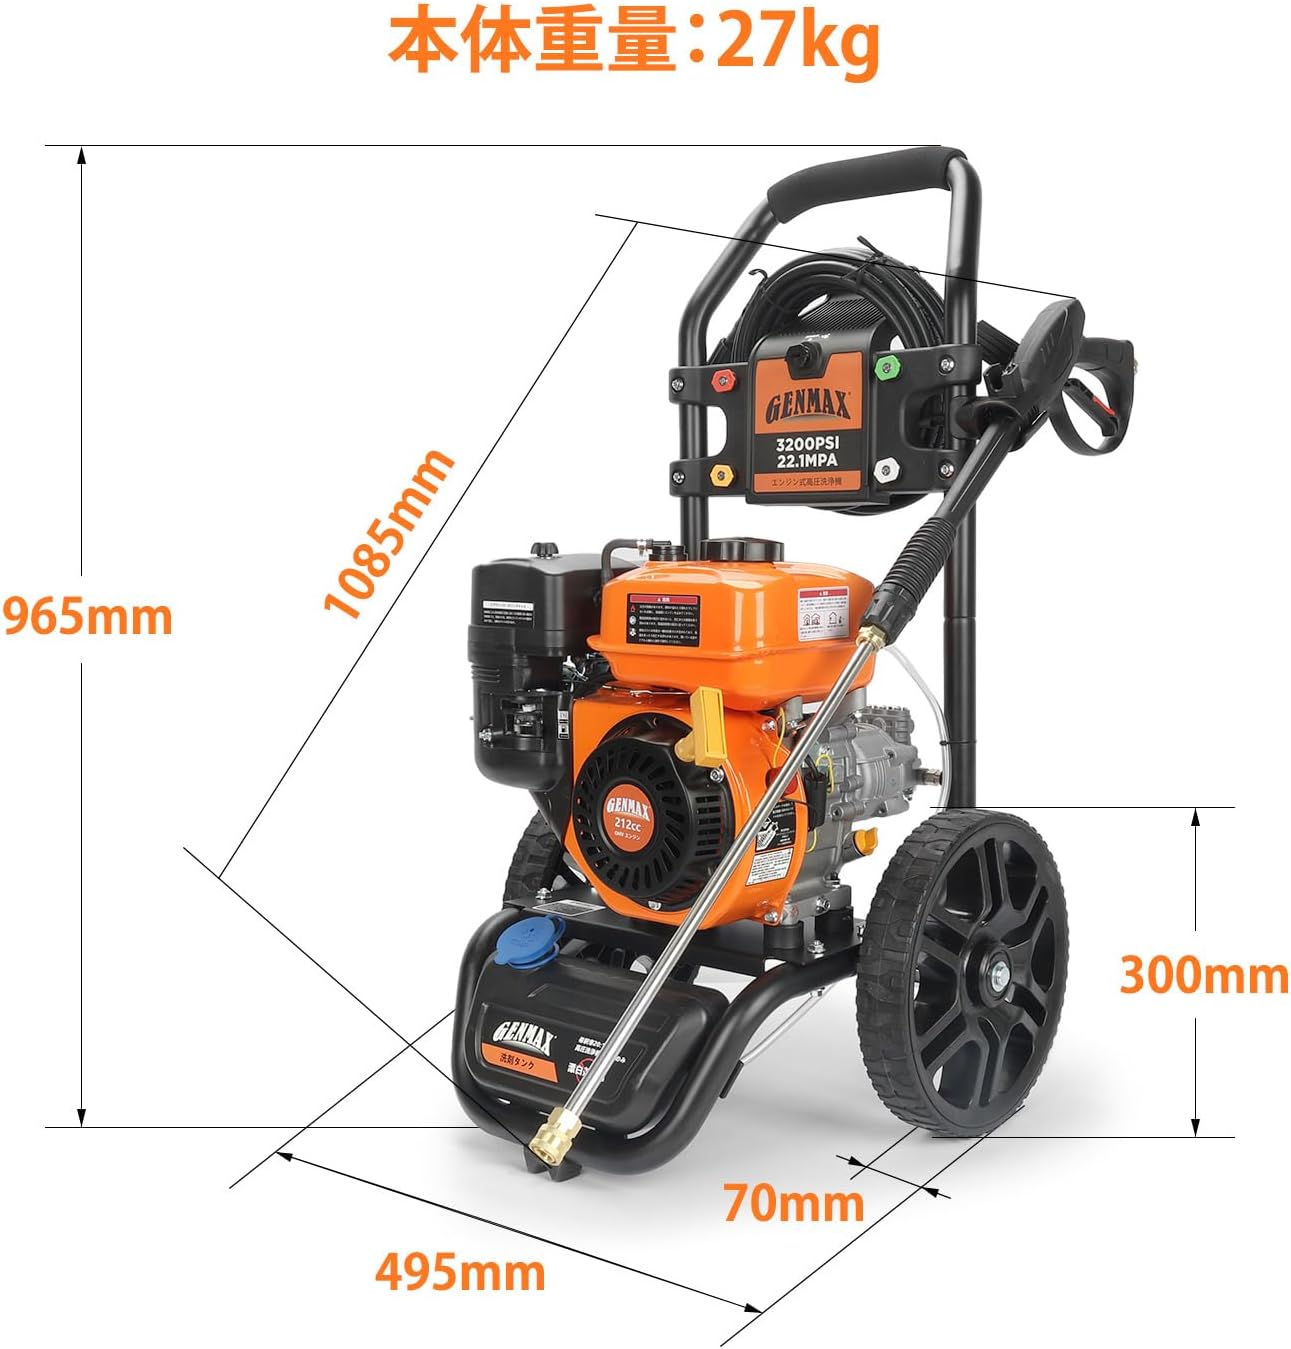
Image: Technical drawing showing the dimensions of the GENMAX GPW3000-LT pressure washer, including height, width, and wheel size.
8. Garantie und Support
GENMAX provides comprehensive support for its products.
- Garantie: This product includes a 1-year limited warranty from the date of purchase.
- Technische Unterstützung: FREE lifetime technical support is available from GENMAX experts.
- For warranty claims, technical assistance, or to order replacement parts, please contact GENMAX customer support. Refer to the contact information provided with your purchase documentation.


