1. Einleitung
Thank you for choosing the Linique 36-inch Bathroom Vanity with Sink Combo Set. This manual provides essential information for the safe assembly, installation, operation, and maintenance of your new vanity. Please read all instructions carefully before beginning assembly and retain this manual for future reference.
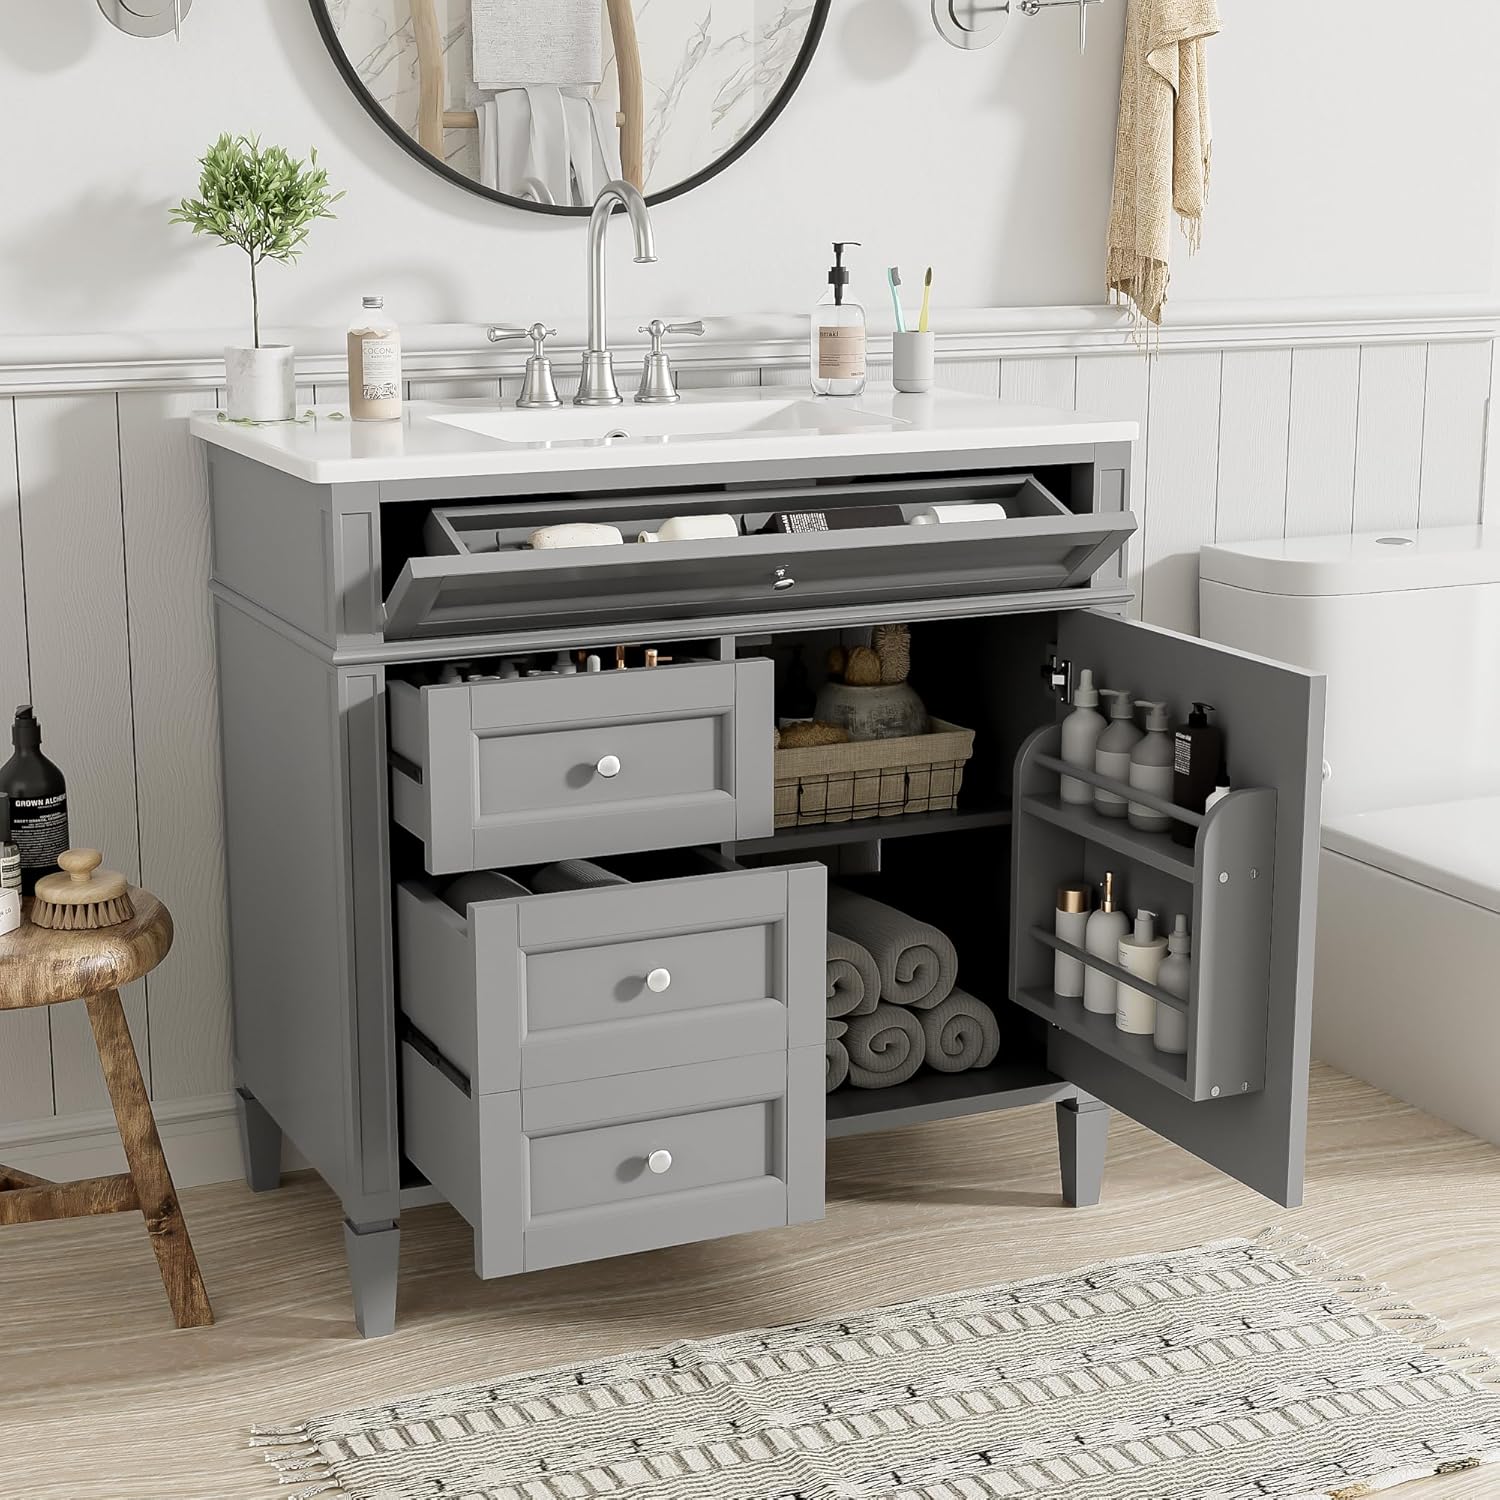
Image 1.1: The Linique 36-inch Bathroom Vanity with Sink Combo Set, showcasing its open storage compartments, including drawers, a tip-out drawer, and a cabinet door organizer.
2. Sicherheitshinweise
WARNUNG: Die Nichtbeachtung dieser Sicherheitshinweise kann zu Verletzungen oder Sachschäden führen.
- Befolgen Sie die Montageanleitung stets sorgfältig.
- Secure the vanity to the wall using appropriate anchoring hardware to prevent tip-over.
- Halten Sie Kinder und Haustiere vom Versammlungsbereich fern.
- Use caution when handling heavy components, especially the ceramic sink. Two people are recommended for lifting.
- Ensure all connections for plumbing are secure and watertight to prevent leaks.
- Überladen Sie Schubladen und Regale nicht.
- Avoid using harsh chemicals or abrasive cleaners on any part of the vanity.
3. Packungsinhalt
Prüfen Sie vor Beginn der Montage, ob alle Komponenten vorhanden sind. Sollten Teile fehlen oder beschädigt sein, wenden Sie sich bitte an den Kundendienst.
- Vanity Cabinet (Solid Wood Frame)
- Keramikwaschbecken
- Drawers (pre-assembled or requiring minor assembly)
- Tip-Out Drawer Mechanism
- Cabinet Door with Organizer
- Hardware Pack (screws, cam locks, dowels, drawer slides, handles, wall anchors)
- Verstellbares Regal
Hinweis: Armatur und Ablaufgarnitur sind nicht im Lieferumfang enthalten und müssen separat erworben werden.
4. Spezifikationen
| Besonderheit | Detail |
|---|---|
| Marke | Linique |
| Technische Daten | 36"T x 18.2"B x 33.78"H |
| Rahmenmaterial | Holz |
| Montagetyp | Freistehend |
| Türstil | Sanfter Verschluss |
| Artikelgewicht | 113.54 Pfund |
| Montage erforderlich | Ja |
| Spülentyp | Keramik Basin |
| Wasserhahnlöcher | 4" Pre-Drilled |

Image 4.1: Detailed dimensions of the Linique 36-inch Bathroom Vanity, including height, width, and depth measurements for the cabinet and sink.
5. Aufbau und Montage
Assembly is required for this vanity. Please follow the step-by-step instructions provided in the included assembly guide. The following is a general overview.
5.1 Benötigtes Werkzeug (nicht im Lieferumfang enthalten)
- Kreuzschlitzschraubendreher
- Flachkopfschraubenzieher
- Verstellbarer Schraubenschlüssel
- Ebene
- Drill (for wall anchors)
- Silicone Sealant (for sink installation)
5.2 Montageschritte
- Auspacken und prüfen: Carefully remove all components from the packaging. Lay them out on a clean, soft surface to prevent scratches. Verify all parts against the parts list in your detailed assembly guide.
- Montage des Schrankrahmens: Follow the specific instructions to connect the side panels, back panel, and base of the vanity cabinet using the provided hardware (cam locks, dowels, screws). Ensure all connections are tight and the frame is square.
- Schubladenschienen montieren: Attach the drawer slides to the cabinet interior according to the guide. Ensure they are level and properly aligned for smooth drawer operation.
- Schubladen zusammenbauen: If drawers are not pre-assembled, follow instructions to put them together and attach the drawer fronts and handles. Insert the assembled drawers onto the slides.
- Schranktür einbauen: Attach the soft-closing hinges to the cabinet door and then to the cabinet frame. Adjust hinges as needed for proper door alignment. Install the cabinet door organizer if it is a separate component.
- Spülbeckenplatte platzieren: Carefully place the ceramic sink top onto the assembled vanity cabinet. Apply a bead of silicone sealant around the top edge of the cabinet where the sink will rest to secure it and prevent water infiltration.
- Wasserhahn und Abfluss installieren: Install your chosen faucet and drain assembly into the pre-drilled holes on the ceramic sink top. Follow the manufacturer's instructions for your specific faucet and drain.
- Sanitäranschlüsse: Connect the water supply lines to the faucet and the drain pipe to the P-trap. Ensure all connections are hand-tightened, then use a wrench for a final snug turn. Check for leaks after turning on the water supply.
- An der Wand befestigen: Position the vanity against the wall. Use a level to ensure it is straight. Mark the locations for wall anchors through the vanity's back panel. Drill pilot holes, insert wall anchors, and secure the vanity to the wall using the provided screws. This step is crucial for stability and safety.
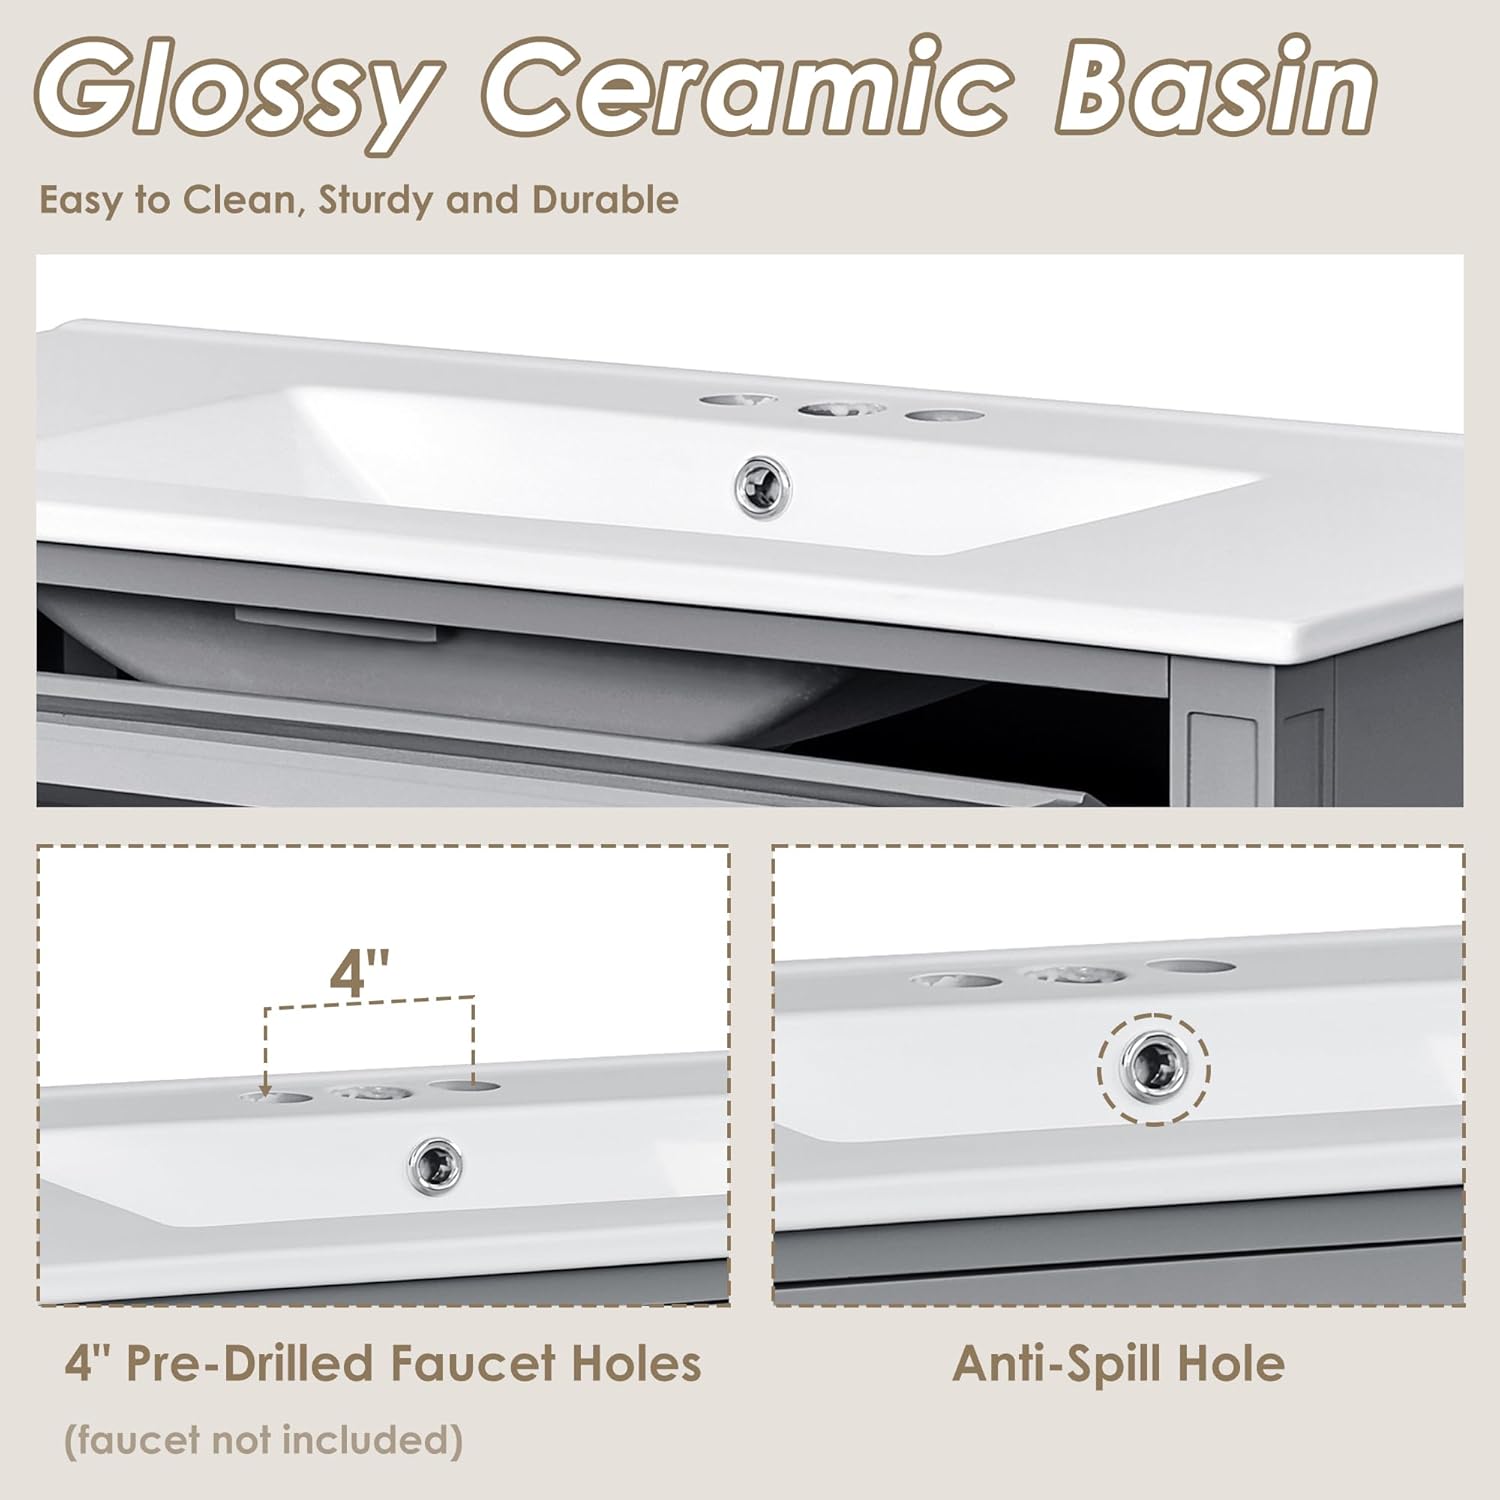
Image 5.1: Detail of the glossy ceramic basin, highlighting the 4-inch pre-drilled faucet holes and the anti-spill overflow hole for easy faucet installation.
6. Bedienung
The Linique vanity is designed for ease of use and efficient storage.
6.1 Schubladen
The vanity features two main drawers and one tip-out drawer. The main drawers operate on smooth slide rails for easy opening and closing. The tip-out drawer provides convenient access to smaller items directly below the sink.
6.2 Soft-Closing Cabinet Door
The cabinet door is equipped with soft-closing hinges, which prevent slamming and reduce noise. The integrated organizer on the inside of the door provides additional storage for bottles and smaller items.
6.3 verstellbare Ablage
The interior cabinet includes an adjustable shelf, allowing you to customize storage space to fit various item heights. To adjust, remove the shelf, reposition the shelf pins to the desired height, and reinsert the shelf.

Bild 6.1: Nahaufnahme view illustrating the multifunctional storage options: the tip-out drawer, the cabinet door organizer, and the adjustable shelf within the main cabinet.
7. Wartung
Proper care will ensure the longevity and appearance of your Linique vanity.
- Reinigung des Schranks: Wischen Sie den Holzrahmen mit einem weichen, fusselfreien Tuch ab.amp Mit einem sauberen Tuch abtrocknen. Vermeiden Sie Scheuermittel oder aggressive Chemikalien, die die Oberfläche beschädigen können.
- Reinigung des Keramikwaschbeckens: Reinigen Sie die Keramikasin Mit milder Seife und Wasser reinigen. Bei hartnäckigeren Flecken einen nicht scheuernden Badreiniger verwenden. Gründlich abspülen und trocken wischen, um Wasserflecken zu vermeiden.
- Verschüttungen: Wipe up any water spills on the vanity surface immediately to prevent water damage to the wood.
- Hardware: Überprüfen Sie regelmäßig alle Schrauben und Verbindungen, um sicherzustellen, dass sie fest sitzen. Ziehen Sie sie gegebenenfalls nach.
- Vermeiden Sie übermäßige Feuchtigkeit: Ensure proper ventilation in the bathroom to prevent excessive humidity, which can affect wood furniture.
8. Fehlerbehebung
If you encounter issues with your vanity, refer to the following common solutions:
| Problem | Mögliche Ursache | Lösung |
|---|---|---|
| Vanity wobbles or is not level | Uneven floor; loose connections; not secured to wall | Adjust leveling feet (if present) or place shims under the base. Ensure all assembly screws are tightened. Verify the vanity is securely anchored to the wall. |
| Die Schubladen lassen sich nicht leichtgängig öffnen und schließen. | Misaligned drawer slides; debris in slides; overloaded drawer | Check that drawer slides are properly installed and aligned. Clean any dust or debris from the slides. Reduce the weight in the drawer. |
| Die Schranktür schließt nicht richtig. | Falsch ausgerichtete Scharniere; Blockierung | Adjust the soft-closing hinges using a screwdriver to align the door. Ensure nothing is obstructing the door's path. |
| Wasser tritt an den Rohrleitungsanschlüssen aus | Loose connections; improper sealant; damaged washer | Tighten all plumbing connections. Ensure proper use of plumber's tape or sealant. Check and replace any damaged washers. If leaks persist, consult a professional plumber. |
9. Garantieinformationen
Linique products are manufactured with quality and care. This product comes with a standard manufacturer's warranty covering defects in materials and workmanship under normal use. Please refer to the warranty card included with your purchase or contact Linique customer service for specific warranty terms and conditions.
10. Kundendienst
For further assistance, missing parts, or warranty claims, please contact Linique customer support through the retailer where the product was purchased or visit the official Linique webWebsite für Kontaktinformationen.
Bitte halten Sie bei Kontaktaufnahme mit dem Support Ihre Produktmodellnummer und das Kaufdatum bereit.


