1. Einleitung
This manual provides essential information for the safe and efficient operation of your TELLUR Obia PRO 60W Bluetooth Speaker. Please read this manual thoroughly before using the product and retain it for future reference.
2. Sicherheitshinweise
- Setzen Sie den Lautsprecher nicht über längere Zeiträume extremen Temperaturen oder direkter Sonneneinstrahlung aus.
- Vermeiden Sie, den Lautsprecher fallen zu lassen oder starken Stößen auszusetzen.
- Versuchen Sie nicht, den Lautsprecher zu zerlegen oder zu verändern. Dadurch erlischt die Garantie.
- Halten Sie den Lautsprecher von medizinischen Geräten fern.
- Um die IPX6-Wasserbeständigkeit zu gewährleisten, muss die Abdeckung des Ladeanschlusses in der Nähe von Wasser sicher geschlossen sein.
- Verwenden Sie ausschließlich das angegebene Ladekabel und Netzteil.
3. Packungsinhalt
Überprüfen Sie, ob alle Artikel im Paket vorhanden sind:
- TELLUR Obia PRO 60W Bluetooth Speaker
- USB-Ladekabel
- 3.5-mm-AUX-Audiokabel
- Benutzerhandbuch (dieses Dokument)
4. Produktüberschreitungview und Kontrollen
Familiarize yourself with the speaker's components and control buttons.

Abbildung 4.1: Front view of the TELLUR Obia PRO speaker, showcasing the main grille, control panel, and integrated LED lights on the handle and side woofers.
4.1 Systemsteuerung

Abbildung 4.2: Detaillierte view of the control buttons located on the top panel of the speaker.
- Lautstärke verringern (-) / Vorheriger Titel: Kurz drücken, um die Lautstärke zu verringern. Gedrückt halten, um zum vorherigen Titel zu springen.
- Lautstärke erhöhen (+) / Nächster Titel: Press briefly to increase volume. Press and hold to go to the next track.
- LED Light Mode Button: Press to cycle through different LED light modes.
- Netzschalter: Press and hold to power on/off. Briefly press to play/pause music.
- TWS (True Wireless Stereo) Button: Press to activate TWS pairing mode.
- Modus-Taste (M): Drücken Sie diese Taste, um zwischen Bluetooth-, USB- und AUX-Eingangsmodi umzuschalten.
4.2 Eingangs-/Ausgangsports
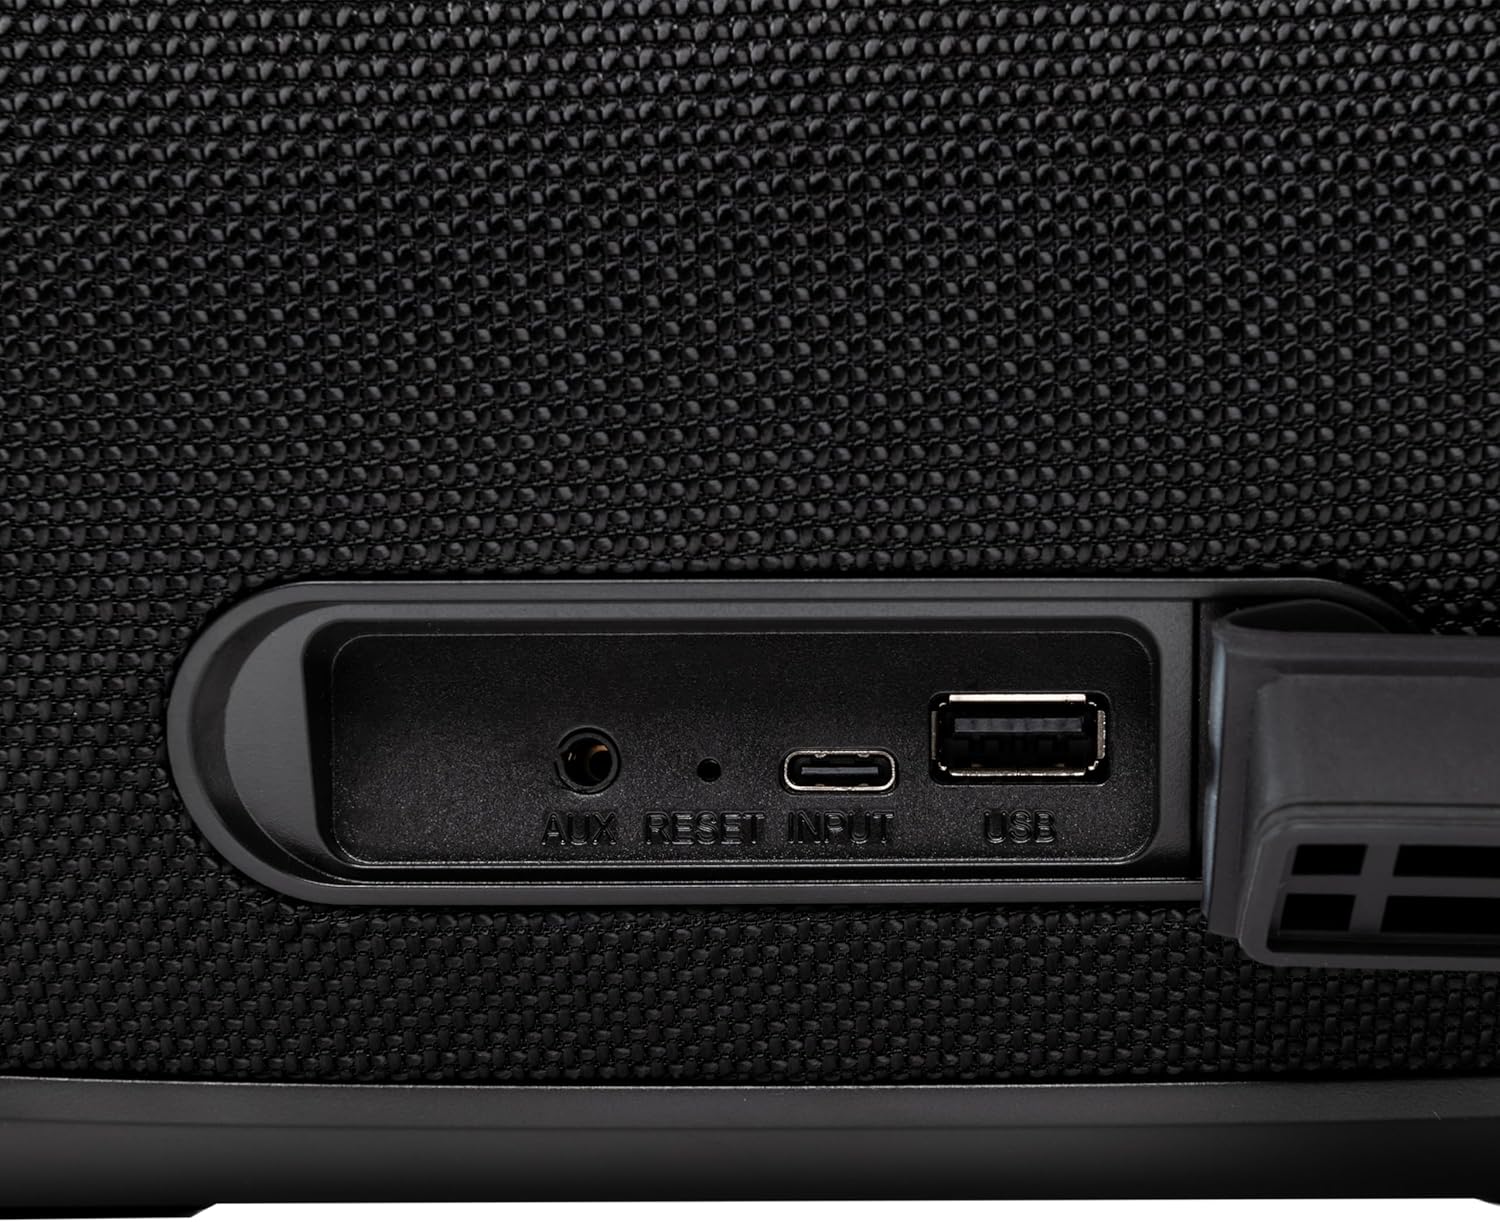
Abbildung 4.3: Close-up of the protected input/output ports on the rear of the speaker.
- AUX-IN-Anschluss: Zum Anschluss externer Audiogeräte über ein 3.5-mm-Audiokabel.
- Reset-Taste: Use a thin object to press and reset the speaker if necessary.
- USB-C-Eingang: Zum Aufladen des Lautsprechers.
- USB-A-Anschluss: Zum Abspielen von MP3-Audiodateien files from a USB drive or for power bank functionality.
5. Einrichtung
5.1 Aufladen des Lautsprechers
Before initial use, fully charge the speaker. The speaker also functions as a power bank to charge other devices via its USB-A port.
- Connect the USB charging cable to the USB-C input port on the speaker.
- Verbinden Sie das andere Ende des Kabels mit einem kompatiblen USB-Netzteil (nicht im Lieferumfang enthalten).
- The charging indicator light will illuminate. It will turn off once charging is complete.
- The battery level can be displayed on your connected phone when paired via Bluetooth.
5.2 Ein-/Ausschalten
- So schalten Sie das Gerät ein: Halten Sie die Netzschalter for approximately 3 seconds until you hear an audible prompt and the LED lights activate.
- So schalten Sie das Gerät aus: Halten Sie die Netzschalter for approximately 3 seconds until you hear an audible prompt and the LED lights turn off.
6. Bedienungsanleitung
6.1 Bluetooth-Kopplung
The speaker uses Bluetooth v5.3 for stable wireless connection up to 10 meters.
- Ensure the speaker is powered on and in Bluetooth mode (indicated by a flashing blue LED). If not, press the Modus-Taste (M) um in den Bluetooth-Modus zu wechseln.
- Aktivieren Sie Bluetooth auf Ihrem Mobilgerät (Smartphone, Tablet usw.).
- Suchen nach verfügbare Bluetooth-Geräte auswählenTELLUR Obia PRO" von der Liste.
- Once paired, the speaker will emit an audible confirmation, and the blue LED will stop flashing.
- Der Lautsprecher verbindet sich beim Einschalten automatisch wieder mit dem zuletzt gekoppelten Gerät, sofern verfügbar.

Abbildung 6.1: The TELLUR Obia PRO speaker wirelessly connected to a smartphone, ready for audio playback.
6.2 True Wireless Stereo (TWS) Funktion
TWS allows you to pair two Obia PRO speakers for a stereo sound experience.
- Ensure both Obia PRO speakers are powered on and in Bluetooth mode, but not yet paired with any device.
- Drücken Sie bei einem Lautsprecher (dies ist der Hauptlautsprecher) die Taste TWS-Taste. The speaker will enter TWS pairing mode, indicated by a flashing light.
- The two speakers will automatically connect to each other. Once connected, you will hear an audible confirmation, and the TWS indicator light on both speakers will become solid.
- Now, connect your mobile device to the primary speaker via Bluetooth as described in Section 6.1. The audio will play in stereo across both speakers.
6.3 Multiple Link Technology
This technology allows connecting an unlimited number of Obia PRO speakers wirelessly for a synchronized audio experience. Refer to the manufacturer's website or specific instructions for detailed setup of Multiple Link.
6.4 USB-Wiedergabe (MP3)
MP3-Audio abspielen files directly from a USB flash drive (up to 128GB).
- Stecken Sie einen USB-Stick mit MP3 ein files in den USB-A-Anschluss.
- Drücken Sie die Modus-Taste (M) to switch to USB mode. The speaker will automatically begin playing music from the USB drive.
- Verwenden Sie die Lautstärke erhöhen/verringern Und Netzschalter (for play/pause) to control playback.
6.5 AUX-IN-Anschluss
Connect non-Bluetooth devices using the 3.5mm AUX audio cable.
- Connect one end of the 3.5mm AUX audio cable to the AUX-IN port on the speaker.
- Verbinden Sie das andere Ende mit der Audioausgangsbuchse Ihres externen Geräts (z. B. MP3-Player, Laptop).
- Drücken Sie die Modus-Taste (M) um in den AUX-Modus zu wechseln.
- Steuern Sie Wiedergabe und Lautstärke über Ihr externes Gerät.
6.6 Freisprechen
When connected to a smartphone via Bluetooth, the speaker's built-in microphone allows for hands-free calls.
- Anruf annehmen/beenden: Drücken Sie kurz die Netzschalter.
- Anruf ablehnen: Halten Sie die Netzschalter für 2 Sekunden.
6.7 LED-Lichtmodi
The speaker features integrated LED lights with multiple display modes.
- Drücken Sie die LED-Lichtmodus-Taste to cycle through available light patterns and colors.
- Halten Sie die LED-Lichtmodus-Taste to turn the lights off or on.

Abbildung 6.2: A user interacting with the LED light mode button to change the speaker's lighting effects.
6.8 Equalizer Settings (Indoor/Outdoor)
The speaker allows for equalizer customization for different environments. Specific controls for this are not detailed in the provided data, but typically involve a dedicated button or a combination of existing buttons. Refer to the product's quick start guide or manufacturer's website for precise instructions on adjusting the equalizer.
7. Wartung
7.1 Reinigung
- Wischen Sie den Lautsprecher mit einem weichen, trockenen Tuch ab.
- Verwenden Sie keine Scheuermittel, Alkohol oder chemische Lösungsmittel.
7.2 Wasserdichtigkeit (IPX6)
The Obia PRO speaker is rated IPX6, meaning it is protected against high-pressure water jets from any direction. This makes it suitable for outdoor use and environments where it might be exposed to splashes or rain.
- Ensure the rubber cover for the charging and AUX ports is securely closed before exposing the speaker to water.
- Tauchen Sie den Lautsprecher nicht in Wasser.
- Nach Kontakt mit Wasser sollte der Lautsprecher vor dem Aufladen trocken gewischt werden.
7.3 Batteriepflege
- Um die Lebensdauer des Akkus zu verlängern, vermeiden Sie häufiges vollständiges Entladen des Akkus.
- Laden Sie den Lautsprecher regelmäßig auf, auch wenn er nicht benutzt wird, um die Batterieleistung zu erhalten.
- Bewahren Sie den Lautsprecher an einem kühlen, trockenen Ort auf, wenn er längere Zeit nicht benutzt wird.
8. Fehlerbehebung
| Problem | Mögliche Ursache | Lösung |
|---|---|---|
| Der Lautsprecher lässt sich nicht einschalten. | Schwache Batterie. | Laden Sie den Lautsprecher vollständig auf. |
| Kopplung via Bluetooth nicht möglich. | Lautsprecher nicht im Kopplungsmodus; Bluetooth-Verbindung des Geräts deaktiviert; zu große Entfernung zum Lautsprecher. | Ensure speaker is in Bluetooth mode (flashing LED). Turn on Bluetooth on your device. Move device closer to speaker (within 10m). |
| Kein Ton. | Lautstärke zu niedrig; falscher Modus ausgewählt; Gerät gibt keine Wiedergabe wieder. | Lautstärke von Lautsprecher und Gerät erhöhen. Drücken Modus-Taste (M) to select correct input. Ensure audio is playing on the connected device. |
| TWS-Kopplung fehlgeschlagen. | Speakers already paired to a device; not both Obia PRO models. | Disconnect both speakers from any Bluetooth devices. Ensure both speakers are Obia PRO models. Try TWS pairing again. |
| USB-Wiedergabe funktioniert nicht. | USB-Laufwerk nicht korrekt formatiert; nicht unterstützt file type; drive capacity too large. | Ensure USB drive is formatted to FAT32. Only MP3 files are supported. Max capacity 128GB. |
9. Spezifikationen
| Modellname | Obia PRO |
| Marke | TELLUR |
| Ausgangsleistung | 60W (2x 20W RMS subwoofers, 2x 10W RMS tweeters) |
| Bluetooth-Version | Version 5.3 |
| Drahtlose Reichweite | Bis zu 10 Meter |
| Frequenzgang | 80 MHz (Note: This value is unusual for speaker frequency response and may be a typo in source data. Typically measured in Hz-kHz.) |
| Impedanz | 4 Ohm |
| Audiomodi | Bluetooth, USB (MP3), AUX-IN |
| USB-Unterstützung | USB 2.0/3.0, up to 128GB (MP3 format) |
| Wasserbeständigkeit | IPX6 |
| Batteriekapazität | 5400 mAh |
| Wiedergabezeit | Bis zu 12 Stunden (bei mäßiger Lautstärke) |
| Powerbank-Funktion | Yes, via USB-A port |
| Abmessungen (L x B x H) | 37.7 x 17 x 18 cm |
| Gewicht | 3.48 kg |
| Material | Plastik |
| Farbe | Schwarz |
Hinweis: Spezifikationen können ohne vorherige Ankündigung geändert werden.
10. Garantie und Support
TELLUR products are manufactured to the highest quality standards. For information regarding warranty terms, technical support, or service, please refer to the warranty card included with your product or visit the official TELLUR webWebsite.
Kontaktinformationen: Besuchen Sie www.tellur.com für die neuesten Supportinformationen.