Einführung
This manual provides comprehensive instructions for the safe and effective use of your Zoom H4essential 4-Track Handy Recorder. Please read this manual thoroughly before operating the device to ensure optimal performance and to prevent damage.
The Zoom H4essential is a versatile 4-track handy recorder designed for musicians, podcasters, and filmmakers. It features 32-bit float recording technology, built-in stereo microphones, and two XLR/TRS combo inputs, offering high-quality audio capture and flexible connectivity.
Packungsinhalt
Überprüfen Sie, ob alle Artikel im Paket vorhanden sind:
- Zoom H4essential Handy Recorder (ZH4)
- Benutzerhandbuch (dieses Dokument)
Gerät überview
Familiarize yourself with the various components and controls of the H4essential recorder.

Abbildung 1: Front view of the Zoom H4essential Handy Recorder, showing the color LCD screen, built-in stereo microphones, and control buttons.
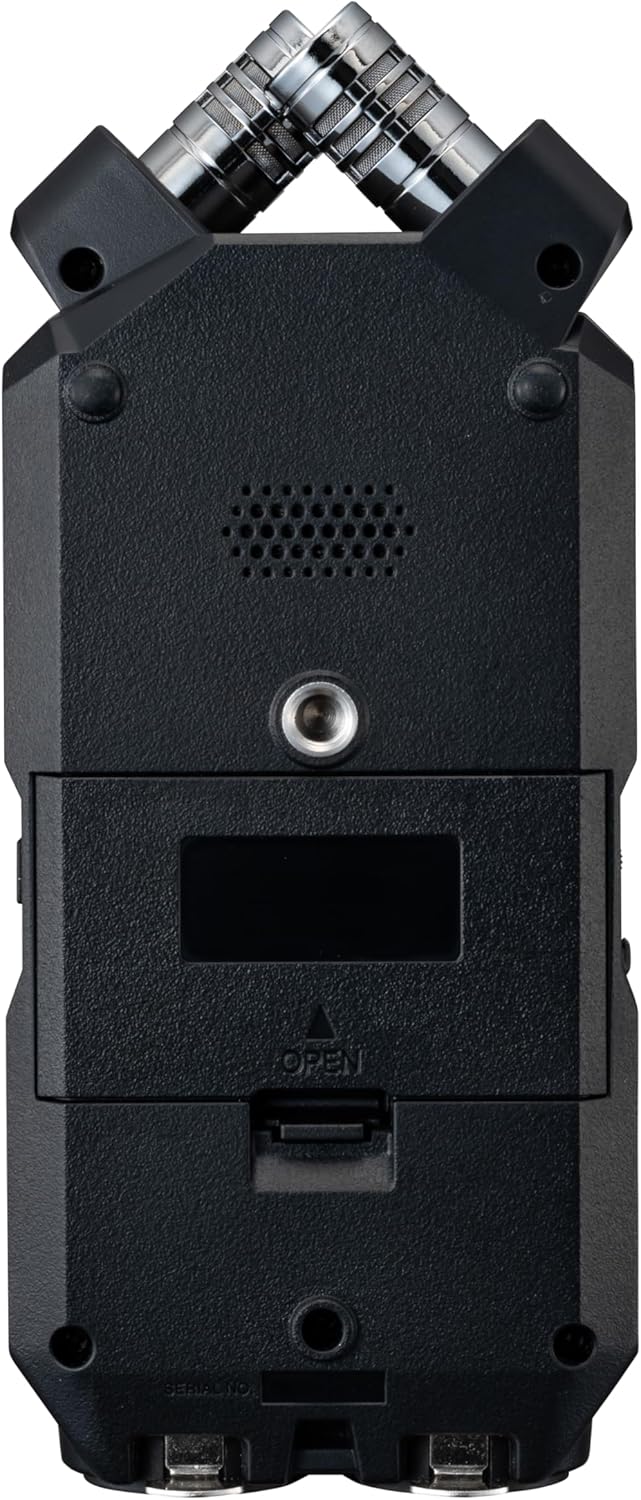
Abbildung 2: Detaillierte Front view of the Zoom H4essential, highlighting the built-in X/Y stereo microphones and the main display.

Abbildung 3: Abgewinkelt view of the H4essential, displaying the active recording interface on the color LCD screen and the two XLR/TRS combo inputs at the bottom.

Abbildung 4: Linke Seite view of the H4essential, featuring the USB-C port for power and data transfer, and the HOLD switch to prevent accidental operation.
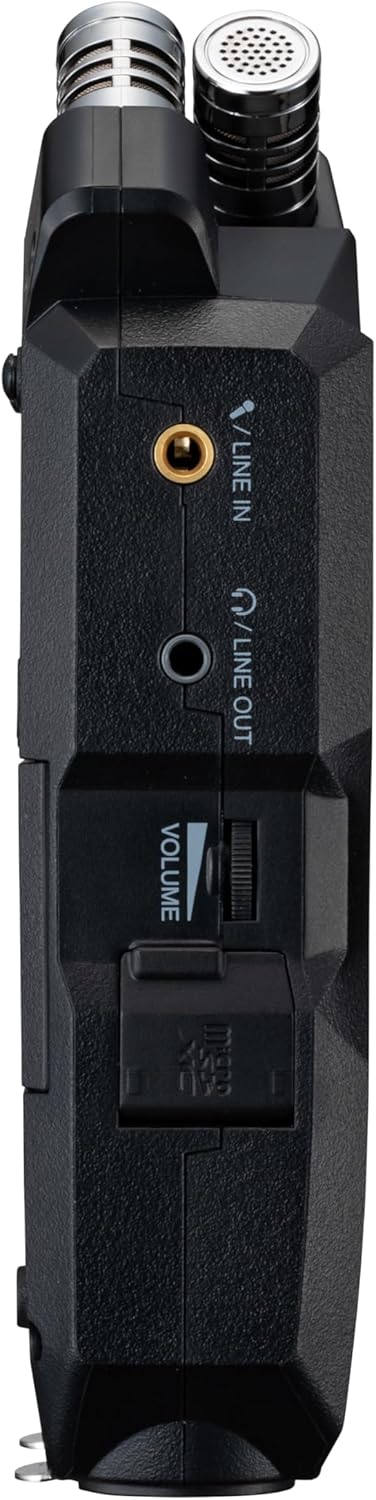
Abbildung 5: Rechte Seite view of the H4essential, showing the 3.5mm LINE IN and LINE OUT jacks, and the volume control wheel.

Abbildung 6: Hinteren view of the H4essential with the battery compartment open, revealing slots for two AA batteries.
Aufstellen
1. Gerät einschalten
The H4essential can be powered by two AA batteries or via USB power.
- Einlegen der Batterie: Open the battery compartment on the rear of the device (refer to Figure 6). Insert two AA batteries, ensuring correct polarity. Lithium batteries are recommended for extended operation, providing up to 20 hours of continuous recording.
- USB-Stromversorgung: Connect the H4essential to a USB power source (e.g., computer, USB wall adapter) using a compatible USB cable. The device can operate without batteries when connected to USB power.
2. Einlegen einer SD-Karte
The H4essential records audio directly to an SD card. A compatible SD card (up to 1TB capacity) is required for recording.
- Suchen Sie den SD-Kartensteckplatz auf dem Gerät.
- Insert the SD card firmly until it clicks into place.
- To remove, push the SD card in again until it springs out.
Notiz: Ensure the SD card is formatted by the H4essential before first use to guarantee compatibility and optimal performance. Refer to the "Operating" section for formatting instructions.
3. Connecting Microphones and Line Sources
The H4essential offers various input options:
- Eingebaute Stereomikrofone: The device features integrated X/Y stereo microphones for immediate recording.
- XLR/TRS Combo Inputs (Inputs 1 & 2): Connect external microphones or line-level sources using XLR or 1/4-inch TRS cables. These inputs are located at the bottom of the device (refer to Figure 3).
- Stereo Mini-Jack Input (LINE IN): Connect a 3.5mm stereo mini-jack cable for external line-level sources, such as a lavalier microphone receiver or a music player. This input is on the right side of the device (refer to Figure 5).

Abbildung 7: A user connecting XLR cables to the combo inputs of the H4essential, demonstrating external microphone connectivity.
Bedienungsanleitung
1. Grundlegende Aufnahme
The H4essential utilizes 32-bit float recording, which significantly simplifies the recording process by eliminating the need for manual gain adjustment and preventing digital clipping.
- Einschalten: Halten Sie den Ein-/Ausschalter gedrückt, bis das Display aufleuchtet.
- Eingaben auswählen: Use the dedicated buttons (e.g., "MIC" for built-in mics, "1" and "2" for XLR/TRS inputs) to arm the desired recording tracks. The armed tracks will show active level meters on the display.
- Aufnahme starten: Drücken Sie die AUFNAHME button (red circle) to begin recording. The recording indicator will illuminate, and the time counter will start.
- Aufnahme beenden: Drücken Sie die AUFNAHME Drücken Sie erneut die Taste, um die Aufnahme zu beenden. Die Aufnahme file will be saved to the SD card.
- Wiedergabe: Use the playback controls (Play/Pause, Fast Forward, Rewind) to review Ihre Aufnahmen.

Abbildung 8: The H4essential display during recording, showing real-time audio waveforms and recording duration.
Benefit of 32-bit Float: With 32-bit float recording, you do not need to worry about setting input levels precisely. The recorder captures a vast dynamic range, allowing you to adjust levels in post-production without introducing noise or clipping.
2. Navigation auf der Benutzeroberfläche
The H4essential features a 2.0" full-color LCD and an intuitive interface for managing settings and files.
- Hauptanzeige: Shows recording levels, time, battery status, and armed tracks.
- Navigationssteuerung: Use the directional buttons and "ENTER" button (typically a scroll wheel or joystick on the side, as suggested by reviews) to navigate menus and select options.
- MIXER Button: Accesses the internal mixer for monitoring and basic level adjustments.
- Zugänglichkeitsfunktionen: The device includes accessibility options for vision-impaired users, such as guide sounds. These can be configured in the system settings.

Abbildung 9: The H4essential display showing the "Accessibility" menu, which includes options like "Guide Sound" and "Volume".
3. File Management and USB Functions
Aufgezeichnet files are automatically organized into folders by date and time on the SD card.
- Übertragen Files: Connect the H4essential to a computer via USB. The device will appear as a mass storage device, allowing you to drag and drop files von der SD-Karte auf Ihren Computer.
- USB-Audio-Schnittstelle: The H4essential can function as a USB audio interface, enabling direct recording to a computer or use with live streaming applications. Select the "Audio Interface" mode when prompted upon USB connection.
4. Power Saving Modes
To conserve battery life, the H4essential offers power-saving features:
- Displaydimmung: The display can be set to dim after a period of inactivity.
- Automatisches Ausschalten: The device can be configured to automatically power off after a set duration of non-use.
These settings can be adjusted in the system menu.
Wartung
- Reinigung: Reinigen Sie die Außenseite des Geräts mit einem weichen, trockenen Tuch. Verwenden Sie keine Scheuermittel oder Lösungsmittel.
- Lagerung: Store the H4essential in a cool, dry place away from direct sunlight and extreme temperatures. Remove batteries if the device will not be used for an extended period.
- Firmware-Updates: Periodically check the official Zoom website for firmware updates. Keeping your device's firmware up-to-date can improve performance and add new features.
Fehlerbehebung
| Problem | Mögliche Ursache | Lösung |
|---|---|---|
| Gerät lässt sich nicht einschalten. | Low or depleted batteries; incorrect battery installation; no USB power. | Replace batteries, ensure correct polarity, or connect to a reliable USB power source. |
| Es wurde kein Ton aufgezeichnet. | Inputs not armed; microphone/line source not connected properly; SD card full or unformatted. | Ensure desired inputs are armed; check cable connections; format SD card or insert a new one. |
| Recorded audio sounds distorted or noisy. | External microphone issues; environmental noise; incorrect settings (less likely with 32-bit float). | Check external microphone functionality; record in a quieter environment; ensure proper input selection. While 32-bit float minimizes clipping, extreme input levels can still affect sound quality. |
| Device freezes or behaves unexpectedly. | Firmware issue; temporary software glitch. | Perform a soft reset (power off and on). If the issue persists, check for and install the latest firmware update from the official Zoom website. If problems continue, contact customer support. |
| SD-Karte wird nicht erkannt. | Incorrectly inserted; incompatible card; card corruption. | Reinsert the SD card; ensure it is a compatible type and capacity (up to 1TB); try formatting the card (this will erase all data); try a different SD card. |
Technische Daten
| Besonderheit | Detail |
|---|---|
| Modellnummer | ZOZH4E |
| Aufnahmeformat | 32-bit Float WAV |
| Mikrofone | Built-in X/Y Stereo Microphones |
| Eingänge | 2 x XLR/TRS Combo Jacks, 1 x 3.5mm Stereo Mini-Jack (LINE IN) |
| Ausgaben | 1 x 3.5mm Stereo Mini-Jack (LINE OUT/Headphones) |
| Speichermedien | SD Card (up to 1TB supported) |
| USB-Schnittstelle | USB-C for data transfer and audio interface functionality |
| Stromversorgung | 2 x AA Batteries (Lithium recommended), USB Bus Power |
| Akkulaufzeit | Up to 20 hours (with lithium batteries) |
| Abmessungen (B x T x H) | 7.87 x 3.9 x 1.8 Zoll |
| Gewicht | 5.1 Unzen (ohne Batterien) |
| Anzeige | 2.0" Full-Color LCD |
| Farbe | Schwarz |
| Kompatible Geräte | Personal Computer, Laptop, Tablet, Smartphone |
Garantie und Support
Garantieinformationen
For detailed warranty information, please refer to the warranty card included with your product or visit the official Zoom webBewahren Sie Ihren Kaufbeleg für Garantieansprüche auf.
Kundenservice
If you encounter any issues not covered in this manual or require further assistance, please contact Zoom customer support. Support contact details can typically be found on the official Zoom webWebsite:


