Einführung
Vielen Dank für Ihren Einkauf.asing the DELTACO Gaming Nintendo Switch Bluetooth Controller (GAM-149-T). This manual provides detailed instructions on how to set up, operate, maintain, and troubleshoot your new controller. Please read this manual carefully before use and keep it for future reference.
Sicherheitshinweise
- Setzen Sie den Controller keinen extremen Temperaturen, hoher Luftfeuchtigkeit oder direkter Sonneneinstrahlung aus.
- Vermeiden Sie es, den Controller fallen zu lassen oder starken Stößen auszusetzen.
- Versuchen Sie nicht, den Controller zu zerlegen oder zu verändern. Dadurch erlischt die Garantie.
- Halten Sie den Controller von Wasser und anderen Flüssigkeiten fern.
- Verwenden Sie ausschließlich das angegebene Ladekabel und die angegebene Stromquelle.
- Außerhalb der Reichweite von kleinen Kindern aufbewahren.
Packungsinhalt
Bitte überprüfen Sie, ob alle Artikel im Paket vorhanden sind:
- DELTACO Gaming Nintendo Switch Bluetooth Controller (GAM-149-T)
- USB-C-Ladekabel
- Benutzerhandbuch (dieses Dokument)
Produkt überview
Familiarize yourself with the various parts of your DELTACO Gaming controller.
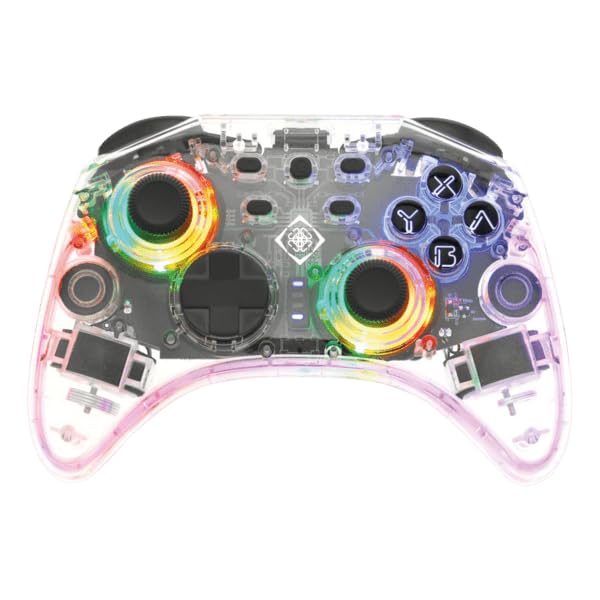
This image shows the front of the transparent controller, highlighting the joysticks, D-pad, action buttons (A, B, X, Y), and the vibrant LED lighting around the joysticks and buttons. The transparent casing allows a view der internen Schaltkreise.
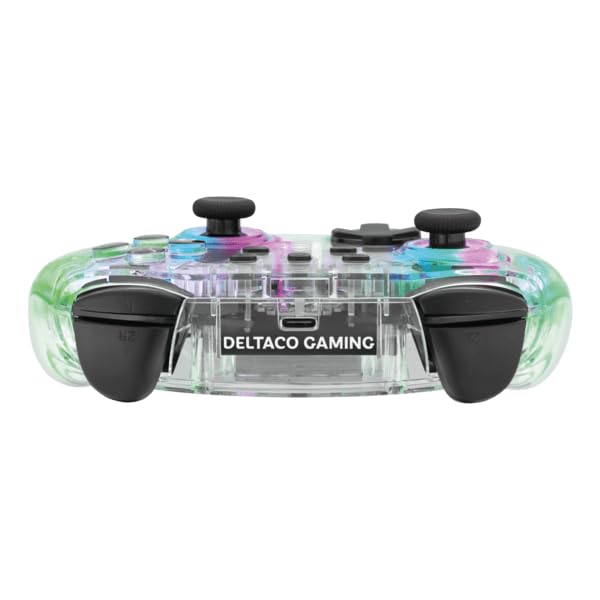
This image displays the top edge of the controller, featuring the L, R, ZL, and ZR shoulder buttons, as well as the central USB-C charging port. The transparent design is visible from this angle.
The controller features a transparent design with integrated LED lighting, dual analog sticks, a D-pad, action buttons (A, B, X, Y), shoulder buttons (L, R, ZL, ZR), and a USB-C port for charging.
Setup: Connecting to Nintendo Switch
Follow these steps to pair your DELTACO Gaming controller with your Nintendo Switch console:
- Stellen Sie sicher, dass Ihre Nintendo Switch-Konsole eingeschaltet und auf die neueste Systemsoftware aktualisiert ist.
- Wählen Sie im HOME-Menü die Option "Controller", Dann "Griff/Bestellung ändern".
- On the DELTACO Gaming controller, press and hold the Kopplungstaste (usually a small button on the top or back of the controller, consult the physical product for exact location) for a few seconds until the LED indicators start flashing rapidly.
- The console will search for available controllers. Once the DELTACO Gaming controller appears on the screen, release the Pairing Button.
- The LED indicators on the controller will become solid when successfully paired.
- You can now use your controller to navigate the Switch menu and play games.
Note: If the controller does not pair, ensure it is charged and try the pairing process again.
Bedienungsanleitung
Grundlegende Bedienelemente
- Analogsticks: Wird zur Bewegungs- und Kamerasteuerung in Spielen verwendet.
- Steuerkreuz: Zur Richtungseingabe, die häufig in Menüs oder für bestimmte Spielaktionen verwendet wird.
- A/B/X/Y-Tasten: Action buttons, functions vary by game.
- L/R/ZL/ZR-Tasten: Shoulder and trigger buttons, commonly used for attacking, aiming, or special abilities.
- Home "Button: Kehrt zum HOME-Menü der Nintendo Switch zurück.
- Screenshot-Schaltfläche: Erstellt einen Screenshot des aktuellen Spielbildschirms.
- Plus (+) / Minus (-) Tasten: Often used for in-game menus or pausing.
LED Lighting Control (if applicable)
Some controllers feature adjustable LED lighting. Refer to the specific button combinations or dedicated buttons on your controller for changing light modes or turning them off. This information is typically found on the product packaging or a small insert.
Aufladen des Controllers
To charge your DELTACO Gaming controller:
- Connect the supplied USB-C charging cable to the USB-C port on the top of the controller.
- Connect the other end of the USB-C cable to a USB power source (e.g., Nintendo Switch dock, USB wall adapter, computer USB port).
- The LED indicators on the controller will typically show charging status (e.g., blinking while charging, solid when fully charged, or turning off).
- Eine vollständige Aufladung dauert in der Regel etwa 2-3 Stunden.
Note: Do not use damaged cables or chargers.
Wartung
Reinigung
- Wipe the controller with a soft, dry, lint-free cloth.
- Bei hartnäckigen Verschmutzungen leicht dampBefeuchten Sie das Tuch mit Wasser. Verwenden Sie keine scharfen Chemikalien oder Scheuermittel.
- Ensure no liquid enters the openings or ports of the controller.
Lagerung
- Bewahren Sie den Controller an einem kühlen, trockenen Ort fern von direkter Sonneneinstrahlung und extremen Temperaturen auf.
- If storing for an extended period, ensure the controller is fully charged before storage and recharge it every few months to maintain battery health.
Fehlerbehebung
| Problem | Mögliche Lösung |
|---|---|
| Der Controller lässt sich nicht einschalten. |
|
| Der Controller lässt sich nicht mit der Switch koppeln. |
|
| Knöpfe oder Joysticks reagieren nicht. |
|
| Kurze Akkulaufzeit. |
|
Technische Daten
| Modell: | GAM-149-T |
| Konnektivität: | Bluetooth |
| Kompatibilität: | Nintendo-Schalter |
| Abmessungen: | 25 x 20 x 10 cm (ungefähr) |
| Gewicht: | 300 Gramm (ungefähr) |
| Ladeanschluss: | USB-C |
Hinweis: Technische Daten können ohne vorherige Ankündigung geändert werden.
Garantie und Support
This DELTACO Gaming product is covered by a limited warranty. For detailed warranty terms, technical support, or service inquiries, please visit the official DELTACO Gaming webBesuchen Sie die Website oder kontaktieren Sie direkt deren Kundendienst.
WebWebsite: www.deltacogaming.com
Please have your product model (GAM-149-T) and purchase information ready when contacting support.


