Einführung
Thank you for choosing the AZDOME M550 Pro 3 Channel Dash Cam. This manual provides detailed instructions for the installation, operation, and maintenance of your device. Please read this manual carefully before using the product to ensure proper functionality and safety. Keep this manual for future reference.
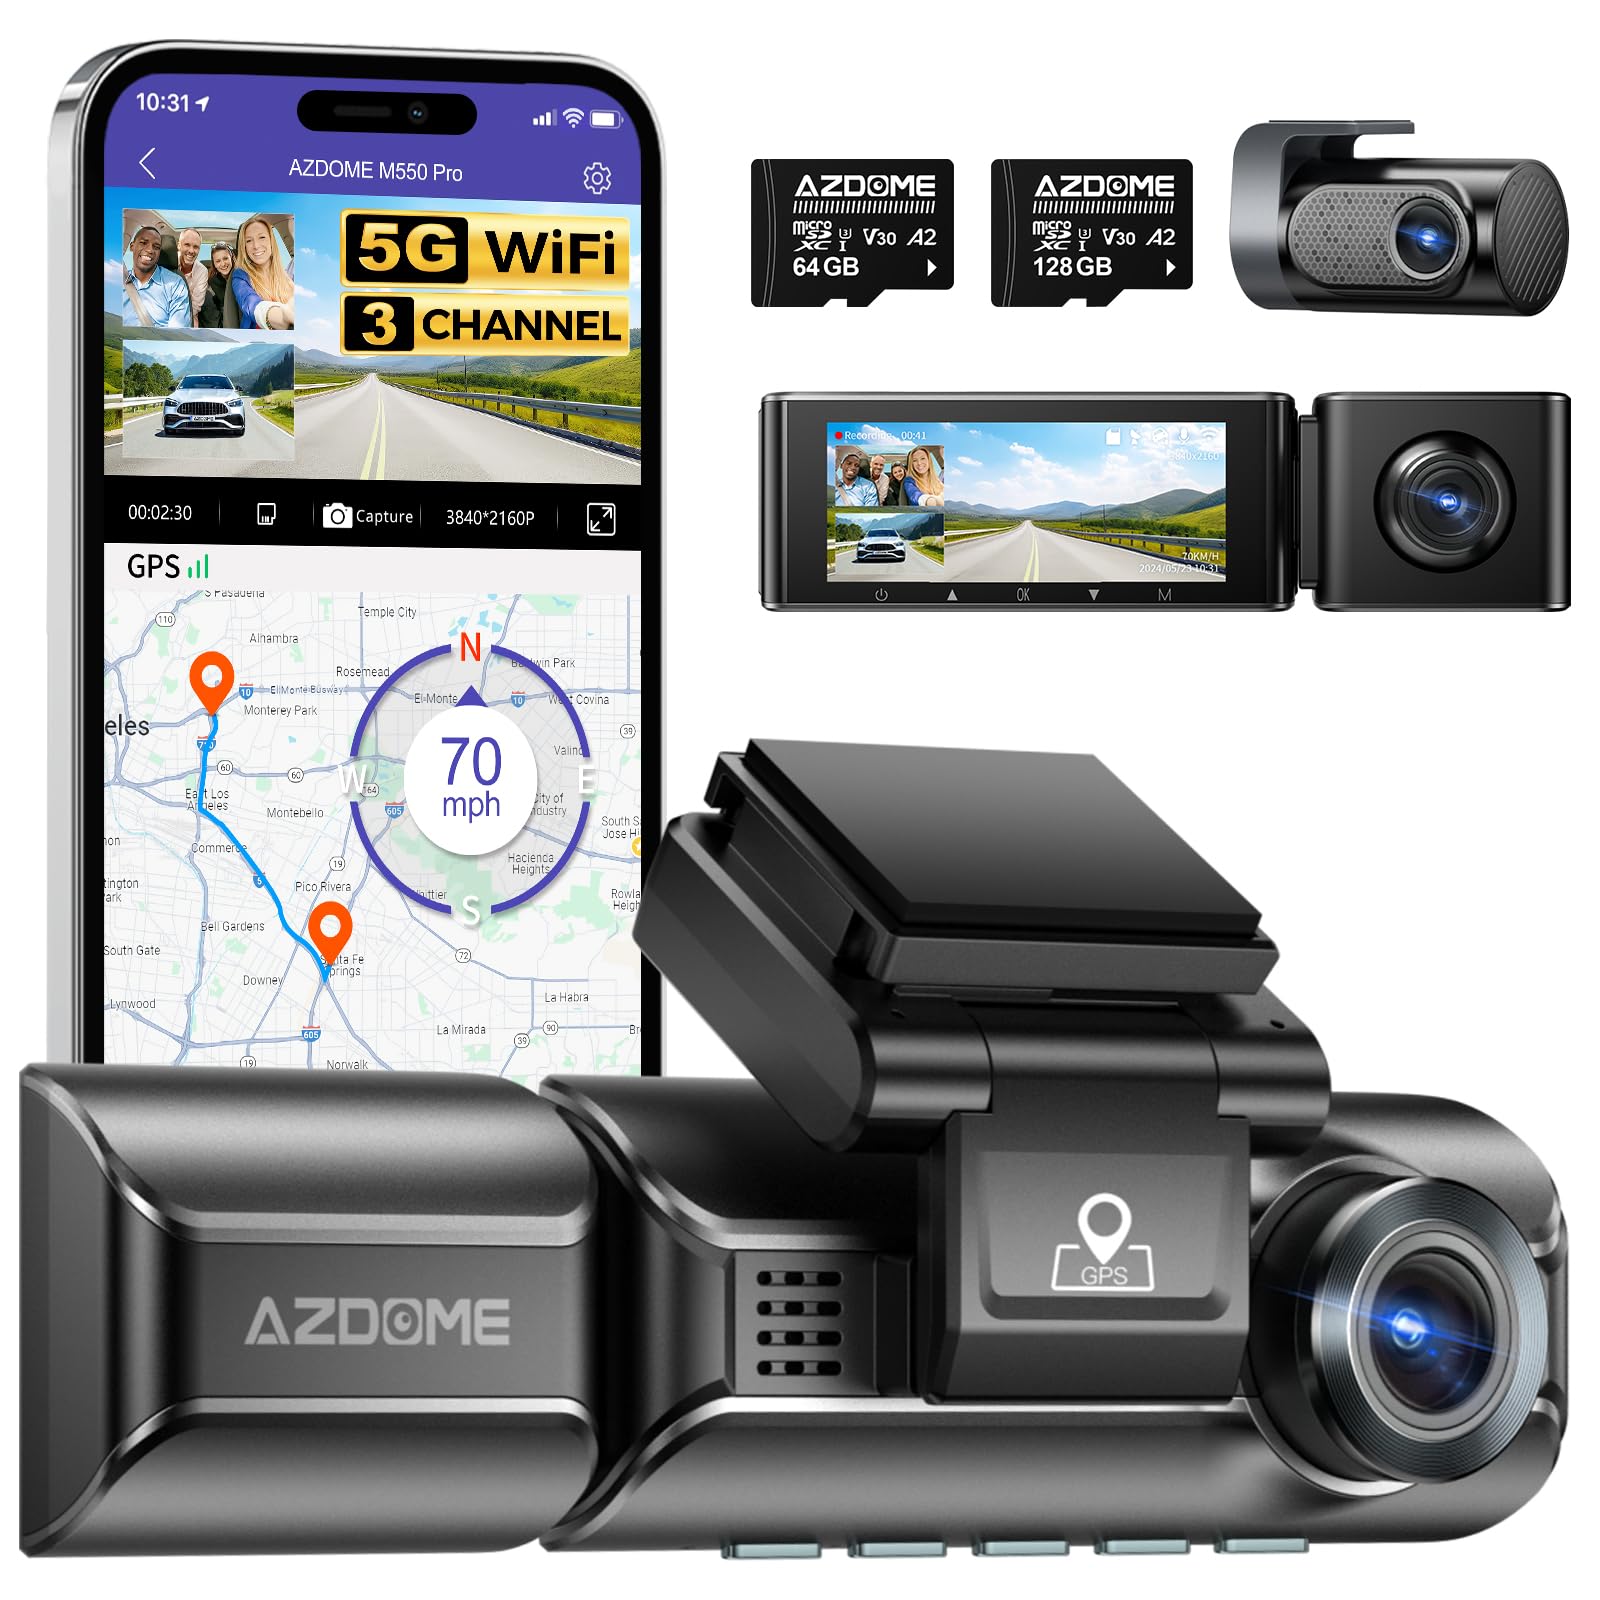
Image: The AZDOME M550 Pro dash cam, showing the main unit, interior camera, rear camera, and a smartphone displaying the companion app interface with GPS and video playback.
Packungsinhalt
Bitte überprüfen Sie den Packungsinhalt nach dem Auspacken. Sollten Artikel fehlen oder beschädigt sein, kontaktieren Sie bitte unseren Kundenservice.
- AZDOME M550 Pro Dashcam (Haupteinheit)
- Innenraumkamera
- Rückfahrkamera
- AZDOME 128GB TF Card (Memory Card)
- Stromkabel (Autoladegerät)
- Montagehalterung
- Bedienungsanleitung

Image: A close-up of the AZDOME 128GB MicroSD TF Card, included with the dash cam.
Produkt überview
The AZDOME M550 Pro is a 3-channel dash cam system designed to record video from the front, interior, and rear of your vehicle. It features a 3.19-inch IPS screen, built-in 5.8G WiFi, GPS, and various parking monitoring modes.
Main Unit (Front Camera)
- Front Lens: Records the road ahead in up to 4K resolution.
- Display Screen: 3.19-inch IPS screen for live view und Wiedergabe.
- Control Buttons: For menu navigation and settings.
- GPS Module: Integrated for location and speed data.
- MicroSD Card Slot: For memory card insertion.
Innenraumkamera
- Records the vehicle's interior in 1080P.
- Equipped with 6 IR LEDs for enhanced night vision inside the cabin.
- Removable (Type-C Port) for flexible installation.
Rückfahrkamera
- Records the rear view of the vehicle in 1080P.
- Verbindet sich über ein separates Kabel mit der Haupteinheit.
Aufstellen
1. Einsetzen der MicroSD-Karte
- Stellen Sie sicher, dass die Dashcam ausgeschaltet ist.
- Suchen Sie den MicroSD-Kartensteckplatz am Hauptgerät.
- Insert the 128GB TF card with the gold contacts facing the back of the dash cam until it clicks into place.
- Zum Herausnehmen die Karte vorsichtig hineindrücken, bis sie herausspringt.
2. Montage der Dashcam
- Reinigen Sie den Bereich der Windschutzscheibe, an dem Sie die Dashcam anbringen möchten.
- Bringen Sie die Montagehalterung an der Dashcam an.
- Secure the dash cam with the bracket to the windshield, ensuring a clear view of the road. Adjust the lens angle as needed.
3. Stromversorgung anschließen
- Schließen Sie das Autoladegerät an den Stromeingang der Dashcam an.
- Stecken Sie das andere Ende des Autoladegeräts in die Zigarettenanzünderbuchse Ihres Fahrzeugs.
- Route the power cable neatly along the windshield and dashboard to avoid obstructing your view.
4. Installing the Interior and Rear Cameras
- Connect the interior camera to its dedicated port on the main unit. Mount it to capture the cabin view.
- Connect the rear camera to its dedicated port on the main unit. Mount it on the rear windshield, ensuring a clear view. Route the cable discreetly.
5. Erstes Einschalten und Einstellungen
- Once powered, the dash cam will automatically turn on and begin recording.
- Access the menu to set the correct date and time.
- It is recommended to format the MicroSD card within the dash cam's settings before first use and periodically thereafter to ensure optimal performance.
Bedienungsanleitung
1. 3 Channel Recording
The M550 Pro supports simultaneous recording from three cameras: front, interior, and rear. You can configure recording resolutions:
- Nur vorne: 4K (3840x2160P)
- Vorderseite und Rückseite: 4K + 1080P
- Front and Interior: 2K (2560x1440P) + 1080P
- Front, Interior, and Rear: 2K + 1080P + 1080P
Abbildung: Visuelle Darstellung der 3-Kanal-Aufnahmefunktion, die Folgendes zeigt viewAufnahmen von der Frontkamera (2.5K), der Kabinenkamera (1080P) und der Rückfahrkamera (1080P).
2. Loop-Aufnahme
Die Dashcam zeichnet Videos in einer Endlosschleife auf. Wenn die Speicherkarte voll ist, wird die älteste ungesperrte Aufnahme automatisch abgespielt. fileVorhandene Aufnahmen werden automatisch durch neue überschrieben. Dies gewährleistet eine kontinuierliche Aufzeichnung ohne manuelles Eingreifen.
3. G-Sensor (Kollisionserkennung)
Der integrierte G-Sensor erkennt plötzliche Stöße oder Kollisionen. Bei Auslösung sperrt er automatisch das aktuelle Videosegment und verhindert so, dass es durch die Loop-Aufnahme überschrieben wird. Die Empfindlichkeit des G-Sensors lässt sich in den Einstellungen anpassen.
4. 24-Stunden-Parküberwachung
The M550 Pro offers two modes for 24-hour parking monitoring. A 3-lead hardwire kit (not included, ASINFür diese Funktion wird B096G6FKZP benötigt.
- Parkmodus Kollisionserkennung: The G-sensor detects impacts and automatically records and locks video segments.
- Zeitraffer-Parkmodus: The dash cam records continuously at a low frame rate (e.g., 1 FPS) for 24 hours, compressing long periods into short videos.

Image: Illustration of the 24-hour parking mode, detailing collision detection and time-lapse recording options, with a car parked under a protective shield icon.
5. Built-in 5.8G WiFi and App Usage
The dash cam features built-in 5.8G WiFi for faster data transfer. Download the AZDOME app on your smartphone to connect to the dash cam.
- Download the AZDOME app from the Google Play Store or Apple App Store.
- Enable WiFi on your dash cam and smartphone.
- Connect your smartphone to the dash cam's WiFi network (SSID and password displayed on the dash cam screen).
- Nutzen Sie die App live view, video playback, downloading recorded files, and adjusting settings. 5.8GHz WiFi allows for downloading 800MB video within 10 seconds.
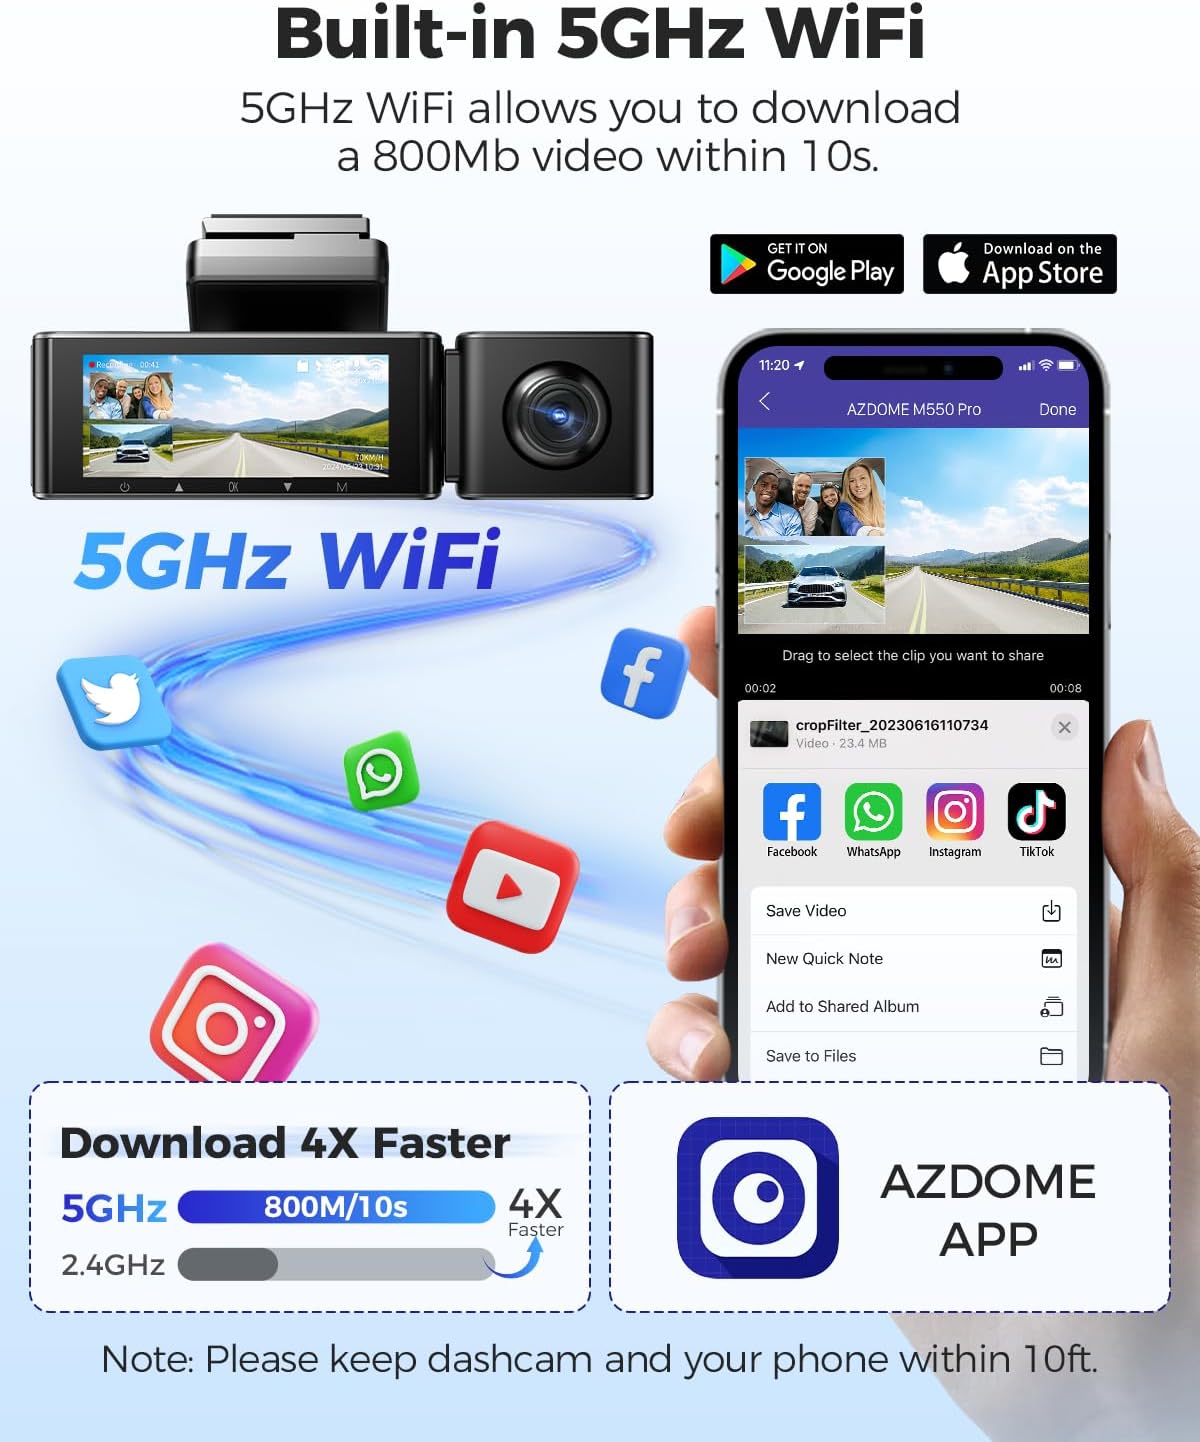
Image: Diagram showing the dash cam connecting to a smartphone via 5GHz WiFi, highlighting faster download speeds for videos through the AZDOME app.
6. Built-in GPS Functionality
The integrated GPS module records your driving route, speed, latitude, and longitude data. This information can be viewed using the AZDOME GPS Player software on a computer.
- Download the AZDOME GPS Player software from the official AZDOME webWebsite.
- Aufgezeichnetes Video übertragen files auf Ihren Computer.
- Öffne das Video files mit dem AZDOME GPS-Player zu view synchronized video, map, and driving data.

Image: A laptop screen displaying the AZDOME GPS Player, showing video playback alongside a map with the driving route, speed, and location details.
7. Nachtsicht
The interior camera is equipped with 6 IR LEDs and a Starvis Sensor to provide clear recordings in low-light conditions inside the vehicle. The front camera also features a 6-glass lens and F=1.8 aperture for improved low-light performance.
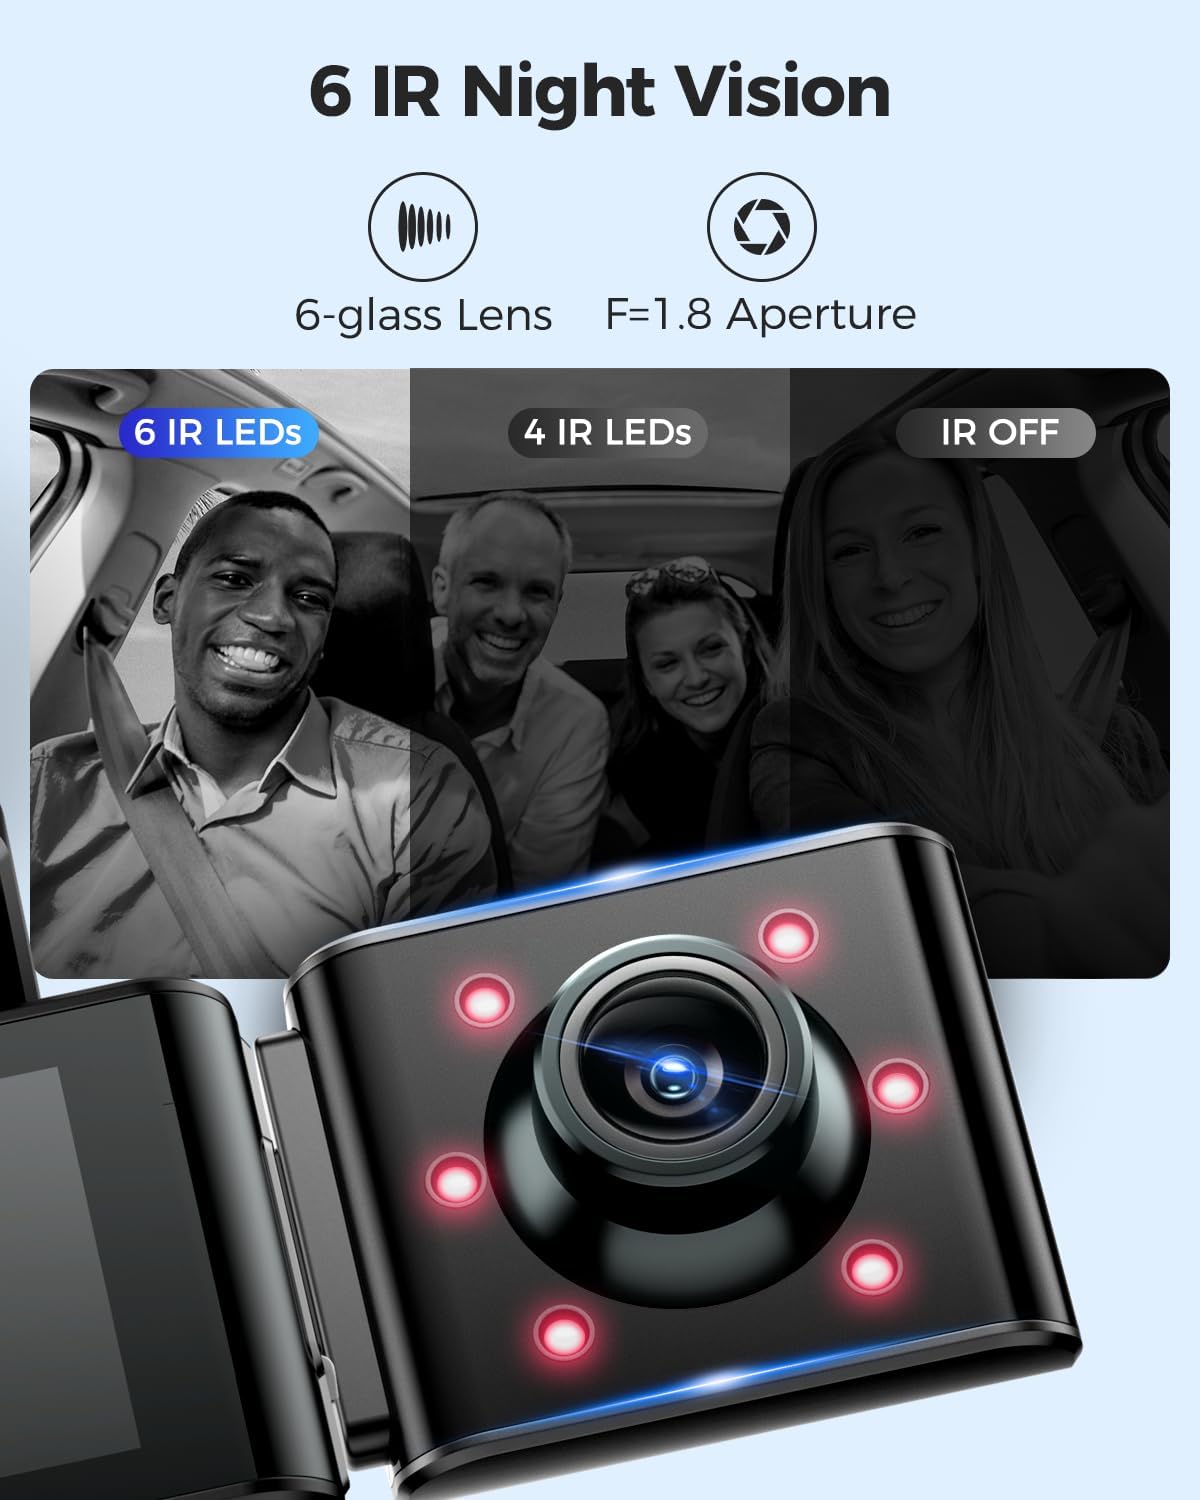
Image: A visual comparison demonstrating the effectiveness of 6 IR LEDs for night vision in the interior camera, showing clearer images compared to 4 IR LEDs or IR off.
Wartung
1. Pflege der Speicherkarte
- Regularly format the MicroSD card (at least once a month) through the dash cam's settings to prevent data corruption and ensure optimal recording performance.
- Use high-quality, high-endurance MicroSD cards (Class 10 or U3 recommended) for reliable operation.
- Avoid removing or inserting the MicroSD card while the dash cam is powered on to prevent damage to the card or device.
2. Reinigen des Geräts
- Use a soft, dry cloth to clean the dash cam's body and screen.
- For camera lenses, use a lens cleaning cloth and specialized lens cleaning solution to avoid scratches and ensure clear video quality.
- Do not use abrasive cleaners or solvents, as they may damage the device.
Fehlerbehebung
- Die Dashcam lässt sich nicht einschalten: Check the power connection. Ensure the car charger is properly plugged into both the dash cam and the vehicle's power outlet. Test the power outlet with another device.
- Dash Cam stops recording: Ensure the MicroSD card is inserted correctly and has sufficient free space. Format the card. If the issue persists, try a different MicroSD card.
- Video files are corrupted or unplayable: Format the MicroSD card. Ensure the card is a high-quality, high-endurance type.
- WLAN-Verbindungsprobleme: Ensure the dash cam's WiFi is enabled. Keep your smartphone within 10 feet of the dash cam for optimal connection. Restart both the dash cam and your phone.
- GPS funktioniert nicht: Stellen Sie sicher, dass die Dashcam ein klares Bild hat. view of the sky. GPS signal acquisition may take a few minutes, especially after initial setup or in areas with poor signal.
- Parküberwachung funktioniert nicht: Ensure the 3-lead hardwire kit is correctly installed and connected. Check parking monitor settings in the menu.
Technische Daten
Below are the key specifications for the AZDOME M550 Pro Dash Cam:
| Besonderheit | Spezifikation |
|---|---|
| Modell | M550 Pro |
| Anzeigegröße | 3.19"-IPS-Bildschirm |
| Videoauflösung (max.) | Front: 4K (3840x2160P) |
| 3-Channel Resolution | 2K(F)+1080P(I)+1080P(R) |
| Konnektivitätstechnologie | 5.8G Wi-Fi |
| Besonderheit | Parking Monitor (Collision Detection, Time-lapse) |
| Eingebautes GPS | Ja |
| Innenraumkamera | Removable (Type-C Port), 6 IR LEDs, Starvis Sensor |
| Bereich View | 170 Grad (Vorderseite) |
| Kontrollmethode | App |
| Flash-Speichertyp | TF (MicroSD) |
| Im Lieferumfang enthaltene Komponenten | Speicherkarte (128 GB) |

Image: A detailed comparison table highlighting features and specifications of the M550 Pro against other AZDOME models, including display size, video resolution, WiFi, and parking modes.
Garantie und Support
Garantieinformationen
AZDOME-Produkte werden üblicherweise mit einer Standard-Herstellergarantie geliefert. Bitte beachten Sie die Garantiekarte in Ihrer Verpackung oder besuchen Sie die offizielle AZDOME-Website. webDie genauen Garantiebedingungen finden Sie auf der Website. Bewahren Sie Ihren Kaufbeleg für Garantieansprüche auf.
Kundenservice
For technical assistance, troubleshooting, or any questions regarding your AZDOME M550 Pro Dash Cam, please contact AZDOME customer support. Contact information can usually be found on the official AZDOME webauf der Website oder auf der Garantiekarte.


