1. Einleitung
Thank you for choosing the KIMO QM-3603-500N·m Electric Impact Wrench. This powerful and versatile cordless tool is designed for a wide range of applications, from automotive maintenance like tire changes to various DIY projects and professional tasks. Featuring a high-capacity 4000mAh battery, intelligent control modes, and robust construction, it provides efficient and reliable performance. Please read this manual thoroughly before operation to ensure safe and optimal use of your new tool.
2. Sicherheitshinweise
WARNUNG: Lesen Sie alle Sicherheitswarnungen, Anweisungen, Abbildungen und Spezifikationen, die mit diesem Elektrowerkzeug geliefert werden. Die Nichtbeachtung aller unten aufgeführten Anweisungen kann zu elektrischem Schlag, Brand und/oder schweren Verletzungen führen.
- Tragen Sie stets geeignete persönliche Schutzausrüstung, einschließlich Schutzbrille, Gehörschutz und Handschuhe.
- Halten Sie den Arbeitsbereich sauber und gut beleuchtet. Unordnung oder dunkle Bereiche führen zu Unfällen.
- Betreiben Sie Elektrowerkzeuge nicht in explosionsgefährdeten Bereichen, in denen sich beispielsweise brennbare Flüssigkeiten, Gase oder Staub befinden.
- Halten Sie Kinder und andere Personen während der Benutzung des Elektrowerkzeugs fern. Durch Ablenkung können Sie die Kontrolle verlieren.
- Stellen Sie vor der Verwendung sicher, dass der Akku vollständig aufgeladen ist.
- Überlasten Sie das Elektrowerkzeug nicht. Verwenden Sie für Ihre Anwendung das dafür geeignete Elektrowerkzeug.
- Trennen Sie den Akku vom Elektrowerkzeug, bevor Sie Einstellungen vornehmen, Zubehörteile wechseln oder Elektrowerkzeuge lagern.
- Bewahren Sie unbenutzte Elektrowerkzeuge außerhalb der Reichweite von Kindern auf. Lassen Sie das Elektrowerkzeug nicht von Personen benutzen, die mit diesem nicht vertraut sind oder diese Anweisungen nicht gelesen haben.
- Warten Sie Elektrowerkzeuge und Zubehör sorgfältig. Achten Sie auf Fehlausrichtung oder Festfressen beweglicher Teile, Bruchstellen oder andere Zustände, die die Funktion des Elektrowerkzeugs beeinträchtigen können.
- Verwenden Sie das Elektrowerkzeug, das Zubehör und die Werkzeugeinsätze gemäß dieser Anleitung und unter Berücksichtigung der Arbeitsbedingungen und der auszuführenden Arbeiten.
- Setzen Sie Elektrowerkzeuge nicht Regen oder Nässe aus. Das Eindringen von Wasser in ein Elektrowerkzeug erhöht das Risiko eines Stromschlags.
3. Produktüberschreitungview
3.1 Komponenten
The KIMO QM-3603-500N·m Electric Impact Wrench comes with the following components:
- KIMO QM-3603-500N·m Impact Wrench Unit
- 20 V 4000 mAh Lithium-Ionen-Akku
- Schnelles Ladegerät
- Impact Sockets (15mm, 17mm, 19mm, 21mm)
- Drill Bits (for wood, metal, screws)
- Aufbewahrungstasche
- Bedienungsanleitung

Image: KIMO Electric Impact Wrench and its complete accessory set, including battery, charger, various sockets, and drill bits.
3.2 Hauptmerkmale
- Hohes Drehmoment: Delivers a maximum torque of 500N·m, capable of loosening stubborn bolts and nuts.
- Langlebiger Akku & Schnellladefunktion: Equipped with a 20V 4000mAh lithium-ion battery, providing approximately 20-40 minutes of continuous use. The included fast charger fully charges the battery in just 120 minutes.
- Intelligent Automatic Stop Mode: Prevents overtightening and damage to bolts/nuts by automatically stopping rotation when the fastener is loose. This feature is active in forward rotation only.
- Multifunktionales 3-in-1-Design: Functions as an impact wrench, electric drill, and electric driver, making it suitable for a wide array of tasks.
- Drei Betriebsarten: Easily switch between Automatic Stop Mode, High Efficiency Mode (0-2600 RPM), and Power Saving Mode (0-1600 RPM) to optimize performance for different materials and tasks.
- Stepless Speed Control & Forward/Reverse: Adjust rotation speed by varying pressure on the trigger. A convenient lever allows for quick switching between forward (tightening) and reverse (loosening) rotation.
- Leichtes und ergonomisches Design: Weighing only 1.1kg, it reduces arm fatigue during prolonged use, making it comfortable for all users.
- Integriertes LED-Licht: Illuminates the work area, providing clear visibility in dark or confined spaces.
- Geräuscharmer Betrieb: Engineered for reduced noise levels, allowing for more comfortable use in various environments.

Image: Visual representation of the KIMO Impact Wrench's 500N·m maximum torque and its impact on product life, power, spark, and noise.

Image: Close-up of the KIMO Impact Wrench's 4000mAh battery, highlighting its large capacity and the integrated battery level indicator.

Image: Illustration of the KIMO Impact Wrench's three adjustable modes: High Efficiency Mode, Power Saving Mode, and Automatic Stop Mode.
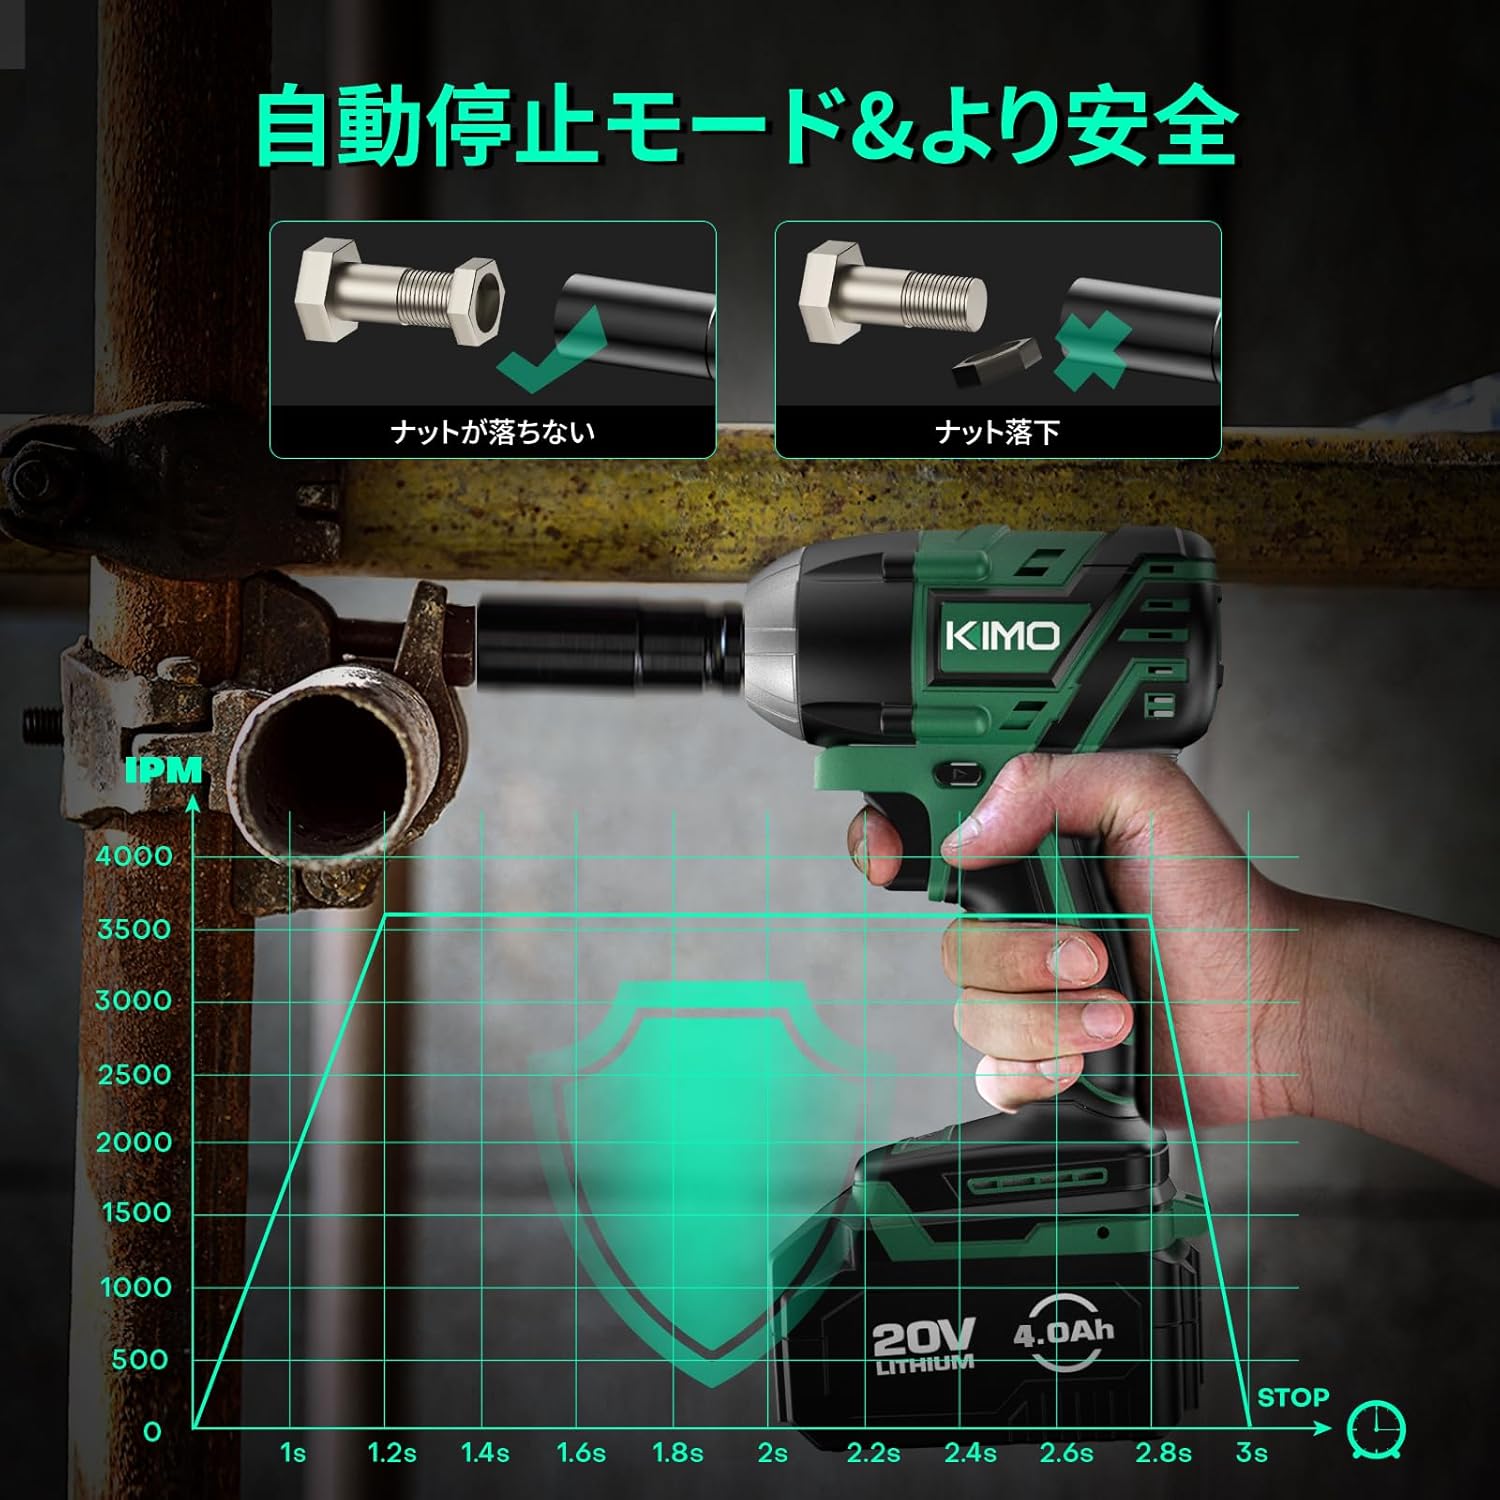
Image: Depiction of the KIMO Impact Wrench's automatic stop mode, showing how it prevents bolts from falling off or overtightening for enhanced safety.

Image: The KIMO Impact Wrench in use, demonstrating its integrated LED light illuminating a dark work area for improved visibility.

Image: Diagram illustrating the forward (F) and reverse (R) rotation capabilities of the KIMO Impact Wrench for tightening and loosening nuts.
4. Einrichtung
4.1 Laden des Akkus
- Ensure the battery pack is securely inserted into the fast charger.
- Stecken Sie das Ladegerät in eine normale Steckdose.
- The indicator lights on the charger will show the charging status. A full charge typically takes 120 minutes.
- Sobald der Akku vollständig geladen ist, trennen Sie das Ladegerät von der Steckdose und entnehmen Sie den Akku.
4.2 Attaching Sockets/Bits
- Ensure the tool is off and the battery pack is removed before attaching or removing accessories.
- For impact sockets, align the square drive of the socket with the anvil on the tool and push firmly until it clicks into place.
- For drill bits or screwdriver bits, use the appropriate adapter (if necessary) and insert the bit into the chuck. Tighten the chuck securely to hold the bit in place.
- To remove, pull the socket or bit firmly away from the anvil/chuck.
5. Bedienungsanleitung
5.1 Ein-/Ausschalten
To power on the tool, simply press the trigger. The tool will start rotating. To power off, release the trigger.
5.2 Moduswechsel
The tool features three operating modes: Automatic Stop Mode, High Efficiency Mode, and Power Saving Mode. Press the mode selection button on the tool to cycle through these modes. The indicator lights will show the currently selected mode.
- Automatic Stop Mode: Ideal for loosening nuts and bolts. The tool will automatically stop rotation once the fastener is loose to prevent it from flying off. This mode only works in forward rotation.
- High Efficiency Mode: Provides maximum speed (0-2600 RPM) for heavy-duty tasks and quick fastening/loosening.
- Energiesparmodus: Operates at a lower speed (0-1600 RPM) to conserve battery life and for more precise work. This mode is ideal for delicate adjustments or re-tightening.
5.3 Vorwärts-/Rückwärtsdrehung
A lever located near the trigger allows you to switch between forward and reverse rotation:
- Push the lever to the left (F) for forward rotation (tightening).
- Push the lever to the right (R) for reverse rotation (loosening).
Stellen Sie sicher, dass das Werkzeug vollständig zum Stillstand gekommen ist, bevor Sie die Drehrichtung ändern.
5.4 Tightening and Loosening
- Select the appropriate socket or bit for the fastener.
- Choose the desired operating mode (e.g., High Efficiency for initial loosening, Automatic Stop for controlled loosening).
- Set the forward/reverse lever to the correct direction.
- Place the socket/bit firmly onto the fastener.
- Gradually press the trigger to start rotation. Apply more pressure for higher speed.
- For tightening, always finish with a torque wrench to ensure proper torque specifications are met, especially for critical applications like wheel nuts.
6. Wartung
6.1 Reinigung
- Vor der Reinigung immer den Akku abklemmen.
- Verwenden Sie ein weiches,amp Verwenden Sie ein Tuch, um die Außenseite des Werkzeugs abzuwischen. Verwenden Sie keine scharfen Chemikalien oder Scheuermittel.
- Halten Sie die Lüftungsöffnungen frei von Staub und Schmutz. Verwenden Sie gegebenenfalls Druckluft.
6.2 Batteriepflege
- Akkus sollten an einem kühlen, trockenen Ort, fern von direkter Sonneneinstrahlung und extremen Temperaturen, aufbewahrt werden.
- Akkus sollten nicht über längere Zeiträume im entladenen Zustand gelagert werden. Laden Sie sie regelmäßig auf, wenn sie nicht verwendet werden.
- Vermeiden Sie es, den Akku fallen zu lassen oder ihn physisch zu beschädigen.
6.3 Speicherung
- Store the tool and accessories in the provided storage bag or a suitable case.
- Keep the tool in a secure location, out of reach of children and unauthorized users.
7. Fehlerbehebung
If you encounter issues with your KIMO Electric Impact Wrench, please refer to the table below for common problems and solutions.
| Problem | Mögliche Ursache | Lösung |
|---|---|---|
| Das Gerät lässt sich nicht einschalten. | Batterie nicht geladen oder nicht richtig eingesetzt. | Stellen Sie sicher, dass der Akku vollständig geladen und fest eingesetzt ist. |
| Low power or inconsistent operation. | Die Batterieladung ist niedrig. | Laden Sie den Akku auf. |
| Socket/bit falls off. | Not properly attached or worn anvil/chuck. | Ensure secure attachment. If issue persists, contact support for inspection. |
| Das Werkzeug überhitzt. | Länger andauernde intensive Nutzung oder blockierte Belüftung. | Allow tool to cool down. Clear ventilation openings. |
If the problem persists after attempting these solutions, please contact KIMO customer support for further assistance.
8. Spezifikationen
| Spezifikation | Wert |
|---|---|
| Marke | KIMO |
| Modellnummer | QM-3603 |
| Technische Daten | 28.4 x 18.4 x 18.1 cm |
| Artikelgewicht | 1.1 kg |
| Farbe | Grün |
| Material | Plastik |
| Bandtage | 20 Volt |
| Wastage | 4.9 Watt |
| Drehmoment | 500 Newtonmeter |
| Maximale Drehzahl | 2600 U/min |
| Batteriekapazität | 4000 mAh |
| Ladezeit | Ca. 120 Minuten |
9. Garantie und Support
KIMO conducts thorough quality inspections on every product before shipment to ensure it meets our high standards. In the unlikely event that you encounter any issues with your product or have questions, please do not hesitate to contact our customer support team. We are committed to providing excellent after-sales service and will respond to your inquiries in the order they are received.
For support, please refer to the contact information provided in your product packaging or visit the official KIMO webWebsite.


