1. Einleitung
The SOAR 24V Ride On UTV for Kids is designed to provide a realistic and exciting driving experience for children. Featuring dual driving modes, robust power, and a multi-functional dashboard, this UTV ensures hours of fun while prioritizing safety. This manual provides essential information for assembly, operation, maintenance, and troubleshooting to ensure safe and optimal performance of your new ride-on toy.

Hauptmerkmale:
- Zwei Fahrmodi: Manual operation for children and remote control for parental supervision.
- 2WD/4WD Switchable: Adaptable driving modes for various terrains.
- Leistungsstarke Motoren: Equipped with four 200W motors for strong performance.
- Langlebige Batterie: 24V7AH battery for extended playtime.
- Sicherheitsmerkmale: LED headlights, adjustable seatbelt, emergency brake, and slow start technology.
- Multi-Functional Dashboard: MP3 player, USB port, one-button start, headlight adjustment, music control, and horn.
2. Aufbau und Montage
Follow these steps carefully to assemble your SOAR 24V Ride On UTV. It is recommended to watch the assembly video for visual guidance.
2.1. Auspacken und Komponentenidentifizierung
This video provides a detailed guide on unboxing and assembling the UTV. It covers all major steps from unpacking to final checks.

Ensure all components are present and undamaged before beginning assembly. Refer to the parts list in your packaging.
2.2. Montageschritte
- Install Rear Suspension: Attach the yellow shock absorbers to the rear of the UTV chassis. Ensure they are securely fastened with the provided screws. (Refer to video: 0:28)
- Attach Rear Axle and Wheels: Slide the rear axle through the designated slots. Connect the motor wires if not pre-connected. Secure the rear wheels using the washers and nuts, then attach the hubcaps. (Refer to video: 0:58)
- Install Front Axle and Wheels: Insert the front axle. Secure the front wheels with washers and nuts, then attach the hubcaps. (Refer to video: 2:00)
- Attach Front Bumper: Secure the front bumper to the chassis using the provided screws. (Refer to video: 2:21)
- Install Rear Storage/Seat Support: Attach the rear storage compartment, which also serves as seat support, to the back of the UTV. Secure it with screws. (Refer to video: 2:40)
- Batterie anschließen: Locate the battery compartment, usually under the seat. Connect the battery terminals (red to red, black to black). Ensure a secure connection. (Refer to video: 4:47)
- Sitz einbauen: Place the seat onto the UTV and secure it with the appropriate screws. Ensure the seatbelt is accessible and functional. (Refer to video: 5:34)
- Install Dashboard Display: Carefully place the dashboard display unit into its slot and connect any necessary wiring. Secure it with screws. (Refer to video: 5:50)
- Lenkrad anbringen: Connect the steering wheel's wiring to the UTV's main wiring harness. Slide the steering wheel onto the steering column and secure it with the provided screw and nut. (Refer to video: 6:08)
- Install Roll Bar: Attach the roll bar to the top of the UTV, ensuring it clicks into place or is secured with screws. (Refer to video: 6:42)
3. Bedienungsanleitung
Familiarize yourself with the UTV's controls and features for a safe and enjoyable experience.
3.1. Starting the UTV
- Stellen Sie sicher, dass die Batterie vollständig geladen und richtig angeschlossen ist.
- Drücken Sie die Ein-Knopf-Start on the dashboard to power on the UTV. You will hear an engine start-up sound.
3.2. Fahrmodi

The UTV offers two primary driving modes:
- Manual Operate Mode: For older children, the UTV is controlled directly by the child using the foot pedal for acceleration and the steering wheel for direction.
- Elternfernsteuerungsmodus: For younger children or for parental supervision, the UTV can be fully controlled by an adult using the included remote control. This mode allows parents to steer, accelerate, brake, and switch between speeds.
This video demonstrates the UTV's driving capabilities and the transition between manual and remote control modes.
3.3. Multi-Functional Dashboard

The dashboard provides various controls for an immersive experience:
- MP3 Player & USB Port: Schließen Sie externe Geräte an, um Musik abzuspielen.
- Scheinwerfereinstellung: Control the LED headlights for visibility.
- Music Control & Horn: Play pre-loaded tunes or use the horn for added realism.
- 2WD/4WD-Schalter: Select between two-wheel drive and four-wheel drive for optimal performance on different surfaces.
This video showcases the UTV in various outdoor settings, highlighting its performance and features.
4. Wartung
Proper maintenance ensures the longevity and safe operation of your UTV.
4.1. Laden des Akkus
- Always use the original charging adapter provided.
- Charge the battery for 8-12 hours before first use, and for 8-12 hours after each use. Do not charge for more than 20 hours to prevent battery damage.
- Do not exhaust the battery completely. Recharge when power is low.
- The charging port is typically located near the battery compartment or on the dashboard.
4.2. Reinigung und Lagerung
- Clean the UTV with a damp Tuch. Vermeiden Sie die Verwendung aggressiver Chemikalien oder Scheuermittel.
- Store the UTV in a dry, cool place away from direct sunlight and moisture.
- If storing for an extended period, disconnect the battery and charge it periodically (once a month) to maintain its health.
5. Fehlerbehebung
Hier sind einige häufige Probleme und ihre möglichen Lösungen:
| Problem | Mögliche Ursache | Lösung |
|---|---|---|
| UTV does not start | Battery not connected or low charge; Power switch off; Loose wiring. | Check battery connection and charge; Ensure power switch is ON; Inspect all wiring connections. |
| Fernbedienung funktioniert nicht | Batterien der Fernbedienung leer; Fernbedienung nicht gekoppelt; Störungen. | Replace remote batteries; Re-pair remote according to instructions; Move away from other electronic devices. |
| Reduzierte Leistung oder Geschwindigkeit | Low battery charge; Overload (exceeding weight limit); Driving on unsuitable terrain. | Recharge battery fully; Ensure child's weight is within limits; Drive on appropriate surfaces. |
| Ungewöhnliche Geräusche | Loose parts; Debris in wheels/motors. | Check for and tighten any loose screws; Remove any obstructions from wheels or motor areas. |
6. Spezifikationen
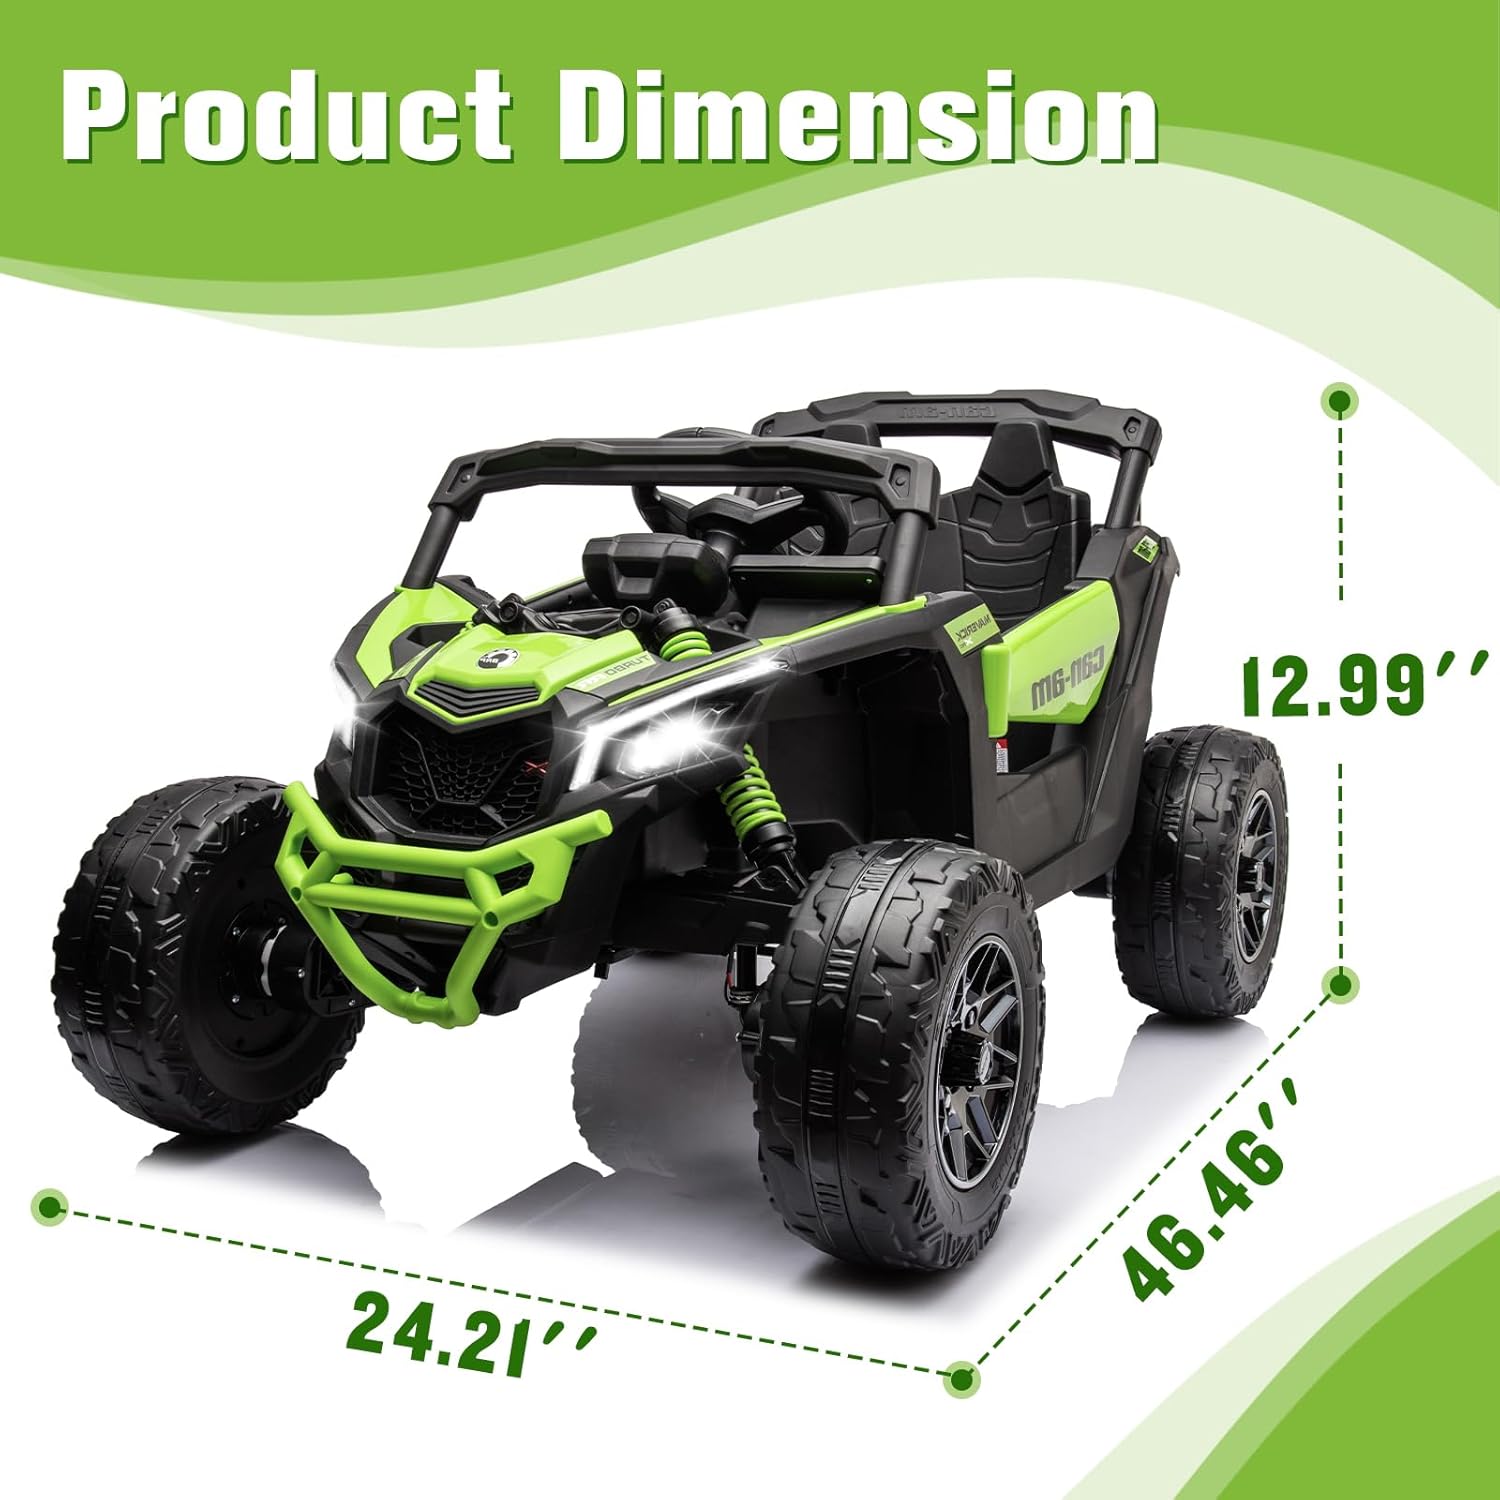
| Spezifikation | Detail |
|---|---|
| Technische Daten | 46.45 x 24 x 13 Zoll |
| Artikelgewicht | 53 Pfund |
| Vom Hersteller empfohlenes Alter | 3 years and up (36 to 84 months) |
| Maximale Belastung | 66lbs / 30kg |
| Batterie | 24V7AH |
| Motoren | 4 x 200W |
| Ladezeit | 8-12 Stunden |
| Geschwindigkeit | 2-5 miles/hour |
| ASIN | B0CXY9QP62 |
| Hersteller | STEIGEN |
7. Garantie und Support
SOAR is committed to providing high-quality products and excellent customer service. For any questions, concerns, or issues regarding your SOAR 24V Ride On UTV, please contact SOAR DIRECT customer support. Please retain your proof of purchase for warranty claims.
Weitere Hilfe finden Sie unter SOAR Store on Amazon oder konsultieren Sie die Kontaktinformationen, die Ihrer Produktverpackung beiliegen.


