1. Einleitung
Thank you for choosing the Spacekey QIG-D01 Dehumidifier. This manual provides essential information for the safe and efficient operation of your new appliance. Please read it thoroughly before use and retain it for future reference. This dehumidifier is designed to reduce excess moisture in areas up to 850 square feet, such as basements, bedrooms, bathrooms, RVs, and closets, improving air quality and comfort.

Abbildung 1: Vorderseite view of the Spacekey QIG-D01 Dehumidifier, showing its white and black design with a digital display and visible water tank.

Figure 2: Visual representation of the dehumidifier's effectiveness in reducing room humidity.

Figure 3: Common issues resolved by maintaining optimal humidity levels with the dehumidifier.
2. Wichtige Sicherheitshinweise
Um das Risiko von Bränden, Stromschlägen oder Verletzungen zu verringern, befolgen Sie stets diese grundlegenden Vorsichtsmaßnahmen:
- Lesen Sie vor der Verwendung des Geräts alle Anweisungen.
- Betreiben Sie den Luftentfeuchter nicht mit einem beschädigten Kabel oder Stecker.
- Stellen Sie sicher, dass die Steckdose ordnungsgemäß geerdet ist.
- Blockieren Sie keine Luftein- und -auslässe.
- Halten Sie das Gerät von Wasser und anderen Flüssigkeiten fern.
- Ziehen Sie vor der Reinigung oder Wartung den Netzstecker des Luftentfeuchters.
- Erlauben Sie Kindern nicht, das Gerät unbeaufsichtigt zu bedienen.
- This appliance is equipped with a 45° tip-over protection feature. If the unit is tilted beyond 45 degrees, it will automatically shut off to prevent damage or spills.

Figure 4: Illustration of the dehumidifier's 45° tip-over protection, demonstrating automatic shutdown for safety.
3. Produktüberschreitungview
3.1 Components and Design Features
- Hauptgerät mit Bedienfeld
- Water Tank (3.0L / 106 oz capacity)
- Waschbarer Luftfilter
- Netzkabel
- Integrated Handles for portability
- Visual Water Tank for easy monitoring
- 45° Tip-over Protection
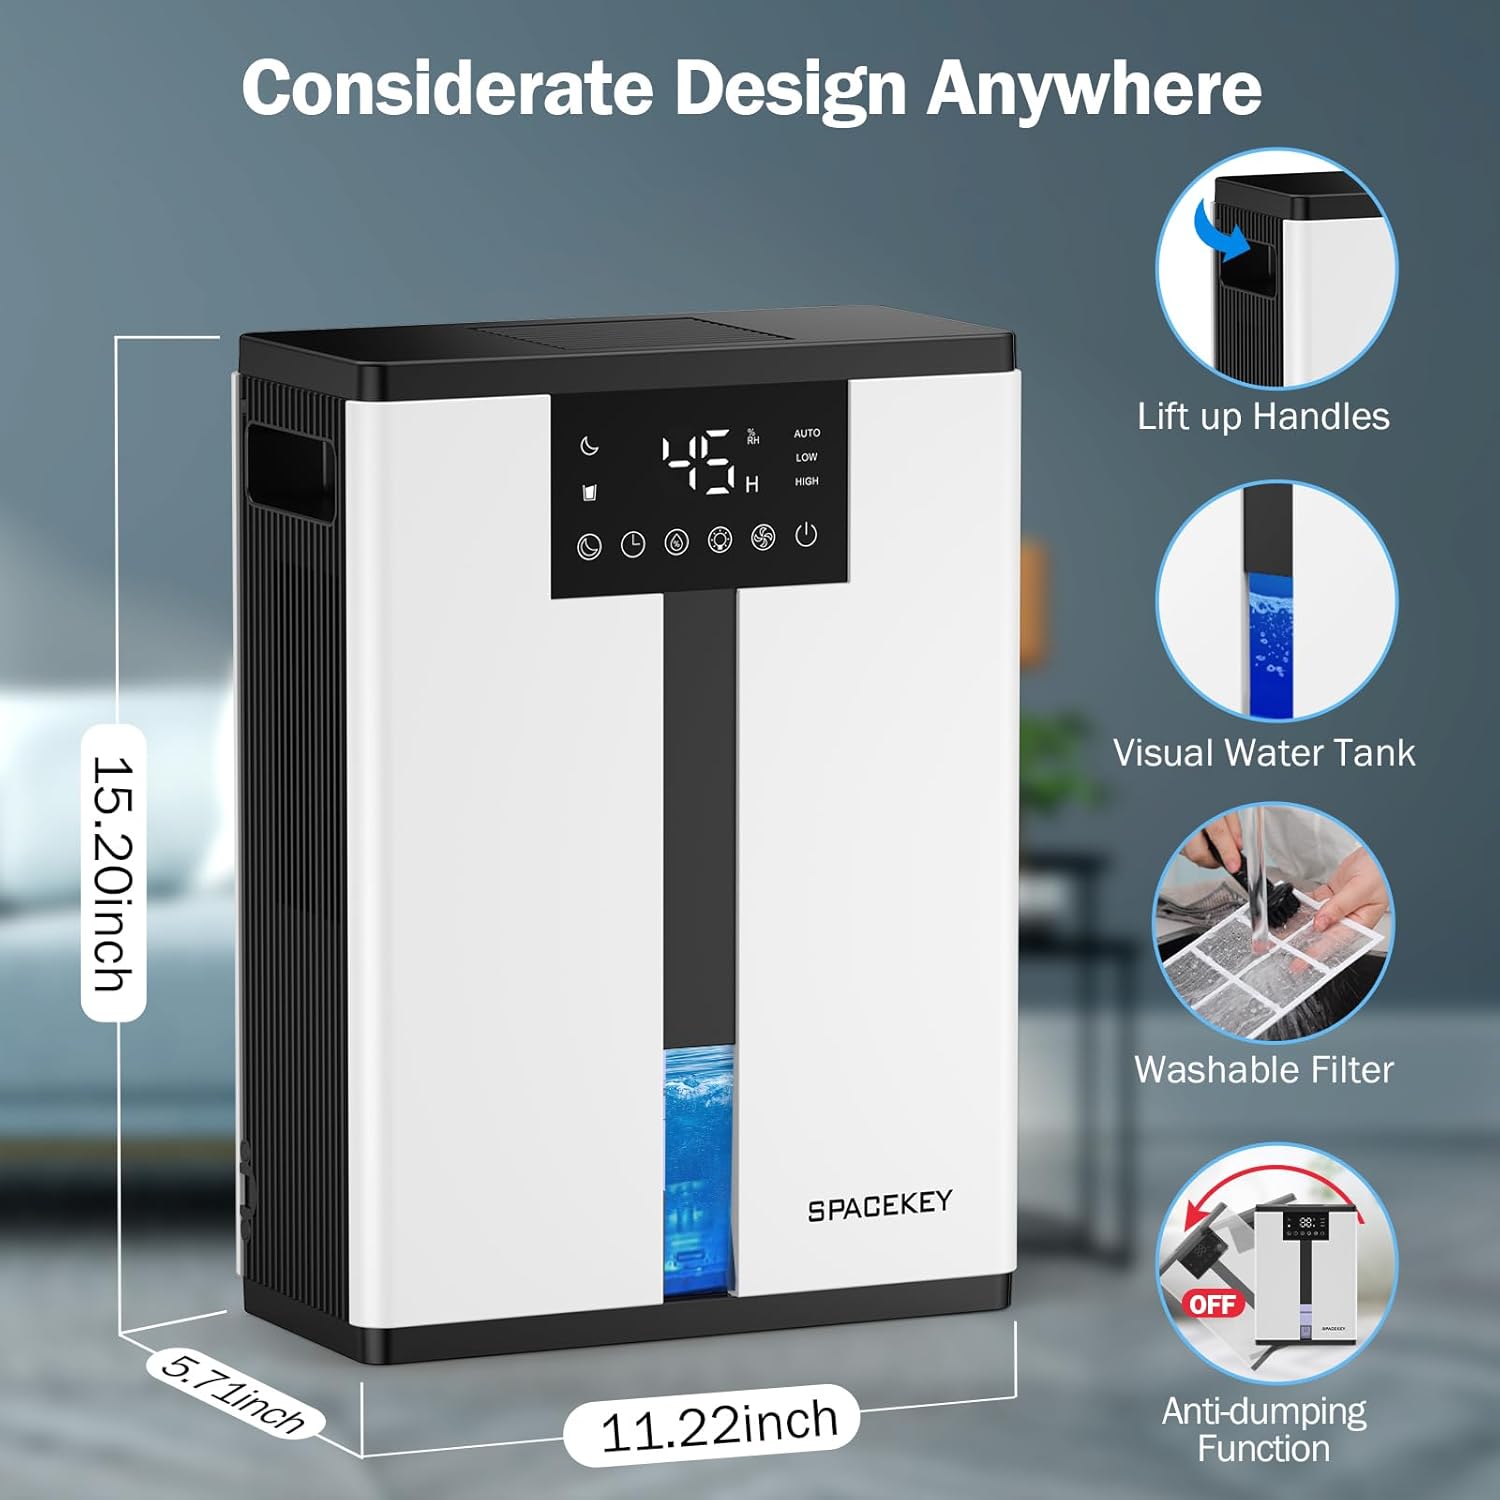
Figure 5: Key design elements and dimensions of the Spacekey QIG-D01 Dehumidifier.
3.2 Advanced Dehumidification Technology
The Spacekey QIG-D01 utilizes semiconductor condensation technology with dual fans and dual semiconductor condensers for enhanced efficiency in moisture removal.
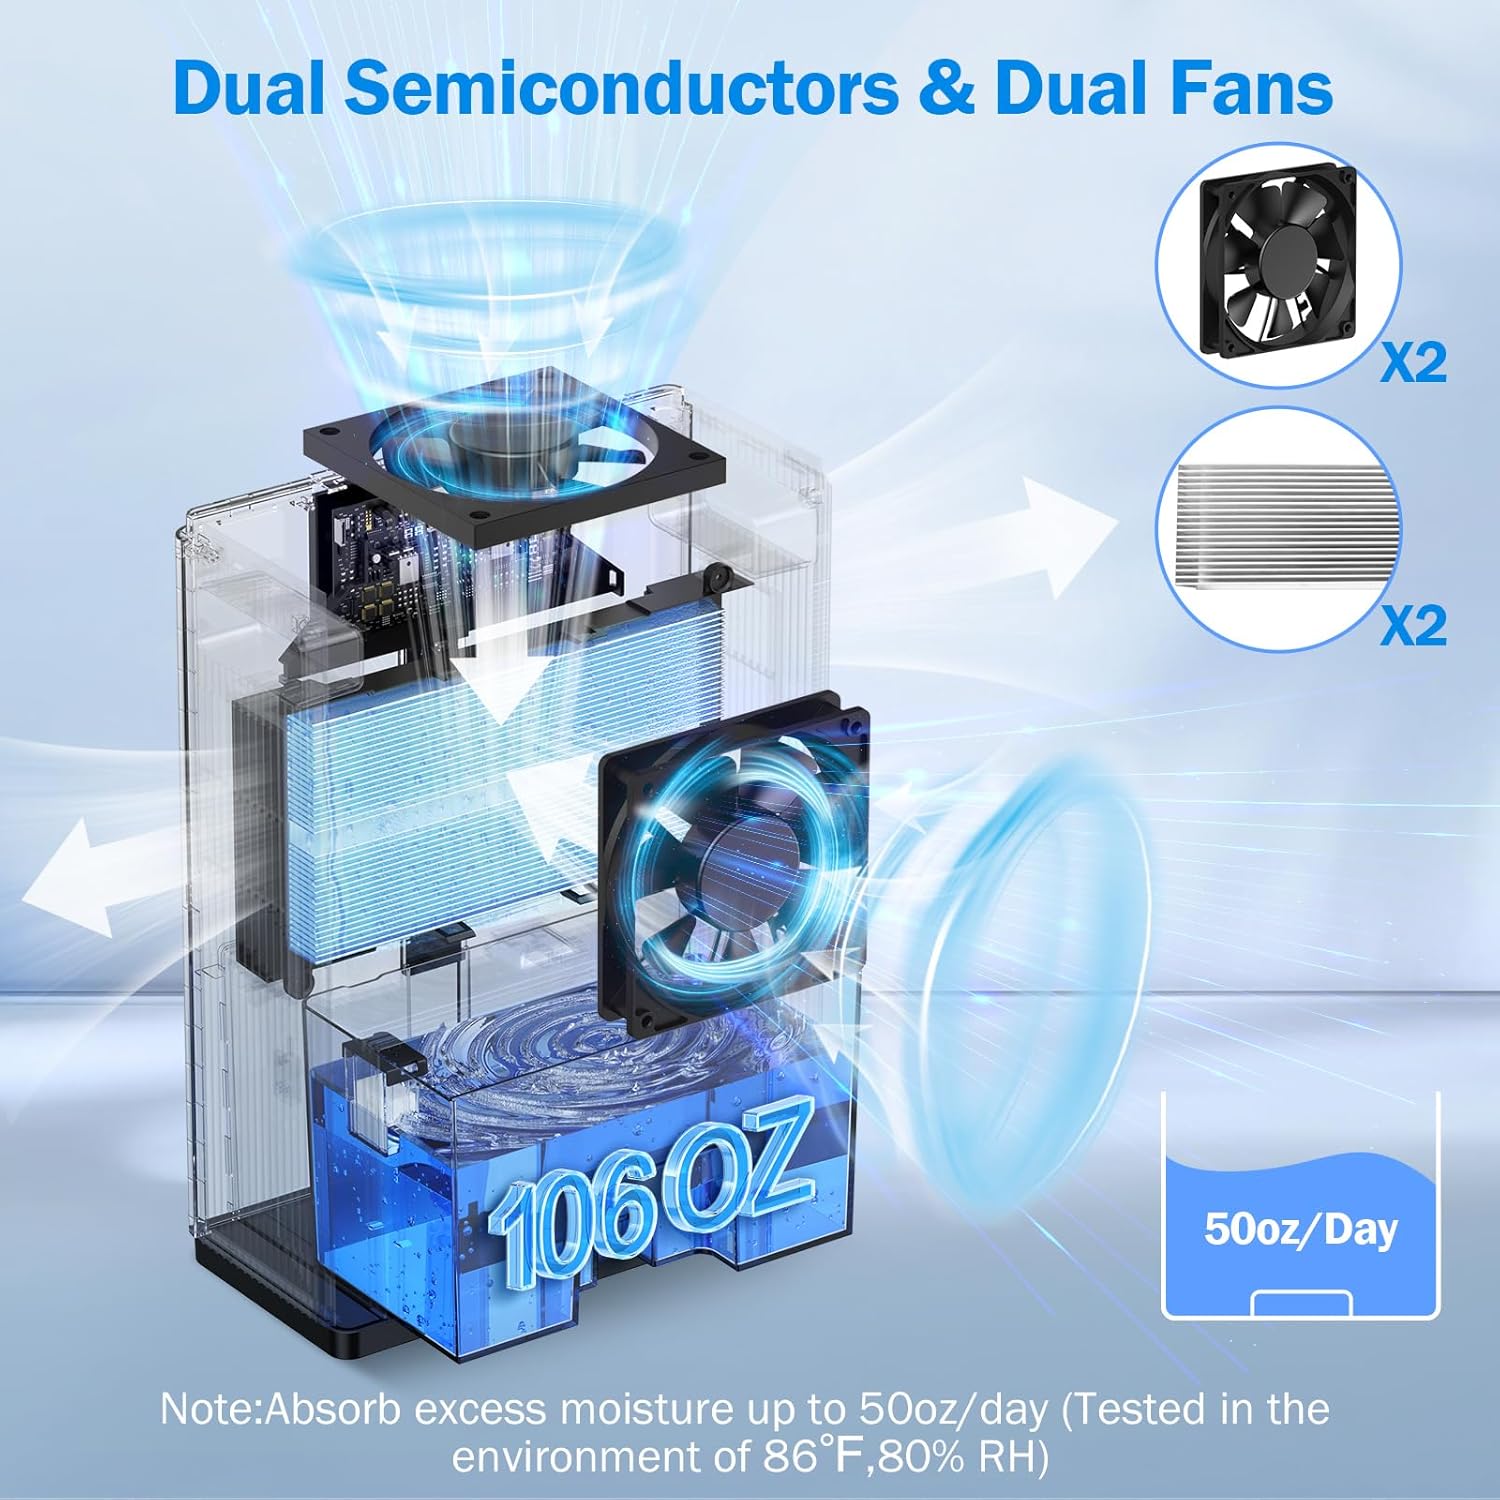
Abbildung 6: Intern view of the dual semiconductor and dual fan system for efficient dehumidification.
3.3 Systemsteuerung
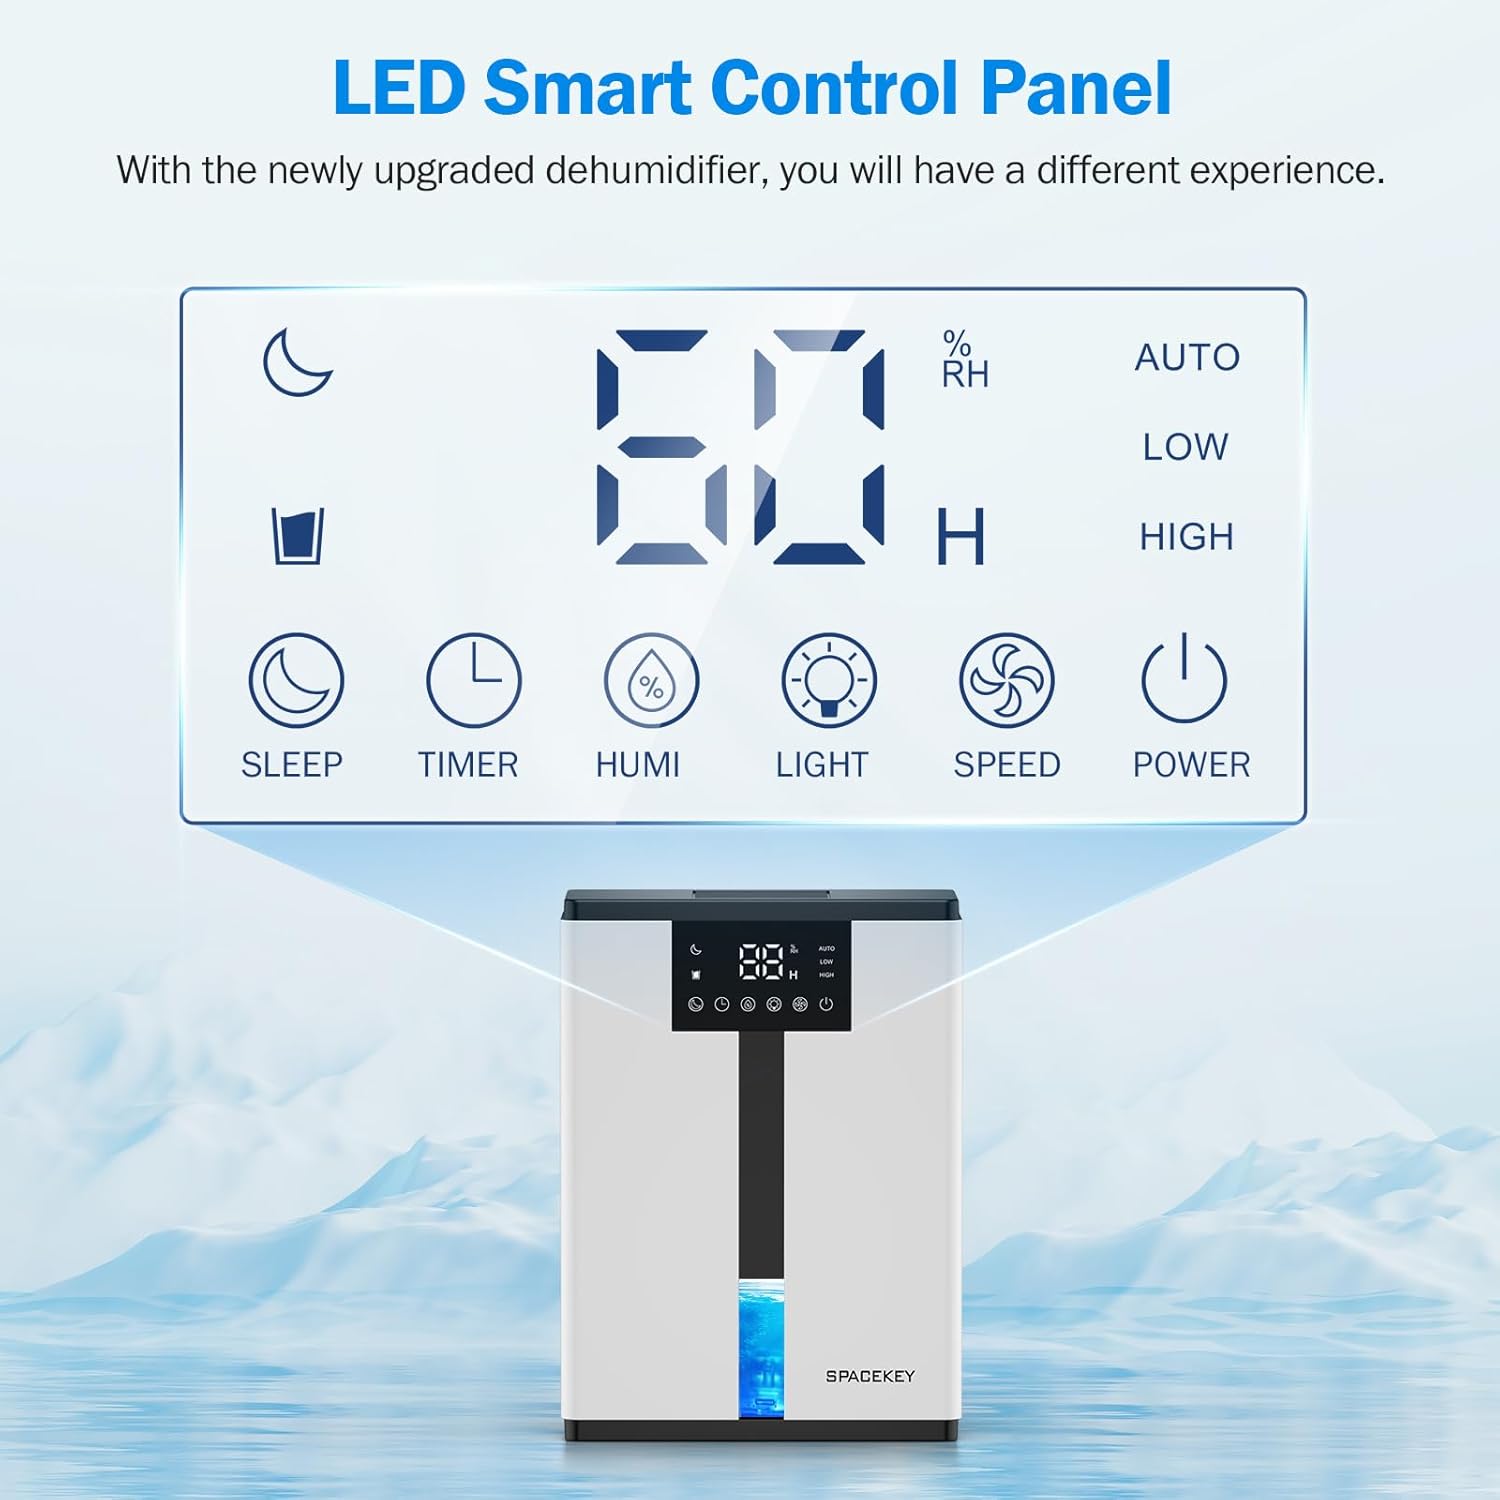
Figure 7: The LED Smart Control Panel, displaying current humidity and various function buttons.
The intuitive LED display shows real-time humidity. Buttons include:
- Schlafmodus: Activates quiet operation and can be used with colorful lights.
- Timer: Sets operating duration (2H, 4H, 6H, 8H, 12H).
- HUMI: Adjusts target humidity (45%, 55%, 65%, or continuous '00').
- LICHT: Steuert die 7-farbige Umgebungsbeleuchtung.
- GESCHWINDIGKEIT: Selects fan speed (Auto, Low, High).
- LEISTUNG: Schaltet das Gerät ein/aus.
4. Einrichtungsanweisungen
- Auspacken: Nehmen Sie den Luftentfeuchter vorsichtig aus der Verpackung.
- Platzierung: Place the unit on a flat, stable surface in the desired location. Ensure there is at least 8 inches (20 cm) of space around the air inlets and outlets for proper airflow.
- Stromanschluss: Stecken Sie das Netzkabel in eine geerdete Steckdose.
- Erstprüfung: Vor Betriebsbeginn sicherstellen, dass der Wassertank korrekt eingesetzt und leer ist.

Figure 8: Recommended placement areas for the dehumidifier, highlighting its suitability for various indoor environments.
5. Bedienungsanleitung
5.1 Ein-/Ausschalten
Drücken Sie die LEISTUNG Taste zum Ein- oder Ausschalten des Luftentfeuchters.
5.2 Einstellen des Feuchtigkeitsniveaus
Drücken Sie die HUMI button to cycle through desired humidity levels: 45%, 55%, 65%. The unit will operate until the set humidity is reached, then pause. If set to '00', the unit will operate continuously.

Figure 9: Setting the target humidity level using the HUMI button.
5.3 Lüftergeschwindigkeitseinstellung
Drücken Sie die GESCHWINDIGKEIT button to select between Auto, Low, and High fan speeds. Auto mode adjusts fan speed based on current humidity.
5.4 Timer-Funktion
Drücken Sie die TIMER button to set an operating duration of 2, 4, 6, 8, or 12 hours. The unit will automatically turn off after the set time.

Figure 10: Using the Timer function to set the operating duration.
5.5 Sleep Mode & Colorful Lights
Drücken Sie die SCHLAFEN button to activate sleep mode for ultra-quiet operation (approx. 30dB). Press the LICHT button to cycle through 7 colorful ambient lights or select a static color. This feature can be used independently or in conjunction with sleep mode.
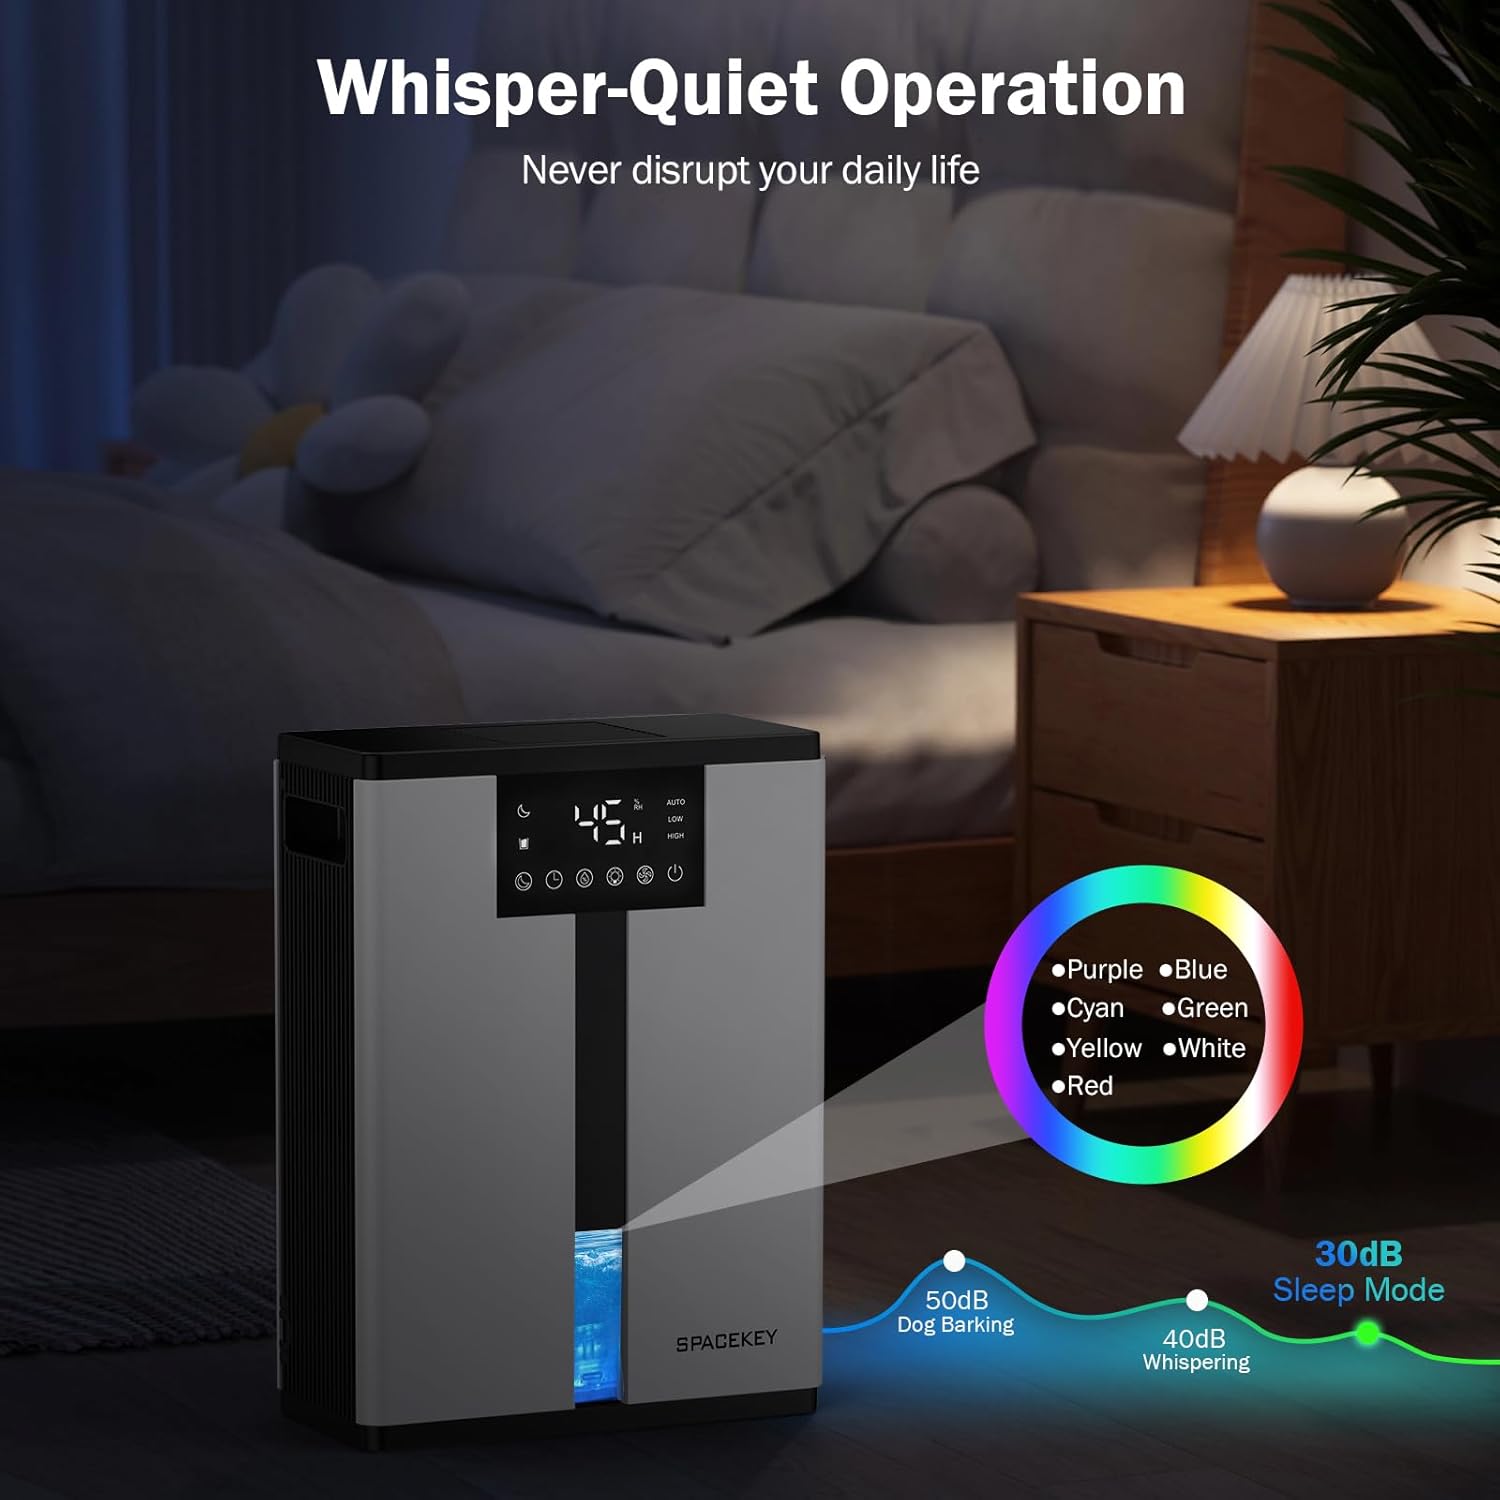
Figure 11: Dehumidifier in Sleep Mode with ambient lighting for a peaceful environment.
5.6 Automatische Abschaltung
The dehumidifier will automatically shut off and flash a red light with an audible beep when the water tank is full. Empty the water tank to resume operation.
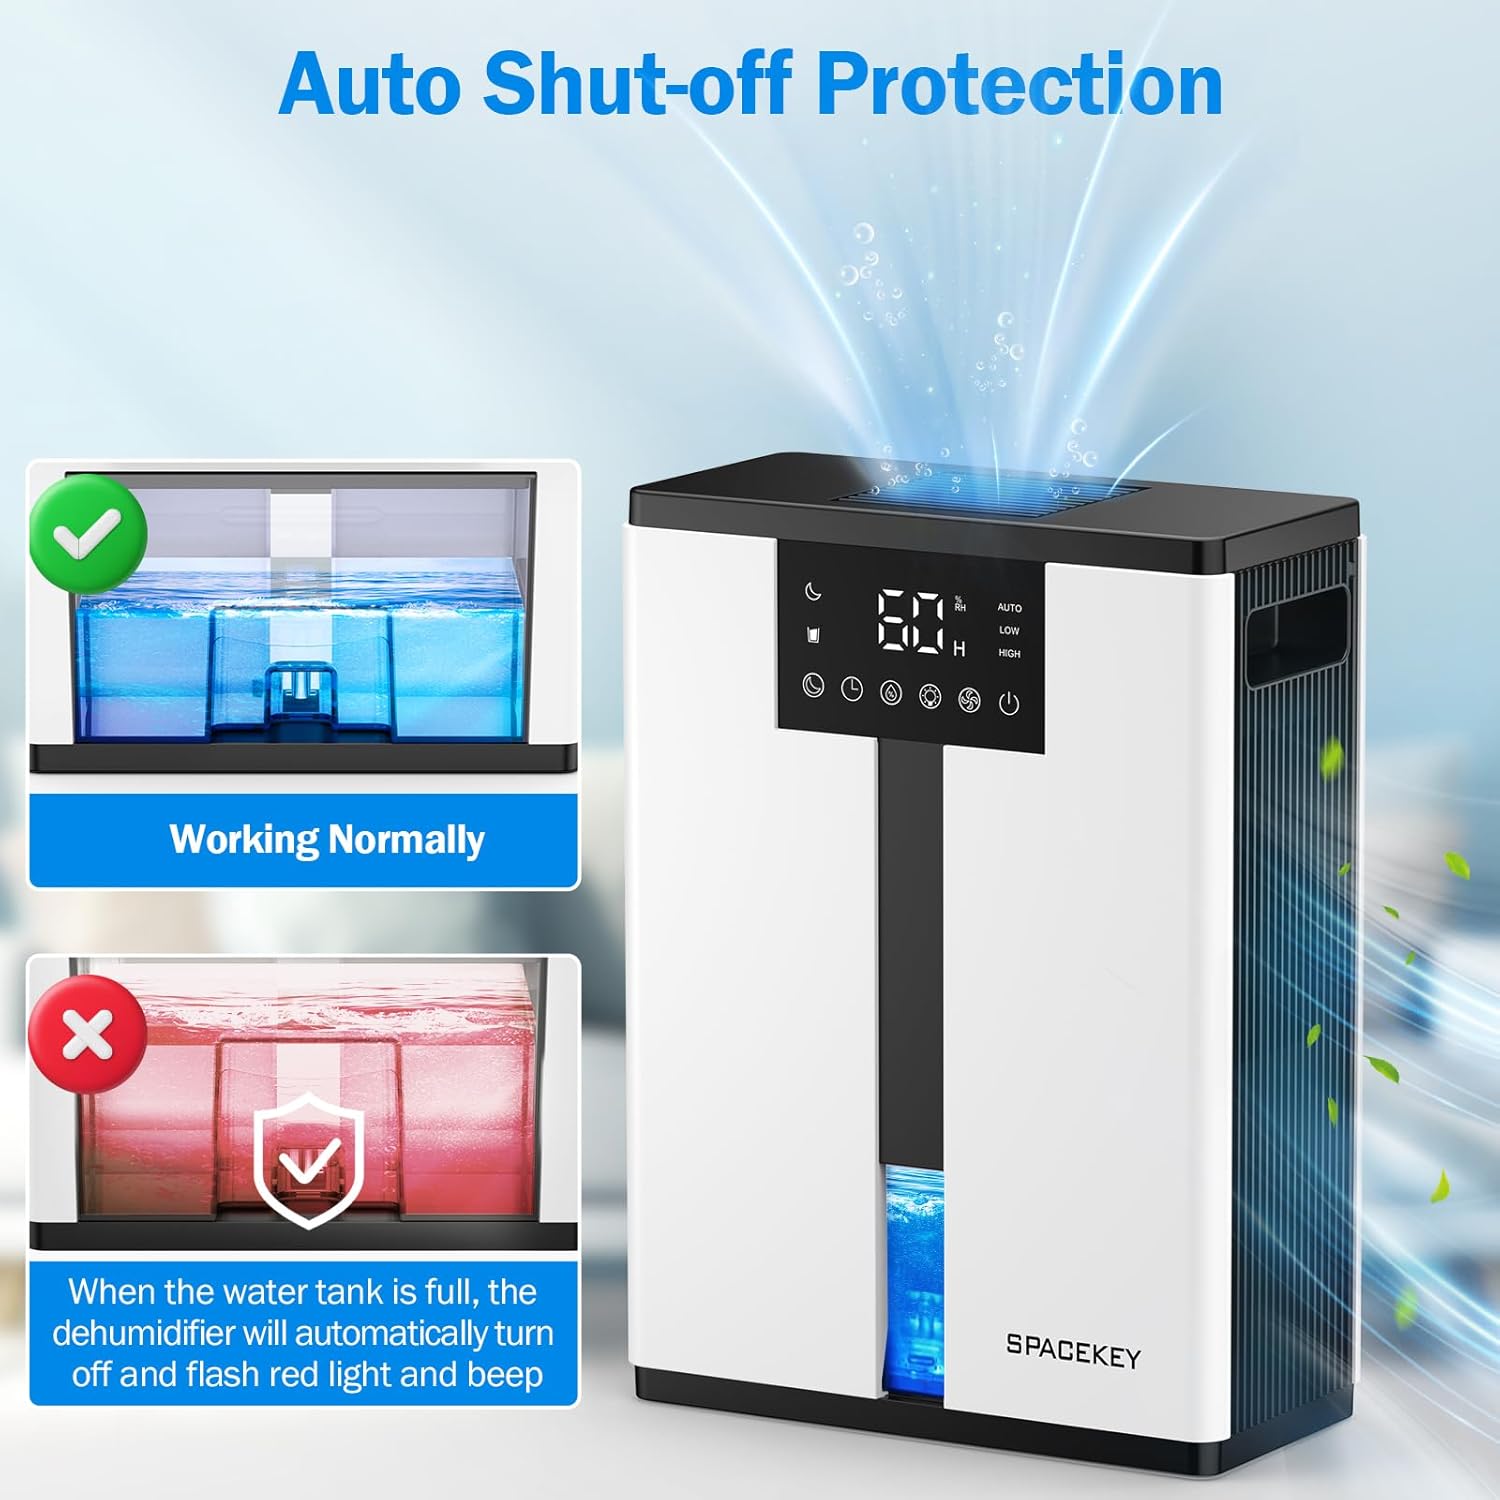
Figure 12: Automatic shut-off mechanism when the water tank is full.
6. Wartung
6.1 Wassertank entleeren
- Ziehen Sie den Wassertank vorsichtig von der Vorderseite des Geräts heraus.
- Nehmen Sie den Tankdeckel ab.
- Das aufgefangene Wasser ausgießen.
- Replace the lid and reinsert the water tank firmly into the dehumidifier.

Figure 13: Step-by-step guide to emptying the water tank.
6.2 Reinigung des Luftfilters
The washable filter should be cleaned regularly (every 2-4 weeks, depending on usage) to maintain optimal performance.
- Trennen Sie den Luftentfeuchter vom Stromnetz.
- Entfernen Sie den Filter von der Rückseite des Geräts.
- Spülen Sie den Filter unter fließendem Wasser ab, um Staub und Schmutz zu entfernen.
- Lassen Sie den Filter vollständig an der Luft trocknen, bevor Sie ihn wieder einsetzen.
- Betreiben Sie den Luftentfeuchter nicht ohne Filter.

Figure 14: Instructions for removing and washing the air filter.
6.3 Außenreinigung
Wischen Sie die Außenseite des Luftentfeuchters mit einem weichen,amp Tuch. Keine Scheuer- oder Lösungsmittel verwenden.
7. Fehlerbehebung
| Problem | Mögliche Ursache | Lösung |
|---|---|---|
| Der Luftentfeuchter schaltet sich nicht ein. | Kein Strom; Netzkabel nicht eingesteckt; Wassertank voll oder falsch eingesetzt. | Stromanschluss prüfen; Wassertank entleeren und korrekt wieder einsetzen. |
| Es wird kein Wasser aufgefangen oder die Entfeuchtung ist unzureichend. | Room humidity is already low; air filter is clogged; ambient temperature is too low; unit size is too small for the space. | Ensure humidity is above target; clean air filter; operate in recommended temperature range; consider unit placement or additional units for larger spaces. |
| Das Gerät ist laut. | Fan speed is set to High; unit is not on a flat surface. | Switch to Low or Sleep mode; ensure unit is on a stable, flat surface. |
| Red light flashing and beeping. | Wassertank ist voll. | Empty the water tank and reinsert it. |
8. Spezifikationen
| Besonderheit | Detail |
|---|---|
| Modellname | QIG-D01 |
| Marke | Leertaste |
| Entfeuchtungskapazität | Up to 50 oz (approx. 3 pints) per 24 hours (at 86°F, 80% RH) |
| Fassungsvermögen des Wassertanks | 3.0 Liter (106 Flüssigunzen) |
| Abdeckungsbereich | Bis zu 850 Quadratmeter |
| Energieaufnahme | 70 Watts (not more than 1.68 kWh/Day) |
| Geräuschpegel | Approx. 30dB (in Sleep Mode) |
| Abmessungen (T x B x H) | 5.71"T x 11.22"B x 15.2"H |
| Artikelgewicht | 8.91 Pfund |
| Besondere Merkmale | Automatic Shutoff, Intelligent Humidity Control, 4 Fan Speeds, Timer, 7 Colorful Lights, 45° Tip-over Protection, Washable Filter |
9. Garantie und Kundendienst
Spacekey offers the following support for your dehumidifier:
- 30-Tage-Rückerstattungsrecht: Bei Unzufriedenheit.
- 2 Jahr Ersatzgarantie: Bei Produktmängeln oder Funktionsstörungen.
- Lebenslanger Kundenservice: Dedicated support for any questions or issues.
If you have any questions or require assistance, please do not hesitate to contact Spacekey customer support. We aim to reply within 24 hours.


Abbildung 15: Überview of Spacekey's customer support and warranty policies.


