1. Einleitung
Vielen Dank für Ihren Einkauf.asing the Pisichen 8-inch Touch Panel Mobile HD Mini Monitor. This compact and versatile display is designed to enhance your productivity and entertainment experience across various devices. Featuring a responsive 5-point capacitive touch screen and multiple connectivity options, it offers a seamless and immersive visual interface.

Figure 1.1: Pisichen 8-inch Touch Panel Mobile HD Mini Monitor
This monitor is equipped with:
- 5-Point Capacitive Touch: For intuitive and precise interaction.
- HD 800x480 Resolution: Delivering clear and vivid visuals.
- Vielfältige Konnektivität: Two HDMI ports and one USB-C port for broad compatibility.
- Mehrere Anzeigemodi: Supports duplicate, extended, and second screen modes.
- HDR Mode & Built-in Speakers: Enhances visual depth and provides integrated audio.
2. Packungsinhalt
Bitte prüfen Sie das Paket auf folgende Artikel:
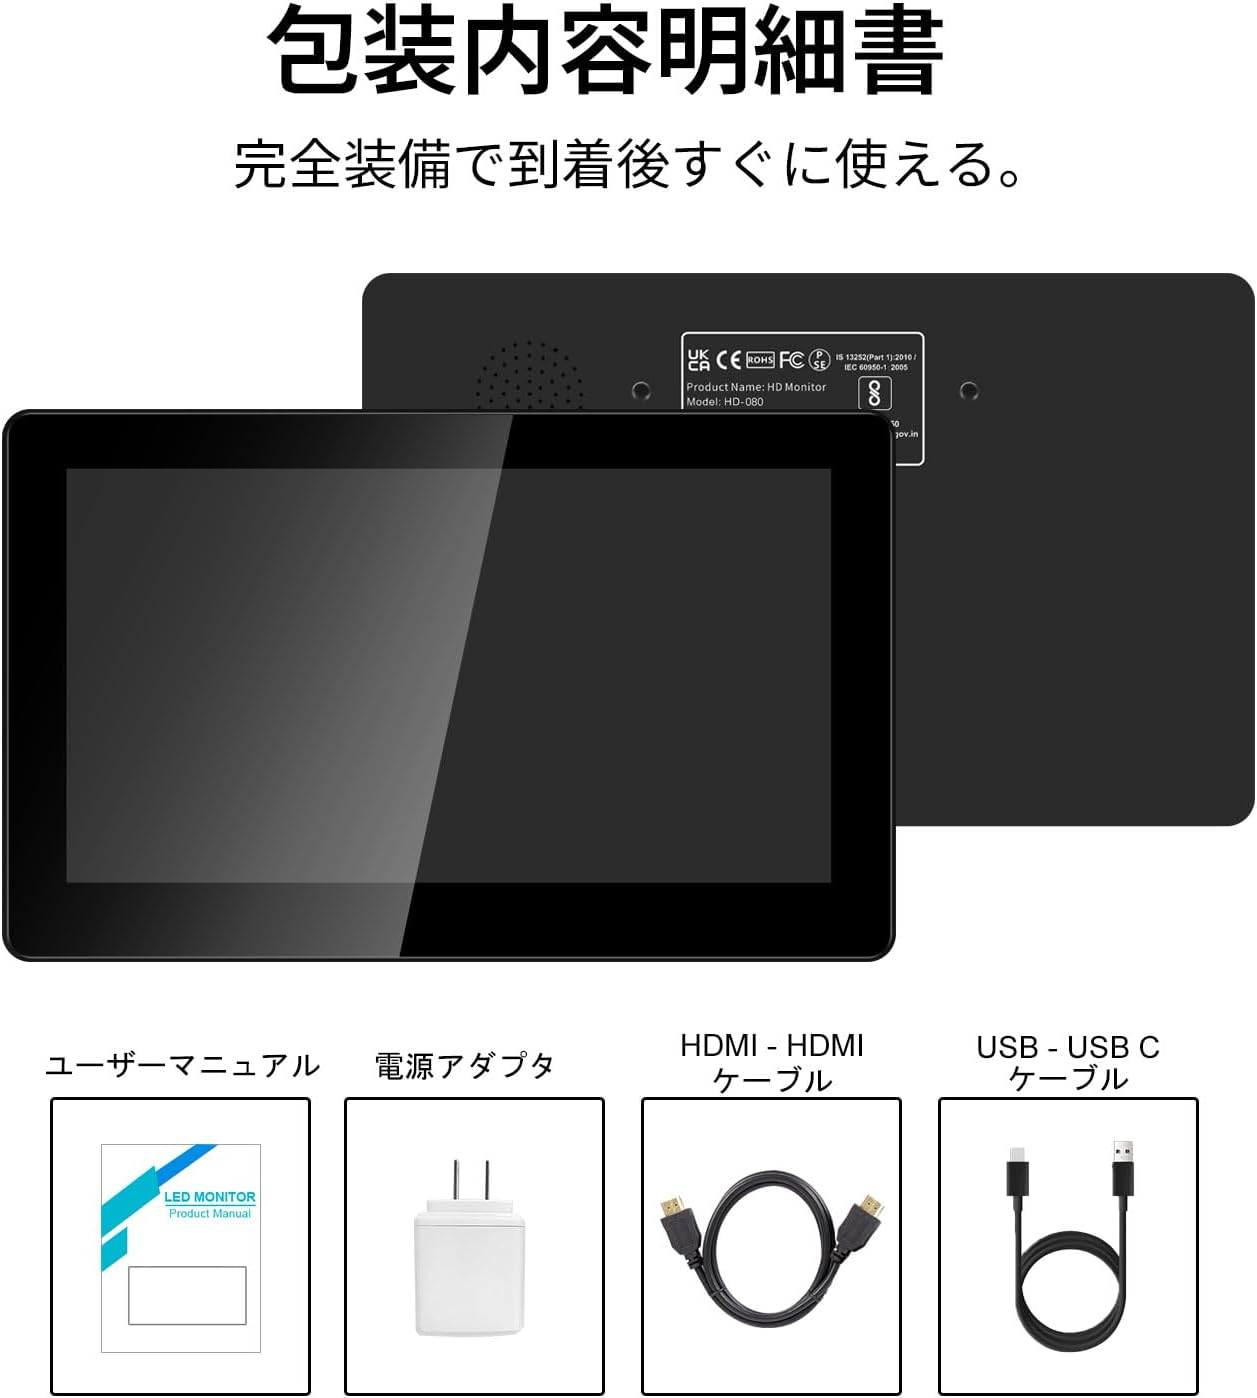
Abbildung 2.1: Packungsinhalt
- Pisichen 8-inch Touch Panel Mobile HD Mini Monitor
- Bedienungsanleitung
- Netzteil
- HDMI zu HDMI Kabel
- USB-A to USB-C Cable (for power and touch functionality)
3. Einrichtungsanweisungen
Follow these steps to set up your Pisichen mini monitor:
3.1 Anschließen des Monitors
- Stromanschluss: Connect the provided power adapter to the monitor's power port and plug it into a power outlet. Alternatively, use the USB-C port for power by connecting it to a compatible USB power source.
- Video-Eingang:
- For HDMI devices (PC, laptop, game console): Use the HDMI to HDMI cable to connect your device's HDMI output to one of the monitor's HDMI ports (HDMI 1 or HDMI 2).
- For USB-C devices (with DisplayPort Alternate Mode support): Connect a USB-C to USB-C cable (not included) from your device to the monitor's USB-C port. This single cable can provide both video and power/touch.
- Touch Functionality (for HDMI connections): If using an HDMI connection and requiring touch functionality, connect the provided USB-A to USB-C cable from your source device's USB-A port to the monitor's USB-C port. This enables touch input.
- Audioausgang: If you prefer external audio, connect headphones or external speakers to the 3.5mm audio jack on the monitor.

Figure 3.1: Monitor Ports and Connections
3.2 Erstes Einschalten
Once connected, press the ON/OFF button on the side of the monitor to power it on. The monitor should automatically detect the input signal. If not, use the menu buttons to select the correct input source.
4. Bedienungsanleitung
4.1 Grundlegende Bedienelemente
Der Monitor verfügt an der Seite über mehrere Tasten zur Steuerung:
- EIN/AUS-Taste: Schaltet den Monitor ein oder aus.
- Volume Down / Brightness Up: Adjusts volume or increases brightness.
- Volume Up / Brightness Down: Regelt die Lautstärke oder verringert die Helligkeit.
- Signal Switch / Return: Switches between input signals or acts as a 'back' button in menus.
- Menu / OK: Opens the OSD (On-Screen Display) menu or confirms a selection.
4.2 Bedienung des Touchscreens
The 5-point capacitive touch panel allows for intuitive interaction:
- Klopfen: Elemente auswählen oder Funktionen aktivieren.
- Wischen: Scroll through content or navigate interfaces.
- Pinch-to-Zoom: Enlarge or reduce content (e.g., images, maps).
- Mehrfingergesten: Supported for specific operating systems and applications.

Figure 4.1: 5-Point Touch Panel Gestures
Note: Touch functionality may require specific driver installation on some operating systems or devices. Ensure your device supports touch input over the chosen connection method.
4.3 Anzeigemodi
Der Monitor unterstützt verschiedene Anzeigemodi, wenn er an einen Computer angeschlossen ist:
- Duplikat-Modus: Displays the same content on both your primary screen and the mini monitor.
- Erweiterter Modus: Erweitert Ihren Desktop auf beide Bildschirme und schafft so mehr Arbeitsfläche.
- Zweiter Bildschirmmodus: Uses only the mini monitor as the display.
- Portraitmodus: The monitor can be rotated for vertical display, useful for specific applications.
Diese Modi können in der Regel über die Anzeigeeinstellungen Ihres Betriebssystems konfiguriert werden.

Abbildung 4.2: Mehrere Anzeigemodi
4.4 HDR-Modus
The monitor supports HDR (High Dynamic Range) mode, which can be enabled via the OSD menu or your connected device's display settings. HDR provides a wider range of colors and contrasts, resulting in a more vibrant and realistic image.
5. Wartung
To ensure the longevity and optimal performance of your Pisichen mini monitor, follow these maintenance guidelines:
- Reinigen des Bildschirms: Mit einem weichen, fusselfreien Tuch leichtampMit Wasser oder einem Siebreinigungsmittel abspülen. Scharfe Chemikalien, scheuernde Materialien und übermäßige Feuchtigkeit vermeiden.
- Reinigung des Casing: Wischen Sie die Oberfläche des Monitors ab.asinmit einem weichen, trockenen Tuch abwischen.
- Lagerung: Bei längerer Nichtbenutzung sollte der Monitor an einem kühlen, trockenen Ort, geschützt vor direkter Sonneneinstrahlung und extremen Temperaturen, aufbewahrt werden.
- Handhabung: Vermeiden Sie es, den Monitor fallen zu lassen oder starken Stößen auszusetzen. Stellen Sie keine schweren Gegenstände darauf.
- Belüftung: Um eine Überhitzung zu vermeiden, stellen Sie sicher, dass die Lüftungsschlitze des Monitors nicht blockiert sind.
6. Fehlerbehebung
Sollten Sie Probleme mit Ihrem Monitor haben, beachten Sie bitte die folgenden häufig auftretenden Probleme und Lösungen:
- Kein Bild / Schwarzer Bildschirm:
- Stellen Sie sicher, dass das Netzteil fest angeschlossen und der Monitor eingeschaltet ist.
- Verify that the video cable (HDMI or USB-C) is properly connected to both the monitor and the source device.
- Check if the correct input source is selected using the monitor's menu buttons.
- Testen Sie es nach Möglichkeit mit einem anderen Videokabel oder Quellgerät.
- Berührungslose Funktionalität:
- If using HDMI, ensure the USB-A to USB-C cable is connected from your source device to the monitor's USB-C port.
- For USB-C connections, ensure your device supports touch input over USB-C.
- Check your operating system's settings for touch screen calibration or driver status.
- Kein Ton:
- Increase the monitor's volume using the side buttons.
- Check your source device's audio output settings to ensure audio is being sent to the monitor.
- Wenn Sie externe Lautsprecher/Kopfhörer verwenden, stellen Sie sicher, dass diese ordnungsgemäß an die 3.5-mm-Audiobuchse angeschlossen sind.
- Image Quality Issues (e.g., lines on screen, distorted colors):
- Prüfen Sie das Videokabel auf Beschädigungen oder lose Verbindungen.
- Adjust the monitor's display settings (brightness, contrast, color temperature) via the OSD menu.
- Ensure your source device's display resolution and refresh rate are compatible with the monitor's specifications.
- If persistent, try connecting to a different source device or using a different cable.
7. Spezifikationen
| Marke | Pisichen |
| Modellnummer | HD-8TS-800P |
| Bildschirmgröße | 8 Zoll |
| Auflösung | 800 x 480 Pixel |
| Seitenverhältnis | 16:9 |
| Berührungsempfindliches Bedienfeld | 5-Punkt-kapazitive Touch-Funktion |
| Konnektivität | 2x HDMI, 1x USB-C (Power/Touch), 1x 3.5mm Audio Jack |
| Farbe | Schwarz |
| Produktabmessungen (B x H x T) | 206 x 130 x 20 mm (ca.) |
| Produktgewicht | 910 g |
| Merkmale | HDR Mode, Built-in Dual Stereo Speakers |
8. Garantie und Support
Pisichen is committed to providing reliable and high-quality products. While specific warranty details are not provided in this manual, please retain your proof of purchase for any warranty claims. For technical support, troubleshooting assistance, or inquiries regarding your product, please contact Pisichen customer service through the retailer where you purchased the product or visit the official Pisichen brand store online.
We strive for continuous innovation, product content updates, and ongoing improvement in product quality. Our goal is to be a company loved and trusted by our customers.


