1. Einleitung
This manual provides detailed instructions for the safe and effective use of your KKnoon Digital Multimeter, specifically focusing on the FY128 model. This compact and intelligent electrical tester is designed for accurate measurements of various electrical parameters, making it suitable for professionals, educational institutions, and home users. It adheres to the safety requirements of the International Electrotechnical Safety Standard (IEC-61010) for electronic measuring instruments.
The multimeter features a 5999-count backlit LCD for clear readings, along with functions for AC/DC voltage, resistance, frequency, continuity, live wire checking, and Non-Contact Voltage (NCV)-Erkennung.

Abbildung 1: Vorderseite view of the KKnoon Digital Multimeter (Model FY128) showing the display and control buttons.
2. Sicherheitshinweise
To ensure safe operation and prevent damage to the meter, please read and follow all safety instructions carefully. Improper use can result in electric shock or damage to the instrument.
- Always verify the meter's functionality before use by testing a known voltage oder Stromquelle.
- Die für jeden Messbereich angegebenen maximalen Eingangswerte dürfen nicht überschritten werden.
- Ensure test leads are in good condition, free from cracks or damaged insulation, before connecting them to any circuit.
- Verwenden Sie das Messgerät niemals, wenn es beschädigt erscheint oder wenn das casing ist offen.
- Seien Sie äußerst vorsichtig, wenn Sie mit vol arbeitentagEs liegt über 30 V AC RMS, 42 V Spitze oder 60 V DC. Diese SpannungentagEs besteht die Gefahr eines Stromschlags.
- Vor dem Ändern von Funktionen oder Messbereichen müssen die Messleitungen aus dem Stromkreis entfernt werden.
- Tauschen Sie die Batterien sofort aus, sobald die Anzeige für niedrigen Batteriestand erscheint, um genaue Messwerte zu gewährleisten.
- Das Messgerät darf nicht in explosionsgefährdeten Bereichen (Gase, Dämpfe, Staub) betrieben werden.
3. Produktmerkmale
The KKnoon Digital Multimeter offers a range of features designed for convenience and accuracy:
- Multifunktionalität: Maßnahmen AC/DC Lautstärketage, Resistance, Frequency, Continuity, Live Wire Checking, and NCV (Non-Contact VoltagUnd).
- Zwei Messmodi:
- Auto Identification: Automatically detects and measures AC/DC voltage, frequency, resistance, and continuity.
- Manuelles Umschalten: Allows selection of specific functions including AC/DC voltage, frequency, resistance, continuity, diode, capacitance (FY129C only), and LIVE NCV.
- Datenaufnahme: Lock the current measurement reading on the display with a single button press.
- Großes LCD-Display: Provides clear and easy-to-read values with a 5999-count resolution.
- Flashlight & Screen Backlight: Verbessert die Sichtbarkeit bei schlechten Lichtverhältnissen.
- Compact Design with Bracket: Portable and includes a built-in support bracket for hands-free operation.
- Sicherheitskonformität: Designed and produced according to IEC-61010 safety standards.

Figure 2: The multimeter's large LCD display clearly shows various measurement functions.

Figure 3: The integrated support bracket allows for convenient hands-free use.
4. Packungsinhalt
Bitte überprüfen Sie nach dem Öffnen Ihres Pakets, ob alle unten aufgeführten Artikel vorhanden und in gutem Zustand sind:
- 1 x KKnoon Digital Multimeter (Model FY128)
- 1 x Paar Messleitungen (rot und schwarz)
- 1 x Benutzerhandbuch (Englisch)
5. Einrichtung
5.1 Einlegen der Batterie
Das Multimeter benötigt 2 x 1.5-V-AAA-Batterien (nicht im Lieferumfang enthalten). So legen Sie die Batterien ein oder tauschen sie aus:
- Stellen Sie sicher, dass das Multimeter ausgeschaltet und die Messleitungen abgeklemmt sind.
- Suchen Sie die Abdeckung des Batteriefachs auf der Rückseite des Geräts.
- Verwenden Sie einen Schraubendreher, um das Batteriefach zu öffnen.
- Legen Sie zwei 1.5V AAA-Batterien ein und achten Sie dabei auf die richtige Polarität (+/-), wie im Batteriefach angegeben.
- Bringen Sie die Batteriefachabdeckung wieder an und sichern Sie sie mit der Schraube.
5.2 Anschließen der Testleitungen
Dem Multimeter liegen zwei Messleitungen (rot und schwarz) bei. Schließen Sie diese wie folgt an:
- Stecken Sie die schwarze Messleitung in die Eingangsbuchse „COM“ (Common).
- Insert the red test lead into the 'INPUT' jack for most measurements (Voltage, Resistance, Frequency, Continuity, Diode, Capacitance).

Figure 4: Labeled diagram of the multimeter's functions and input jacks.
6. Bedienungsanleitung
6.1 Ein-/Ausschalten
Drücken Sie den roten Netzschalter (Einschalttaste) to turn the multimeter on or off. The device features an auto-shutdown function to conserve battery life after a period of inactivity.
6.2 Messmodi
The multimeter offers two primary measurement modes:

Figure 5: The multimeter supports both auto identification and manual switching modes.
- Auto Identification Mode: When powered on, the meter defaults to auto identification. In this mode, it automatically detects and measures AC/DC voltage, frequency, resistance, and continuity. Simply connect the test leads to the circuit, and the meter will display the relevant measurement.
- Manueller Schaltmodus: To access specific functions not covered by auto identification or to manually select a range, press the 'NCV/LIVE' button (or other function buttons if available on your specific model, e.g., FY129C for Diode/Capacitance). This allows you to cycle through AC/DC voltage, frequency, resistance, continuity, LIVE, and NCV.
6.3 Messen von AC/DC-Voltage
- Connect the black test lead to the 'COM' jack and the red test lead to the 'INPUT' jack.
- If in auto identification mode, the meter will automatically detect voltage. If in manual mode, select the appropriate AC or DC voltage Funktion.
- Schließen Sie die Messleitungen parallel an das zu messende Bauteil oder den zu messenden Stromkreis an.
- Lesen Sie den Bandtage-Wert auf dem LCD-Display.
6.4 Widerstandsmessung
- Vor der Widerstandsmessung muss sichergestellt werden, dass der Stromkreis spannungsfrei ist.
- Verbinden Sie die schwarze Messleitung mit „COM“ und die rote Messleitung mit „INPUT“.
- If in auto identification mode, the meter will automatically detect resistance. If in manual mode, select the resistance function (Ω).
- Schließen Sie die Messleitungen an das Bauteil an, dessen Widerstand Sie messen möchten.
- Lesen Sie den Widerstandswert auf dem LCD-Display ab.
6.5 Frequenz messen
- Verbinden Sie die schwarze Messleitung mit „COM“ und die rote Messleitung mit „INPUT“.
- If in auto identification mode, the meter will automatically detect frequency. If in manual mode, select the frequency function (Hz).
- Schließen Sie die Messleitungen an den Stromkreis an, in dem die Frequenz gemessen werden soll.
- Lesen Sie den Frequenzwert auf der LCD-Anzeige ab.
6.6 Durchgangstest
- Stellen Sie sicher, dass der Stromkreis spannungsfrei ist.
- Verbinden Sie die schwarze Messleitung mit „COM“ und die rote Messleitung mit „INPUT“.
- If in auto identification mode, the meter will automatically detect continuity. If in manual mode, select the continuity function (★)).
- Berühren Sie mit den Testleitungen die beiden Punkte des Schaltkreises oder Bauteils, die Sie testen möchten.
- Ein Dauerton signalisiert einen niedrigen Widerstand (Durchgang). Der Widerstandswert wird im Display angezeigt.
6.7 Live Wire Checking
This function helps identify live AC wires.
- Verbinden Sie die schwarze Messleitung mit „COM“ und die rote Messleitung mit „INPUT“.
- Press the 'NCV/LIVE' button until 'LIVE' is indicated on the display.
- Insert the red test lead into the socket or touch it to the wire you suspect is live.
- The meter will beep and the display will indicate 'LIVE' if a live wire is detected.
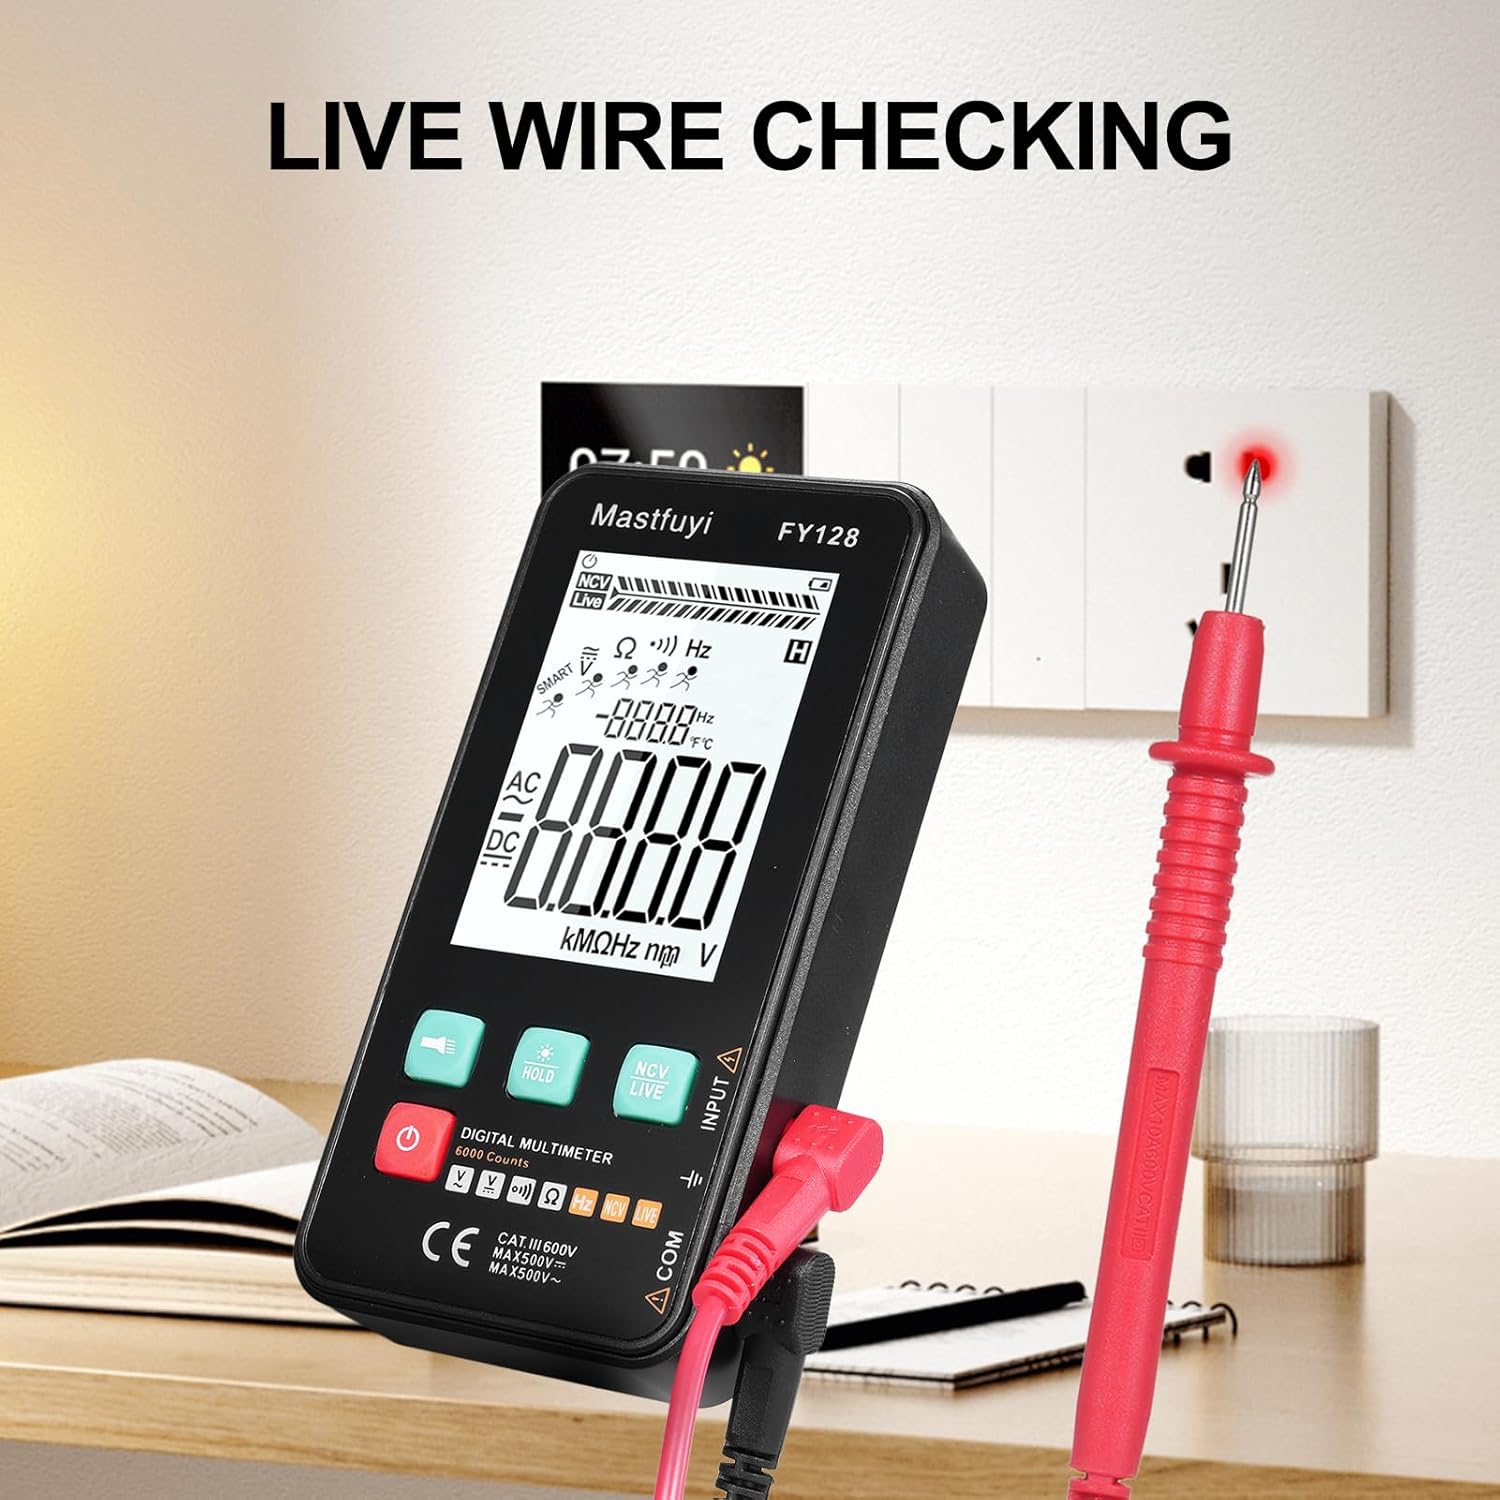
Figure 6: Using the multimeter for live wire detection.
6.8 NCV (Nicht-Kontakt-Volumen)tage) Prüfung
Die NCV-Funktion ermöglicht die Erkennung von Wechselstromspannungen.tage ohne direkten Kontakt.
- Press the 'NCV/LIVE' button until 'NCV' is indicated on the display.
- Bring the top front part of the multimeter close to the wire or electrical outlet.
- The meter will beep and the NCV indicator on the display will illuminate or increase in intensity as it detects AC voltage.

Abbildung 7: Nicht-Kontakt-Volumentage (NCV)-Erkennung läuft.
6.9 Datenhaltefunktion
To freeze the current reading on the display, press the 'HOLD' button. Press it again to release the hold and resume live measurements.
6.10 Flashlight & Backlight
Press the flashlight button (🔦) to turn on the built-in flashlight. Long press the 'HOLD' button to activate the screen backlight for improved visibility in dark environments.
7. Wartung
7.1 Batteriewechsel
When the low battery indicator appears on the display, replace the batteries as described in Section 5.1. Always use new 1.5V AAA batteries.
7.2 Reinigung
Um das Multimeter zu reinigen, wischen Sie das Gehäuse mit einem feuchten Tuch ab.amp Verwenden Sie ein Tuch und ein mildes Reinigungsmittel. Scheuermittel oder Lösungsmittel sind nicht geeignet. Stellen Sie sicher, dass das Gerät vor Gebrauch vollständig trocken ist.
7.3 Speicherung
If the multimeter is not used for an extended period, remove the batteries to prevent leakage and corrosion. Store the device in a cool, dry place, away from direct sunlight and extreme temperatures.
8. Fehlerbehebung
Sollten Sie Probleme mit Ihrem Multimeter haben, beachten Sie bitte die folgenden häufig auftretenden Probleme und Lösungen:
| Problem | Mögliche Ursache | Lösung |
|---|---|---|
| Keine oder nur schwache Anzeige | Niedrige oder leere Batteriekapazität; Falscher Batterieeinbau | Batterien austauschen; Batteriepolarität prüfen |
| Ungenaue Messwerte | Low batteries; Damaged test leads; Incorrect function selected | Replace batteries; Inspect/replace test leads; Select correct measurement function |
| Der Durchgangstest piept nicht. | Open circuit; High resistance; Incorrect function | Ensure circuit is closed; Check for breaks; Select continuity function |
| Der Zähler reagiert nicht. | Frozen display (Data Hold); Internal fault | Press 'HOLD' button to release; Contact customer support if issue persists |
9. Spezifikationen
The following specifications apply to the KKnoon Digital Multimeter Model FY128 (and FY128C, unless specified for FY129C):
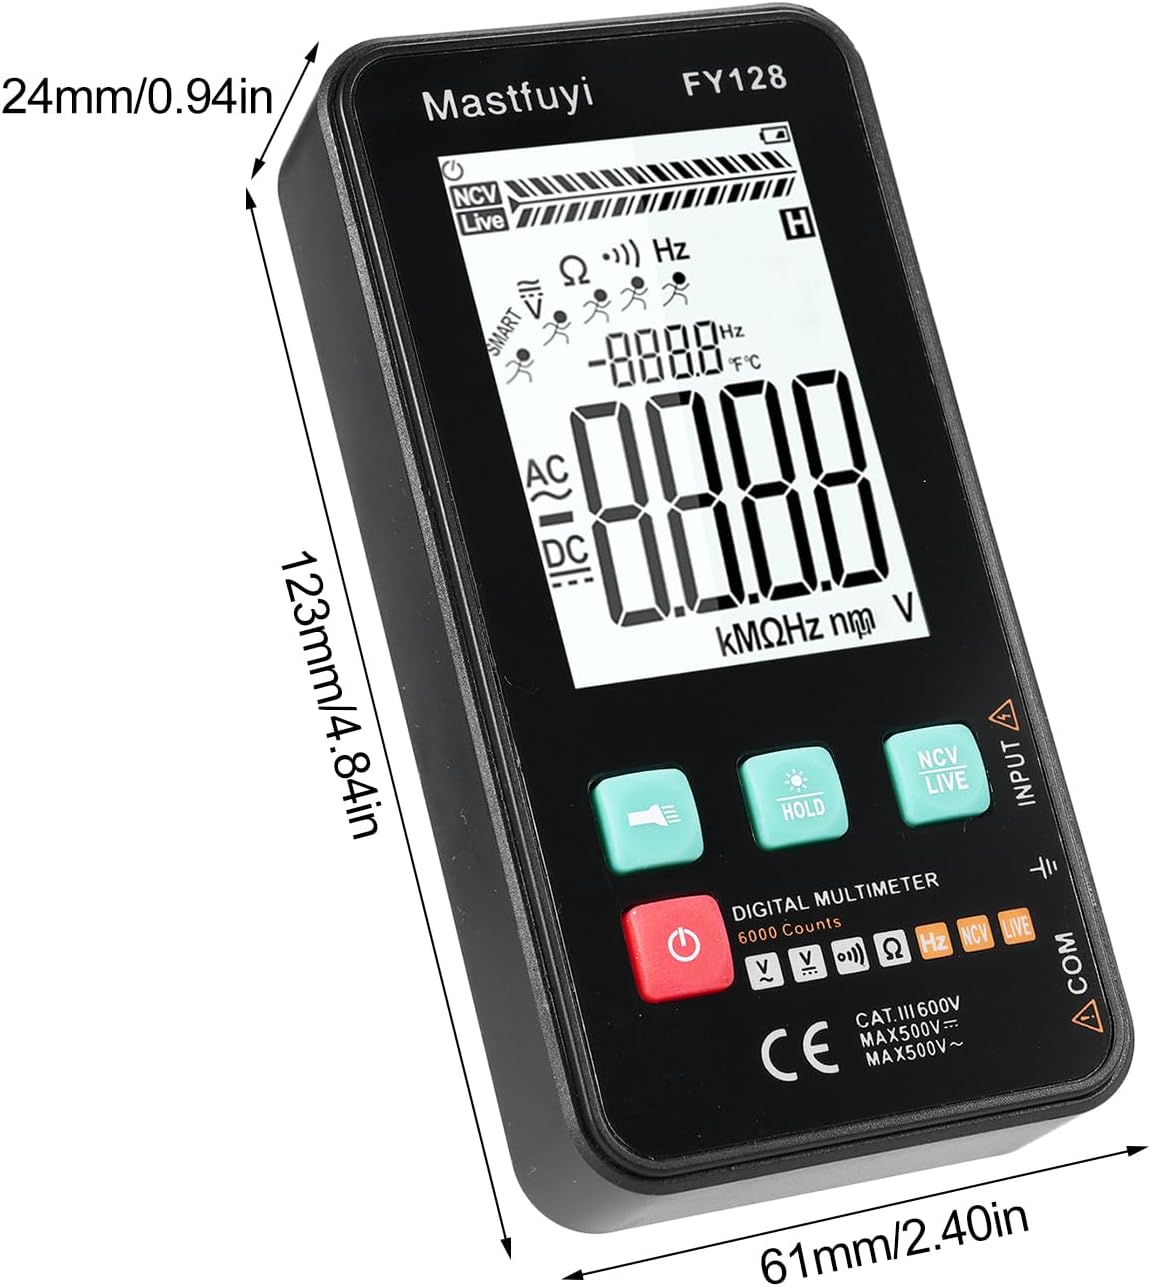
Figure 8: Physical dimensions of the KKnoon Digital Multimeter.
| Parameter | Specification (FY128/FY128C) | Specification (FY129C - if different) |
|---|---|---|
| AC-Lautstärketage | 1V~500V, ±(1.5%+3) | 0.8V~500V, ±(1.5%+5) |
| DC-Voltage | 0.5V~500V, ±(1.2%+5) | 0.8V~500V, ±(1.2%+5) |
| Widerstand | 30Ω~10000KΩ, ±(2%+5) | 30Ω~60000KΩ, ±(2%+5) |
| Frequenz | 40Hz~1000Hz, ±(2.5%+5) | 10Hz~6000Hz, ±(2.5%+5) |
| Kapazität | N / A | 6nf~60000µf, ±(2.5%+5) |
| Temperatur | N / A | -20℃~1000℃, ±(5%+4) |
| Umgebungstemperatur | N / A | 0℃~70℃ |
| Diode | NEIN | Ja |
| Kontinuität | Ja | Ja |
| NCV | Ja | Ja |
| Live Wire Checking | Ja | Ja |
| Automatische Abschaltung | Ja | Ja |
| Stromversorgung | 2 x 1.5V AAA-Batterien (nicht im Lieferumfang enthalten) | 2 x 1.5V AAA-Batterien (nicht im Lieferumfang enthalten) |
| Artikelgröße | 123 * 61 * 24 mm / 4.84 * 2.40 * 0.94 Zoll | 123 * 61 * 24 mm / 4.84 * 2.40 * 0.94 Zoll |
| Artikelgewicht | 113 g | 113 g |
10. Garantie und Support
For warranty information or technical support, please refer to the product packaging or contact your retailer. Keep your purchase receipt as proof of purchase. For general inquiries, you may visit the KKnoon brand page on Amazon.
