1. Einleitung
The SCULPFUN S9 is a high-performance laser engraving and cutting machine designed for precision work on various materials. Featuring advanced laser beam shaping technology, it offers powerful cutting capabilities comparable to 90W CO2 lasers, along with ultra-fine engraving precision. This manual provides essential information for the safe and effective operation of your SCULPFUN S9 machine.
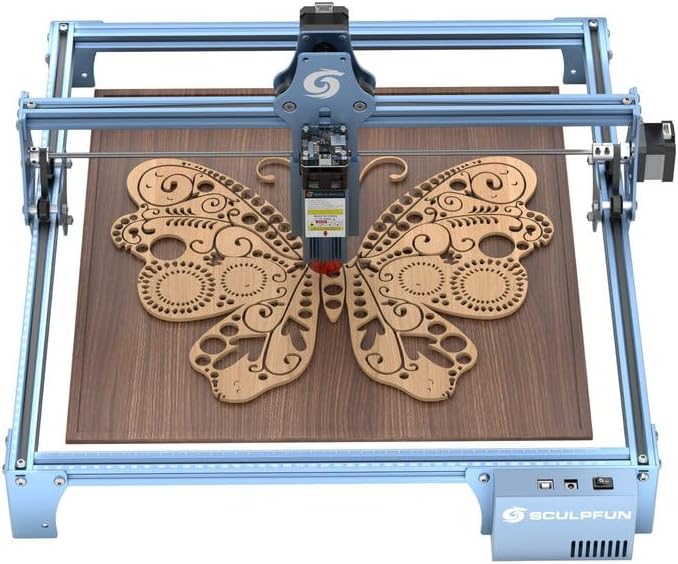
Figure 1: SCULPFUN S9 Laser Engraving Machine.
2. Sicherheitshinweise
Operating a laser engraving machine requires strict adherence to safety guidelines to prevent injury. Please read and understand all safety warnings before use.
- Augenschutz: The laser filter cover blocks 98% of UV light, allowing observation without protective glasses. However, always exercise caution. Ensure no pets or unauthorized individuals are exposed to the laser point.
- Not-Halt: The machine is equipped with a power switch for immediate shutdown in emergencies. Familiarize yourself with its location.
- Oberflächenschutz: Use the provided A4-sized steel pad to protect your work surface from laser damage and reduce fire risks.
- Belüftung: Operate the machine in a well-ventilated area to disperse fumes and particles generated during engraving and cutting.
- Brennbare Materialien: Avoid operating near highly flammable materials. Always monitor the machine during operation.

Figure 2: Laser filter cover for eye protection.

Figure 3: A4 metal pad for surface protection.
3. Aufbau und Montage
3.1 Packungsinhalt
Vor Beginn der Montage prüfen Sie, ob alle Komponenten vorhanden sind:
- 1 x X-Achsen-Komponente
- 2 x X profiles
- 2 x Y profiles
- 1 x Steuerbox-Komponente
- 3 x Stützbeine
- 1 x Laserkomponente
- 1 x 12V 5A Power adapter
- 1 x Stromkabel
- 1 x USB-Kabel
- 1 x Assembly kit with screws for steps 1-5
- 2 x Gürtel
- 1 x M5 T-type hexagonal screwdriver
- 1 x M4 L-type hexagonal screwdriver
- 1 x M3 L-type hexagonal screwdriver
- 1 x 8-10 mm Screw wrench
- 10 x Krawatten

Abbildung 4: Überview der enthaltenen Komponenten.
3.2 Montageanleitung
The SCULPFUN S9 features an all-metal structure designed for robustness and stability. Assembly is straightforward and typically takes 10 to 20 minutes. Follow the detailed instructions provided in the included assembly guide (not part of this digital manual) for step-by-step installation. Ensure all screws are tightened securely for optimal performance and safety.
Reserved fixing holes are present on the four feet and the body for securing the machine and data cable, enhancing stability during operation.

Figure 5: Close-up of the robust metal frame.
4. Bedienungsanleitung
4.1 Softwarekompatibilität
The SCULPFUN S9 is compatible with a wide range of mature engraving software:
- LaserGRBL
- LightBurn (supports Windows and Apple systems)
- Benbox
- GrblController
- LiteFire
It supports PWM mode engraving.

Figure 6: Compatible software and operating systems.
4.2 Unterstützt File Formate
The machine supports various engraving file Formate, einschließlich:
- JPG
- PNG
- DXF
- SVG
- G-Code
- NC
- BMP
- TIF
- AI
4.3 Gravur- und Schneidmöglichkeiten
The S9 utilizes the latest 5.5W diode laser beam shaping technology, resulting in an ultra-fine compressed laser focus spot of 0.06*0.06 mm and an engraving accuracy of 0.01 mm. This provides superior penetration and cutting precision.
- Schneiden: Capable of cutting wood up to 15mm thick, 10mm acrylic, and 10mm plywood.
- Gravur: Suitable for engraving ceramics and stainless steel, among other materials.

Abbildung 7: Bspamples of cutting capabilities (15mm wood, 10mm acrylic).

Figure 8: Demonstration of 0.06mm ultra-fine laser focus for high-precision engraving.

Abbildung 9: Bspamples of materials suitable for engraving, including wood, cardboard, leather, and ceramics.

Abbildung 10: Bspamples of materials suitable for cutting, including wood, acrylic, cardboard, fabric, bamboo, and plastic sheets.
4.4 Fokuseinstellung
The laser module features a fixed focus design with an easy sliding mechanism for height adjustment. Refer to the assembly guide for precise focusing instructions to achieve optimal engraving and cutting results.

Figure 11: Fixed focus and sliding design for easy height adjustment.
4.5 Expandable Engraving Area
The SCULPFUN S9's structure uses standard 2020 V-slot anodized aluminum, allowing for easy expansion of the engraving area. You can purchase the SCULPFUN extension kit to enlarge the working area up to 400x950 mm (37.4"x16.14"), which is beneficial for larger projects.

Figure 12: Illustration of the expandable working area from 420x410mm to 950x410mm.
5. Wartung
Regelmäßige Wartung gewährleistet die Langlebigkeit und optimale Leistung Ihres SCULPFUN S9 Lasergravierers.
- Linsenreinigung: Reinigen Sie die Laserlinse regelmäßig mit einem weichen, fusselfreien Tuch und einer Linsenreinigungslösung, um die Laserleistung und -präzision zu erhalten.
- Schienenschmierung: Apply a small amount of lubricant to the guide rails to ensure smooth movement of the laser module.
- Schmutzentfernung: Regularly remove dust and debris from the machine, especially around the laser module and ventilation areas, to prevent overheating and obstruction.
- Gurtspannung: Check the tension of the drive belts periodically. Adjust if they are too loose or too tight to ensure accurate movement.
6. Fehlerbehebung
This section addresses common issues you might encounter with your SCULPFUN S9.
| Problem | Mögliche Ursache | Lösung |
|---|---|---|
| Laser feuert nicht oder ist zu schwach | Loose cable connection, dirty lens, incorrect focus, software settings. | Check all cable connections. Clean the laser lens. Adjust the laser focus. Verify laser power settings in your software. |
| Maschine verbindet sich nicht mit dem Computer | Problem mit dem USB-Kabel, Treiber nicht installiert, falscher COM-Port ausgewählt. | Try a different USB port or cable. Install necessary drivers. Select the correct COM port in your engraving software. |
| Engraving/Cutting results are inconsistent | Loose belts, unstable machine, incorrect speed/power settings, material issues. | Check and adjust belt tension. Ensure the machine is on a stable surface. Calibrate speed and power settings for the material. Ensure material is flat and secured. |
| Die Maschine macht ungewöhnliche Geräusche. | Obstruction in moving parts, dry rails, loose components. | Inspect for any obstructions. Lubricate guide rails. Check for and tighten any loose screws. |
If you encounter issues not listed here, please refer to the official SCULPFUN support resources or contact customer service.
7. Spezifikationen
| Besonderheit | Detail |
|---|---|
| Hersteller | SKULPTUR |
| Modellnummer | SCULPFUN S9 |
| Gravurbereich | 410 x 420 mm (Expandable to 400 x 950 mm with extension kit) |
| Laserleistung | 5.5W Diode Laser (90W CO2 laser effect equivalent) |
| Laser Focus Spot | 0.06 x 0.06 mm |
| Gravurgenauigkeit | 0.01 mm |
| Material | Metal (Anodized Aluminum) |
| Farbe | Blau |
| Stromquellentyp | AC |
| Bandtage | 100-240 V Wechselstrom, 50/60 Hz |
| Gewicht | 3 Kilogramm |
| Besondere Merkmale | High-precision engraving and laser cutting, Laser filter protection and safety measures, Broad compatibility and versatile file formats, Durable metal structure and easy assembly. |
8. Garantie und Support
The SCULPFUN S9 machine comes with a one-year warranty. For any inquiries or support needs, please contact SCULPFUN customer service. They aim to provide attentive service and quick responses within 12 hours.
For further assistance, you may visit the official SCULPFUN store on Amazon: SCULPFUN Store.


